Important Safety and Product Information
Page 2
... RSS standard(s). If this equipment does cause harmful interference to radio or television reception, which we identify in a residential installation, and are designed to provide more stringent than "outdoor" requirements. In addition, Garmin reserves the right to refuse warranty claims against harmful interference in product literature and copyright messages displayed to the...
... RSS standard(s). If this equipment does cause harmful interference to radio or television reception, which we identify in a residential installation, and are designed to provide more stringent than "outdoor" requirements. In addition, Garmin reserves the right to refuse warranty claims against harmful interference in product literature and copyright messages displayed to the...
Installation Instructions
Page 1
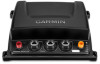
..., but it cannot be submerged. • The sounder must carefully plan the GCV 10 sounder installation. 1 Select a mounting location. 2 Mount the sounder. 3 Connect the sounder to the Garmin Marine Network and to power. 4 Connect the sounder to the transducer. Tools Needed... are tightened. Garmin recommends applying an anti-seize lubricant to the screws before proceeding with the installation, contact Garmin Product Support. GCV™ 10 Installation Instructions To obtain the best performance and to avoid damage to your boat, install the Garmin® GCV 10 device according to...
..., but it cannot be submerged. • The sounder must carefully plan the GCV 10 sounder installation. 1 Select a mounting location. 2 Mount the sounder. 3 Connect the sounder to the Garmin Marine Network and to power. 4 Connect the sounder to the transducer. Tools Needed... are tightened. Garmin recommends applying an anti-seize lubricant to the screws before proceeding with the installation, contact Garmin Product Support. GCV™ 10 Installation Instructions To obtain the best performance and to avoid damage to your boat, install the Garmin® GCV 10 device according to...
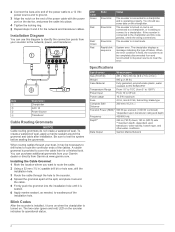
Installation Instructions
Page 2
...15° to 70°C (from your boat, it may be completely disconnected from Garmin at the split, and place it around the grommet and cable after installation. Blink Codes After the sounder is installed, it is in test mode. 2 Connect the bare-wire end of the power cable... press the cable into the installation hole until it turns on when the chartplotter is operating properly. You should see sonar data on . When the error condition is connected to clear the error. Item À Á Â Ã Description Chartplotter GCV 10 Power Source Transducer Cable Routing ...
...15° to 70°C (from your boat, it may be completely disconnected from Garmin at the split, and place it around the grommet and cable after installation. Blink Codes After the sounder is installed, it is in test mode. 2 Connect the bare-wire end of the power cable... press the cable into the installation hole until it turns on when the chartplotter is operating properly. You should see sonar data on . When the error condition is connected to clear the error. Item À Á Â Ã Description Chartplotter GCV 10 Power Source Transducer Cable Routing ...


