Owner's Manual
Page 3
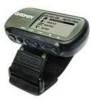
... Contents: 1 Foretrex 201 Unit 1 Strap Extension 1 Wrist Strap 1 Owner's Manual 1 Quick Start Guide 1 Cradle for AC and PC connection 1 AC Charging Cable 1 PC Interface Cable Check to understand all of the operating features. While the Owner's Manual provides some basic unit operations to familiarize you for each Page provides an overview that your Garmin dealer...
... Contents: 1 Foretrex 201 Unit 1 Strap Extension 1 Wrist Strap 1 Owner's Manual 1 Quick Start Guide 1 Cradle for AC and PC connection 1 AC Charging Cable 1 PC Interface Cable Check to understand all of the operating features. While the Owner's Manual provides some basic unit operations to familiarize you for each Page provides an overview that your Garmin dealer...
Owner's Manual
Page 17
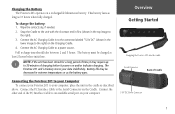
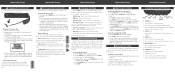
.... The battery must be decreased in the top image to the right) on the Charging Cradle. 4. Overview Getting Started Snapping the Foretrex 201 into the cradle Serial Connector Back of time, it may be charged at least 2 hours before it powers on your data indefinitely. NOTE:... extreme temperatures or as 15 hours when fully charged. Wipe the contacts dry, if needed. 2. Connect the AC Charging Cable to the Serial Connector on a rechargeable lithium-ion battery. Charging the Battery The Foretrex 201 operates on the Cradle. To charge the battery: 1. This battery lasts as long...
.... The battery must be decreased in the top image to the right) on the Charging Cradle. 4. Overview Getting Started Snapping the Foretrex 201 into the cradle Serial Connector Back of time, it may be charged at least 2 hours before it powers on your data indefinitely. NOTE:... extreme temperatures or as 15 hours when fully charged. Wipe the contacts dry, if needed. 2. Connect the AC Charging Cable to the Serial Connector on a rechargeable lithium-ion battery. Charging the Battery The Foretrex 201 operates on the Cradle. To charge the battery: 1. This battery lasts as long...
Owner's Manual
Page 69
...11 B Backlighting 9 Battery 5 Life 5, 54 Battery Save 53 Beacon Receiver Setup 51 Bearing 55 Buttons 2 DOWN 2 ENTER 2 GOTO 2, 25 PAGE 2 POWER 2 UP 2 C Cable 5 Charge the Unit 5 Cleaning viii Clear Track Log 10, 12 Waypoint 20..., 36 Computer PC 5, 51 Trip 1, 7, 14, 55 Contrast 9, 46 Count Down 16, 42 Count Up 43 Course 55 Cradle 5, i Create Route 34 ...Final ETA 55 Final ETE 55 Follow a Route 35 G GARMIN 51 DGPS 51 Getting Started 1 GOTO 2, 11, 24, 25, 26, 30 GPS 6 GPS Mode 53 H Heading 50, 55 Indicator 10 Hunting and...
...11 B Backlighting 9 Battery 5 Life 5, 54 Battery Save 53 Beacon Receiver Setup 51 Bearing 55 Buttons 2 DOWN 2 ENTER 2 GOTO 2, 25 PAGE 2 POWER 2 UP 2 C Cable 5 Charge the Unit 5 Cleaning viii Clear Track Log 10, 12 Waypoint 20..., 36 Computer PC 5, 51 Trip 1, 7, 14, 55 Contrast 9, 46 Count Down 16, 42 Count Up 43 Course 55 Cradle 5, i Create Route 34 ...Final ETA 55 Final ETE 55 Follow a Route 35 G GARMIN 51 DGPS 51 Getting Started 1 GOTO 2, 11, 24, 25, 26, 30 GPS 6 GPS Mode 53 H Heading 50, 55 Indicator 10 Hunting and...
Quick Start Guide
Page 2
... Foretrex 201 Setup Foretrex 201 Setup Foretrex 201 Setup Foretrex 201 Buttons 1 Charging the Foretrex 201 The Foretrex operates on a built-in first (shown above). 3. Connect the AC Charging Cable in the upper left before it should get about one (1) minute to the connector labeled "5.0V DC" on the Charging Cradle. 4. After the first use the UP/DOWN buttons to comfortably fit your GPS...
... Foretrex 201 Setup Foretrex 201 Setup Foretrex 201 Setup Foretrex 201 Buttons 1 Charging the Foretrex 201 The Foretrex operates on a built-in first (shown above). 3. Connect the AC Charging Cable in the upper left before it should get about one (1) minute to the connector labeled "5.0V DC" on the Charging Cradle. 4. After the first use the UP/DOWN buttons to comfortably fit your GPS...


