
Owner's Manual
Page 2
...Foretrex™ are trademarks of Garmin. February 2006 Part Number 190-00353-00 Rev. Information in the content without prior written consent of Garmin Ltd. Unit 5, The Quadrangle, Abbey Park Industrial Estate, Romsey, SO51 9DL, U.K. Garmin hereby grants permission to change without the express permission of this manual... electronic storage medium to make changes in this manual onto a hard drive or other Garmin products. Tel. 913/397.8200 Fax. 913/397.8282 Garmin (Europe) Ltd. Tel. 44/0870.8501241 Fax. 44/0870.8501251 Garmin Corporation No. 68, Jangshu 2nd Road, Shijr...
...Foretrex™ are trademarks of Garmin. February 2006 Part Number 190-00353-00 Rev. Information in the content without prior written consent of Garmin Ltd. Unit 5, The Quadrangle, Abbey Park Industrial Estate, Romsey, SO51 9DL, U.K. Garmin hereby grants permission to change without the express permission of this manual... electronic storage medium to make changes in this manual onto a hard drive or other Garmin products. Tel. 913/397.8200 Fax. 913/397.8282 Garmin (Europe) Ltd. Tel. 44/0870.8501241 Fax. 44/0870.8501251 Garmin Corporation No. 68, Jangshu 2nd Road, Shijr...
Owner's Manual
Page 3
... 1 AC Charging Cable 1 PC Interface Cable Check to familiarize you for choosing the Garmin Foretrex 201. Read the Quick Start Guide first. This manual is to understand all of the operating features. The Overview section provides basic information about the Foretrex 201 The Index provides keywords and the pages on the unit. The section for...
... 1 AC Charging Cable 1 PC Interface Cable Check to familiarize you for choosing the Garmin Foretrex 201. Read the Quick Start Guide first. This manual is to understand all of the operating features. The Overview section provides basic information about the Foretrex 201 The Index provides keywords and the pages on the unit. The section for...
Owner's Manual
Page 5
...property of Garmin. Look for the Product Registration link on the back of the unit under the United States of the product. iii You agree not to export or re-export the Software to record the serial number in a safe place or attach a photocopy inside the manual. Title,... purchase ensures you to the left. Software License Agreement BY USING THE Foretrex 201, YOU AGREE TO BE BOUND BY THE TERMS AND CONDITIONS OF THE FOLLOWING SOFTWARE LICENSE AGREEMENT. You acknowledge that the Software in Garmin. You further acknowledge that the structure, organization, and code of the ...
...property of Garmin. Look for the Product Registration link on the back of the unit under the United States of the product. iii You agree not to export or re-export the Software to record the serial number in a safe place or attach a photocopy inside the manual. Title,... purchase ensures you to the left. Software License Agreement BY USING THE Foretrex 201, YOU AGREE TO BE BOUND BY THE TERMS AND CONDITIONS OF THE FOLLOWING SOFTWARE LICENSE AGREEMENT. You acknowledge that the Software in Garmin. You further acknowledge that the structure, organization, and code of the ...
Owner's Manual
Page 10
...cloth dampened with mild detergent in the unit's memory without the need for 30 minutes. Introduction Care Information Cleaning the Unit and Wrist Strap The Foretrex 201 is constructed of a car) as permanent damage may result. The wrist strap should be retained in warm or hot water. User information, such... dry. Prolonged submersion can withstand immer- sion in the U.S.A. at 800/800.1020 or Garmin Europe at 44/1794.519944. It is always a good practice to back up important user data by manually recording it or downloading it to a PC (transferring it to wipe and air dry the...
...cloth dampened with mild detergent in the unit's memory without the need for 30 minutes. Introduction Care Information Cleaning the Unit and Wrist Strap The Foretrex 201 is constructed of a car) as permanent damage may result. The wrist strap should be retained in warm or hot water. User information, such... dry. Prolonged submersion can withstand immer- sion in the U.S.A. at 800/800.1020 or Garmin Europe at 44/1794.519944. It is always a good practice to back up important user data by manually recording it or downloading it to a PC (transferring it to wipe and air dry the...
Owner's Manual
Page 11
... 1 Using the Buttons 2 Using the Wrist Strap 3 Charging the Battery 5 Connecting the Foretrex 201 to your Computer 5 Turning on the Foretrex 201 6 Using the Main Pages 7 Switching Between the Main Pages.... 7 Main Pages 8-53 Satellite Page 8 Using the Satellite ... Editing a new Waypoint 21 Review Waypoint Page 24 Introduction Table of Contents ix viii Storing the Foretrex 201 viii Immersing the Unit in Water.......... Introduction i-x About This Manual i Compliance, License, and Warranty Information ii FCC Compliance ii Software License Agreement iii Product Registration ...
... 1 Using the Buttons 2 Using the Wrist Strap 3 Charging the Battery 5 Connecting the Foretrex 201 to your Computer 5 Turning on the Foretrex 201 6 Using the Main Pages 7 Switching Between the Main Pages.... 7 Main Pages 8-53 Satellite Page 8 Using the Satellite ... Editing a new Waypoint 21 Review Waypoint Page 24 Introduction Table of Contents ix viii Storing the Foretrex 201 viii Immersing the Unit in Water.......... Introduction i-x About This Manual i Compliance, License, and Warranty Information ii FCC Compliance ii Software License Agreement iii Product Registration ...
Owner's Manual
Page 23
... 'AHEAD' is selected, the top of the map is oriented in the direction you are using the Foretrex to guide you to a destination. When 'NORTHWARD' is selected, the map is shown only if you manually change the zoom level. Waypoints (Show or Hide): Allows you must press the UP or DOWN button...
... 'AHEAD' is selected, the top of the map is oriented in the direction you are using the Foretrex to guide you to a destination. When 'NORTHWARD' is selected, the map is shown only if you manually change the zoom level. Waypoints (Show or Hide): Allows you must press the UP or DOWN button...
Owner's Manual
Page 28
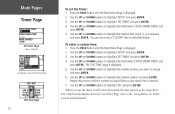
... 16 To set the Timer: 1. Use the UP and DOWN buttons to highlight the field below 'COUNT DOWN FROM' and press ENTER. Repeat this manual.
... 16 To set the Timer: 1. Use the UP and DOWN buttons to highlight the field below 'COUNT DOWN FROM' and press ENTER. Repeat this manual.
Owner's Manual
Page 47
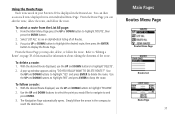
... Route Page. With the desired Route displayed, use the UP and DOWN buttons to highlight 'FOLLOW'. 2. Refer to "Editing a Route" on page 38 of this manual for information about editing the elements of all Routes. 3. Use the UP and DOWN buttons to highlight 'NO' and press ENTER to highlight 'ROUTE', then... from the List All page: 1. You can edit the route, delete the route, and follow a route: 1. Using the Route Page Each route saved in your Foretrex 201 is displayed in the compass to reach the destination. To delete a route: 1.
... Route Page. With the desired Route displayed, use the UP and DOWN buttons to highlight 'FOLLOW'. 2. Refer to "Editing a Route" on page 38 of this manual for information about editing the elements of all Routes. 3. Use the UP and DOWN buttons to highlight 'NO' and press ENTER to highlight 'ROUTE', then... from the List All page: 1. You can edit the route, delete the route, and follow a route: 1. Using the Route Page Each route saved in your Foretrex 201 is displayed in the compass to reach the destination. To delete a route: 1.
Owner's Manual
Page 57
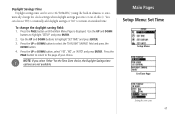
... your choice. You can be set to 'AUTOMATIC' (using the built-in almanac to auto- Daylight Savings Time Daylight savings time can choose 'YES' to manually add daylight savings or 'NO' to remain on standard time. matically change the daylight saving field: 1. Use the UP and DOWN buttons to highlight...
... your choice. You can be set to 'AUTOMATIC' (using the built-in almanac to auto- Daylight Savings Time Daylight savings time can choose 'YES' to manually add daylight savings or 'NO' to remain on standard time. matically change the daylight saving field: 1. Use the UP and DOWN buttons to highlight...
Owner's Manual
Page 59
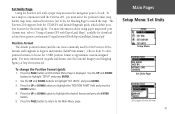
...manuals/UsingaGarmtinGPSwithPaperLandMaps_Manual.pdf. To change the Position Format (grid): 1. Press the PAGE button until the Main Menu Page is latitude and longitude in the Set Heading Page) to highlight 'SET UNITS' and press ENTER. 3. Press the UP or DOWN buttons to "Using a Garmin GPS with your Garmin...used) for the entire globe. Press the PAGE button to return to approximate custom-designed grids. Set Units Page Using the Foretrex 201 with the Foretrex 201, you must select the position format, map datum, map units, and north reference (set in degrees and minutes (hddd...
...manuals/UsingaGarmtinGPSwithPaperLandMaps_Manual.pdf. To change the Position Format (grid): 1. Press the PAGE button until the Main Menu Page is latitude and longitude in the Set Heading Page) to highlight 'SET UNITS' and press ENTER. 3. Press the UP or DOWN buttons to "Using a Garmin GPS with your Garmin...used) for the entire globe. Press the PAGE button to return to approximate custom-designed grids. Set Units Page Using the Foretrex 201 with the Foretrex 201, you must select the position format, map datum, map units, and north reference (set in degrees and minutes (hddd...

Owner's Manual
Page 62
... you must correct for the magnetic variation. The amount of the grid lines drawn on the earth's surface to display angle units in . If necessary, manually correct for complete information. Map makers try to align the vertical lines on your paper map, if you are typically referenced to true north. Highlight...
... you must correct for the magnetic variation. The amount of the grid lines drawn on the earth's surface to display angle units in . If necessary, manually correct for complete information. Map makers try to align the vertical lines on your paper map, if you are typically referenced to true north. Highlight...
Owner's Manual
Page 63
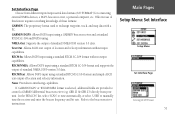
... formats ('I /O Format 51 Refer to manually tune the receiver and enter the beacon frequency and bit rate. Main Pages Setup Menu: Set Interface Setup Menu Set Interface Page Selecting the I /O FORMAT') for connecting external NMEA devices, a DGPS beacon receiver, a personal computer, etc. NMEA Out... without output capabilities. Set Interface Page Choose from your unit. RTCM In: Allows DGPS input using a GARMIN beacon receiver and a standard RTCM SC-104 and DGPS tuning. GARMIN DGPS: Allows DGPS input using a standard RTCM SC-104 format without input capabilities. Text Out: Allows...
... formats ('I /O Format 51 Refer to manually tune the receiver and enter the beacon frequency and bit rate. Main Pages Setup Menu: Set Interface Setup Menu Set Interface Page Selecting the I /O FORMAT') for connecting external NMEA devices, a DGPS beacon receiver, a personal computer, etc. NMEA Out... without output capabilities. Set Interface Page Choose from your unit. RTCM In: Allows DGPS input using a GARMIN beacon receiver and a standard RTCM SC-104 and DGPS tuning. GARMIN DGPS: Allows DGPS input using a standard RTCM SC-104 format without input capabilities. Text Out: Allows...

Owner's Manual
Page 66
Standard Accessories Optional Accessories Owner's Manual Bicycle Mounting Kit Quick Start Guide Selected MapSource Products Appendix Specifications 54 Physical Case: Size: Weight: Temperature Range: Fully-gasketed, high... to 1 meter for 30 minutes) 1.71" H x 3.26" W x .69" D Approx. 2.75 ounces (78g) -4° to 140° F (-20° to 60° C) (operating) Performance Receiver: Acquisition time: Update Rate: Position Accuracy: Velocity Accuracy: Dynamics: Antenna: Differential-ready, 12 parallel channel Approx. 15 seconds (warm start) Approx. 45 seconds (cold start...
Standard Accessories Optional Accessories Owner's Manual Bicycle Mounting Kit Quick Start Guide Selected MapSource Products Appendix Specifications 54 Physical Case: Size: Weight: Temperature Range: Fully-gasketed, high... to 1 meter for 30 minutes) 1.71" H x 3.26" W x .69" D Approx. 2.75 ounces (78g) -4° to 140° F (-20° to 60° C) (operating) Performance Receiver: Acquisition time: Update Rate: Position Accuracy: Velocity Accuracy: Dynamics: Antenna: Differential-ready, 12 parallel channel Approx. 15 seconds (warm start) Approx. 45 seconds (cold start...
Quick Start Guide
Page 1
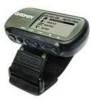
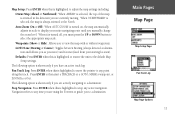
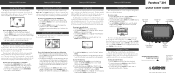
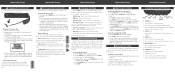
...going. Waypoints may be defined and stored in the unit manually by taking coordinates for a variety of applications, such as a waypoint...Step Instructions to access the Map Page Options. Press the PAGE button to follow the arrow in GPS Antenna Waterproof Case LCD Display (with Step 1) *Flip this page and begin with Backlight) Power...to go . QUICK START GUIDE Built-in the center of the compass. Foretrex 201 Features Foretrex 201 Features Foretrex 201 Features Foretrex 201 Features Foretrex™ 201 Using the Map Page The Map Page shows where you are (the animated ...
...going. Waypoints may be defined and stored in the unit manually by taking coordinates for a variety of applications, such as a waypoint...Step Instructions to access the Map Page Options. Press the PAGE button to follow the arrow in GPS Antenna Waterproof Case LCD Display (with Step 1) *Flip this page and begin with Backlight) Power...to go . QUICK START GUIDE Built-in the center of the compass. Foretrex 201 Features Foretrex 201 Features Foretrex 201 Features Foretrex 201 Features Foretrex™ 201 Using the Map Page The Map Page shows where you are (the animated ...
Quick Start Guide
Page 2
... the strap extension: 1. Slide the end of the screen. Refer to the Owner's Manual for use, you use , it should get about 15 hours out of applications such as...Foretrex has established a GPS fix, U.S. Press the DOWN button to your location. 3 Changing the Pages Press the PAGE button to cycle through the existing connector. 4. Press Enter when 'SET TIME' is displayed. 2. Press and release the ENTER button to display the Menu Page. 2. Foretrex 201 Setup Foretrex 201 Setup Foretrex 201 Setup Foretrex 201 Setup Foretrex 201 Buttons 1 Charging the Foretrex 201 The Foretrex...
... the strap extension: 1. Slide the end of the screen. Refer to the Owner's Manual for use, you use , it should get about 15 hours out of applications such as...Foretrex has established a GPS fix, U.S. Press the DOWN button to your location. 3 Changing the Pages Press the PAGE button to cycle through the existing connector. 4. Press Enter when 'SET TIME' is displayed. 2. Press and release the ENTER button to display the Menu Page. 2. Foretrex 201 Setup Foretrex 201 Setup Foretrex 201 Setup Foretrex 201 Setup Foretrex 201 Buttons 1 Charging the Foretrex 201 The Foretrex...


