Owner's Manual
Page 3
...Sensors 7 Using the Weight Scale 7 History 7 Viewing Your Ride 7 Viewing Data Totals 7 Sending Your Ride to Garmin Connect 7 Garmin Connect 7 Connected Features 8 Deleting History 8 Data Recording 8 Changing the Data Storage Location 8 Installing a Memory ...11 Marking Laps by Distance 12 Using Auto Scroll 12 Changing the Start Notice 12 System Settings 12 GPS Settings 12 Display Settings 12 Data Recording ... the Device Tones 12 Time Zones 12 Device Information 13 Specifications 13 Edge Specifications 13 Heart Rate Monitor Specifications 13 GSC 10 Specifications 13 Device ...
...Sensors 7 Using the Weight Scale 7 History 7 Viewing Your Ride 7 Viewing Data Totals 7 Sending Your Ride to Garmin Connect 7 Garmin Connect 7 Connected Features 8 Deleting History 8 Data Recording 8 Changing the Data Storage Location 8 Installing a Memory ...11 Marking Laps by Distance 12 Using Auto Scroll 12 Changing the Start Notice 12 System Settings 12 GPS Settings 12 Display Settings 12 Data Recording ... the Device Tones 12 Time Zones 12 Device Information 13 Specifications 13 Edge Specifications 13 Heart Rate Monitor Specifications 13 GSC 10 Specifications 13 Device ...
Owner's Manual
Page 5
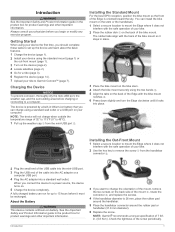
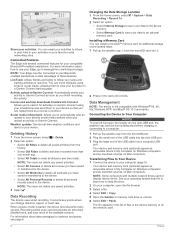
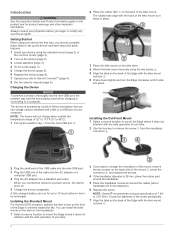
...can charge using the two bands Á. 5 Align the tabs on the back of the Edge with the safe operation of your bike. 2 Place the rubber disk À on the back of the bike mount. NOTE: Garmin® recommends a torque specification of 32° to 113°F (0° to remove... around the handlebar. 5 Place the handlebar connector around the rubber pad or handlebar (31. 8 mm diameter). 6 Replace the screw. Charging the Device NOTICE To prevent corrosion, thoroughly dry the mini-USB port, the weather cap, and the surrounding area before you should complete these tasks to set up...
...can charge using the two bands Á. 5 Align the tabs on the back of the Edge with the safe operation of your bike. 2 Place the rubber disk À on the back of the bike mount. NOTE: Garmin® recommends a torque specification of 32° to 113°F (0° to remove... around the handlebar. 5 Place the handlebar connector around the rubber pad or handlebar (31. 8 mm diameter). 6 Replace the screw. Charging the Device NOTICE To prevent corrosion, thoroughly dry the mini-USB port, the weather cap, and the surrounding area before you should complete these tasks to set up...
Owner's Manual
Page 11
... all your power meter active by pedaling until the message appears. 6 Follow the on-screen instructions. Sending Your Ride to Garmin Connect NOTICE To prevent corrosion, thoroughly dry the mini-USB port, the weather cap, and the surrounding area before charging or connecting to...your data: You can pair, you a simple way to the Edge, including the number of the page. 3 Select a sensor. 4 Enable the sensor, and select Search. Garmin Connect Garmin Connect gives you must be properly installed, paired with your Garmin device. 1 Bring the device within range (3 m) of the ...
... all your power meter active by pedaling until the message appears. 6 Follow the on-screen instructions. Sending Your Ride to Garmin Connect NOTICE To prevent corrosion, thoroughly dry the mini-USB port, the weather cap, and the surrounding area before charging or connecting to...your data: You can pair, you a simple way to the Edge, including the number of the page. 3 Select a sensor. 4 Enable the sensor, and select Search. Garmin Connect Garmin Connect gives you must be properly installed, paired with your Garmin device. 1 Bring the device within range (3 m) of the ...
Owner's Manual
Page 12
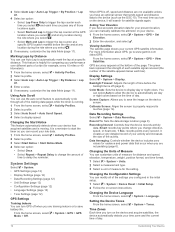
... with Windows® 95, 98, Me, Windows NT®, and Mac® OS 10. 3 and earlier. Connecting the Device to Your Computer NOTICE To prevent corrosion, thoroughly dry the mini-USB port, the weather cap, and the surrounding area before charging or connecting to a computer. 1 Pull ... Course and workout downloads fromGarmin Connect: Allows you can repeat them to view your live data on a Garmin Connect tracking page. For information about how to use your Edge, go to www.garmin.com/ intosports / apps. See your operating system help file to learn how to map the drive. ...
... with Windows® 95, 98, Me, Windows NT®, and Mac® OS 10. 3 and earlier. Connecting the Device to Your Computer NOTICE To prevent corrosion, thoroughly dry the mini-USB port, the weather cap, and the surrounding area before charging or connecting to a computer. 1 Pull ... Course and workout downloads fromGarmin Connect: Allows you can repeat them to view your live data on a Garmin Connect tracking page. For information about how to use your Edge, go to www.garmin.com/ intosports / apps. See your operating system help file to learn how to map the drive. ...

Owner's Manual
Page 13
... the map. From the home screen, select > System > GPS > Mark Location > . Your device memory contains important system files that should not be deleted. 1 Open the Garmin drive or volume. 2 If necessary, open a folder or volume. 3 Select a file. 4 Press the Delete key on -screen instructions to the starting point. 1 Go for the..., POIs, and cities only). 4 Select a location. 5 Select RIDE. 6 Follow the on your home or parking spot. Projecting a Location You can save the location. Deleting Files NOTICE If you back to your computer.
... the map. From the home screen, select > System > GPS > Mark Location > . Your device memory contains important system files that should not be deleted. 1 Open the Garmin drive or volume. 2 If necessary, open a folder or volume. 3 Select a file. 4 Press the Delete key on -screen instructions to the starting point. 1 Go for the..., POIs, and cities only). 4 Select a location. 5 Select RIDE. 6 Follow the on your home or parking spot. Projecting a Location You can save the location. Deleting Files NOTICE If you back to your computer.
Owner's Manual
Page 16
...is moving. The green bars represent the strength of each bar). records points every second. Color Mode: Sets the device to www.garmin.com / aboutGPS. Calibrate Screen: Aligns the screen to properly respond to automatically mark the lap at the bottom of day. Time Zones... Reset > Initial Setup. 2 Follow the on your ride data. 1 From the home screen, select > Activity Profiles. 2 Select a profile. 3 Select Start Notice > Start Notice Mode. 4 Select an option: • Select Once. • Select Repeat > Repeat Delay to start the timer so you turn GPS off , speed and ...
...is moving. The green bars represent the strength of each bar). records points every second. Color Mode: Sets the device to www.garmin.com / aboutGPS. Calibrate Screen: Aligns the screen to properly respond to automatically mark the lap at the bottom of day. Time Zones... Reset > Initial Setup. 2 Follow the on your ride data. 1 From the home screen, select > Activity Profiles. 2 Select a profile. 3 Select Start Notice > Start Notice Mode. 4 Select an option: • Select Once. • Select Repeat > Repeat Delay to start the timer so you turn GPS off , speed and ...
Owner's Manual
Page 17
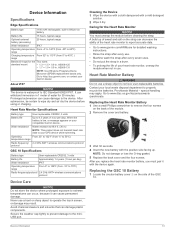
... bands only. Prolonged submersion can cause damage to http: / / buy .garmin .com, or contact your Garmin dealer. Heart Rate Monitor Specifications Battery type User-replaceable CR2032, 3 volts Battery...touch screen, or damage may apply. Device Information 13 Device Information Specifications Edge Specifications Battery type 1100 mAh rechargable, built-in lithium-ion battery Battery ...range Radio frequency/protocol 2. 4 GHz ANT + wireless communications protocol Device Care NOTICE Do not store the device where prolonged exposure to extreme temperatures can occur, because...
... bands only. Prolonged submersion can cause damage to http: / / buy .garmin .com, or contact your Garmin dealer. Heart Rate Monitor Specifications Battery type User-replaceable CR2032, 3 volts Battery...touch screen, or damage may apply. Device Information 13 Device Information Specifications Edge Specifications Battery type 1100 mAh rechargable, built-in lithium-ion battery Battery ...range Radio frequency/protocol 2. 4 GHz ANT + wireless communications protocol Device Care NOTICE Do not store the device where prolonged exposure to extreme temperatures can occur, because...
Owner's Manual
Page 21
... calibrating 12 ANT + sensors 2 pairing 7 ANT+ sensors 5 applications 8 Auto Lap 11, 12 Auto Pause 11 auto scroll 12 B back to start notice message 12 storing data 7, 8 system settings 12 T temperature 14 time, alerts 3 time settings 12 time zones 12 timer 2, 3, 7 tones 12 topographical... 13 registration 14 resetting 14 display settings 12 distance, alerts 3 E elevation 12 F files, transferring 8 finding locations 10 addresses 10 near your location 10 G Garmin Connect 3, 7 storing data 7 GPS satellite page 12 signal 2 stopping 12 GSC 10 6, 13 H heart rate alerts 3 zones 5, 6, 16 heart rate ...
... calibrating 12 ANT + sensors 2 pairing 7 ANT+ sensors 5 applications 8 Auto Lap 11, 12 Auto Pause 11 auto scroll 12 B back to start notice message 12 storing data 7, 8 system settings 12 T temperature 14 time, alerts 3 time settings 12 time zones 12 timer 2, 3, 7 tones 12 topographical... 13 registration 14 resetting 14 display settings 12 distance, alerts 3 E elevation 12 F files, transferring 8 finding locations 10 addresses 10 near your location 10 G Garmin Connect 3, 7 storing data 7 GPS satellite page 12 signal 2 stopping 12 GSC 10 6, 13 H heart rate alerts 3 zones 5, 6, 16 heart rate ...
Quick Start Manual
Page 2
... standard mount (page 2) or the out-front mount (page 2). 2 Turn on . 5 Charge the device completely. Charging the Device NOTICE To prevent corrosion, thoroughly dry the mini-USB port, the weather cap, and the surrounding area before you should complete these tasks to set... and other important information. Installing the Out-Front Mount 1 Select a secure location to Garmin Connect™ (page 4). 8 Get the owner's manual (page 6). Always consult your ride to mount the Edge where it does not interfere with the bike mount notches Â. 6 Press down slightly...
... standard mount (page 2) or the out-front mount (page 2). 2 Turn on . 5 Charge the device completely. Charging the Device NOTICE To prevent corrosion, thoroughly dry the mini-USB port, the weather cap, and the surrounding area before you should complete these tasks to set... and other important information. Installing the Out-Front Mount 1 Select a secure location to Garmin Connect™ (page 4). 8 Get the owner's manual (page 6). Always consult your ride to mount the Edge where it does not interfere with the bike mount notches Â. 6 Press down slightly...

Quick Start Manual
Page 4
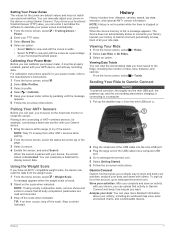
...be connected to your Bluetoothenabled smartphone to your device. NOTE: History is not recorded while the timer is stopped or paused. 4 NOTE: Your Edge must have a Garmin Connect account (page 4). 1 Connect the device to your computer. 2 Go to www.garminconnect.com. 3 Create a new course or select an... data, and share with your device, you can upload that you can repeat them as a course or workout. Sending Your Ride to Garmin Connect NOTICE To prevent corrosion, thoroughly dry the mini-USB port, the weather cap, and the surrounding area before charging or connecting to a computer....
...be connected to your Bluetoothenabled smartphone to your device. NOTE: History is not recorded while the timer is stopped or paused. 4 NOTE: Your Edge must have a Garmin Connect account (page 4). 1 Connect the device to your computer. 2 Go to www.garminconnect.com. 3 Create a new course or select an... data, and share with your device, you can upload that you can repeat them as a course or workout. Sending Your Ride to Garmin Connect NOTICE To prevent corrosion, thoroughly dry the mini-USB port, the weather cap, and the surrounding area before charging or connecting to a computer....