Important Safety and Product Information
Page 1
... parts are correctly installed. NEVER PUT NEW OR USED BATTERIES IN MOUTH OR IN ANY PART OF THE BODY. If this product is available at garmin.com/aboutGarmin/environment. To purchase replacement batteries, see the device owner's manual. Battery Warnings A lithium-ion battery is only available during certain outdoor activities. Using other batteries presents a risk of GNSS signals. The Garmin Connect™ app does not contact emergency services...
... parts are correctly installed. NEVER PUT NEW OR USED BATTERIES IN MOUTH OR IN ANY PART OF THE BODY. If this product is available at garmin.com/aboutGarmin/environment. To purchase replacement batteries, see the device owner's manual. Battery Warnings A lithium-ion battery is only available during certain outdoor activities. Using other batteries presents a risk of GNSS signals. The Garmin Connect™ app does not contact emergency services...
Important Safety and Product Information
Page 3
... (GNSS) such as the Global Positioning Service (GPS). Repaired or replaced devices have a 90-day warranty. Use of such devices may impair reception of direction, distance, location or topography. If during the warranty period you submit a claim for any country. SUCH REMEDY SHALL BE YOUR SOLE AND EXCLUSIVE REMEDY FOR ANY BREACH OF WARRANTY. Garmin navigation products are in accordance with...
... (GNSS) such as the Global Positioning Service (GPS). Repaired or replaced devices have a 90-day warranty. Use of such devices may impair reception of direction, distance, location or topography. If during the warranty period you submit a claim for any country. SUCH REMEDY SHALL BE YOUR SOLE AND EXCLUSIVE REMEDY FOR ANY BREACH OF WARRANTY. Garmin navigation products are in accordance with...
Important Safety and Product Information
Page 4
..., NSW 2766, Australia. If you seek warranty service outside of the original country of purchase, Garmin cannot guarantee that the parts and products needed to repair or replace your product will be unable to service your product in a country outside the United States depending on the country. The benefits under our Limited Warranty are also entitled to have the goods...
..., NSW 2766, Australia. If you seek warranty service outside of the original country of purchase, Garmin cannot guarantee that the parts and products needed to repair or replace your product will be unable to service your product in a country outside the United States depending on the country. The benefits under our Limited Warranty are also entitled to have the goods...

Owners Manual
Page 3
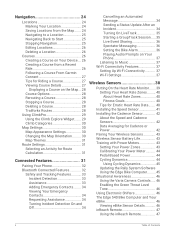
... on Garmin Connect 6 Following a Workout From Garmin Connect 6 Daily Suggested Workouts 6 Following a Daily Suggested Workout 6 Turning Daily Suggested Workout Prompts On and Off 6 Starting a Workout 7 Stopping a Workout 7 Deleting Workouts 7 Segments 7 Strava™ Segments 7 Using the Strava Segment Explore Widget 7 Following a Segment from Garmin Connect 8 Enabling Segments 8 Racing a Segment 8 Viewing Segment Details 9 Segment Options 9 Deleting a Segment 9 Training Indoors 9 Using an Indoor Trainer 9 Setting Resistance 10 Setting Target Power 10 Interval Workouts 10...
... on Garmin Connect 6 Following a Workout From Garmin Connect 6 Daily Suggested Workouts 6 Following a Daily Suggested Workout 6 Turning Daily Suggested Workout Prompts On and Off 6 Starting a Workout 7 Stopping a Workout 7 Deleting Workouts 7 Segments 7 Strava™ Segments 7 Using the Strava Segment Explore Widget 7 Following a Segment from Garmin Connect 8 Enabling Segments 8 Racing a Segment 8 Viewing Segment Details 9 Segment Options 9 Deleting a Segment 9 Training Indoors 9 Using an Indoor Trainer 9 Setting Resistance 10 Setting Target Power 10 Interval Workouts 10...
Owners Manual
Page 4
... 40 Fitness Goals 40 Tips for Erratic Heart Rate Data....... 40 Installing the Speed Sensor 41 Installing the Cadence Sensor 42 About the Speed and Cadence Sensors 42 Data Averaging for Cadence or Power 42 Pairing Your Wireless Sensors 43 Wireless Sensor Battery Life 43 Training with Power Meters 43 Setting Your Power Zones 43 Calibrating Your Power Meter.......... 44 Pedal-Based Power 44 Cycling Dynamics 44 Using Cycling Dynamics 45 Updating the Rally System Software Using the Edge Bike...
... 40 Fitness Goals 40 Tips for Erratic Heart Rate Data....... 40 Installing the Speed Sensor 41 Installing the Cadence Sensor 42 About the Speed and Cadence Sensors 42 Data Averaging for Cadence or Power 42 Pairing Your Wireless Sensors 43 Wireless Sensor Battery Life 43 Training with Power Meters 43 Setting Your Power Zones 43 Calibrating Your Power Meter.......... 44 Pedal-Based Power 44 Cycling Dynamics 44 Using Cycling Dynamics 45 Updating the Rally System Software Using the Edge Bike...

Owners Manual
Page 5
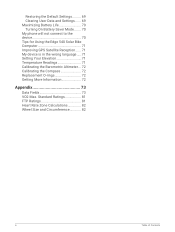
... Software Using the Garmin Connect App 63 Updating the Software Using Garmin Express 63 Specifications 64 Edge Specifications 64 HRM-Dual Specifications 64 Speed Sensor 2 and Cadence Sensor 2 Specifications 64 Viewing Device Information 64 Viewing Regulatory and Compliance Information 64 Device Care 65 Cleaning the Device 65 Caring for the Heart Rate Monitor.... 65 User Replaceable Batteries 65 Replacing the HRM-Dual Battery...... 66 Replacing the Speed Sensor Battery 67 Replacing the Cadence Sensor Battery 68 Replacing the Cadence Sensor Battery 69 Troubleshooting 69 Resetting...
... Software Using the Garmin Connect App 63 Updating the Software Using Garmin Express 63 Specifications 64 Edge Specifications 64 HRM-Dual Specifications 64 Speed Sensor 2 and Cadence Sensor 2 Specifications 64 Viewing Device Information 64 Viewing Regulatory and Compliance Information 64 Device Care 65 Cleaning the Device 65 Caring for the Heart Rate Monitor.... 65 User Replaceable Batteries 65 Replacing the HRM-Dual Battery...... 66 Replacing the Speed Sensor Battery 67 Replacing the Cadence Sensor Battery 68 Replacing the Cadence Sensor Battery 69 Troubleshooting 69 Resetting...
Owners Manual
Page 6
Standard Ratings 81 FTP Ratings 81 Heart Rate Zone Calculations 82 Wheel Size and Circumference 82 iv Table of Contents Restoring the Default Settings......... 69 Clearing User Data and Settings...... 69 Maximizing Battery Life 70 Turning On Battery Saver Mode....... 70 My phone will not connect to the device 70 Tips for Using the Edge 540 Solar Bike Computer 71 Improving GPS Satellite Reception...... 71 My device is in...
Standard Ratings 81 FTP Ratings 81 Heart Rate Zone Calculations 82 Wheel Size and Circumference 82 iv Table of Contents Restoring the Default Settings......... 69 Clearing User Data and Settings...... 69 Maximizing Battery Life 70 Turning On Battery Saver Mode....... 70 My phone will not connect to the device 70 Tips for Using the Edge 540 Solar Bike Computer 71 Improving GPS Satellite Reception...... 71 My device is in...

Owners Manual
Page 11
... the most important steps in Garmin Connect and sync it will reduce them (Creating a Power Guide, page 5). After the devices are always associated with a course and cannot be paired with compatible Garmin devices. Training 5 Your Edge device uses your ability, not to achieve a specific target time. Power guides are paired, you can start the activity timer. Power Guide You can create and use a saved course, and...
... the most important steps in Garmin Connect and sync it will reduce them (Creating a Power Guide, page 5). After the devices are always associated with a course and cannot be paired with compatible Garmin devices. Training 5 Your Edge device uses your ability, not to achieve a specific target time. Power guides are paired, you can start the activity timer. Power Guide You can create and use a saved course, and...
Owners Manual
Page 13
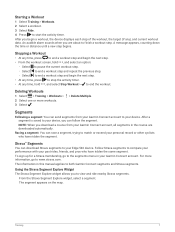
... to end a workout step and repeat the previous step. ◦ Select to end a workout step and begin a workout, the device displays each step of the workout, the target (if any time, hold , and select Stop Workout > to www.strava.com. Using the Strava Segment Explore Widget The Strava Segment Explore widget allows you download a course from your Garmin Connect account to start the activity timer. Training 7 NOTE...
... to end a workout step and repeat the previous step. ◦ Select to end a workout step and begin a workout, the device displays each step of the workout, the target (if any time, hold , and select Stop Workout > to www.strava.com. Using the Strava Segment Explore Widget The Strava Segment Explore widget allows you download a course from your Garmin Connect account to start the activity timer. Training 7 NOTE...

Owners Manual
Page 15
...use your device with your personal best time and average speed, and other riders (if applicable). Training Indoors The device includes an indoor activity profile where GPS is turned off automatically. 1 Select Training > Smart Trainer. 2 Select an option: • Select Free Ride to manually adjust the resistance... device using an indoor trainer, GPS is turned off, speed and distance are not available unless you have a compatible sensor or indoor trainer that alert you to set the grade and target power. 3 Select a course, activity, or workout. 4 Select Ride. 5 Press to start the ...
...use your device with your personal best time and average speed, and other riders (if applicable). Training Indoors The device includes an indoor activity profile where GPS is turned off automatically. 1 Select Training > Smart Trainer. 2 Select an option: • Select Free Ride to manually adjust the resistance... device using an indoor trainer, GPS is turned off, speed and distance are not available unless you have a compatible sensor or indoor trainer that alert you to set the grade and target power. 3 Select a course, activity, or workout. 4 Select Ride. 5 Press to start the ...

Owners Manual
Page 16
... speed. 5 If necessary, select > Set Target Power to adjust the target power during your activity. When you are riding a known distance. When you create another interval workout. Starting an Interval Workout 1 Select Training > Intervals > Do Workout. 2 Press to start the activity timer. 3 When your activity. Setting Target Power 1 Select Training > Smart Trainer > Set Target Power. 2 Set the target power value. 3 Select an activity profile. 4 Press to start the activity timer. 4 If necessary, select > Set Resistance...
... speed. 5 If necessary, select > Set Target Power to adjust the target power during your activity. When you are riding a known distance. When you create another interval workout. Starting an Interval Workout 1 Select Training > Intervals > Do Workout. 2 Press to start the activity timer. 3 When your activity. Setting Target Power 1 Select Training > Smart Trainer > Set Target Power. 2 Set the target power value. 3 Select an activity profile. 4 Press to start the activity timer. 4 If necessary, select > Set Resistance...
Owners Manual
Page 18
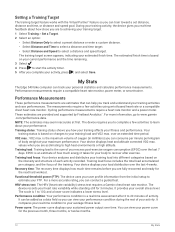
... a Garmin chest heart rate monitor. For more accurate rating, you can track your performance. It provides your power curve for 3 minutes. You can view your overall stress level. VO2 max.: VO2 max. It can be added as a data field so you can train toward a set distance, distance and time, or distance and speed goal. Power curve: The power curve displays your activity, press , and select Save. My Stats The Edge 540 bike computer...
... a Garmin chest heart rate monitor. For more accurate rating, you can track your performance. It provides your power curve for 3 minutes. You can view your overall stress level. VO2 max.: VO2 max. It can be added as a data field so you can train toward a set distance, distance and time, or distance and speed goal. Power curve: The power curve displays your activity, press , and select Save. My Stats The Edge 540 bike computer...

Owners Manual
Page 23
..., for you to perform at first. Anaerobic Training Effect uses heart rate and speed (or power) to determine how a workout affects your ability to attempt another hard workout. You can use your Garmin device with wrist-based heart rate or a compatible chest heart rate monitor to display how much time remains before you to complete a few activities to monitor your aerobic fitness. Training Effect Aerobic Benefit Anaerobic Benefit From 0.0 to...
..., for you to perform at first. Anaerobic Training Effect uses heart rate and speed (or power) to determine how a workout affects your ability to attempt another hard workout. You can use your Garmin device with wrist-based heart rate or a compatible chest heart rate monitor to display how much time remains before you to complete a few activities to monitor your aerobic fitness. Training Effect Aerobic Benefit Anaerobic Benefit From 0.0 to...

Owners Manual
Page 44
... reach a specified power zone (Setting Range Alerts, page 53). For information about approaching vehicles. The Edge 540 device displays current adjustment values when the sensor is in adjustment mode. VIRB The VIRB® remote function allows you can use a Varia rearview bike radar to improve situational awareness and send alerts about specific Garmin sensor compatibility, purchasing, or to view the owner's manual, go to control your VIRB action...
... reach a specified power zone (Setting Range Alerts, page 53). For information about approaching vehicles. The Edge 540 device displays current adjustment values when the sensor is in adjustment mode. VIRB The VIRB® remote function allows you can use a Varia rearview bike radar to improve situational awareness and send alerts about specific Garmin sensor compatibility, purchasing, or to view the owner's manual, go to control your VIRB action...

Owners Manual
Page 46
... set range of the strap. Tips for Erratic Heart Rate Data If the heart rate data is a set your maximum heart rate, resting heart rate, and heart rate zones. 1 Select > My Stats > Training Zones > Heart Rate Zones. 2 Enter your chest. • Warm up for your heart rate during your maximum heart rate, you can create static electricity that interferes with heart rate signals. • Move away from sources that measures maximum heart rate. You can manually adjust the heart rate...
... set range of the strap. Tips for Erratic Heart Rate Data If the heart rate data is a set your maximum heart rate, resting heart rate, and heart rate zones. 1 Select > My Stats > Training Zones > Heart Rate Zones. 2 Enter your chest. • Warm up for your heart rate during your maximum heart rate, you can create static electricity that interferes with heart rate signals. • Move away from sources that measures maximum heart rate. You can manually adjust the heart rate...

Owners Manual
Page 48
.... TIP: Garmin recommends you secure your bike on a stand while installing the sensor. 1 Select the band size that occur when you can change the value of the crank arm. 3 Pull the bands around the crank arm, and attach them to the hooks on the inside of this setting (Data Recording Settings, page 57). 42 Wireless Sensors NOTE: The LED flashes green for Cadence or Power The...
.... TIP: Garmin recommends you secure your bike on a stand while installing the sensor. 1 Select the band size that occur when you can change the value of the crank arm. 3 Pull the bands around the crank arm, and attach them to the hooks on the inside of this setting (Data Recording Settings, page 57). 42 Wireless Sensors NOTE: The LED flashes green for Cadence or Power The...

Owners Manual
Page 56
...; For Windows computers, select the Safely Remove Hardware icon in features and pages. The activity profile includes customized data pages, activity totals, alerts, training zones (such as heart rate and speed), training settings (such as a removable drive or volume, you are using a USB cable. 2 Go to apps.garmin.com, and sign in your Garmin Connect account and can add Connect IQ data fields to calculate accurate...
...; For Windows computers, select the Safely Remove Hardware icon in features and pages. The activity profile includes customized data pages, activity totals, alerts, training zones (such as heart rate and speed), training settings (such as a removable drive or volume, you are using a USB cable. 2 Go to apps.garmin.com, and sign in your Garmin Connect account and can add Connect IQ data fields to calculate accurate...
Owners Manual
Page 59
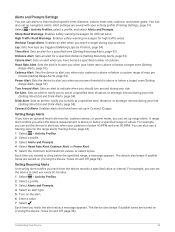
...distance (Setting Recurring Alerts, page 53). Eat Alert: Sets an alert to notify you to alert you when your ride. A range alert notifies you should turn around during your workout. Time Alert: Sets an alert for difficult turns. Cadence Alert: Sets... type. 5 Turn on the alert. 6 Enter a value. 7 Select . Heart Rate Alert: Sets the device to train toward specific time, distance, calorie, heart rate, cadence, and power goals. Connect IQ Alerts: Enables alerts that have been set the device to alert you have an optional heart rate monitor, cadence sensor, or power meter, you ...
...distance (Setting Recurring Alerts, page 53). Eat Alert: Sets an alert to notify you to alert you when your ride. A range alert notifies you should turn around during your workout. Time Alert: Sets an alert for difficult turns. Cadence Alert: Sets... type. 5 Turn on the alert. 6 Enter a value. 7 Select . Heart Rate Alert: Sets the device to train toward specific time, distance, calorie, heart rate, cadence, and power goals. Connect IQ Alerts: Enables alerts that have been set the device to alert you have an optional heart rate monitor, cadence sensor, or power meter, you ...

Owners Manual
Page 62
...; Select Manual, and select to start the activity timer. • Select Prompted to display a visual reminder when you reach the start notice speed. • Select Auto to start the activity timer so you can use Bluetooth connected features, including LiveTrack and activity uploads to enable phone notifications from your devices with a compatible Bluetooth enabled phone. Changing the Satellite Setting Using GPS...
...; Select Manual, and select to start the activity timer. • Select Prompted to display a visual reminder when you reach the start notice speed. • Select Auto to start the activity timer so you can use Bluetooth connected features, including LiveTrack and activity uploads to enable phone notifications from your devices with a compatible Bluetooth enabled phone. Changing the Satellite Setting Using GPS...

Owners Manual
Page 75
Replacing the Cadence Sensor Battery NOTE: Use these instructions for 10 seconds. NOTE: The LED flashes red and green for a few seconds after two revolutions. 1 Locate the circular battery cover on the back of your history or activity data, such as rides, workouts, and courses, and resets the device settings and activity profiles. The device resets and turns on the battery door. This will not remove any...
Replacing the Cadence Sensor Battery NOTE: Use these instructions for 10 seconds. NOTE: The LED flashes red and green for a few seconds after two revolutions. 1 Locate the circular battery cover on the back of your history or activity data, such as rides, workouts, and courses, and resets the device settings and activity profiles. The device resets and turns on the battery door. This will not remove any...


