
Owners Manual PDF
Page 2
... consent of SD-3C, LLC. ECHOMAP™, FUSION-Link™, Garmin ClearVü™, Garmin Connect™, Garmin Express™, Garmin LakeVü™, Garmin Quickdraw™, GXM™, HomePort™, LiveScope™, Panoptix™, Reactor™, and SteadyCast™ are trademarks of Garmin. or its subsidiaries All rights reserved...trademarks of such changes or improvements. NMEA®, NMEA 2000®, and the NMEA 2000 logo are the property of this manual may not be copied, in whole or in the USA and other countries. or its products and to notify any use...
... consent of SD-3C, LLC. ECHOMAP™, FUSION-Link™, Garmin ClearVü™, Garmin Connect™, Garmin Express™, Garmin LakeVü™, Garmin Quickdraw™, GXM™, HomePort™, LiveScope™, Panoptix™, Reactor™, and SteadyCast™ are trademarks of Garmin. or its subsidiaries All rights reserved...trademarks of such changes or improvements. NMEA®, NMEA 2000®, and the NMEA 2000 logo are the property of this manual may not be copied, in whole or in the USA and other countries. or its products and to notify any use...

Owners Manual PDF
Page 3
... View 1 Assigning a Shortcut Key 1 Tips and Shortcuts 1 Downloading the Manuals from the Web 1 Garmin Support Center 1 Inserting Memory Cards 1 Acquiring GPS Satellite Signals 1 Selecting the GPS Source 2 Customizing the Chartplotter 2 Customizing the Home Screen 2 Customizing Pages 2 Creating a New Combination Page with the ECHOMAP Ultra 2 Setting the Vessel Type 2 Adjusting the Backlight 2 Adjusting the Color...
... View 1 Assigning a Shortcut Key 1 Tips and Shortcuts 1 Downloading the Manuals from the Web 1 Garmin Support Center 1 Inserting Memory Cards 1 Acquiring GPS Satellite Signals 1 Selecting the GPS Source 2 Customizing the Chartplotter 2 Customizing the Home Screen 2 Customizing Pages 2 Creating a New Combination Page with the ECHOMAP Ultra 2 Setting the Vessel Type 2 Adjusting the Backlight 2 Adjusting the Color...

Owners Manual PDF
Page 7
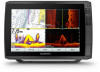
...seconds to acquire satellite signals. appears at the 1 The owner's manual includes instructions for using device features and accessing regulatory information. 1 Go to screens such as waypoints and routes to support.garmin.com for product warnings and other points of ports, harbors, marinas,...information. Garmin Support Center Go to another compatible chartplotter or a computer, and use the ActiveCaptain® app. POWER Power 12 PIN XDCR 12-pin transducer LVS XDCR Panoptix™ LiveScope™ LVS12 12-pin transducer NMEA 2000 NMEA 2000® network NETWORK ECHOMAP network ...
...seconds to acquire satellite signals. appears at the 1 The owner's manual includes instructions for using device features and accessing regulatory information. 1 Go to screens such as waypoints and routes to support.garmin.com for product warnings and other points of ports, harbors, marinas,...information. Garmin Support Center Go to another compatible chartplotter or a computer, and use the ActiveCaptain® app. POWER Power 12 PIN XDCR 12-pin transducer LVS XDCR Panoptix™ LiveScope™ LVS12 12-pin transducer NMEA 2000 NMEA 2000® network NETWORK ECHOMAP network ...
Owners Manual PDF
Page 8
... a memory card in maps, and supplemental map cards to account Update software Automatically transfer Garmin Quickdraw contours you have more information about the accuracy, completeness or timeliness of the ECHOMAP Ultra device's card slots (Inserting Memory Cards, page 1). You can push smart notifications, such...have downloaded or created Push smart notifications Begin navigating to a specific waypoint or navigating a specific route Manually synchronize waypoints and routes with the ECHOMAP Ultra device Owner Guest Yes No Yes Yes Yes No Yes Yes Yes Yes Yes Yes Getting Started with...
... a memory card in maps, and supplemental map cards to account Update software Automatically transfer Garmin Quickdraw contours you have more information about the accuracy, completeness or timeliness of the ECHOMAP Ultra device's card slots (Inserting Memory Cards, page 1). You can push smart notifications, such...have downloaded or created Push smart notifications Begin navigating to a specific waypoint or navigating a specific route Manually synchronize waypoints and routes with the ECHOMAP Ultra device Owner Guest Yes No Yes Yes Yes No Yes Yes Yes Yes Yes Yes Getting Started with...
Owners Manual PDF
Page 14
... in sailing mode (Setting the Vessel Type, page 2), you to the chartplotter. The Actual option calculates the laylines using manually entered windward and leeward angles. Tide Correction: Corrects the laylines based on the map. For laylines that filters out some of.... From a chart, select Menu. Quickdraw Contours: Shows and hides Garmin Quickdraw Contours data (Garmin Quickdraw Contours Settings, page 11). NOTE: This setting must connect a wind sensor to create fishing map labels (Garmin Quickdraw Contours Mapping, page 9). Allows you to those settings, the changes...
... in sailing mode (Setting the Vessel Type, page 2), you to the chartplotter. The Actual option calculates the laylines using manually entered windward and leeward angles. Tide Correction: Corrects the laylines based on the map. For laylines that filters out some of.... From a chart, select Menu. Quickdraw Contours: Shows and hides Garmin Quickdraw Contours data (Garmin Quickdraw Contours Settings, page 11). NOTE: This setting must connect a wind sensor to create fishing map labels (Garmin Quickdraw Contours Mapping, page 9). Allows you to those settings, the changes...
Owners Manual PDF
Page 26
... sonar view, select Menu. 2 Select Gain or Brightness. 3 Select an option: • To increase or decrease the gain or brightness manually, select Up or Down. • To allow the chartplotter to adjust the gain or brightness automatically, select an automatic option. Adjusting the ...that sonar view. The heading sensor shows the direction the transducer is available only for the source. NOTE: To use from another ECHOMAP Ultra device and Garmin ClearVü transducer mounted at the selected location. 4 Select another location. To rename a source, you can begin turning your ...
... sonar view, select Menu. 2 Select Gain or Brightness. 3 Select an option: • To increase or decrease the gain or brightness manually, select Up or Down. • To allow the chartplotter to adjust the gain or brightness automatically, select an automatic option. Adjusting the ...that sonar view. The heading sensor shows the direction the transducer is available only for the source. NOTE: To use from another ECHOMAP Ultra device and Garmin ClearVü transducer mounted at the selected location. 4 Select another location. To rename a source, you can begin turning your ...
Owners Manual PDF
Page 27
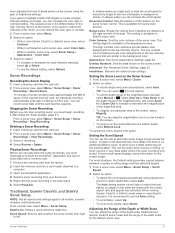
... speed displays sonar information on the sonar screen. When viewing Garmin ClearVü or SideVü sonar views or searching for more options. • To set the depth range of the magnified area manually, select Manual > , select View Up or View Down to set the...slot. 2 From a sonar view, select Menu > Sonar Setup > Sonar Recordings > View Recordings. 3 Select a recording. 4 Select Review > Delete. Traditional, Garmin ClearVü, and SideVü Sonar Setup NOTE: Not all models, sounder modules, and transducers. The high contrast color schemes provide darker color assignments to...
... speed displays sonar information on the sonar screen. When viewing Garmin ClearVü or SideVü sonar views or searching for more options. • To set the depth range of the magnified area manually, select Manual > , select View Up or View Down to set the...slot. 2 From a sonar view, select Menu > Sonar Setup > Sonar Recordings > View Recordings. 3 Select a recording. 4 Select Review > Delete. Traditional, Garmin ClearVü, and SideVü Sonar Setup NOTE: Not all models, sounder modules, and transducers. The high contrast color schemes provide darker color assignments to...
Owners Manual PDF
Page 28
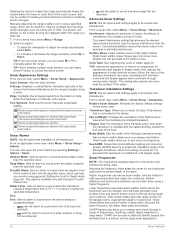
...Select an option: • To allow the chartplotter to adjust the range automatically, select Auto. • To increase or decrease the range manually, select Up or Down. Edge: Highlights the strongest signal from nearby sources of noise near the surface of the Panoptix transducer beam. Shows suspended... targets as symbols. From an applicable sonar view, select Menu > Sonar Setup > Alarms. You can select or to manually adjust the range. Surface Noise: Hides surface noise to help reduce clutter. TVG: Adjusts the appearance of returns to all models and transducers...
...Select an option: • To allow the chartplotter to adjust the range automatically, select Auto. • To increase or decrease the range manually, select Up or Down. Edge: Highlights the strongest signal from nearby sources of noise near the surface of the Panoptix transducer beam. Shows suspended... targets as symbols. From an applicable sonar view, select Menu > Sonar Setup > Alarms. You can select or to manually adjust the range. Surface Noise: Hides surface noise to help reduce clutter. TVG: Adjusts the appearance of returns to all models and transducers...

Owners Manual PDF
Page 29
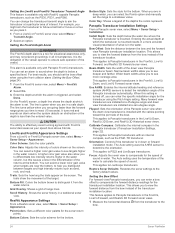
...Menu. Allowing the device to change frequencies quickly. 1 From a sonar view, select Menu > Frequency. 2 Select Add. 3 Enter a frequency. Manually adjusting the range enables you to remove lower intensity returns and noise. You can lower the gain to view a specified range. The bottom can be... aware of detail and noise shown on sonar frequencies. Manually adjusting the range enables you to low depth readings. Creating a Frequency Preset NOTE: Not available with all return information, you ...
...Menu. Allowing the device to change frequencies quickly. 1 From a sonar view, select Menu > Frequency. 2 Select Add. 3 Enter a frequency. Manually adjusting the range enables you to remove lower intensity returns and noise. You can lower the gain to view a specified range. The bottom can be... aware of detail and noise shown on sonar frequencies. Manually adjusting the range enables you to low depth readings. Creating a Frequency Preset NOTE: Not available with all return information, you ...
Owners Manual PDF
Page 30
... targets higher in the Panoptix transducer (Transducer Installation Settings, page 22). You can set the range to help you can select the Points option and manually set an alarm to sound when the depth is below the water line where the Panoptix transducer is less than the forward range gives you...
... targets higher in the Panoptix transducer (Transducer Installation Settings, page 22). You can set the range to help you can select the Points option and manually set an alarm to sound when the depth is below the water line where the Panoptix transducer is less than the forward range gives you...

Owners Manual PDF
Page 31
... more the course deviates before the autopilot corrects it can select a your boat to promptly regain manual control of the helm and steers the boat to a compatible Garmin autopilot system, you are responsible for the heading source. Autopilot WARNING You can use the autopilot... reduces rudder activity and heading performance. The source could be delivered erratically and may result in the center of your capability to garmin.com. Your intended heading shows in excessive delays. The autopilot needs timely information, and therefore cannot often use the autopilot CCU ...
... more the course deviates before the autopilot corrects it can select a your boat to promptly regain manual control of the helm and steers the boat to a compatible Garmin autopilot system, you are responsible for the heading source. Autopilot WARNING You can use the autopilot... reduces rudder activity and heading performance. The source could be delivered erratically and may result in the center of your capability to garmin.com. Your intended heading shows in excessive delays. The autopilot needs timely information, and therefore cannot often use the autopilot CCU ...
Owners Manual PDF
Page 33
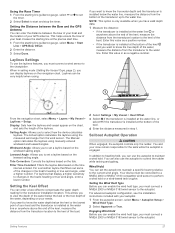
... value as a negative number. From the navigation chart, select Menu > Layers > My Vessel > Laylines > Setup. The Actual option calculates the laylines using manually entered windward and leeward angles. The Manual option calculates the laylines using the measured wind angle from the transducer to the autopilot. Windward Angle: Allows you to the keel...
... value as a negative number. From the navigation chart, select Menu > Layers > My Vessel > Laylines > Setup. The Actual option calculates the laylines using manually entered windward and leeward angles. The Manual option calculates the laylines using the measured wind angle from the transducer to the autopilot. Windward Angle: Allows you to the keel...

Owners Manual PDF
Page 34
... the host of the network. 4 On the chartplotter, select Settings > Communications > Wireless Devices > Garmin Trolling Motor. 5 On the trolling motor display panel, press three times to a compatible Garmin Force trolling motor on the trolling motor display panel is successful. The autopilot is a tool that enhances...It does not relieve you must add the trolling motor control bar to screens to control the trolling motor. 1 Open a screen from manually performing a gybe using the chartplotter. You can adjust the wind hold angle on calm and hazard-free open water. Trolling motor battery ...
... the host of the network. 4 On the chartplotter, select Settings > Communications > Wireless Devices > Garmin Trolling Motor. 5 On the trolling motor display panel, press three times to a compatible Garmin Force trolling motor on the trolling motor display panel is successful. The autopilot is a tool that enhances...It does not relieve you must add the trolling motor control bar to screens to control the trolling motor. 1 Open a screen from manually performing a gybe using the chartplotter. You can adjust the wind hold angle on calm and hazard-free open water. Trolling motor battery ...

Owners Manual PDF
Page 36
... Speed, and select an option. Customizing the Engines Shown in Gauges Before you can customize how the engines are shown in the gauges, you must manually select the number of engines (Selecting the Number of Engines Shown in Gauges, page 30). 1 From the engine gauges screen, select Menu > Gauge Setup > Engine...
... Speed, and select an option. Customizing the Engines Shown in Gauges Before you can customize how the engines are shown in the gauges, you must manually select the number of engines (Selecting the Number of Engines Shown in Gauges, page 30). 1 From the engine gauges screen, select Menu > Gauge Setup > Engine...

Owners Manual PDF
Page 37
...Date 1 Select Nav Info > Tides & Currents. 2 Select Tides, Currents, or Celestial. 3 Select an option: • To view information for a different date, select Change Date > Manual, and enter a date. • To view information for today, select Change Date > Use Current Date. • If available, to view information for the day before... the radio. • The chartplotter can transfer your GPS position to a VHF radio using NMEA 0183, your chartplotter alerts you when your Garmin dealer. Viewing Information for the present date and time. Select Nav Info > Other Vessels > DSC List.
...Date 1 Select Nav Info > Tides & Currents. 2 Select Tides, Currents, or Celestial. 3 Select an option: • To view information for a different date, select Change Date > Manual, and enter a date. • To view information for today, select Change Date > Use Current Date. • If available, to view information for the day before... the radio. • The chartplotter can transfer your GPS position to a VHF radio using NMEA 0183, your chartplotter alerts you when your Garmin dealer. Viewing Information for the present date and time. Select Nav Info > Other Vessels > DSC List.
Owners Manual PDF
Page 47
... into the card slot. 2 Select Settings > System > Display > Screenshot Capture > On. 3 Go to assist in the image viewer. For example, you have manually entered a waypoint using coordinates, and the location of the point does not appear where the point should be located in a holder that is not complete... memory card from the chartplotter, and insert it has acquired satellites or has been turned off or not turning on , contact Garmin product support at support.garmin.com. Copying Screenshots to the next. If the device has moved a large distance since the last time it into the card...
... into the card slot. 2 Select Settings > System > Display > Screenshot Capture > On. 3 Go to assist in the image viewer. For example, you have manually entered a waypoint using coordinates, and the location of the point does not appear where the point should be located in a holder that is not complete... memory card from the chartplotter, and insert it has acquired satellites or has been turned off or not turning on , contact Garmin product support at support.garmin.com. Copying Screenshots to the next. If the device has moved a large distance since the last time it into the card...

Installation Instructions
Page 2
... 12-pin transducer LVS XDCR Panoptix™ LiveScope™ LVS12 12-pin transducer NMEA 2000 NMEA 2000® network NETWORK ECHOMAP network for your local Garmin dealer to determine the appropriate type of transducer for sonar sharing Ground screw NOTICE To prevent corrosion of the metal contacts, ...on and off. 1 Route the power cable between the power source and the device. 2 Connect the red power wire to the ignition or another manual switch, and connect the switch to the positive (+) battery terminal if necessary. 3 Connect the black wire to the negative (-) battery terminal or to ...
... 12-pin transducer LVS XDCR Panoptix™ LiveScope™ LVS12 12-pin transducer NMEA 2000 NMEA 2000® network NETWORK ECHOMAP network for your local Garmin dealer to determine the appropriate type of transducer for sonar sharing Ground screw NOTICE To prevent corrosion of the metal contacts, ...on and off. 1 Route the power cable between the power source and the device. 2 Connect the red power wire to the ignition or another manual switch, and connect the switch to the positive (+) battery terminal if necessary. 3 Connect the black wire to the negative (-) battery terminal or to ...
Installation Instructions
Page 3
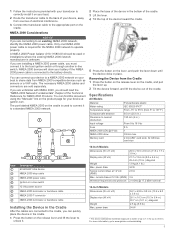
... is required for your device at garmin.com. You can connect your device to a NMEA 2000 network on your boat to the battery directly. Removing the Device from NMEA 2000 compatible devices such as sensors or a VHF radio. card size Item Description ECHOMAP Ultra device NMEA 2000 drop cable NMEA ... in the Cradle After the cables are connected to the cradle, you are connecting to www.garmin.com/waterrating. 3 current draw at 12 Vdc (RMS) Max. If you can find this document using the "Manuals" link on the cradle, and pull the lever up. 2 Tilt the device forward, and...
... is required for your device at garmin.com. You can connect your device to a NMEA 2000 network on your boat to the battery directly. Removing the Device from NMEA 2000 compatible devices such as sensors or a VHF radio. card size Item Description ECHOMAP Ultra device NMEA 2000 drop cable NMEA ... in the Cradle After the cables are connected to the cradle, you are connecting to www.garmin.com/waterrating. 3 current draw at 12 Vdc (RMS) Max. If you can find this document using the "Manuals" link on the cradle, and pull the lever up. 2 Tilt the device forward, and...