Important Product and Safety Information (Multilingual)
Page 2
... heat source or in a high temperature location, such as in an unattended vehicle. In addition, the GPS unit may use of time spent viewing the unit's screen while navigating and use a sharp object to ...properly recycle/dispose of or above any airbag. (See diagram.) Do not mount Do not place where driver's unsecured on the unit to all driving conditions. Do not place in... field of fire or explosion. • Contact your product contains or accepts street maps. See www.garmin.com/prop65 for various purposes, such as the steering wheel, foot pedals, or transmission levers. It is...
... heat source or in a high temperature location, such as in an unattended vehicle. In addition, the GPS unit may use of time spent viewing the unit's screen while navigating and use a sharp object to ...properly recycle/dispose of or above any airbag. (See diagram.) Do not mount Do not place where driver's unsecured on the unit to all driving conditions. Do not place in... field of fire or explosion. • Contact your product contains or accepts street maps. See www.garmin.com/prop65 for various purposes, such as the steering wheel, foot pedals, or transmission levers. It is...
Important Product and Safety Information (Multilingual)
Page 3
...laws and ordinances. Some state laws prohibit drivers from the GPS unit. • Consult the dealer or an experienced radio/TV technician for Class B digital devices FOR HOME OR OFFICE USE. Always mount your Garmin device in a location that obstruct the driver's vision. ... this equipment does cause harmful interference to the following measures: • Reorient or relocate the receiving antenna. • Increase the separation between the equipment and the receiver. • Connect the equipment into an outlet that may cause undesired operation. Operation of this...
...laws and ordinances. Some state laws prohibit drivers from the GPS unit. • Consult the dealer or an experienced radio/TV technician for Class B digital devices FOR HOME OR OFFICE USE. Always mount your Garmin device in a location that obstruct the driver's vision. ... this equipment does cause harmful interference to the following measures: • Reorient or relocate the receiving antenna. • Increase the separation between the equipment and the receiver. • Connect the equipment into an outlet that may cause undesired operation. Operation of this...

Owner's Manual
Page 5
GPS Games 20 Geocaches 20 Customizing the Dakota... 21 Changing the Profile 21 Setting Up Profiles 21 Using System Setup 22 Customizing the Display.......... 22 Map Setup 23 Track Setup 24 Customizing the... Introduction Specifications 31 Using Demo Mode 32 Connecting Your Dakota to a Computer........... 33 Installing a microSD™ Card 33 Transferring Tracks, Routes, or Waypoints 34 Loading and Deleting Files 35 Optimizing Battery Life 36 Restoring Factory Default Settings 36 Attaching a Carabiner, Lanyard, Mount, or Other Optional Accessory 37 Calibrating the Touchscreen 37...
GPS Games 20 Geocaches 20 Customizing the Dakota... 21 Changing the Profile 21 Setting Up Profiles 21 Using System Setup 22 Customizing the Display.......... 22 Map Setup 23 Track Setup 24 Customizing the... Introduction Specifications 31 Using Demo Mode 32 Connecting Your Dakota to a Computer........... 33 Installing a microSD™ Card 33 Transferring Tracks, Routes, or Waypoints 34 Loading and Deleting Files 35 Optimizing Battery Life 36 Restoring Factory Default Settings 36 Attaching a Carabiner, Lanyard, Mount, or Other Optional Accessory 37 Calibrating the Touchscreen 37...
Owner's Manual
Page 6
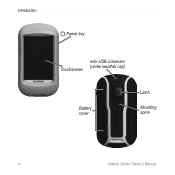
Introduction Power key mini-USB connector Touchscreen (under weather cap) Battery cover Latch Mounting spine iv Dakota Series Owner's Manual
Introduction Power key mini-USB connector Touchscreen (under weather cap) Battery cover Latch Mounting spine iv Dakota Series Owner's Manual

Owner's Manual
Page 43
... remove the clip, lift the bottom of the Dakota. To calibrate the touchscreen: 1. Dakota Series Owner's Manual 37 Slide the clip up until it locks in the slots on the screen until "Calibration is complete" is turned off the mounting spine. However, if the buttons do not seem... to be responding properly, use the following process. Appendix Calibrating the Touchscreen The Dakota screen does not normally require calibration. Follow the instructions on the mounting spine of the clip and slide the clip off , press and hold for approximately 30 seconds. 2. Position...
... remove the clip, lift the bottom of the Dakota. To calibrate the touchscreen: 1. Dakota Series Owner's Manual 37 Slide the clip up until it locks in the slots on the screen until "Calibration is complete" is turned off the mounting spine. However, if the buttons do not seem... to be responding properly, use the following process. Appendix Calibrating the Touchscreen The Dakota screen does not normally require calibration. Follow the instructions on the mounting spine of the clip and slide the clip off , press and hold for approximately 30 seconds. 2. Position...


