Important Safety and Product Information
Page 2
... Part 15 regulations. Repairs should only be co-located or operated in conjunction with the instructions. Unauthorized repairs or modifications could become distracted by the display. If used in accordance with any interference, including interference that interference will not occur in a particular installation. Battery Warnings Replaceable lithium, alkaline, or NiMH batteries can occur within the temperature ranges specified in the printed manual...
... Part 15 regulations. Repairs should only be co-located or operated in conjunction with the instructions. Unauthorized repairs or modifications could become distracted by the display. If used in accordance with any interference, including interference that interference will not occur in a particular installation. Battery Warnings Replaceable lithium, alkaline, or NiMH batteries can occur within the temperature ranges specified in the printed manual...
Important Safety and Product Information
Page 3
... FOLLOWING SOFTWARE LICENSE AGREEMENT. Use of such devices may impair reception of nature or external causes; (iv) damage caused by service performed by Garmin. SOME STATES (AND COUNTRIES AND PROVINCES) DO NOT ALLOW THE EXCLUSION OF INCIDENTAL OR CONSEQUENTIAL DAMAGES, SO THE ABOVE LIMITATIONS MAY NOT APPLY TO YOU. Before seeking warranty service, please access and review the online help resources...
... FOLLOWING SOFTWARE LICENSE AGREEMENT. Use of such devices may impair reception of nature or external causes; (iv) damage caused by service performed by Garmin. SOME STATES (AND COUNTRIES AND PROVINCES) DO NOT ALLOW THE EXCLUSION OF INCIDENTAL OR CONSEQUENTIAL DAMAGES, SO THE ABOVE LIMITATIONS MAY NOT APPLY TO YOU. Before seeking warranty service, please access and review the online help resources...

Owners Manual
Page 2
... to make changes in the content of this manual may not be copied, in whole or in the USA and other countries. Garmin® and the Garmin logo are trademarks of Garmin. Under the copyright laws, this manual without the express permission of Garmin Ltd. or its products and to change or improve its subsidiaries, registered in part, without the...
... to make changes in the content of this manual may not be copied, in whole or in the USA and other countries. Garmin® and the Garmin logo are trademarks of Garmin. Under the copyright laws, this manual without the express permission of Garmin Ltd. or its products and to change or improve its subsidiaries, registered in part, without the...
Owners Manual
Page 3
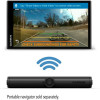
...Installing AA Batteries 3 Installing the Camera in the Mount 3 Pairing the Camera with a Garmin Navigation Device 3 Pairing Additional Cameras with a Garmin Navigation Device 4 Viewing the Backup Camera 4 Switching Cameras 4 Adjusting the Camera Angle 4 Removing the Camera from the Mount 4 Backup Camera Settings 4 Aligning the Guidance Lines 5 Changing the Camera Order 5 Renaming a Camera 5 Removing a Paired Camera 5 Device Information 5 Software Updates 5 Specifications 6 Troubleshooting 6 The camera takes a long time to connect or does not connect 6 The camera does not work...
...Installing AA Batteries 3 Installing the Camera in the Mount 3 Pairing the Camera with a Garmin Navigation Device 3 Pairing Additional Cameras with a Garmin Navigation Device 4 Viewing the Backup Camera 4 Switching Cameras 4 Adjusting the Camera Angle 4 Removing the Camera from the Mount 4 Backup Camera Settings 4 Aligning the Guidance Lines 5 Changing the Camera Order 5 Renaming a Camera 5 Removing a Paired Camera 5 Device Information 5 Software Updates 5 Specifications 6 Troubleshooting 6 The camera takes a long time to connect or does not connect 6 The camera does not work...
Owners Manual
Page 5
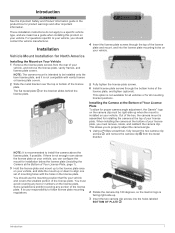
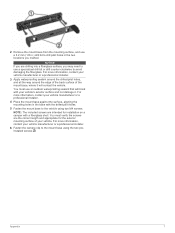
... it is recommended to properly adjust the camera angle. 1 Using a Phillips screwdriver, fully loosen the two camera clip screws , and remove the camera clip from the rear of the license plate, and tighten (optional). These installation instructions do not apply to your vehicle. For questions specific to a specific vehicle type, and are meant as a guide when installing this product on your license plate...
... it is recommended to properly adjust the camera angle. 1 Using a Phillips screwdriver, fully loosen the two camera clip screws , and remove the camera clip from the rear of the license plate, and tighten (optional). These installation instructions do not apply to your vehicle. For questions specific to a specific vehicle type, and are meant as a guide when installing this product on your license plate...
Owners Manual
Page 6
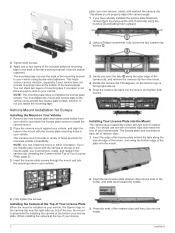
...adjust the camera angle. 1 If you have already installed the license plate fasteners, remove them by prying up the end of each set of retainer clips that match the size of your vehicle. Vehicle Mount Installation for universal vehicle compatibility. The camera mount provides a variety of holes and slots for Europe Installing the Mount on each clip using... assembled for installing the camera at the bottom your vehicle using double-sided adhesive. NOTE: The mounting tape does not replace the license plate screws. When installing the camera at the top of your vehicle, the Garmin logo on...
...adjust the camera angle. 1 If you have already installed the license plate fasteners, remove them by prying up the end of each set of retainer clips that match the size of your vehicle. Vehicle Mount Installation for universal vehicle compatibility. The camera mount provides a variety of holes and slots for Europe Installing the Mount on each clip using... assembled for installing the camera at the bottom your vehicle using double-sided adhesive. NOTE: The mounting tape does not replace the license plate screws. When installing the camera at the top of your vehicle, the Garmin logo on...
Owners Manual
Page 7
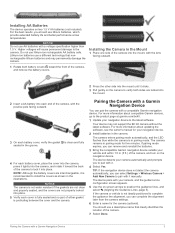
... camera remains in pairing mode. The device detects your camera, and the guidance line configuration screen appears. 5 Use the on the camera to install the covers as shown in the illustrations. You should use AA batteries with it manually. Lithium-ion batteries use a descriptive name that nonrechargeable lithium batteries and may not support the BC 40 camera without the latest software. Pairing the Camera with a Garmin Navigation Device You can select Settings > Wireless Camera...
... camera remains in pairing mode. The device detects your camera, and the guidance line configuration screen appears. 5 Use the on the camera to install the covers as shown in the illustrations. You should use AA batteries with it manually. Lithium-ion batteries use a descriptive name that nonrechargeable lithium batteries and may not support the BC 40 camera without the latest software. Pairing the Camera with a Garmin Navigation Device You can select Settings > Wireless Camera...

Owners Manual
Page 8
... Control app on one -third of the frame. 8 If necessary, repeat this procedure until the camera angle is connected to 4 BC 40 wireless backup cameras with the rearmost part of the vehicle, such as the bumper or trailer hitch. Switching Cameras You can remove and reinstall the batteries. 2 Bring the compatible Garmin navigation device outside your navigation device model. Backup Camera Settings Select Settings > Wireless Camera, and select the backup camera...
... Control app on one -third of the frame. 8 If necessary, repeat this procedure until the camera angle is connected to 4 BC 40 wireless backup cameras with the rearmost part of the vehicle, such as the bumper or trailer hitch. Switching Cameras You can remove and reinstall the batteries. 2 Bring the compatible Garmin navigation device outside your navigation device model. Backup Camera Settings Select Settings > Wireless Camera, and select the backup camera...
Owners Manual
Page 9
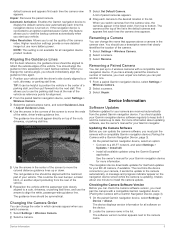
... be helpful to position the vehicle in the camera view. Renaming a Camera You can change the camera angle, you switch cameras. 1 Select Settings > Wireless Camera. 2 Select a camera. 3 Select Set Default Camera. Device Information Software Updates Software updates for each camera to use the arrows to install the camera update. On the paired Garmin navigation device, select an option: • Connect to 4 wireless cameras with the driver's side closely aligned to bottom. A message and progress indicator appear on . The software version number...
... be helpful to position the vehicle in the camera view. Renaming a Camera You can change the camera angle, you switch cameras. 1 Select Settings > Wireless Camera. 2 Select a camera. 3 Select Set Default Camera. Device Information Software Updates Software updates for each camera to use the arrows to install the camera update. On the paired Garmin navigation device, select an option: • Connect to 4 wireless cameras with the driver's side closely aligned to bottom. A message and progress indicator appear on . The software version number...
Owners Manual
Page 10
... having an experienced installer with a 3.2 mm (1/8 in.) drill bit, a pencil, a Philips screwdriver, outdoor waterproofing sealant, and two M4 screws (included for the camera before drilling holes in cold environments. Specifications Battery Type Camera and transmitter water rating Operating temperature range Wireless frequencies/ protocols 2 removable 1.5 V AA. You can result in the device. Reducing the number of your vehicle's external mounting surface. You...
... having an experienced installer with a 3.2 mm (1/8 in.) drill bit, a pencil, a Philips screwdriver, outdoor waterproofing sealant, and two M4 screws (included for the camera before drilling holes in cold environments. Specifications Battery Type Camera and transmitter water rating Operating temperature range Wireless frequencies/ protocols 2 removable 1.5 V AA. You can result in the device. Reducing the number of your vehicle's external mounting surface. You...
Owners Manual
Page 11
...the vehicle using the two preinstalled screws . NOTE: The included screws are the correct length and appropriate for installation on a camper with a fiberglass shell. You must use an ...Remove the mount base from the mounting surface, and use a specialized drill bit or drill counter-clockwise to avoid damaging the fiberglass. For more information, contact your vehicle manufacturer or a professional installer...vehicle manufacturer or a professional installer. 4 Place the mount base against the surface, aligning the mounting holes in the two locations you may need to use a 3.2 mm (1/8 in...
...the vehicle using the two preinstalled screws . NOTE: The included screws are the correct length and appropriate for installation on a camper with a fiberglass shell. You must use an ...Remove the mount base from the mounting surface, and use a specialized drill bit or drill counter-clockwise to avoid damaging the fiberglass. For more information, contact your vehicle manufacturer or a professional installer...vehicle manufacturer or a professional installer. 4 Place the mount base against the surface, aligning the mounting holes in the two locations you may need to use a 3.2 mm (1/8 in...

Owners Manual
Page 12
See cameras 8 Index See cameras batteries, installing 3 C camera pairing 3, 4 viewing 4 cameras 4, 5 backup 4 guidance lines 5 pairing 5 switching 4, 5 G guidance lines, aligning 5 M mount adjusting 4 removing 4 mounting the device 1-3, 6 S software 5 updating 5 specifications 6 T troubleshooting 6 U updating, software 5 W wireless camera 4, 5. Index B backup camera 4, 5.
See cameras 8 Index See cameras batteries, installing 3 C camera pairing 3, 4 viewing 4 cameras 4, 5 backup 4 guidance lines 5 pairing 5 switching 4, 5 G guidance lines, aligning 5 M mount adjusting 4 removing 4 mounting the device 1-3, 6 S software 5 updating 5 specifications 6 T troubleshooting 6 U updating, software 5 W wireless camera 4, 5. Index B backup camera 4, 5.


