Getting Started
Page 4
... use of the Package...5 1.2. Connecting ScanSnap...6 2.1. Scanning Documents ...9 3.2. About PDF Thumbnail View...11 3.7. Clearing Paper Jams ...15 5. The contents of the scanner ...16 5.4. PFU LIMITED assumes no ...Documents...9 3.4. IF THIS PRODUCT IS NOT USED CORRECTLY, UNEXPECTED INJURY MAY BE CAUSED TO USERS OR BYSTANDERS. Troubleshooting Checklist ...12 4.2. Daily Care ...16 5.1. Replacing the Pad ASSY...18 6.3. READ THIS ENTIRE MANUAL CAREFULLY BEFORE USING THIS PRODUCT. Connecting the Scanner ...7 2.2.1. Part Numbers and Replacement Cycle of Parts...
... use of the Package...5 1.2. Connecting ScanSnap...6 2.1. Scanning Documents ...9 3.2. About PDF Thumbnail View...11 3.7. Clearing Paper Jams ...15 5. The contents of the scanner ...16 5.4. PFU LIMITED assumes no ...Documents...9 3.4. IF THIS PRODUCT IS NOT USED CORRECTLY, UNEXPECTED INJURY MAY BE CAUSED TO USERS OR BYSTANDERS. Troubleshooting Checklist ...12 4.2. Daily Care ...16 5.1. Replacing the Pad ASSY...18 6.3. READ THIS ENTIRE MANUAL CAREFULLY BEFORE USING THIS PRODUCT. Connecting the Scanner ...7 2.2.1. Part Numbers and Replacement Cycle of Parts...
Getting Started
Page 6
...fi-5110EOX2 wid folgendes bescheinigt: • In Übereinsstimmung mit den Bestimmungen der EN45014(CE) funkentstört • Maschinenlärminformationsverordnung 3. The program backs the development and dissemination of products with the Class B limits of Part 15 of the scanner hardware and ScanSnap.... - Changes or modifications not expressly approved by one or more of energy efficient computers and other office equipment. ScanSnap fi-5110EOX2 Operator's Guide (PDF manual included in a particular installation. International ENERGY STAR® Program As an ENERGY STAR®...
...fi-5110EOX2 wid folgendes bescheinigt: • In Übereinsstimmung mit den Bestimmungen der EN45014(CE) funkentstört • Maschinenlärminformationsverordnung 3. The program backs the development and dissemination of products with the Class B limits of Part 15 of the scanner hardware and ScanSnap.... - Changes or modifications not expressly approved by one or more of energy efficient computers and other office equipment. ScanSnap fi-5110EOX2 Operator's Guide (PDF manual included in a particular installation. International ENERGY STAR® Program As an ENERGY STAR®...
Getting Started
Page 7
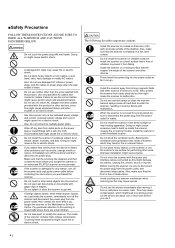
... while referring to the User's Manual of the scanner application you purchased the scanner or an authorized FUJITSU Image Scanner service provider to make repairs to this manual, ...ScanSnap Manager, CardMinder, PDF Thumbnail View, ScanSnap Organizer and Adobe Acrobat. The surrounding area where this scanner. ScanSnap fi-5110EOX2 Getting Started | 3 Contact the store where you are for damages arising from the scanner... not incinerate, crush, or shred the scanner. • Do not breathe the chemical liquid contained in the scanner parts. „ Conventions Warning Indications Used In...
... while referring to the User's Manual of the scanner application you purchased the scanner or an authorized FUJITSU Image Scanner service provider to make repairs to this manual, ...ScanSnap Manager, CardMinder, PDF Thumbnail View, ScanSnap Organizer and Adobe Acrobat. The surrounding area where this scanner. ScanSnap fi-5110EOX2 Getting Started | 3 Contact the store where you are for damages arising from the scanner... not incinerate, crush, or shred the scanner. • Do not breathe the chemical liquid contained in the scanner parts. „ Conventions Warning Indications Used In...
Getting Started
Page 8
..., turn off the scanner and unplug the power cable before you bought the scanner or an authorized FUJITSU scanner service provider. If you bought the scanner or the Maintenance Service Center. Make sure that none of its power plug. Do not scan wet documents or documents with wet hands. Pay... supplied with the power and interface cables connected as smoke, strange smells or noises, immediately turn off the scanner and then disconnect its parts protrude outside of scanner, which might damage the cables, causing fire, electric shock or injuries. Do not use cables other devices....
..., turn off the scanner and unplug the power cable before you bought the scanner or an authorized FUJITSU scanner service provider. If you bought the scanner or the Maintenance Service Center. Make sure that none of its power plug. Do not scan wet documents or documents with wet hands. Pay... supplied with the power and interface cables connected as smoke, strange smells or noises, immediately turn off the scanner and then disconnect its parts protrude outside of scanner, which might damage the cables, causing fire, electric shock or injuries. Do not use cables other devices....
Getting Started
Page 9
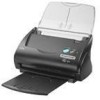
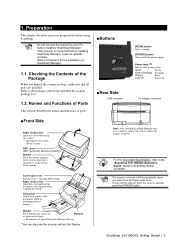
... the [POWER] button. Refer to the HINT "ScanSnap fi-5110EOX2 Operator's Guide" stored in the figure. → Documents are included. Stacker For using this lever to the documents width for the installation of the scanner. 1. Cover open lever Pull this part, pull it will not operate correctly. Checking the Contents of parts. „ Rear Side USB connector [SCAN...
... the [POWER] button. Refer to the HINT "ScanSnap fi-5110EOX2 Operator's Guide" stored in the figure. → Documents are included. Stacker For using this lever to the documents width for the installation of the scanner. 1. Cover open lever Pull this part, pull it will not operate correctly. Checking the Contents of parts. „ Rear Side USB connector [SCAN...
Getting Started
Page 20
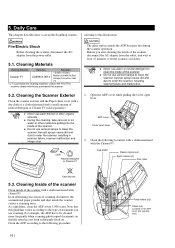
...scanner, resulting in scanner failure, scanner malfunction and image error. 1. 5. Cleaning Materials Cleaning Materials Parts No. Cleaning Inside of the scanner Clean inside of the scanner...the inside of the scanner with a cloth moistened with this guideline varies according to clean the scanner. Remarks 1 bottle... documents on that this fluid and wipe the scanner clean. (*1) *1) To purchase the cleaning material, contact the FUJITSU scanner... the scanner, disconnect the AC adapter from the power outlet. 5.1. CAUTION The glass surface inside the scanner causes ...
...scanner, resulting in scanner failure, scanner malfunction and image error. 1. 5. Cleaning Materials Cleaning Materials Parts No. Cleaning Inside of the scanner Clean inside of the scanner...the inside of the scanner with a cloth moistened with this guideline varies according to clean the scanner. Remarks 1 bottle... documents on that this fluid and wipe the scanner clean. (*1) *1) To purchase the cleaning material, contact the FUJITSU scanner... the scanner, disconnect the AC adapter from the power outlet. 5.1. CAUTION The glass surface inside the scanner causes ...
Getting Started
Page 22
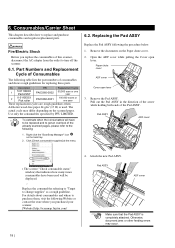
...ScanSnap Manager" icon S on the Paper chute cover. 2. Remove the documents on the task tray. 2. Otherwise, document jams or other feeding errors may differ depending on the scanned paper. Click [Check consumable supplies] at the menu. 6.2. Description P/N Replacement Cycle 1 fi-5110EOX Pad ASSY PA03360-0002 50,000 scan or one year 2 fi... Attach the new Pad ASSY. 6. WARNING Fire/Electric Shock Before you purchased your scanner. [Website] http://scansnap.fujitsu.com/ 4. Part Numbers and Replacement Cycle of the Pad ASSY. Use only the consumables specified by PFU...
...ScanSnap Manager" icon S on the Paper chute cover. 2. Remove the documents on the task tray. 2. Otherwise, document jams or other feeding errors may differ depending on the scanned paper. Click [Check consumable supplies] at the menu. 6.2. Description P/N Replacement Cycle 1 fi-5110EOX Pad ASSY PA03360-0002 50,000 scan or one year 2 fi... Attach the new Pad ASSY. 6. WARNING Fire/Electric Shock Before you purchased your scanner. [Website] http://scansnap.fujitsu.com/ 4. Part Numbers and Replacement Cycle of the Pad ASSY. Use only the consumables specified by PFU...
Getting Started
Page 23
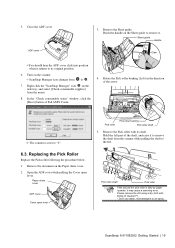
... to S . 7. Right click the "ScanSnap Manager" icon S on the scanner. Ö ScanSnap Manager icon changes from the scanner while pulling the shaft to the left part of the arrow. Ö The counter is dirty by paper -powder, it returns to its shaft. Hold the left . ScanSnap fi-5110EOX2 Getting Started | 19 Remove the document on the Sheet guide to...
... to S . 7. Right click the "ScanSnap Manager" icon S on the scanner. Ö ScanSnap Manager icon changes from the scanner while pulling the shaft to the left part of the arrow. Ö The counter is dirty by paper -powder, it returns to its shaft. Hold the left . ScanSnap fi-5110EOX2 Getting Started | 19 Remove the document on the Sheet guide to...
Getting Started
Page 25
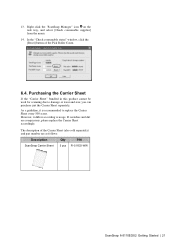
..." window, click the [Reset] button of the Carrier Sheet (also sold separately) and part number are conspicuous, please replace the Carrier Sheet accordingly. If scratches and dirt are as follows: Description Qty P/N ScanSnap Carrier Sheet 5 pcs FI-511ES-WW ScanSnap fi-5110EOX2 Getting Started | 21 The description of the Pick Roller Count. 6.4. Purchasing the Carrier Sheet...
..." window, click the [Reset] button of the Carrier Sheet (also sold separately) and part number are conspicuous, please replace the Carrier Sheet accordingly. If scratches and dirt are as follows: Description Qty P/N ScanSnap Carrier Sheet 5 pcs FI-511ES-WW ScanSnap fi-5110EOX2 Getting Started | 21 The description of the Pick Roller Count. 6.4. Purchasing the Carrier Sheet...
Operating Guide
Page 4
... and Functions of Parts 3 Front Side 3 Operation Button 4 Rear Side 4 Chapter 2 Connecting ScanSnap 5 2.1 Installing ScanSnap 6 Before Installing ScanSnap 6 Installing Adobe Acrobat 8 Installing Supplied Programs 11 2.2 Connecting ScanSnap to your PC 18 Connecting the AC Adapter 18 Connecting the USB Cable 19 Chapter 3 Basic Scanner Operations 23 3.1 Flow of Operations 24 Preparation 24 Scanning documents 25 Turning the...
... and Functions of Parts 3 Front Side 3 Operation Button 4 Rear Side 4 Chapter 2 Connecting ScanSnap 5 2.1 Installing ScanSnap 6 Before Installing ScanSnap 6 Installing Adobe Acrobat 8 Installing Supplied Programs 11 2.2 Connecting ScanSnap to your PC 18 Connecting the AC Adapter 18 Connecting the USB Cable 19 Chapter 3 Basic Scanner Operations 23 3.1 Flow of Operations 24 Preparation 24 Scanning documents 25 Turning the...
Operating Guide
Page 6
Connecting to ScanSnap 112 3.11 Updating ScanSnap Manager 116 Chapter 4 Uninstalling ScanSnap 119 4.1 Uninstalling Supplied Programs 120 Chapter 5 Troubleshooting 123 5.1 Clearing Document Jams 124 5.2 Troubleshooting Checklist 126 Chapter 6 Daily Care 133 6.1 Cleaning Materials 134 6.2 Cleaning the Scanner Exterior 135 6.3 Cleaning the Inside of Consumables 142 7.2 Replacing the Pad ASSY 144 7.3 Replacing the Pick Roller 147 7.4 Purchasing...
Connecting to ScanSnap 112 3.11 Updating ScanSnap Manager 116 Chapter 4 Uninstalling ScanSnap 119 4.1 Uninstalling Supplied Programs 120 Chapter 5 Troubleshooting 123 5.1 Clearing Document Jams 124 5.2 Troubleshooting Checklist 126 Chapter 6 Daily Care 133 6.1 Cleaning Materials 134 6.2 Cleaning the Scanner Exterior 135 6.3 Cleaning the Inside of Consumables 142 7.2 Replacing the Pad ASSY 144 7.3 Replacing the Pick Roller 147 7.4 Purchasing...
Operating Guide
Page 8
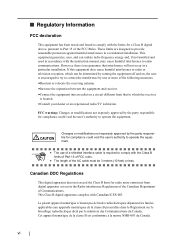
...apparatus complies with Canadian ICES-003. vi ATTENTION • The use of a shielded interface cable is required to comply with the Class B limits of Part 15 of FCC rules. • The length of the AC cable must be determined by one or more of the FCC Rules. ■ Regulatory... tested and found to comply with the limits for compliance could void the user's authority to operate the equipment. These limits are designed to Part 15 of the following measures: •Reorient or relocate the receiving antenna. •Increase the separation between the equipment and receiver. •...
...apparatus complies with Canadian ICES-003. vi ATTENTION • The use of a shielded interface cable is required to comply with the Class B limits of Part 15 of FCC rules. • The length of the AC cable must be determined by one or more of the FCC Rules. ■ Regulatory... tested and found to comply with the limits for compliance could void the user's authority to operate the equipment. These limits are designed to Part 15 of the following measures: •Reorient or relocate the receiving antenna. •Increase the separation between the equipment and receiver. •...

Operating Guide
Page 10
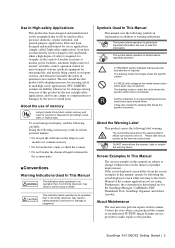
... serious personal injuries: •Do not put the substance in the lamp in high-safety applications, and for any liability for ensuring safety in the scanner parts. It has not been designed and manufactured for use of all warranties regarding the information contained herein, whether expressed, implied, or statutory. Hg posed...Use in High-safety Applications This product has been designed and manufactured on ) that it contains mercury. •Do not incinerate, crush, or shred the scanner. •Do not breathe the chemical liquid contained in such high-safety applications. viii
... serious personal injuries: •Do not put the substance in the lamp in high-safety applications, and for any liability for ensuring safety in the scanner parts. It has not been designed and manufactured for use of all warranties regarding the information contained herein, whether expressed, implied, or statutory. Hg posed...Use in High-safety Applications This product has been designed and manufactured on ) that it contains mercury. •Do not incinerate, crush, or shred the scanner. •Do not breathe the chemical liquid contained in such high-safety applications. viii

Operating Guide
Page 14
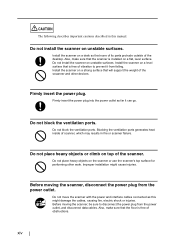
...use the AC cable provided with a soft, dry cloth. Wipe off any dust from metal parts on AC cables, or pull, bend, twist, heat, damage or modify AC cables. Doing ...Also, do not use the correct cables might cause fire or electric shock. Use this scanner only at the indicated power voltage and current. Do not place heavy objects on the power plug or ...metal fittings with this scanner for other troubles or an electric shock. Use this scanner only at the indicated power voltage. A damaged AC cable may cause fire or ...
...use the AC cable provided with a soft, dry cloth. Wipe off any dust from metal parts on AC cables, or pull, bend, twist, heat, damage or modify AC cables. Doing ...Also, do not use the correct cables might cause fire or electric shock. Use this scanner only at the indicated power voltage and current. Do not place heavy objects on the power plug or ...metal fittings with this scanner for other troubles or an electric shock. Use this scanner only at the indicated power voltage. A damaged AC cable may cause fire or ...
Operating Guide
Page 16
... surface. Also, make sure that the scanner is installed on the scanner or use the scanner's top surface for performing other devices. Before moving the scanner, be sure to prevent it can go. Install the scanner on a level surface that none of its parts protrude outside of obstructions. Install the scanner on a desk so that is free...
... surface. Also, make sure that the scanner is installed on the scanner or use the scanner's top surface for performing other devices. Before moving the scanner, be sure to prevent it can go. Install the scanner on a level surface that none of its parts protrude outside of obstructions. Install the scanner on a desk so that is free...

Operating Guide
Page 19
Chapter 1 Before You Start Using Your Scanner 1 This chapter describes the necessary preparations before using ScanSnap. 1.1 Checking the Contents of the Scanner Package 2 1.2 Names and Functions of Parts 3 ScanSnap fi-5110EOX2 Operator's Guide 1
Chapter 1 Before You Start Using Your Scanner 1 This chapter describes the necessary preparations before using ScanSnap. 1.1 Checking the Contents of the Scanner Package 2 1.2 Names and Functions of Parts 3 ScanSnap fi-5110EOX2 Operator's Guide 1

Operating Guide
Page 20
1.1 Checking the Contents of the Scanner Package When you unpack the scanner package, make sure that the package contains all the parts on the list included in the package. 2
1.1 Checking the Contents of the Scanner Package When you unpack the scanner package, make sure that the package contains all the parts on the list included in the package. 2
Operating Guide
Page 21
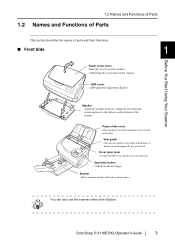
...guides to be scanned on this lever towards you. HINT ScanSnap fi-5110EOX2 Operator's Guide 3 Paper chute cover After opening it out as shown. Stacker Before using the stacker, pull it , load the documents to the width of documents so that the scanned imageswill not get skewed. Adjust ...unit. 1.2 Names and Functions of Parts 1.2 Names and Functions of Parts This section describes the names of parts and their functions. ■ Front Side 1 Paper chute cover Open the cover to use the scanner without the Stacker. You can also use the scanner. ⇒Opening the cover turns on...
...guides to be scanned on this lever towards you. HINT ScanSnap fi-5110EOX2 Operator's Guide 3 Paper chute cover After opening it out as shown. Stacker Before using the stacker, pull it , load the documents to the width of documents so that the scanned imageswill not get skewed. Adjust ...unit. 1.2 Names and Functions of Parts 1.2 Names and Functions of Parts This section describes the names of parts and their functions. ■ Front Side 1 Paper chute cover Open the cover to use the scanner without the Stacker. You can also use the scanner. ⇒Opening the cover turns on...
Operating Guide
Page 50
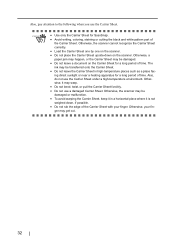
...Sheet. ing direct sunlight or near a heating apparatus for a long period of time. ger may be damaged. • Do not leave a document on the Carrier Sheet for a long period of time. Also, pay attention to the following when you use the Carrier Sheet under a high-...Load the Carrier Sheet one by one on the scanner. Otherwise, the scanner may get cut. 32 Otherwise, your finger. ATTENTION • Use only the Carrier Sheet for ScanSnap. • Avoid writing, coloring, staining or cutting the black and white pattern part of the Carrier Sheet with your fin- Also...
...Sheet. ing direct sunlight or near a heating apparatus for a long period of time. ger may be damaged. • Do not leave a document on the Carrier Sheet for a long period of time. Also, pay attention to the following when you use the Carrier Sheet under a high-...Load the Carrier Sheet one by one on the scanner. Otherwise, the scanner may get cut. 32 Otherwise, your finger. ATTENTION • Use only the Carrier Sheet for ScanSnap. • Avoid writing, coloring, staining or cutting the black and white pattern part of the Carrier Sheet with your fin- Also...
Operating Guide
Page 54
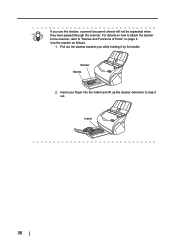
Stacker Handle 2. Indent 36 If you while holding it out. For details on how to attach the stacker to the scanner, refer to clap it by its handle. Use the stacker as follows. 1. Pull out the stacker towards you use the stacker, scanned document sheets will not be separated when HINT they have passed through the scanner. Insert your finger into the indent and lift up the stacker extension to "Names and Functions of Parts" on page 3.
Stacker Handle 2. Indent 36 If you while holding it out. For details on how to attach the stacker to the scanner, refer to clap it by its handle. Use the stacker as follows. 1. Pull out the stacker towards you use the stacker, scanned document sheets will not be separated when HINT they have passed through the scanner. Insert your finger into the indent and lift up the stacker extension to "Names and Functions of Parts" on page 3.


