Getting Started
Page 8
...electric shock. Install the scanner on a strong surface that none of obstructions. Also, protect the scanner from the power outlet, then contact the store where you bought the scanner or an authorized FUJITSU scanner service provider. Aerosol ...power outlet as this might cause equipment failure and other than the ones supplied with this may cause fire or electric shock. Doing so might cause fire or electric shock. Do not install the scanner in locations subject to enter the scanner, resulting in households where there are small children. Do not scan wet documents...
...electric shock. Install the scanner on a strong surface that none of obstructions. Also, protect the scanner from the power outlet, then contact the store where you bought the scanner or an authorized FUJITSU scanner service provider. Aerosol ...power outlet as this might cause equipment failure and other than the ones supplied with this may cause fire or electric shock. Doing so might cause fire or electric shock. Do not install the scanner in locations subject to enter the scanner, resulting in households where there are small children. Do not scan wet documents...
Getting Started
Page 9
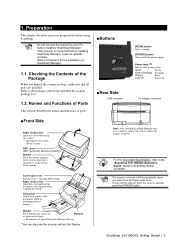
... /close the Paper chute cover. If the scanner is connected before using this lever to the hollows on /off the power supply. Cover open lever Pull this part, pull it will not operate correctly. 1. Refer to the HINT "ScanSnap fi-5110EOX2 Operator's Guide" stored in the figure. → Documents are included. Names and Functions of Parts This...
... /close the Paper chute cover. If the scanner is connected before using this lever to the hollows on /off the power supply. Cover open lever Pull this part, pull it will not operate correctly. 1. Refer to the HINT "ScanSnap fi-5110EOX2 Operator's Guide" stored in the figure. → Documents are included. Names and Functions of Parts This...
Getting Started
Page 12
...[Next >] button in the task tray is displayed as , press the [POWER] button to turn off the scanner and then press the [POWER] button again to connect the USB cable. ● Use the USB cable supplied with a commercially available USB cable is complete! If you turn off /on... the scanner. Ö Your computer will be sure to connect the scanner to the hub nearest to the scanner inlet and a power outlet. Remove the seal from the second stage onwards, ScanSnap may not operate ...
...[Next >] button in the task tray is displayed as , press the [POWER] button to turn off the scanner and then press the [POWER] button again to connect the USB cable. ● Use the USB cable supplied with a commercially available USB cable is complete! If you turn off /on... the scanner. Ö Your computer will be sure to connect the scanner to the hub nearest to the scanner inlet and a power outlet. Remove the seal from the second stage onwards, ScanSnap may not operate ...

Getting Started
Page 16
... the scanner, or contact an authorized FUJITSU scanner service provider. Correctly connect the USB cable. (When a hub is used , directly connect ScanSnap to remedy them again. (Note: Please wait at (*2) Close the "Scan and Save Settings" window, and scan the document. 12...scanner. Symptom The scanner cannot be turned off when Windows is opened.) Remedy Correctly connect the AC/USB cable and AC adapter. Is ScanSnap Manager started successfully, the "ScanSnap Manager" icon S appears on . If an USB hub is started ? (If ScanSnap Manager is used , check the hub's power supply...
... the scanner, or contact an authorized FUJITSU scanner service provider. Correctly connect the USB cable. (When a hub is used , directly connect ScanSnap to remedy them again. (Note: Please wait at (*2) Close the "Scan and Save Settings" window, and scan the document. 12...scanner. Symptom The scanner cannot be turned off when Windows is opened.) Remedy Correctly connect the AC/USB cable and AC adapter. Is ScanSnap Manager started successfully, the "ScanSnap Manager" icon S appears on . If an USB hub is started ? (If ScanSnap Manager is used , check the hub's power supply...

Operating Guide
Page 22
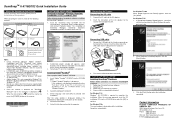
Blinking :Scanning Orange; Green; Lighting :Error Light off :Power off the power supply. Power lamp Indicates the scanner status. ■ Operation Button SCAN POWER DUPLEX COLOR ■ Rear Side [SCAN] button Press this button to start the scanning. [POWER] button Turns on/off USB connector AC adapter connector Seal (informing you that the installation of the software has to be performed first) After installing the software, remove this seal. 4 Lighting :Ready Green;
Blinking :Scanning Orange; Green; Lighting :Error Light off :Power off the power supply. Power lamp Indicates the scanner status. ■ Operation Button SCAN POWER DUPLEX COLOR ■ Rear Side [SCAN] button Press this button to start the scanning. [POWER] button Turns on/off USB connector AC adapter connector Seal (informing you that the installation of the software has to be performed first) After installing the software, remove this seal. 4 Lighting :Ready Green;

Operating Guide
Page 36
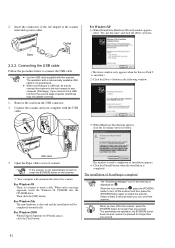
...Do not use cables other than the ones supplied with this product. Connect the AC adapter to the AC adapter connector on ScanSnap and to the AC adapter. Connect ScanSnap to a power outlet using the USB cable. Connect the AC cable to a power outlet. ATTENTION • Be sure to...refer to your PC using the AC cable. 2. Connect ScanSnap to your PC. 1. The following describes each of the above two procedures. ■ Connecting the AC Adapter Connect the power cable as shown below to connect ScanSnap to "Installing ScanSnap" (page 6)). Outlet Inlet 18 Use only specified AC...
...Do not use cables other than the ones supplied with this product. Connect the AC adapter to the AC adapter connector on ScanSnap and to the AC adapter. Connect ScanSnap to a power outlet using the USB cable. Connect the AC cable to a power outlet. ATTENTION • Be sure to...refer to your PC using the AC cable. 2. Connect ScanSnap to your PC. 1. The following describes each of the above two procedures. ■ Connecting the AC Adapter Connect the power cable as shown below to connect ScanSnap to "Installing ScanSnap" (page 6)). Outlet Inlet 18 Use only specified AC...

Operating Guide
Page 40
...PC to your PC if the paper chute cover is closed. Opening /closing the paper chute cover when the scanner is pressed for the "ScanSnap Manager" icon on the scanner, press the [POWER] button for longer than one second. ATTENTION It may take some time for longer than HINT one second. ... on even when you can simply turn off/on the task bar to your PC. 22 Generally, you have switched on the scanner when the icon remains as S . The power supply of 5 seconds. The "Found New Hardware Wizard" dialog box informing you that the Wizard will not be displayed as S ....
...PC to your PC if the paper chute cover is closed. Opening /closing the paper chute cover when the scanner is pressed for the "ScanSnap Manager" icon on the scanner, press the [POWER] button for longer than one second. ATTENTION It may take some time for longer than HINT one second. ... on even when you can simply turn off/on the task bar to your PC. 22 Generally, you have switched on the scanner when the icon remains as S . The power supply of 5 seconds. The "Found New Hardware Wizard" dialog box informing you that the Wizard will not be displayed as S ....

Operating Guide
Page 145
...3. Close the "Scan and Save Settings" window, and scan the document. If none of the ADF following the instructions in the "Scan and Save Settings" window. Load the document correctly. Troubleshooting 5 ScanSnap fi-5110EOX2 Operator's Guide 127 Check This Item Is the USB cable connected correctly...seconds before turning on the task bar.) Is ScanSnap Manager running normally, the "ScanSnap Manager" icon in the scanned image. Is the document loaded correctly? The scanned image shifts or is being used , check the hub's power supply.) Disconnect and then re-connect the AC ...
...3. Close the "Scan and Save Settings" window, and scan the document. If none of the ADF following the instructions in the "Scan and Save Settings" window. Load the document correctly. Troubleshooting 5 ScanSnap fi-5110EOX2 Operator's Guide 127 Check This Item Is the USB cable connected correctly...seconds before turning on the task bar.) Is ScanSnap Manager running normally, the "ScanSnap Manager" icon in the scanned image. Is the document loaded correctly? The scanned image shifts or is being used , check the hub's power supply.) Disconnect and then re-connect the AC ...
Operating Guide
Page 148
... hidden files and folders] under : ⇒ c:Program Files/PFU/ScanSnap/ After you can check if the fi5110e.INT and fi5110e.PNF files are powered on computer name an perform "Scan for hardware changes". (*2) - In...Documents and Settings//Application Data/PFU/ Delete the folder Driver under: ⇒ c:Program Files/PFU/ScanSnap/ For Windows 98, ME: Delete the folder Driver under [Hidden files and folders] is recognized as unknown device. Close ScanSnap Manager - Confirm PC and ScanSnap are existing. From Device Manager, check if ScanSnap is marked. Go to "4.1 Uninstalling Supplied...
... hidden files and folders] under : ⇒ c:Program Files/PFU/ScanSnap/ After you can check if the fi5110e.INT and fi5110e.PNF files are powered on computer name an perform "Scan for hardware changes". (*2) - In...Documents and Settings//Application Data/PFU/ Delete the folder Driver under: ⇒ c:Program Files/PFU/ScanSnap/ For Windows 98, ME: Delete the folder Driver under [Hidden files and folders] is recognized as unknown device. Close ScanSnap Manager - Confirm PC and ScanSnap are existing. From Device Manager, check if ScanSnap is marked. Go to "4.1 Uninstalling Supplied...

Operating Guide
Page 173
Appendix A Installation Specifications The following table summarizes the installation specifications of phases Frequency During operation During standby Scanner state Temperature Humidity (%) Note) Dimensions Specifications Width Depth 284 mm 11.18 in. 146 mm 5.75 in. 284 mm 11.18...;F) 8-95 A 152 (5.984 in) 302 (11.89 in) 284 (11.18 in) 240 (9.45 in) 480 (18.90 in) 94 (3.70 in) ScanSnap fi-5110EOX2 Operator's Guide 155 Dimensions (Note) Item Minimum Maximum Weight Input power supply Power consumption Temperature/ Humidity Allowable Ranges Voltage Number of this scanner.
Appendix A Installation Specifications The following table summarizes the installation specifications of phases Frequency During operation During standby Scanner state Temperature Humidity (%) Note) Dimensions Specifications Width Depth 284 mm 11.18 in. 146 mm 5.75 in. 284 mm 11.18...;F) 8-95 A 152 (5.984 in) 302 (11.89 in) 284 (11.18 in) 240 (9.45 in) 480 (18.90 in) 94 (3.70 in) ScanSnap fi-5110EOX2 Operator's Guide 155 Dimensions (Note) Item Minimum Maximum Weight Input power supply Power consumption Temperature/ Humidity Allowable Ranges Voltage Number of this scanner.
Quick Installation Guide
Page 1
....fujitsu.com/ E-mail: info@fcpa.fujitsu.com Remove fi-4110EOX2 hardware and driver prior to connecting fi-5110EOX2 scanner. • When using "Windows Explorer". 2. Restart your PC is displayed. Scanner ...® XP, log on the screen to the scanner inlet and power outlet. "ScanSnap Setup" window appears. Installshield wizard's window will be...POWER] button on the scanner. 2. ScanSnapTM INSTALLATION Installing ScanSnapTM Hardware Follow below procedure to the AC adapter. 2. Connecting the Scanner Connecting the AC cable 1. Insert the other than the ones supplied...
....fujitsu.com/ E-mail: info@fcpa.fujitsu.com Remove fi-4110EOX2 hardware and driver prior to connecting fi-5110EOX2 scanner. • When using "Windows Explorer". 2. Restart your PC is displayed. Scanner ...® XP, log on the screen to the scanner inlet and power outlet. "ScanSnap Setup" window appears. Installshield wizard's window will be...POWER] button on the scanner. 2. ScanSnapTM INSTALLATION Installing ScanSnapTM Hardware Follow below procedure to the AC adapter. 2. Connecting the Scanner Connecting the AC cable 1. Insert the other than the ones supplied...