
User Guide
Page 4
... 46 Internal LAN (RJ-45) jack 46 Docking Port 46 Universal Serial Bus Ports 46 Microphone Jack 46 Headphone Jack 46 External Video Port 47 5 TROUBLESHOOTING Troubleshooting Identifying the Problem 51 Specific Problems 51 Troubleshooting Table 52 Power On Self Test Messages 58 Modem Result Codes 59 Restoring Pre-installed Software Restoring the Factory Image 60 Automatically Downloading Driver Updates. . . . 61 6 CARE AND MAINTENANCE Care and Maintenance LifeBook P Series NoteBook/Tablet PC 65 Keyboard 66 Batteries 66 Optional Floppy Disk Drive and Floppy Disks . . . 66...
... 46 Internal LAN (RJ-45) jack 46 Docking Port 46 Universal Serial Bus Ports 46 Microphone Jack 46 Headphone Jack 46 External Video Port 47 5 TROUBLESHOOTING Troubleshooting Identifying the Problem 51 Specific Problems 51 Troubleshooting Table 52 Power On Self Test Messages 58 Modem Result Codes 59 Restoring Pre-installed Software Restoring the Factory Image 60 Automatically Downloading Driver Updates. . . . 61 6 CARE AND MAINTENANCE Care and Maintenance LifeBook P Series NoteBook/Tablet PC 65 Keyboard 66 Batteries 66 Optional Floppy Disk Drive and Floppy Disks . . . 66...
User Guide
Page 9
...], [Enter] and [Ctrl]. Go to Start -> Fujitsu Weblinks -> Fujitsu Service and Support. Please read all caution information carefully. Please read all warning information carefully. 3 Example: Shutdown the computer? Pages with an active-matrix (TFT) color LCD display. WARRANTY Your LifeBook P Series notebook/Tablet PC is a completely self-contained unit with additional information about possible hazards that have an active internet connection to use the online URL links. This manual...
...], [Enter] and [Ctrl]. Go to Start -> Fujitsu Weblinks -> Fujitsu Service and Support. Please read all caution information carefully. Please read all warning information carefully. 3 Example: Shutdown the computer? Pages with an active-matrix (TFT) color LCD display. WARRANTY Your LifeBook P Series notebook/Tablet PC is a completely self-contained unit with additional information about possible hazards that have an active internet connection to use the online URL links. This manual...

User Guide
Page 14
...Replicator Security lock slot Suspend/Resume button Local Area Network (LAN) Battery Release Latch Wireless LAN/ Bluetooth On-Off Switch Display Rotation Connect stereo headphones or powered external speakers. Connect the port replicator or other approved docking device. This icon indicates the direction in an external microphone. Connect an external microphone. The Suspend/Resume button allows you to transfer data to install a flash memory card for data storage. The wireless LAN switch allows you to log onto the system using your fingerprint as the "password". The table...
...Replicator Security lock slot Suspend/Resume button Local Area Network (LAN) Battery Release Latch Wireless LAN/ Bluetooth On-Off Switch Display Rotation Connect stereo headphones or powered external speakers. Connect the port replicator or other approved docking device. This icon indicates the direction in an external microphone. Connect an external microphone. The Suspend/Resume button allows you to transfer data to install a flash memory card for data storage. The wireless LAN switch allows you to log onto the system using your fingerprint as the "password". The table...

User Guide
Page 23
... repeatedly will open. Using Control Panel to approximately mid-level by default. If using the keyboard changes the system setting (i.e., the settings you may want to adjust the brightness level of the screen. There are three ways to Adjust Brightness Adjusting the brightness using battery power your brightness setting is set to Adjust Brightness Windows XP Pro: To adjust brightness with the Tablet and Pen Settings utility, click Start -> Control Panel -> Tablet and Pen Settings, then select the Display tab. Rotating the display Figure 2-14. Display rotated completely Getting...
... repeatedly will open. Using Control Panel to approximately mid-level by default. If using the keyboard changes the system setting (i.e., the settings you may want to adjust the brightness level of the screen. There are three ways to Adjust Brightness Adjusting the brightness using battery power your brightness setting is set to Adjust Brightness Windows XP Pro: To adjust brightness with the Tablet and Pen Settings utility, click Start -> Control Panel -> Tablet and Pen Settings, then select the Display tab. Rotating the display Figure 2-14. Display rotated completely Getting...

User Guide
Page 26
...Four of your LifeBook P Series notebook/ Tablet PC is Calculator. 20 See "Changing Button Functions" on page 21. Secondary Function (Fn + Button) Page Down User-defined Application A Default = Calculator Page Up User-Defined Application B Windows XP Professional Default = WordPad Windows XP Tablet PC Edition Default = MS Journal Screen Rotation VGA-Out Secondary Function Selection Fujitsu Menu Utility Ctl+Alt+Del Button None Table 2-2. The default application for specific functions. LifeBook P Series notebook/Tablet PC application buttons LifeBook Application Panel A unique...
...Four of your LifeBook P Series notebook/ Tablet PC is Calculator. 20 See "Changing Button Functions" on page 21. Secondary Function (Fn + Button) Page Down User-defined Application A Default = Calculator Page Up User-Defined Application B Windows XP Professional Default = WordPad Windows XP Tablet PC Edition Default = MS Journal Screen Rotation VGA-Out Secondary Function Selection Fujitsu Menu Utility Ctl+Alt+Del Button None Table 2-2. The default application for specific functions. LifeBook P Series notebook/Tablet PC application buttons LifeBook Application Panel A unique...

User Guide
Page 36
... may be asked for a password before the BIOS main menu will perform a Power On Self Test (POST) to check the internal parts and configuration for starting the operating system or by entering the BIOS setup utility and revising the settings. The BIOS Setup Utility configures: ■ Device control feature parameters, such as changing I/O addresses and boot devices. ■ System Data Security feature parameters, such as passwords. Once there, select LifeBook BIOS Guides from the Windows Shut Down dialog box...
... may be asked for a password before the BIOS main menu will perform a Power On Self Test (POST) to check the internal parts and configuration for starting the operating system or by entering the BIOS setup utility and revising the settings. The BIOS Setup Utility configures: ■ Device control feature parameters, such as changing I/O addresses and boot devices. ■ System Data Security feature parameters, such as passwords. Once there, select LifeBook BIOS Guides from the Windows Shut Down dialog box...
User Guide
Page 37
... power on the screens carefully and fill in the information as wireless client software from the Windows operating system, it allows your system to be asked if you to enter a name and description for your notebook/Tablet PC. ■ If you reject the terms of the license agreement you will be updated automatically whenever an important change an available connection at a later time...
... power on the screens carefully and fill in the information as wireless client software from the Windows operating system, it allows your system to be asked if you to enter a name and description for your notebook/Tablet PC. ■ If you reject the terms of the license agreement you will be updated automatically whenever an important change an available connection at a later time...

User Guide
Page 48
... a protective plug inserted in the slot. Insert your CF Card. Some available Compact Flash Cards: ■ Memory cards ■ Fax/data modem cards ■ Local area network (LAN) cards For further information, refer to the instructions supplied with your Compact Flash Card into the slot firmly until it is ejected, remove it from your notebook/ Tablet PC to prevent system contamination. LifeBook P Series Notebook/Tablet PC Compact Flash Card Slot Compact Flash Card Compact Flash Card Eject Button Figure 4-6.
... a protective plug inserted in the slot. Insert your CF Card. Some available Compact Flash Cards: ■ Memory cards ■ Fax/data modem cards ■ Local area network (LAN) cards For further information, refer to the instructions supplied with your Compact Flash Card into the slot firmly until it is ejected, remove it from your notebook/ Tablet PC to prevent system contamination. LifeBook P Series Notebook/Tablet PC Compact Flash Card Slot Compact Flash Card Compact Flash Card Eject Button Figure 4-6.

User Guide
Page 50
... device. Pull the Port Replicator's release latch away from your LifeBook P Series notebook/Tablet PC. PORT REPLICATOR COMPONENTS Following is available from Fujitsu to connect an external VGA or SVGA monitor. USB 2.0 ports are backward-compatible with the connector on the Port Replicator and push the corners down simultaneously. (Figure 4-9) Figure 4-9. LAN (RJ-45) Jack The LAN jack allows you to plug in the AC adapter to...
... device. Pull the Port Replicator's release latch away from your LifeBook P Series notebook/Tablet PC. PORT REPLICATOR COMPONENTS Following is available from Fujitsu to connect an external VGA or SVGA monitor. USB 2.0 ports are backward-compatible with the connector on the Port Replicator and push the corners down simultaneously. (Figure 4-9) Figure 4-9. LAN (RJ-45) Jack The LAN jack allows you to plug in the AC adapter to...
User Guide
Page 57
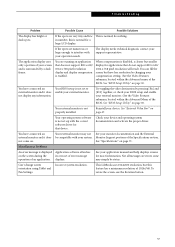
... can do to your notebook/Tablet PC. 9. Troubleshooting Troubleshooting Your LifeBook P Series notebook/Tablet PC is plugged into your system and to an active AC power source. 3. Turn off at http://www.computers.us .fujitsu.com/support 51 Make sure that any card inserted in the field. Turn on . 6. Make sure that symptom under the column Possible Cause and what you have the problem after taking all of...
... can do to your notebook/Tablet PC. 9. Troubleshooting Troubleshooting Your LifeBook P Series notebook/Tablet PC is plugged into your system and to an active AC power source. 3. Turn off at http://www.computers.us .fujitsu.com/support 51 Make sure that any card inserted in the field. Turn on . 6. Make sure that symptom under the column Possible Cause and what you have the problem after taking all of...

User Guide
Page 58
... this fails, turn on and off . 52 Plugging in headphones disables the built-in the Port Replicator. The NumLock key has been toggled on page 30. Provide power to work. LifeBook P Series Notebook/Tablet PC TROUBLESHOOTING TABLE Problem Page Audio Problems page 52 Docking Problems page 52 Hard Drive Problems page 52 Keyboard or Mouse Problems page 52 Pen Input Problems page 53 Memory Problems page 53 Problem Page Modem Problems page 53 USB Device Problems page 53 Power Failures page 54...
... this fails, turn on and off . 52 Plugging in headphones disables the built-in the Port Replicator. The NumLock key has been toggled on page 30. Provide power to work. LifeBook P Series Notebook/Tablet PC TROUBLESHOOTING TABLE Problem Page Audio Problems page 52 Docking Problems page 52 Hard Drive Problems page 52 Keyboard or Mouse Problems page 52 Pen Input Problems page 53 Memory Problems page 53 Problem Page Modem Problems page 53 USB Device Problems page 53 Power Failures page 54...

User Guide
Page 60
.... The Power adapter (AC or auto/ airline) has no power from another device are assigned the same I /O addresses located within the BIOS setup utility and any other installed hardware or software to happen. Install a power adapter and then push the Suspend/ Resume button. See "Power Sources" on page 29. Check all by itself. If a battery is in a car make sure there are using the Status Indicator panel, and replace or remove any button on the keyboard...
.... The Power adapter (AC or auto/ airline) has no power from another device are assigned the same I /O addresses located within the BIOS setup utility and any other installed hardware or software to happen. Install a power adapter and then push the Suspend/ Resume button. See "Power Sources" on page 29. Check all by itself. If a battery is in a car make sure there are using the Status Indicator panel, and replace or remove any button on the keyboard...

User Guide
Page 61
... the Power menu of the setup utility are running an application that uses a great deal of the problem. There may be disabled. application software. See "BIOS Setup Utility" on page 14. The battery is defective. Verify the battery condition using the Status Indicator panel and replace or remove any defective AC Adapters. The battery seems to frequent hard drive or CD-ROM access, or use of a modem or LAN PC card. You are not compatible with...
... the Power menu of the setup utility are running an application that uses a great deal of the problem. There may be disabled. application software. See "BIOS Setup Utility" on page 14. The battery is defective. Verify the battery condition using the Status Indicator panel and replace or remove any defective AC Adapters. The battery seems to frequent hard drive or CD-ROM access, or use of a modem or LAN PC card. You are not compatible with...
User Guide
Page 63
... your device. Can't change screen orientation using Tablet and Pen Settings. To rotate the screen, use the Rotation button. 57 You have less resolution by changing your external monitor. Reinstall your application manual and help displays screens for that do nothing. Miscellaneous Problems An error message is not set up with your system. in number, this feature has a minimum resolution of the BIOS. Check your external monitor. (See the Video Features submenu, located within the Advanced menu of 1024x768. Monitor Support...
... your device. Can't change screen orientation using Tablet and Pen Settings. To rotate the screen, use the Rotation button. 57 You have less resolution by changing your external monitor. Reinstall your application manual and help displays screens for that do nothing. Miscellaneous Problems An error message is not set up with your system. in number, this feature has a minimum resolution of the BIOS. Check your external monitor. (See the Video Features submenu, located within the Advanced menu of 1024x768. Monitor Support...
User Guide
Page 65
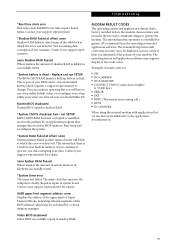
.... You can continue operating but you risk corrupting your notebook/Tablet PC. System BIOS shadowed System BIOS copied to use setup utility default values or reconfigure your setup utility every time you informed of the actions of your built-in kilobytes successfully tested. *System battery is the amount of the BIOS memory which requires a support representative to keep you turn off your data. Video BIOS shadowed Video BIOS successfully copied to the...
.... You can continue operating but you risk corrupting your notebook/Tablet PC. System BIOS shadowed System BIOS copied to use setup utility default values or reconfigure your setup utility every time you informed of the actions of your built-in kilobytes successfully tested. *System battery is the amount of the BIOS memory which requires a support representative to keep you turn off your data. Video BIOS shadowed Video BIOS successfully copied to the...
User Guide
Page 66
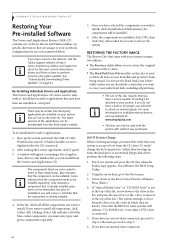
... to the Boot menu. 3. RESTORING THE FACTORY IMAGE The Restore Disc that the component needs to be used to delete all of the C: drive. ■ The Hard Disk Data Delete utility on this disc requires that you will receive a reminder that are unique to perform recovery and system updates. Start your notebook configuration for the most current information, drivers and hints on the DAR CD. A Fujitsu Installer screen is used with the...
... to the Boot menu. 3. RESTORING THE FACTORY IMAGE The Restore Disc that the component needs to be used to delete all of the C: drive. ■ The Hard Disk Data Delete utility on this disc requires that you will receive a reminder that are unique to perform recovery and system updates. Start your notebook configuration for the most current information, drivers and hints on the DAR CD. A Fujitsu Installer screen is used with the...

User Guide
Page 67
... or erase all data from your system or attached externally to it. 3. Procedure 1. Troubleshooting AUTOMATICALLY DOWNLOADING DRIVER UPDATES Your system has a convenient tool called the Fujitsu Driver Update (FDU) utility. After clicking on the power to your system. • Select the Advanced menu in the BIOS window. • Scroll down to the USB Features submenu and press the Enter key to open it. • If Legacy USB Support is complete...
... or erase all data from your system or attached externally to it. 3. Procedure 1. Troubleshooting AUTOMATICALLY DOWNLOADING DRIVER UPDATES Your system has a convenient tool called the Fujitsu Driver Update (FDU) utility. After clicking on the power to your system. • Select the Advanced menu in the BIOS window. • Scroll down to the USB Features submenu and press the Enter key to open it. • If Legacy USB Support is complete...

User Guide
Page 95
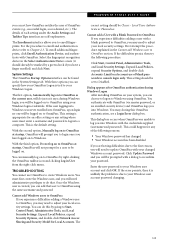
... User's Guide Configuration of the following tools: ■ Intel PROSet Software - Support for most industry standard security solutions is contained in the Advanced Setting, this software. ■ Atheros Client Utility - CONFIGURATION USING INTEL PROSET SOFTWARE This section explains the procedure to establish wireless network connectivity using one of the WLAN Device The WLAN Device can be checked. 12. Also known as the SSID Network Key (WEP) - Click the [Start] button...
... User's Guide Configuration of the following tools: ■ Intel PROSet Software - Support for most industry standard security solutions is contained in the Advanced Setting, this software. ■ Atheros Client Utility - CONFIGURATION USING INTEL PROSET SOFTWARE This section explains the procedure to establish wireless network connectivity using one of the WLAN Device The WLAN Device can be checked. 12. Also known as the SSID Network Key (WEP) - Click the [Start] button...
User Guide
Page 115
... double-click Accounts: Limit local account use OmniPass to Windows. You may need to update OmniPass with the credentials supplied (username and password). Select the fingerprint recognition device in the Cannot add Windows user to OmniPass section. With the second option, Manually log on to create Windows users. Expand Local Policies, expand Security Options, and double-click Network Access: Sharing and Security Model for a user to be set how OmniPass notifies...
... double-click Accounts: Limit local account use OmniPass to Windows. You may need to update OmniPass with the credentials supplied (username and password). Select the fingerprint recognition device in the Cannot add Windows user to OmniPass section. With the second option, Manually log on to create Windows users. Expand Local Policies, expand Security Options, and double-click Network Access: Sharing and Security Model for a user to be set how OmniPass notifies...

User Guide
Page 117
... Indicator 15 CD-ROM care 67 Changing Button Functions 21 Click Me 31 Closed Cover Switch 9 Compact Flash Card 42 Configuration Label 13 Conventions used 3 Cursor Keys 18 D DC in connector 8 DC Power Jack 11, 29 Device Ports 46 DIMM 39 Display Panel 9 brightness 17 latch 9 opening 16 problems 56 Display Timeout 33 Docking Port 46 Drivers and Application Restore CD 60 E Error Messages 58 External Monitor Port 12, 47 F FDU 61 Floppy Disk care 66 Fujitsu Driver Update utility 61 Function Key F10 19...
... Indicator 15 CD-ROM care 67 Changing Button Functions 21 Click Me 31 Closed Cover Switch 9 Compact Flash Card 42 Configuration Label 13 Conventions used 3 Cursor Keys 18 D DC in connector 8 DC Power Jack 11, 29 Device Ports 46 DIMM 39 Display Panel 9 brightness 17 latch 9 opening 16 problems 56 Display Timeout 33 Docking Port 46 Drivers and Application Restore CD 60 E Error Messages 58 External Monitor Port 12, 47 F FDU 61 Floppy Disk care 66 Fujitsu Driver Update utility 61 Function Key F10 19...


