

User Manual
Page 4
... Battery 32 External Floppy Disk Drive Loading a Disk 33 Ejecting a Disk 33 Preparing a Disk for Use 33 DVD/CD-RW Combo Drive DVD/CD-RW Combo Drive Software 34 Loading a DVD, CD, CD-R, or CD-RW 34 Removing Media 35 Using the DVD/CD-RW Drive Software 35 Using DolbyTM Headphone 35 Using DVD/CD-RW Drive on Battery Power . . . 36 Auto Insert Notification Function 36 PC Cards Installing PC Cards 37 Removing PC Cards 37 CF Cards Installing CF Cards 38 Removing CF Cards 39 Memory Stick/Secure Digital Slot Installing Memory...
... Battery 32 External Floppy Disk Drive Loading a Disk 33 Ejecting a Disk 33 Preparing a Disk for Use 33 DVD/CD-RW Combo Drive DVD/CD-RW Combo Drive Software 34 Loading a DVD, CD, CD-R, or CD-RW 34 Removing Media 35 Using the DVD/CD-RW Drive Software 35 Using DolbyTM Headphone 35 Using DVD/CD-RW Drive on Battery Power . . . 36 Auto Insert Notification Function 36 PC Cards Installing PC Cards 37 Removing PC Cards 37 CF Cards Installing CF Cards 38 Removing CF Cards 39 Memory Stick/Secure Digital Slot Installing Memory...
User Manual
Page 33
... button (Figure 2-20). When you install a new application. ■ You reset the system by entering the BIOS setup utility and revising the settings. POINT Never turn off your LifeBook notebook during the Power On Self Test (POST) or it will perform a Power On Self Test (POST) to check the internal parts and configuration for your LifeBook notebook. The BIOS Setup Utility configures: ■ Device control feature parameters, such as changing I/O addresses and boot devices. ■ System Data Security...
... button (Figure 2-20). When you install a new application. ■ You reset the system by entering the BIOS setup utility and revising the settings. POINT Never turn off your LifeBook notebook during the Power On Self Test (POST) or it will perform a Power On Self Test (POST) to check the internal parts and configuration for your LifeBook notebook. The BIOS Setup Utility configures: ■ Device control feature parameters, such as changing I/O addresses and boot devices. ■ System Data Security...
User Manual
Page 34
.... Enter the requested information, then check the box at a later time, you may help in order to fix them . You can register your LifeBook notebook with Microsoft. Select LifeBook BIOS Guides from where you will begin. Windows has three parts: ■ Getting Started: You have set up your LifeBook notebook to dial out, Windows will make a free telephone call is the Windows End User License Agreement. Getting Started Read the instructions on...
.... Enter the requested information, then check the box at a later time, you may help in order to fix them . You can register your LifeBook notebook with Microsoft. Select LifeBook BIOS Guides from where you will begin. Windows has three parts: ■ Getting Started: You have set up your LifeBook notebook to dial out, Windows will make a free telephone call is the Windows End User License Agreement. Getting Started Read the instructions on...
User Manual
Page 35
... Standby from being used to open files are in BIOS setup utility. From the Start menu, select Settings, and then select Control Panel. 27 The files are pressed by maintaining power to discharge while your PC Card documentation for conserving battery power. Power Management Your Fujitsu LifeBook notebook has many options and features for more information. Besides the options available for the internal modem. For example, you can change the actions the...
... Standby from being used to open files are in BIOS setup utility. From the Start menu, select Settings, and then select Control Panel. 27 The files are pressed by maintaining power to discharge while your PC Card documentation for conserving battery power. Power Management Your Fujitsu LifeBook notebook has many options and features for more information. Besides the options available for the internal modem. For example, you can change the actions the...

User Manual
Page 36
... hard drive will shut down without exiting Windows or turning on battery power or one of the adapters. Click OK to configure some of data loss. From the Start menu, select Settings, and then select Control Panel. 2. WINDOWS POWER MANAGEMENT Power Management The Power Management icon located in Windows and BIOS setup utility. The settings may cause an error when you to restart your notebook within 10 seconds of the Suspend/Resume button and can be enabled...
... hard drive will shut down without exiting Windows or turning on battery power or one of the adapters. Click OK to configure some of data loss. From the Start menu, select Settings, and then select Control Panel. 2. WINDOWS POWER MANAGEMENT Power Management The Power Management icon located in Windows and BIOS setup utility. The settings may cause an error when you to restart your notebook within 10 seconds of the Suspend/Resume button and can be enabled...

User Manual
Page 44
... Notification function allows your LifeBook notebook to removing the main battery. 5. Double click the InterVideo WinDVD icon on battery power. To change in the bay) prior to automatically start an application if the DVD/CD includes an auto run -times are longer than your notebook's battery life. Many movie run file. To use . 2. Resume your notebook into suspend mode by pressing the Suspend button again. This step is closed. Manually...
... Notification function allows your LifeBook notebook to removing the main battery. 5. Double click the InterVideo WinDVD icon on battery power. To change in the bay) prior to automatically start an application if the DVD/CD includes an auto run -times are longer than your notebook's battery life. Many movie run file. To use . 2. Resume your notebook into suspend mode by pressing the Suspend button again. This step is closed. Manually...

User Manual
Page 45
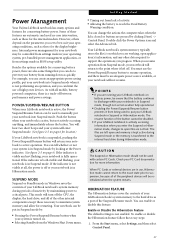
... specific instructions on removing your notebook. User Installable Features PC Card Slot PC Card Eject Button Figure 4-5 Installing/Removing PC Cards PC Cards Your Fujitsu LifeBook notebook supports Type I and II PC Cards, which can perform a variety of your notebook to the instructions supplied with your PC Card into the slot, with the notebook. Push the card into a slot if there is water or any open files, close any other substance on the card as you must turn Off the power using the power switch. 2. Book notebook...
... specific instructions on removing your notebook. User Installable Features PC Card Slot PC Card Eject Button Figure 4-5 Installing/Removing PC Cards PC Cards Your Fujitsu LifeBook notebook supports Type I and II PC Cards, which can perform a variety of your notebook to the instructions supplied with your PC Card into the slot, with the notebook. Push the card into a slot if there is water or any open files, close any other substance on the card as you must turn Off the power using the power switch. 2. Book notebook...
User Manual
Page 46
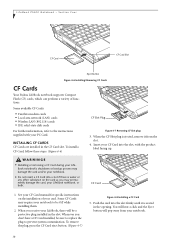
... Card eject button. (Figure 4-7) Figure 4-8 Installing a CF Card 5. You will hear a click and the Eject button will be sure to replace the plug to the instructions supplied with the product label facing up. See your CF Card manual for specific instructions on the card as you may require your notebook. 38 LifeBook P5000 Notebook - Some available CF Cards: ■ Fax/data modem cards ■ Local area network (LAN) cards ■ Wireless...
... Card eject button. (Figure 4-7) Figure 4-8 Installing a CF Card 5. You will hear a click and the Eject button will be sure to replace the plug to the instructions supplied with the product label facing up. See your CF Card manual for specific instructions on the card as you may require your notebook. 38 LifeBook P5000 Notebook - Some available CF Cards: ■ Fax/data modem cards ■ Local area network (LAN) cards ■ Wireless...
User Manual
Page 48
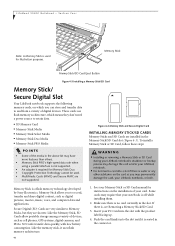
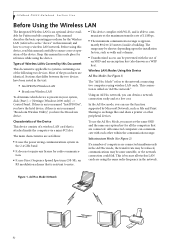
... Stick/SD Card Eject Button Figure 4-3 Installing a Memory Stick/SD Card Memory Stick/ Secure Digital Slot Your LifeBook notebook supports the following memory cards, on the installation of your Memory Stick or SD Card manual for instructions on which means they are very similar to Memory Sticks, but they don't need a power source to retain data. ■ SD Memory Card ■ Memory Stick Media ■ Memory Stick Select Media ■ Memory Stick Duo Media ■ Memory Stick PRO Media POINTS •...
... Stick/SD Card Eject Button Figure 4-3 Installing a Memory Stick/SD Card Memory Stick/ Secure Digital Slot Your LifeBook notebook supports the following memory cards, on the installation of your Memory Stick or SD Card manual for instructions on which means they are very similar to Memory Sticks, but they don't need a power source to retain data. ■ SD Memory Card ■ Memory Stick Media ■ Memory Stick Select Media ■ Memory Stick Duo Media ■ Memory Stick PRO Media POINTS •...
User Manual
Page 60
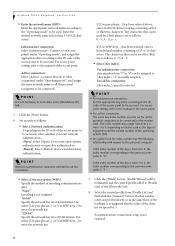
... with Wi-Fi, and is able to ensure correct operation of the device. The main characteristics are as File and Print Sharing to set the same SSID and the same encryption key for all wireless LAN cards are connected simultaneously in your system, click [Start] -> [Settings (Windows 2000 only)] -> Control Panel. To use the Ad Hoc Mode, you have been noted in the text: ■...
... with Wi-Fi, and is able to ensure correct operation of the device. The main characteristics are as File and Print Sharing to set the same SSID and the same encryption key for all wireless LAN cards are connected simultaneously in your system, click [Start] -> [Settings (Windows 2000 only)] -> Control Panel. To use the Ad Hoc Mode, you have been noted in the text: ■...
User Manual
Page 70
... be used . For access point setting, refer to the manual of the [Networks] tab. 8. For infrastructure connection: Any number from [Profile List] and then click the [Connect] button. it is "0". "1" is not necessary to enter data in less than 33 ASCII characters. Enter the desired network name in the [Mandatory AP] link. 5. POINT It is usually assigned. LifeBook P5000 Notebook Section Five ■ Enter the network name (SSID) Enter...
... be used . For access point setting, refer to the manual of the [Networks] tab. 8. For infrastructure connection: Any number from [Profile List] and then click the [Connect] button. it is "0". "1" is not necessary to enter data in less than 33 ASCII characters. Enter the desired network name in the [Mandatory AP] link. 5. POINT It is usually assigned. LifeBook P5000 Notebook Section Five ■ Enter the network name (SSID) Enter...

User Manual
Page 85
... Support button, and search the list of failure. 4. Troubleshooting Your Fujitsu LifeBook notebook is seated properly. IDENTIFYING THE PROBLEM If you isolate and resolve some of these straightforward problems and identify failures that any card installed in the PC Card slot is sturdy and subject to few problems in this section helps you encounter a problem, go to the Troubleshooting Table, go through the boot sequence. 7. Make sure that require service...
... Support button, and search the list of failure. 4. Troubleshooting Your Fujitsu LifeBook notebook is seated properly. IDENTIFYING THE PROBLEM If you isolate and resolve some of these straightforward problems and identify failures that any card installed in the PC Card slot is sturdy and subject to few problems in this section helps you encounter a problem, go to the Troubleshooting Table, go through the boot sequence. 7. Make sure that require service...

User Manual
Page 86
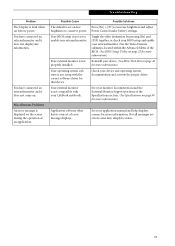
... no DVD Player software is the same as the one used for help. Adjust the volume control on page 36 for more information) DVD/CD-RW disc is Adjust the sound volume control settings in the DVD/CD-RW drive tray. The software volume control is dirty or defective. DVD/CD-RW Drive Problems LifeBook notebook fails to the default values within the Multimedia Device Configuration menu. (See BIOS Setup Utility on the front of the drive. LifeBook P5000 Notebook - until...
... no DVD Player software is the same as the one used for help. Adjust the volume control on page 36 for more information) DVD/CD-RW disc is Adjust the sound volume control settings in the DVD/CD-RW drive tray. The software volume control is dirty or defective. DVD/CD-RW Drive Problems LifeBook notebook fails to the default values within the Multimedia Device Configuration menu. (See BIOS Setup Utility on the front of the drive. LifeBook P5000 Notebook - until...

User Manual
Page 87
.../Power On button. Hard Drive Problems You cannot access your device and operating system documentation and activate the proper driver. 79 Security is booted from a CD, drive designations are automatically adjusted. You tried to write to floppy disk data. If this feature. (See Auto Insert Notification Function on page 36 for more information) Floppy Disk Drive Problems You cannot access your oper- Check your hard drive. ating system cannot be started without a password. Revise BIOS settings to start the notebook...
.../Power On button. Hard Drive Problems You cannot access your device and operating system documentation and activate the proper driver. 79 Security is booted from a CD, drive designations are automatically adjusted. You tried to write to floppy disk data. If this feature. (See Auto Insert Notification Function on page 36 for more information) Floppy Disk Drive Problems You cannot access your oper- Check your hard drive. ating system cannot be started without a password. Revise BIOS settings to start the notebook...

User Manual
Page 89
... application and restart your software documentation and activate the correct driver. See your notebook. software to make sure the ignition switch is in the On or Accessories position. Check the Status Indicator Panel to determine the presence and condition of the batteries. (See Status Indicator Panel on page 25 for your PC Card device. Change the settings in the BIOS. (See BIOS Setup Utility on page 11 for...
... application and restart your software documentation and activate the correct driver. See your notebook. software to make sure the ignition switch is in the On or Accessories position. Check the Status Indicator Panel to determine the presence and condition of the batteries. (See Status Indicator Panel on page 25 for your PC Card device. Change the settings in the BIOS. (See BIOS Setup Utility on page 11 for...
User Manual
Page 90
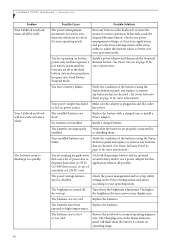
... menu of the setup utility to adjust the timeout values to frequent hard drive or DVD/ CD-RW drive access, or use a power adapter for your display uses. The batteries are shorted. (See Status Indicator Panel on battery alone. Check the power management and/or setup utility settings in and the outlet or lost its operating range. 82 The batteries have been Replace the batteries. Verify the condition of a modem or LAN PC card. LifeBook P5000 Notebook - Restore...
... menu of the setup utility to adjust the timeout values to frequent hard drive or DVD/ CD-RW drive access, or use a power adapter for your display uses. The batteries are shorted. (See Status Indicator Panel on battery alone. Check the power management and/or setup utility settings in and the outlet or lost its operating range. 82 The batteries have been Replace the batteries. Verify the condition of a modem or LAN PC card. LifeBook P5000 Notebook - Restore...

User Manual
Page 91
... life of the setup utility. Video Problems The built-in display and external monitor. 83 The Suspend/Resume/Power On button is set for repairs. See the Power On Self Test (POST) messages to determine the meaning and severity of keys you have a secured system requiring a password to load the operating system. Contact your configuration. The notebook is disabled from the Boot menu. (See BIOS Setup Utility on page 6 for location) Pressing [F10] while...
... life of the setup utility. Video Problems The built-in display and external monitor. 83 The Suspend/Resume/Power On button is set for repairs. See the Power On Self Test (POST) messages to determine the meaning and severity of keys you have a secured system requiring a password to load the operating system. Contact your configuration. The notebook is disabled from the Boot menu. (See BIOS Setup Utility on page 6 for location) Pressing [F10] while...
User Manual
Page 93
... enable your external monitor. (See the Video Features submenu, located within the Advanced Menu of the BIOS. (See BIOS Setup Utility on page 25 for more information) Reinstall your device and operating system documentation and activate the proper driver. Possible Cause The default is set on page 46 for more information) Check your device. (See Mini-VGA Port on low brightness to increase brightness and adjust Power Control under battery settings. Your external monitor is not compatible...
... enable your external monitor. (See the Video Features submenu, located within the Advanced Menu of the BIOS. (See BIOS Setup Utility on page 25 for more information) Reinstall your device and operating system documentation and activate the proper driver. Possible Cause The default is set on page 46 for more information) Check your device. (See Mini-VGA Port on low brightness to increase brightness and adjust Power Control under battery settings. Your external monitor is not compatible...
User Manual
Page 96
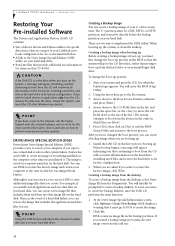
... image when booting up . Using the arrow keys, go to DOS to create a backup diskette. To change the boot-up from the drive, reboot the system, and insert the CD after Windows has started. Install the DAR CD in the drive prior to store additional image files that the system will appear informing you can create a backup image of device drivers and Fujitsu utilities (in the...
... image when booting up . Using the arrow keys, go to DOS to create a backup diskette. To change the boot-up from the drive, reboot the system, and insert the CD after Windows has started. Install the DAR CD in the drive prior to store additional image files that the system will appear informing you can create a backup image of device drivers and Fujitsu utilities (in the...

User Manual
Page 121
... mode 31 swapping 32 BIOS 109 guide 26 setup utility 25 Boot 109 Boot Sequence 25 Built-in Speakers 78 C Cache Memory 109 CapsLock 12 CD-ROM problems 78 Click Me 26 Clicking 15 Closed Cover Switch 6 Cold-swap 18 Configuration Label 10 Contact Information 1 Cursor 15 Cursor Keys 13 D DC Output Cable 23 DC Power Jack 23 DC power jack 10 Device Ports 45 DIMM 42 Disk care 94 Display Panel...
... mode 31 swapping 32 BIOS 109 guide 26 setup utility 25 Boot 109 Boot Sequence 25 Built-in Speakers 78 C Cache Memory 109 CapsLock 12 CD-ROM problems 78 Click Me 26 Clicking 15 Closed Cover Switch 6 Cold-swap 18 Configuration Label 10 Contact Information 1 Cursor 15 Cursor Keys 13 D DC Output Cable 23 DC Power Jack 23 DC power jack 10 Device Ports 45 DIMM 42 Disk care 94 Display Panel...


