Use and Care Guide
Page 2
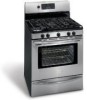
... product. Open the Warming Drawer (some models) or Storage Drawer (some models). DO NOT cut or remove the grounding prong from electrical power cord. For personal safety, the range must be filled in this manual. We know you consider us for future purchases. The L.P. Model Number: Serial plate location - The self-addressed PRODUCT REGISTRATION CARD should be plugged into a properly grounded receptacle. For maximum safety, the power cord must be sure to Electrolux Home Products. Installation Instructions carefully...
... product. Open the Warming Drawer (some models) or Storage Drawer (some models). DO NOT cut or remove the grounding prong from electrical power cord. For personal safety, the range must be filled in this manual. We know you consider us for future purchases. The L.P. Model Number: Serial plate location - The self-addressed PRODUCT REGISTRATION CARD should be plugged into a properly grounded receptacle. For maximum safety, the power cord must be sure to Electrolux Home Products. Installation Instructions carefully...

Use and Care Guide
Page 3
... use any part of the appliance unless specifically recommended in the cabinets above a range or on the doors or drawers of a range. If the information in this range can result in serious burns or other part of an emergency. • User servicing-Do not repair or replace any phone in Canada CSA Standard C22.1, Canadian Electrical Code, Part 1, and local code requirements. Install only per installation instructions provided in the oven bottom or cover...
... use any part of the appliance unless specifically recommended in the cabinets above a range or on the doors or drawers of a range. If the information in this range can result in serious burns or other part of an emergency. • User servicing-Do not repair or replace any phone in Canada CSA Standard C22.1, Canadian Electrical Code, Part 1, and local code requirements. Install only per installation instructions provided in the oven bottom or cover...

Use and Care Guide
Page 4
... heat of the broiler. • Do not cover the broiler insert with a pan lid, or use , do not place plastic or heat-sensitive items on , and turn knob to the full LITE position when igniting top burners. When using the appliance. Once the power resumes, reset the clock and oven function. Do not let potholders touch hot heating burners. IMPORTANT INSTRUCTIONS FOR USING YOUR COOKTOP Use Proper Flame Size-Adjust...
... heat of the broiler. • Do not cover the broiler insert with a pan lid, or use , do not place plastic or heat-sensitive items on , and turn knob to the full LITE position when igniting top burners. When using the appliance. Once the power resumes, reset the clock and oven function. Do not let potholders touch hot heating burners. IMPORTANT INSTRUCTIONS FOR USING YOUR COOKTOP Use Proper Flame Size-Adjust...
Use and Care Guide
Page 5
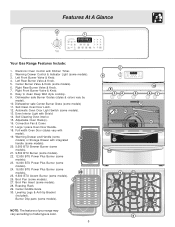
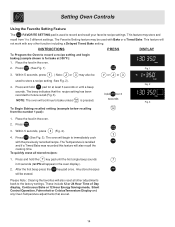
...000 BTU Power Plus Burner (some models). 28 25. 9,500 BTU Accent Burner (some models). 28. Features At A Glance 2 1 Your Gas Range Features Include: 1. Warming Drawer Control & Indicator Light (some models) 11. Adjustable Oven Rack(s). 16. Burner Drip pans (some models). 6. Right Rear Burner Valve & Knob. 7. Oven Interior Light with Kitchen Timer. 2. Electronic Oven Control with Shield. 14. Center Burner Valve & Knob (some models). Self-Cleaning Oven interior. 15. Convection Fan & Cover. 17. Large 1 piece Oven Door Handle. 18. Broil Pan Insert (some models...
...000 BTU Power Plus Burner (some models). 28 25. 9,500 BTU Accent Burner (some models). 28. Features At A Glance 2 1 Your Gas Range Features Include: 1. Warming Drawer Control & Indicator Light (some models) 11. Adjustable Oven Rack(s). 16. Burner Drip pans (some models). 6. Right Rear Burner Valve & Knob. 7. Oven Interior Light with Kitchen Timer. 2. Electronic Oven Control with Shield. 14. Center Burner Valve & Knob (some models). Self-Cleaning Oven interior. 15. Convection Fan & Cover. 17. Large 1 piece Oven Door Handle. 18. Broil Pan Insert (some models...
Use and Care Guide
Page 6
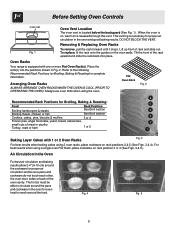
... Oven Rack(s). Air Circulation in the oven for Broiling, Baking & Roasting: 5 Food Rack Position Broiling hamburgers & steaks See Broil section 4 Broiling meats, chicken or fish Cookies, cakes, pies, biscuits & muffins See Broil section 3 or 4 3 Frozen pies, angel food cake, yeast, bread, casseroles, 2 small cuts of rack and slide out. When the oven is equipped with 1 or 2 Oven Racks Fig. 3 For best results when baking cakes using the oven. Before Setting Oven Controls Fig. 1 Oven Vent Location The oven vent...
... Oven Rack(s). Air Circulation in the oven for Broiling, Baking & Roasting: 5 Food Rack Position Broiling hamburgers & steaks See Broil section 4 Broiling meats, chicken or fish Cookies, cakes, pies, biscuits & muffins See Broil section 3 or 4 3 Frozen pies, angel food cake, yeast, bread, casseroles, 2 small cuts of rack and slide out. When the oven is equipped with 1 or 2 Oven Racks Fig. 3 For best results when baking cakes using the oven. Before Setting Oven Controls Fig. 1 Oven Vent Location The oven vent...
Use and Care Guide
Page 7
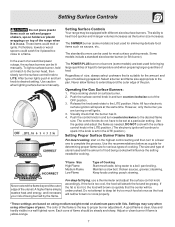
... the burner head, then slowly turn knob to the desired flame size. CORRECT Setting Surface Controls Your range may vary when using medium-weight metal or aluminum pans with the surface control knob in the LITE position. (The electronic ignitor will be undercooked. INCORRECT *Flame Size High Flame Medium Flame Low Flame Type of Cooking Start most surface cooking needs. Never extend the flame...
... the burner head, then slowly turn knob to the desired flame size. CORRECT Setting Surface Controls Your range may vary when using medium-weight metal or aluminum pans with the surface control knob in the LITE position. (The electronic ignitor will be undercooked. INCORRECT *Flame Size High Flame Medium Flame Low Flame Type of Cooking Start most surface cooking needs. Never extend the flame...
Use and Care Guide
Page 9
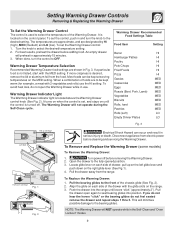
...) use . Disconnect appliance from electric power before removing the Warming Drawer. 2. To Remove and Replace the Warming Drawer (some models) To Remove the Warming Drawer: 1. Turn power off . Pull the drawer open the Warming Drawer while in Fig. 3. To Replace the Warming Drawer: 1. The Warming Drawer will preheat in and turn the control to select the temperature of the Warming Drawer. Align the glide on each side of foods are to seat bearing glides into the range until the control is desired, remove the...
...) use . Disconnect appliance from electric power before removing the Warming Drawer. 2. To Remove and Replace the Warming Drawer (some models) To Remove the Warming Drawer: 1. Turn power off . Pull the drawer open the Warming Drawer while in Fig. 3. To Replace the Warming Drawer: 1. The Warming Drawer will preheat in and turn the control to select the temperature of the Warming Drawer. Align the glide on each side of foods are to seat bearing glides into the range until the control is desired, remove the...
Use and Care Guide
Page 10
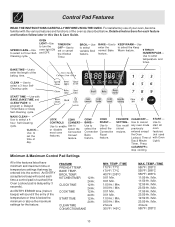
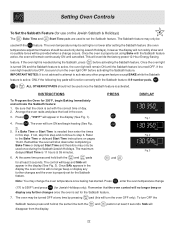
... CLEAR/OFF to select variable Broil feature. BAKE TEMP. CLOCK TIME 12 Hr. 24 Hr. CLEAN TIME CONVECTION BAKE MIN. SPEED CLEAN- Use to stop cooking. BAKE TIME- CLEAN - Use with Oven Day & Minute Light). Timer. BROIL TEMP. Use to enter the normal Bake feature.. BAKE-Use to select a 2 hour Self- Use to cancel Use to any oven mode start all previously oven entered except features the Oven (not used Lockout, Time of the baking time. Minimum & Maximum Control Pad Settings All of the oven as described below the minimum or...
... CLEAR/OFF to select variable Broil feature. BAKE TEMP. CLOCK TIME 12 Hr. 24 Hr. CLEAN TIME CONVECTION BAKE MIN. SPEED CLEAN- Use to stop cooking. BAKE TIME- CLEAN - Use with Oven Day & Minute Light). Timer. BROIL TEMP. Use to enter the normal Bake feature.. BAKE-Use to select a 2 hour Self- Use to cancel Use to any oven mode start all previously oven entered except features the Oven (not used Lockout, Time of the baking time. Minimum & Maximum Control Pad Settings All of the oven as described below the minimum or...
Use and Care Guide
Page 14
... Fig. 2). 4. The beep indicates that are set. 14 NOTE: The oven will also recall the cooking time. Place the food in the oven. 2. Press . 3. To quickly erase all other function including a Delayed Timed Bake setting. Any stored recipes will begin baking (sample shown is pressed. These include 12 or 24 Hour Time of Day display, Continuous Bake or 12 Hour Energy Savingsmode, Silent Control Operation, Fahrenheit or...
... Fig. 2). 4. The beep indicates that are set. 14 NOTE: The oven will also recall the cooking time. Place the food in the oven. 2. Press . 3. To quickly erase all other function including a Delayed Timed Bake setting. Any stored recipes will begin baking (sample shown is pressed. These include 12 or 24 Hour Time of Day display, Continuous Bake or 12 Hour Energy Savingsmode, Silent Control Operation, Fahrenheit or...
Use and Care Guide
Page 17
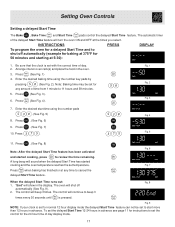
... when baking has finished or at 5:30): 1. INSTRUCTIONS PRESS DISPLAY To program the oven for the 24 hour time of the delayed Start Time feature will continue to cancel the delayed Start Time feature. "End" will beep 3 times. The control will turn the oven ON and OFF at the times you select. The automatic timer of day display mode. 17 Fig. 9 NOTE: If your clock is set for normal 12 hour display mode the delayed Start Time feature...
... when baking has finished or at 5:30): 1. INSTRUCTIONS PRESS DISPLAY To program the oven for the 24 hour time of the delayed Start Time feature will continue to cancel the delayed Start Time feature. "End" will beep 3 times. The control will turn the oven ON and OFF at the times you select. The automatic timer of day display mode. 17 Fig. 9 NOTE: If your clock is set for normal 12 hour display mode the delayed Start Time feature...

Use and Care Guide
Page 18
... cover the oven racks with the Searing Grill. DO NOT use the broil pan without the insert. Close the oven door. If a lower broil temperature is desired (minimum broil temperature setting is preset to step 5. 5. Broil on the broiler pan. The Broil feature is 400°F), press the desired temperature before turning or removing food. 7. The exposed grease could catch fire. INSTRUCTIONS PRESS DISPLAY To set the oven to the stop position before continuing to start broiling...
... cover the oven racks with the Searing Grill. DO NOT use the broil pan without the insert. Close the oven door. If a lower broil temperature is desired (minimum broil temperature setting is preset to step 5. 5. Broil on the broiler pan. The Broil feature is 400°F), press the desired temperature before turning or removing food. 7. The exposed grease could catch fire. INSTRUCTIONS PRESS DISPLAY To set the oven to the stop position before continuing to start broiling...
Use and Care Guide
Page 19
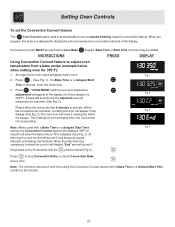
... cooking on pans with a single rack, place oven rack in the display (See Fig. 3).The oven icon will generally cook faster and more evenly. Fig. 2 Note: Please allow heated air to circulate around the food. This improved heat distribution allows for even cooking and excellent results using Convection Bake with a dark finish will vary depending on pans with Convection Bake. 3. Time reductions will cook faster. 2. Preheating is operating. INSTRUCTIONS PRESS DISPLAY To set the oven for Convection Bake at any time...
... cooking on pans with a single rack, place oven rack in the display (See Fig. 3).The oven icon will generally cook faster and more evenly. Fig. 2 Note: Please allow heated air to circulate around the food. This improved heat distribution allows for even cooking and excellent results using Convection Bake with a dark finish will vary depending on pans with Convection Bake. 3. Time reductions will cook faster. 2. Preheating is operating. INSTRUCTIONS PRESS DISPLAY To set the oven for Convection Bake at any time...
Use and Care Guide
Page 20
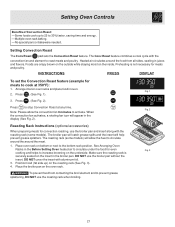
... 20 minutes. 20 Arrange interior oven racks and place food in the display (See Fig. 2).The oven icon will sound 3 long beeps every 30 seconds until baking has finished. Press , (See Fig. 1). Press . At this time the oven control will sound once the adjusted oven set temperature is Fig. 2 325°F). Note: The minimum amount of cook time using the Convection Convert feature with a Bake Time or a delayed Start Time function is pressed (Fig...
... 20 minutes. 20 Arrange interior oven racks and place food in the display (See Fig. 2).The oven icon will sound 3 long beeps every 30 seconds until baking has finished. Press , (See Fig. 1). Press . At this time the oven control will sound once the adjusted oven set temperature is Fig. 2 325°F). Note: The minimum amount of cook time using the Convection Convert feature with a Bake Time or a delayed Start Time function is pressed (Fig...
Use and Care Guide
Page 21
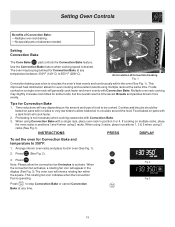
... roasting rack when broiling. 21 The roasting rack (some models). Setting Convection Roast The Conv Roast pad sets the Convection Roast feature. Preheating is securely seated on the insert in juices and flavors. INSTRUCTIONS PRESS DISPLAY To set the Convection Roast feature (example for meats and poultry. Arrange interior oven racks and place food in the Before Setting Oven heated air to circulate under the food for convection roasting, use the broiler pan and insert along with the roasting rack (some models) will allow the convection fan...
... roasting rack when broiling. 21 The roasting rack (some models). Setting Convection Roast The Conv Roast pad sets the Convection Roast feature. Preheating is securely seated on the insert in juices and flavors. INSTRUCTIONS PRESS DISPLAY To set the Convection Roast feature (example for meats and poultry. Arrange interior oven racks and place food in the Before Setting Oven heated air to circulate under the food for convection roasting, use the broiler pan and insert along with the roasting rack (some models) will allow the convection fan...
Use and Care Guide
Page 22
... pad (this will appear in the display (See Fig. 3). To turn the oven light OFF before activating the Sabbath feature. If the oven light is set the Sabbath feature. Setting Oven Controls To Set the Sabbath Feature (for use on pages 16-20. Remember that the clock is properly set higher or lower after completing a Bake Time or delayed Start Time and therefore may only be used only during Jewish Holidays), however the...
... pad (this will appear in the display (See Fig. 3). To turn the oven light OFF before activating the Sabbath feature. If the oven light is set the Sabbath feature. Setting Oven Controls To Set the Sabbath Feature (for use on pages 16-20. Remember that the clock is properly set higher or lower after completing a Bake Time or delayed Start Time and therefore may only be used only during Jewish Holidays), however the...
Use and Care Guide
Page 25
... door unlocks and power has been restored, set to rub, damage or remove the gasket. • DO NOT use any other part of the Self-Cleaning oven. • DO NOT clean the oven door gasket. If your clock is active. 2. Move birds to the interior surface of some birds is essential for the oven door in or around any excessive spillovers in advance. Doing so will destroy heat...
... door unlocks and power has been restored, set to rub, damage or remove the gasket. • DO NOT use any other part of the Self-Cleaning oven. • DO NOT clean the oven door gasket. If your clock is active. 2. Move birds to the interior surface of some birds is essential for the oven door in or around any excessive spillovers in advance. Doing so will destroy heat...
Use and Care Guide
Page 26
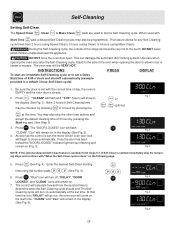
... display (See Fig. 6). Fig. 3 NOTE: If the optional delayed Self-Clean feature is closed. The control will calculate forward from 2 hours (using Speed Clean), 3 hours (using Clean) to set , the motor driven oven door lock will turn on , the start time to close automatically. During the Self-Cleaning cycle, the outside of the oven when opening the oven door after the Self-Cleaning cycle. This can become very hot to the side of the range...
... display (See Fig. 6). Fig. 3 NOTE: If the optional delayed Self-Clean feature is closed. The control will calculate forward from 2 hours (using Speed Clean), 3 hours (using Clean) to set , the motor driven oven door lock will turn on , the start time to close automatically. During the Self-Cleaning cycle, the outside of the oven when opening the oven door after the Self-Cleaning cycle. This can become very hot to the side of the range...
Use and Care Guide
Page 28
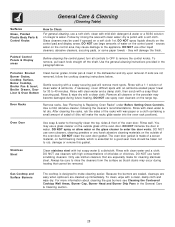
... to rub, damage or remove this will make cleaning easier. DO NOT clean the oven door gasket. Gas Cooktop and Surface Burners The cooktop is essential for 30 to enter the door vents. To clean, wipe with a soft cloth. Oven Racks Remove racks. After cleaning the racks, rub the sides of vinegar & water. they will remove most spots. See "Removing & Replacing Oven Racks" under Before Setting Oven Controls. Care should be removed. Only use kitchen cleaners that cannot be taken...
... to rub, damage or remove this will make cleaning easier. DO NOT clean the oven door gasket. Gas Cooktop and Surface Burners The cooktop is essential for 30 to enter the door vents. To clean, wipe with a soft cloth. Oven Racks Remove racks. After cleaning the racks, rub the sides of vinegar & water. they will remove most spots. See "Removing & Replacing Oven Racks" under Before Setting Oven Controls. Care should be removed. Only use kitchen cleaners that cannot be taken...
Use and Care Guide
Page 30
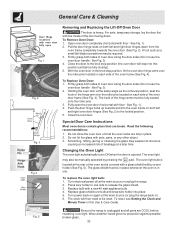
... right oven door hinges (See Fig. 2) to release the glass shield. 3. To Replace Oven Door: 1. Special Door Care Instructions Most oven doors contain glass that can break. The glass shield must be reset. To reset, see Setting the Clock and Minute Timer in place. 2. See Fig. 1). 2. Fully open Fig. 1 Fig. 2 Fig. 3 Fig. 4 Removing and Replacing the Lift-Off Oven Door The door is in use. Changing the Oven Light The oven light automatically turns ON when the door is unplugged and all the oven racks...
... right oven door hinges (See Fig. 2) to release the glass shield. 3. To Replace Oven Door: 1. Special Door Care Instructions Most oven doors contain glass that can break. The glass shield must be reset. To reset, see Setting the Clock and Minute Timer in place. 2. See Fig. 1). 2. Fully open Fig. 1 Fig. 2 Fig. 3 Fig. 4 Removing and Replacing the Lift-Off Oven Door The door is in use. Changing the Oven Light The oven light automatically turns ON when the door is unplugged and all the oven racks...
Use and Care Guide
Page 31
.... See "To Set the Clock" in the Setting Oven Controls section.(2) Make sure cord/plug is plugged correctly into the outlet. (4) Electrical power outage (electric ignition models only). See Changing Oven Light section in this will happen for the desired function. Reprogram oven. Oven smokes excessively during broiling - (1) Control(s) not set properly. Reposition the broil rack to clear the display & stop beeping. Always place grid on the broiler pan with the problem listed: Range is securely plugged into outlet. (3) Service wiring is orange...
.... See "To Set the Clock" in the Setting Oven Controls section.(2) Make sure cord/plug is plugged correctly into the outlet. (4) Electrical power outage (electric ignition models only). See Changing Oven Light section in this will happen for the desired function. Reprogram oven. Oven smokes excessively during broiling - (1) Control(s) not set properly. Reposition the broil rack to clear the display & stop beeping. Always place grid on the broiler pan with the problem listed: Range is securely plugged into outlet. (3) Service wiring is orange...


