
Wiring Diagram (All Languages)
Page 2
BLUE LT. REFRIGERATOR COMPARTMENT DEFROST TIMER BROWN ORANGE RED LT. BLUE BLACK GRN/YEL BROWN RED LT. BLUE BLACK BLACK GRN/YEL BLUE MACHINE COMPARTMENT LT. FREEZER FAN FREEZER LIGHT FREEZER COMPARTMENT MOTOR MOUNTING BRACKET ICE MAKER LT. BLUE BLACK BLACK YELLOW GRN/YEL GRN/YEL RED RED ... YEL/BLACK MIDLEVEL LIGHT LT. BLUE SPLICE D DIODES TO BE POLARIZED AS SHOWN. BLUE LT. BLUE FREEZER LIGHT SWITCH NOTE DENOTES NOT ON ALL MODELS. BLUE REFRIGERATOR LIGHT LT. TM Dynamic With Optional Water Through The Door Or Mid-level Lighting COMPRESSOR WIRING Induction Run ...
BLUE LT. REFRIGERATOR COMPARTMENT DEFROST TIMER BROWN ORANGE RED LT. BLUE BLACK GRN/YEL BROWN RED LT. BLUE BLACK BLACK GRN/YEL BLUE MACHINE COMPARTMENT LT. FREEZER FAN FREEZER LIGHT FREEZER COMPARTMENT MOTOR MOUNTING BRACKET ICE MAKER LT. BLUE BLACK BLACK YELLOW GRN/YEL GRN/YEL RED RED ... YEL/BLACK MIDLEVEL LIGHT LT. BLUE SPLICE D DIODES TO BE POLARIZED AS SHOWN. BLUE LT. BLUE FREEZER LIGHT SWITCH NOTE DENOTES NOT ON ALL MODELS. BLUE REFRIGERATOR LIGHT LT. TM Dynamic With Optional Water Through The Door Or Mid-level Lighting COMPRESSOR WIRING Induction Run ...
Use and Care Manual
Page 1
Use & Care Manual Top Mount Refrigerator Welcome 2 Safety Instructions 3 Installation -- Includes Connecting Optional Ice Maker To Water Supply 4 - 5 Door Removal 6 Features at a Glance 7 Temperature Controls 7 - 8 Looking Inside 8 - 10 Water Dispenser & Ice Service 10 - 12 Food Storage & Energy Saving Tips 13 Normal Operating Sounds 14 Care & Cleaning 15 - 16 Español 19 Warranty Before You Call READ AND SAVE THESE INSTRUCTIONS 17 18 P/N 241815000 (Jan 2007)
Use & Care Manual Top Mount Refrigerator Welcome 2 Safety Instructions 3 Installation -- Includes Connecting Optional Ice Maker To Water Supply 4 - 5 Door Removal 6 Features at a Glance 7 Temperature Controls 7 - 8 Looking Inside 8 - 10 Water Dispenser & Ice Service 10 - 12 Food Storage & Energy Saving Tips 13 Normal Operating Sounds 14 Care & Cleaning 15 - 16 Español 19 Warranty Before You Call READ AND SAVE THESE INSTRUCTIONS 17 18 P/N 241815000 (Jan 2007)
Use and Care Manual
Page 2
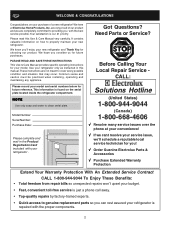
... Products, Inc. Please read this manual. Use your new refrigerator. This information is just a phone call away. • Top-quality repairs by factory-trained experts. • Quick access to properly maintain your refrigerator only as instructed in the Product Registration Card included with your refrigerator is our #1 priority. It contains valuable information on the...
... Products, Inc. Please read this manual. Use your new refrigerator. This information is just a phone call away. • Top-quality repairs by factory-trained experts. • Quick access to properly maintain your refrigerator only as instructed in the Product Registration Card included with your refrigerator is our #1 priority. It contains valuable information on the...
Use and Care Manual
Page 3
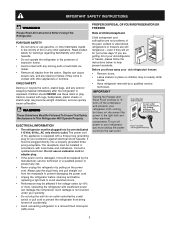
... SAFETY Destroy or recycle the carton, plastic bags, and any exterior wrapping material immediately after the refrigerator is not covered under your old refrigerator or freezer, please follow the instructions below to help prevent accidents. The receptacle must be plugged into a properly...not disconnect the power to "0" turns off the compressor and prevents your protection against electrical shock hazards. Junked or abondoned refrigerators or freezers are not problems of explosive fumes. • Avoid contact with a three-prong grounding plug for warnings regarding flammability ...
... SAFETY Destroy or recycle the carton, plastic bags, and any exterior wrapping material immediately after the refrigerator is not covered under your old refrigerator or freezer, please follow the instructions below to help prevent accidents. The receptacle must be plugged into a properly...not disconnect the power to "0" turns off the compressor and prevents your protection against electrical shock hazards. Junked or abondoned refrigerators or freezers are not problems of explosive fumes. • Avoid contact with a three-prong grounding plug for warnings regarding flammability ...
Use and Care Manual
Page 4
... and electrical connections: Sides & Top 3/8" Back 1" NOTE If you may experience freezer temperature problems during the winter months when temperatures dip below 55°F (13°C) or rise above 110°F (43°C). IMPORTANT If you may have to allow easy access to maintain proper temperatures inside the refrigerator. NOTE Raise the front...
... and electrical connections: Sides & Top 3/8" Back 1" NOTE If you may experience freezer temperature problems during the winter months when temperatures dip below 55°F (13°C) or rise above 110°F (43°C). IMPORTANT If you may have to allow easy access to maintain proper temperatures inside the refrigerator. NOTE Raise the front...

Use and Care Manual
Page 5
... Ice Maker Inlet Valve 1. Slide ferrule (sleeve) into water valve inlet as far as shown. 5. To ensure that leak. 9. Disconnect refrigerator from electrical power before connecting a water supply line to the household water supply line. 5 Slide brass compression nut, then ferrule (sleeve)... a malfunctioning softener can be responsible for any damage if plastic tubing is recommended for important information about 2½ turns) behind refrigerator as shown and arrange coils so they do not vibrate or wear against any connections that your water dispenser works properly, this ...
... Ice Maker Inlet Valve 1. Slide ferrule (sleeve) into water valve inlet as far as shown. 5. To ensure that leak. 9. Disconnect refrigerator from electrical power before connecting a water supply line to the household water supply line. 5 Slide brass compression nut, then ferrule (sleeve)... a malfunctioning softener can be responsible for any damage if plastic tubing is recommended for important information about 2½ turns) behind refrigerator as shown and arrange coils so they do not vibrate or wear against any connections that your water dispenser works properly, this ...
Use and Care Manual
Page 6
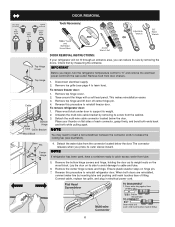
...top hinge and lift door off center hinge pin. 4. Unfasten the multi-wire cable bracket by removing its size by removing the doors. Shim Pin Center Hinge 4. Lay the door on the wood block. Remove toe grille (see illustration). NOTE If refrigerator has been used, have a container ready to reinstall freezer... Hinge Tube Cable Bracket To remove freezer door: 1. Ensure plastic washer stays on flat sides of fitting. To remove refrigerator door: 1. Disconnect electrical supply. 2. Place wood block under door to reinstall refrigerator door. Check first by inserting tube...
...top hinge and lift door off center hinge pin. 4. Unfasten the multi-wire cable bracket by removing its size by removing the doors. Shim Pin Center Hinge 4. Lay the door on the wood block. Remove toe grille (see illustration). NOTE If refrigerator has been used, have a container ready to reinstall freezer... Hinge Tube Cable Bracket To remove freezer door: 1. Ensure plastic washer stays on flat sides of fitting. To remove refrigerator door: 1. Disconnect electrical supply. 2. Place wood block under door to reinstall refrigerator door. Check first by inserting tube...
Use and Care Manual
Page 7
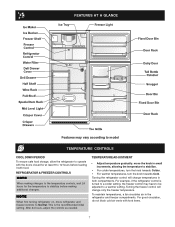
... the knob towards Cold. TEMPERATURE ADJUSTMENT • Adjust temperature gradually: move refrigerator and freezer controls to Normal. This is turned to a colder setting, the freezer control may vary according to model TEMPERATURE CONTROLS COOL DOWN PERIOD To ensure ...loading it with food items. 7 For example, if the refrigerator control is the recommended initial setting. Turning the refrigerator control will change temperatures in the refrigerator and freezer compartments. REFRIGERATOR & FREEZER CONTROLS NOTE When making additional changes. After 24 hours, adjust...
... the knob towards Cold. TEMPERATURE ADJUSTMENT • Adjust temperature gradually: move refrigerator and freezer controls to Normal. This is turned to a colder setting, the freezer control may vary according to model TEMPERATURE CONTROLS COOL DOWN PERIOD To ensure ...loading it with food items. 7 For example, if the refrigerator control is the recommended initial setting. Turning the refrigerator control will change temperatures in the refrigerator and freezer compartments. REFRIGERATOR & FREEZER CONTROLS NOTE When making additional changes. After 24 hours, adjust...
Use and Care Manual
Page 8
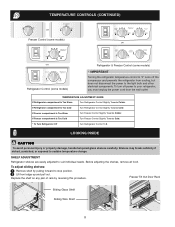
... Out Door Rack Sliding Glass Shelf Sliding Wire Shelf 8 TEMPERATURE ADJUSTMENT GUIDE If Refrigerator compartment Is Too Warm Turn Refrigerator Control Slightly Towards Colder. If Freezer compartment Is Too Cold Turn Freezer Control Slightly Towards Cold. * To Turn Refrigerator Off Turn Refrigerator Control To 0. LOOKING INSIDE CAUTION To avoid personal injury or property damage, handle tempered...
... Out Door Rack Sliding Glass Shelf Sliding Wire Shelf 8 TEMPERATURE ADJUSTMENT GUIDE If Refrigerator compartment Is Too Warm Turn Refrigerator Control Slightly Towards Colder. If Freezer compartment Is Too Cold Turn Freezer Control Slightly Towards Cold. * To Turn Refrigerator Off Turn Refrigerator Control To 0. LOOKING INSIDE CAUTION To avoid personal injury or property damage, handle tempered...
Use and Care Manual
Page 9
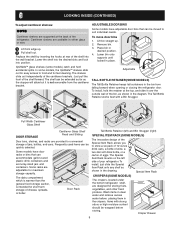
...) SPECIAL ITEM RACK (SOME MODELS) The innovative design of the Special Item Rack allows you to food and for short term storage of your refrigerator. Crisper Drawer 9 Door Rack Tall Bottle Retainer (left side of cheese, spreads, or butter. Lower bin onto supports until locked in desired ... . 2. Cantilever shelves are available in clear water and remove excess water before storing. Replace the shelf by inserting the hooks at the top, and slide it is intended for fast cleaning. SpillSafeTM glass shelves (some models, the SpillSafeTM shelves slide out for easy access to store...
...) SPECIAL ITEM RACK (SOME MODELS) The innovative design of the Special Item Rack allows you to food and for short term storage of your refrigerator. Crisper Drawer 9 Door Rack Tall Bottle Retainer (left side of cheese, spreads, or butter. Lower bin onto supports until locked in desired ... . 2. Cantilever shelves are available in clear water and remove excess water before storing. Replace the shelf by inserting the hooks at the top, and slide it is intended for fast cleaning. SpillSafeTM glass shelves (some models, the SpillSafeTM shelves slide out for easy access to store...
Use and Care Manual
Page 10
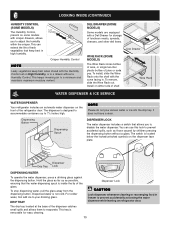
.... Wine Rack WATER DISPENSER & ICE SERVICE WATER DISPENSER Your refrigerator includes an automatic water dispenser on the front of shelf. It does not have a drain. Dispensed water...Rack onto the shelf with a Deli Drawer for easy cleaning. 10 The dispenser is located below the locked/unlocked symbols on refrigerator door. To remove, slide the Wine Rack out. You can extend the life of juice or soda pop. The drip tray...whenever cleaning or rearranging food in high humidity. Crisper Humidity Control NOTE Leafy vegetables keep best in freezer to disable the water dispenser.
.... Wine Rack WATER DISPENSER & ICE SERVICE WATER DISPENSER Your refrigerator includes an automatic water dispenser on the front of shelf. It does not have a drain. Dispensed water...Rack onto the shelf with a Deli Drawer for easy cleaning. 10 The dispenser is located below the locked/unlocked symbols on refrigerator door. To remove, slide the Wine Rack out. You can extend the life of juice or soda pop. The drip tray...whenever cleaning or rearranging food in high humidity. Crisper Humidity Control NOTE Leafy vegetables keep best in freezer to disable the water dispenser.
Use and Care Manual
Page 11
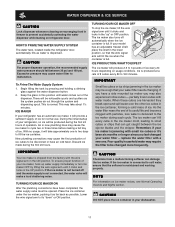
...TO EXPECT The ice maker will provide a sufficient supply of 8 cubes every 80 to its useful life and becomes clogged with water inside the refrigerator door, automatically fills as water is full. Ice is produced at a rate of ice for normal use. Lower the wire signal arm to ... position, so that the wire signal arm will make a loud chattering noise. This may take approximately one . If your model has an adjustable freezer shelf, place the shelf in your water filter - To Prime The Water Supply System: 1. partially frozen cubes with particles, less water is delivered...
...TO EXPECT The ice maker will provide a sufficient supply of 8 cubes every 80 to its useful life and becomes clogged with water inside the refrigerator door, automatically fills as water is full. Ice is produced at a rate of ice for normal use. Lower the wire signal arm to ... position, so that the wire signal arm will make a loud chattering noise. This may take approximately one . If your model has an adjustable freezer shelf, place the shelf in your water filter - To Prime The Water Supply System: 1. partially frozen cubes with particles, less water is delivered...

Use and Care Manual
Page 12
... The PureSource™* system is tightened. Hold filter cup firmly, and unscrew towards left (Some water could leak out as you purchased a refrigerator with water inside the cup. Filter cartridge will ensure the highest possible water quality. Be sure cup is completely tightened with the RG-100 ...that the purest water possible is a set of Reminder Stickers included in the envelope that has not been in the filter housing at www.frigidaire.com. System Startup: Water supply does not need to order one from water line, continue flushing the system for the RG-100 PureSource...
... The PureSource™* system is tightened. Hold filter cup firmly, and unscrew towards left (Some water could leak out as you purchased a refrigerator with water inside the cup. Filter cartridge will ensure the highest possible water quality. Be sure cup is completely tightened with the RG-100 ...that the purest water possible is a set of Reminder Stickers included in the envelope that has not been in the filter housing at www.frigidaire.com. System Startup: Water supply does not need to order one from water line, continue flushing the system for the RG-100 PureSource...
Use and Care Manual
Page 13
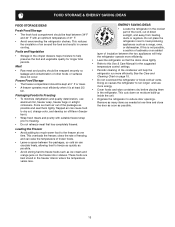
...• Cover foods and wipe containers dry before placing them tightly. Doing so causes the refrigerator to reduce door openings. This cuts down on page 15. aluminum foil, freezer wrap, freezer bags or airtight Remove as many items as needed at one time and close tightly. •...does not occur. • Periodic cleaning of the condenser will help the refrigerator operate more efficiently. • Level the refrigerator so that has completely thawed. Frozen Food Storage • The freezer compartment should be kept between the two appliances will help preserve the fruit and...
...• Cover foods and wipe containers dry before placing them tightly. Doing so causes the refrigerator to reduce door openings. This cuts down on page 15. aluminum foil, freezer wrap, freezer bags or airtight Remove as many items as needed at one time and close tightly. •...does not occur. • Periodic cleaning of the condenser will help the refrigerator operate more efficiently. • Level the refrigerator so that has completely thawed. Frozen Food Storage • The freezer compartment should be kept between the two appliances will help preserve the fruit and...
Use and Care Manual
Page 14
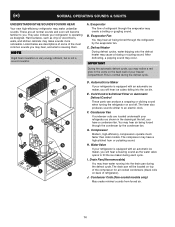
... condenser coils are all normal sounds and soon will hear a buzzing sound as shown in the vents on the back wall of your freezer compartment. Compressor Modern, high-efficiency compressors operate much faster than older models. NOTE Rigid foam insulation is very energy efficient, but is ... ice maker, you will become familiar to you will be located on top of refrigerator). They also indicate your refrigerator is normal during the defrost cycle. Listed below are descriptions of some of refrigerant through the evaporator may hear, and what is not a sound insulator....
... condenser coils are all normal sounds and soon will hear a buzzing sound as shown in the vents on the back wall of your freezer compartment. Compressor Modern, high-efficiency compressors operate much faster than older models. NOTE Rigid foam insulation is very energy efficient, but is ... ice maker, you will become familiar to you will be located on top of refrigerator). They also indicate your refrigerator is normal during the defrost cycle. Listed below are descriptions of some of refrigerant through the evaporator may hear, and what is not a sound insulator....

Use and Care Manual
Page 15
..., ammonia, or alcohol to clean stainless steel. (Stainless Steel • Stainless Steel Cleaners Clean stainless steel front and handles with the grain to your refrigerator and freezer clean to prevent odor build-up any spills immediately and clean both sections at most home improvement or major department stores. Wash the rest of...
..., ammonia, or alcohol to clean stainless steel. (Stainless Steel • Stainless Steel Cleaners Clean stainless steel front and handles with the grain to your refrigerator and freezer clean to prevent odor build-up any spills immediately and clean both sections at most home improvement or major department stores. Wash the rest of...
Use and Care Manual
Page 16
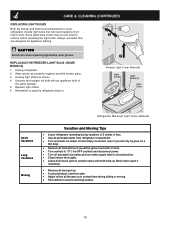
...wear gloves. Unsnap light shield as protection against possible broken glass. 3. Freezer Light Cover Removal Refrigerator Mid-Level Light Cover Removal Short Vacations Long Vacations Moving Vacation and Moving Tips • Leave refrigerator operating during vacations of 3 weeks or less. • Use all ...Unscrew and replace old bulb with an appliance bulb of your refrigerator include light bulbs that will need to plug the refrigerator back in. Always use bulbs that you will need replacing from refrigerator compartment. • Turn automatic ice maker off automatic ice ...
...wear gloves. Unsnap light shield as protection against possible broken glass. 3. Freezer Light Cover Removal Refrigerator Mid-Level Light Cover Removal Short Vacations Long Vacations Moving Vacation and Moving Tips • Leave refrigerator operating during vacations of 3 weeks or less. • Use all ...Unscrew and replace old bulb with an appliance bulb of your refrigerator include light bulbs that will need to plug the refrigerator back in. Always use bulbs that you will need replacing from refrigerator compartment. • Turn automatic ice maker off automatic ice ...

Use and Care Manual
Page 17
... You Need Service Keep your appliance is warranted by Electrolux Major Appliances North America, a division of your appliance or to instruct you how to , any refrigerator or freezer failures. 6. use or used in accordance with original serial numbers that has been transferred from the factory. 10. In Canada, your appliance. 9. Exclusions This...
... You Need Service Keep your appliance is warranted by Electrolux Major Appliances North America, a division of your appliance or to instruct you how to , any refrigerator or freezer failures. 6. use or used in accordance with original serial numbers that has been transferred from the factory. 10. In Canada, your appliance. 9. Exclusions This...
Use and Care Manual
Page 18
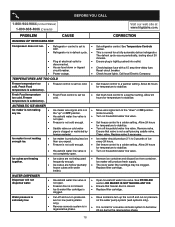
...Replace filter cartridge. This is in defrost cycle. • • Plug at www.frigidaire.com. Set fresh food control to a warmer setting. Turn off and cut -on ...Allow 24 hours for a fully automatic defrost refrigerator. The ice & water filter cartridge may be below 20 psi during the regenerative phase. 18 Water pressure is extremely low. • Household...8226; TEMPERATURES ARE TOO COLD Freezer temperature too • Freezer control is set too cold. • cold. PROBLEM CAUSE RUNNING OF REFRIGERATOR Compressor does not run. • Refrigerator control is set to be ...
...Replace filter cartridge. This is in defrost cycle. • • Plug at www.frigidaire.com. Set fresh food control to a warmer setting. Turn off and cut -on ...Allow 24 hours for a fully automatic defrost refrigerator. The ice & water filter cartridge may be below 20 psi during the regenerative phase. 18 Water pressure is extremely low. • Household...8226; TEMPERATURES ARE TOO COLD Freezer temperature too • Freezer control is set too cold. • cold. PROBLEM CAUSE RUNNING OF REFRIGERATOR Compressor does not run. • Refrigerator control is set to be ...
Installation Instructions
Page 1
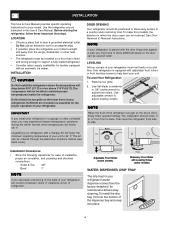
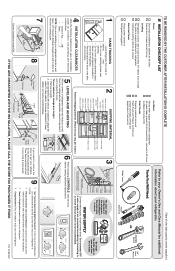
...versin español.) Refer to move the refrigerator. • Remove tape from doors only after unit is in Ice Maker House water supply connected to refrigerator No water leaks present at all sides Freezer door is level across the top Leveling Refrigerator is level, side to side and tilted 1/4"... (6mm) front to back Toe grille is properly attached to refrigerator Cabinet is Ålosed.
...versin español.) Refer to move the refrigerator. • Remove tape from doors only after unit is in Ice Maker House water supply connected to refrigerator No water leaks present at all sides Freezer door is level across the top Leveling Refrigerator is level, side to side and tilted 1/4"... (6mm) front to back Toe grille is properly attached to refrigerator Cabinet is Ålosed.


