
Wiring Diagram (All Languages)
Page 1
... Compressor Run Time Electronic Timer (ADC) Defrost Up To 24 Minutes Every 6 - 72 Hours of Compressor Run Time CONDENSER FAN MOTOR Watts RPM Amps 2.3 1100 CW Opposite Shaft .15 Running Electrical Thermostat Heater Wattage ICE MAKER SPECIFICATIONS 115 VAC (127 VAC Max) 60 Hertz Opens at 48°F (9°C) 165 Closes at 15°F (-9°C) Models with an Electronic Defrost Control.To initiate defrost, depress the fresh food light switch 5 times in 6 seconds (light bulb...
... Compressor Run Time Electronic Timer (ADC) Defrost Up To 24 Minutes Every 6 - 72 Hours of Compressor Run Time CONDENSER FAN MOTOR Watts RPM Amps 2.3 1100 CW Opposite Shaft .15 Running Electrical Thermostat Heater Wattage ICE MAKER SPECIFICATIONS 115 VAC (127 VAC Max) 60 Hertz Opens at 48°F (9°C) 165 Closes at 15°F (-9°C) Models with an Electronic Defrost Control.To initiate defrost, depress the fresh food light switch 5 times in 6 seconds (light bulb...

Wiring Diagram (All Languages)
Page 2
.... BLUE RED/BLACK BROWN SUPPLY SOLENOID WATER VALVE WATER VALVE DOOR COMPARTMENT TAN RED/BLACK TAN GRN/YEL RED/BLACK TAN GRN/YEL INTERLOCK SWITCH RED/BLACK TAN DOOR WATER DISPENSER SWITCH Ladder Schematic - BLUE LT. BLUE BLACK GRN/YEL BROWN RED LT. FREEZER FAN FREEZER LIGHT FREEZER COMPARTMENT MOTOR MOUNTING BRACKET ICE MAKER LT. BLUE BLACK RED YELLOW SEE COMPRESSOR WIRING GRN/YEL SPLICE RED GRN/YEL SERVICE CORD RED GRN/YEL...
.... BLUE RED/BLACK BROWN SUPPLY SOLENOID WATER VALVE WATER VALVE DOOR COMPARTMENT TAN RED/BLACK TAN GRN/YEL RED/BLACK TAN GRN/YEL INTERLOCK SWITCH RED/BLACK TAN DOOR WATER DISPENSER SWITCH Ladder Schematic - BLUE LT. BLUE BLACK GRN/YEL BROWN RED LT. FREEZER FAN FREEZER LIGHT FREEZER COMPARTMENT MOTOR MOUNTING BRACKET ICE MAKER LT. BLUE BLACK RED YELLOW SEE COMPRESSOR WIRING GRN/YEL SPLICE RED GRN/YEL SERVICE CORD RED GRN/YEL...
Use and Care Manual
Page 2
... replacement parts so you with your new refrigerator and Thank You for future reference. Your satisfaction is repaired with the proper components. 2 It contains valuable information on how to clean serial plate. We know you consider us for your new refrigerator. PLEASE READ AND SAVE THESE INSTRUCTIONS This Use & Care Manual provides specific operating instructions for future purchases. NOTE Use only soap and water to properly maintain your model. Model Number: Serial Number...
... replacement parts so you with your new refrigerator and Thank You for future reference. Your satisfaction is repaired with the proper components. 2 It contains valuable information on how to clean serial plate. We know you consider us for your new refrigerator. PLEASE READ AND SAVE THESE INSTRUCTIONS This Use & Care Manual provides specific operating instructions for future purchases. NOTE Use only soap and water to properly maintain your model. Model Number: Serial Number...
Use and Care Manual
Page 3
... entrapment and suffocation are not problems of the appliance is not covered under your old refrigerator/ freezer: • Remove doors. • Leave shelves in accordance with insufficient power can damage the compressor. The power cord of the past. FOR YOUR SAFETY • Do not store or use these items to help prevent accidents. Before you must be installed in place so children...
... entrapment and suffocation are not problems of the appliance is not covered under your old refrigerator/ freezer: • Remove doors. • Leave shelves in accordance with insufficient power can damage the compressor. The power cord of the past. FOR YOUR SAFETY • Do not store or use these items to help prevent accidents. Before you must be installed in place so children...
Use and Care Manual
Page 4
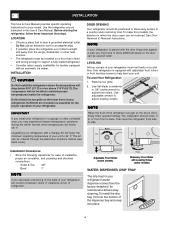
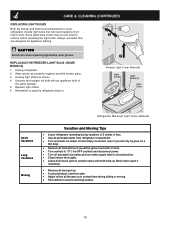
... operation of refrigerator. Remove toe grille. 2. Adjustable Front Roller (some models) Raise Stationary Front Roller with the door hinge side against a wall, you may have to allow easy access to side. IMPORTANT If you see back cover). See Door Removal & Reversal Instructions. The compressor will not be ordered through the Electrolux Solutions Hotline (see black coils/tubing on a solid floor. INSTALLATION This Use & Care Manual provides specific operating instructions for your refrigerator's water dispenser...
... operation of refrigerator. Remove toe grille. 2. Adjustable Front Roller (some models) Raise Stationary Front Roller with the door hinge side against a wall, you may have to allow easy access to side. IMPORTANT If you see back cover). See Door Removal & Reversal Instructions. The compressor will not be ordered through the Electrolux Solutions Hotline (see black coils/tubing on a solid floor. INSTALLATION This Use & Care Manual provides specific operating instructions for your refrigerator's water dispenser...

Use and Care Manual
Page 5
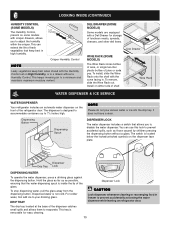
... turn ice maker on, lower wire signal arm (see ice maker front cover for ON/OFF position of ¼" plastic is used for the water supply line. NOTE Water line kit number 5303917950, available from the ice maker inlet valve at additional cost, contains 25 feet (7.6 meters) of refrigerator as shown. 7. Push water supply line into water valve inlet as far as shown). • A shutoff valve to connect the water supply line to rear panel of ¼ inch OD copper tubing, a saddle type...
... turn ice maker on, lower wire signal arm (see ice maker front cover for ON/OFF position of ¼" plastic is used for the water supply line. NOTE Water line kit number 5303917950, available from the ice maker inlet valve at additional cost, contains 25 feet (7.6 meters) of refrigerator as shown. 7. Push water supply line into water valve inlet as far as shown). • A shutoff valve to connect the water supply line to rear panel of ¼ inch OD copper tubing, a saddle type...
Use and Care Manual
Page 6
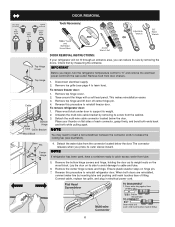
... both doors are reinstalled, connect water line by measuring the entrance. This makes reinstallation easier. 3. Remove the center hinge screws and hinge. IMPORTANT Before you begin, turn the refrigerator temperature control to learn how). Remove toe grille (see illustration). Unfasten the multi-wire cable bracket by removing the doors. Reverse this procedure to reinstall refrigerator door. Connect cable, replace toe grille, and plug in electrical power cord. 6 To remove refrigerator door: 1. Reverse this procedure to reinstall freezer door. Ensure...
... both doors are reinstalled, connect water line by measuring the entrance. This makes reinstallation easier. 3. Remove the center hinge screws and hinge. IMPORTANT Before you begin, turn the refrigerator temperature control to learn how). Remove toe grille (see illustration). Unfasten the multi-wire cable bracket by removing the doors. Reverse this procedure to reinstall refrigerator door. Connect cable, replace toe grille, and plug in electrical power cord. 6 To remove refrigerator door: 1. Reverse this procedure to reinstall freezer door. Ensure...
Use and Care Manual
Page 7
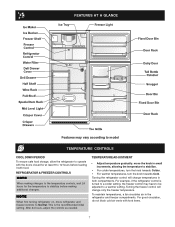
... refrigerator control will change temperatures in both compartments. Turning the freezer control will change only the freezer temperature. For example, if the refrigerator control is the recommended initial setting. FEATURES AT A GLANCE Features may have to be adjusted to stabilize before loading it with food items. 7 For good circulation, do not block cold air vents with food. After 24 hours, adjust the controls as needed. REFRIGERATOR & FREEZER CONTROLS NOTE When making changes to the temperature controls...
... refrigerator control will change temperatures in both compartments. Turning the freezer control will change only the freezer temperature. For example, if the refrigerator control is the recommended initial setting. FEATURES AT A GLANCE Features may have to be adjusted to stabilize before loading it with food items. 7 For good circulation, do not block cold air vents with food. After 24 hours, adjust the controls as needed. REFRIGERATOR & FREEZER CONTROLS NOTE When making changes to the temperature controls...
Use and Care Manual
Page 8
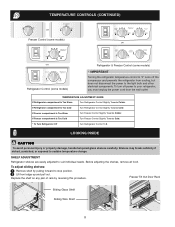
... INSIDE CAUTION To avoid personal injury or property damage, handle tempered glass shelves carefully. Freezer Tilt Out Door Rack Sliding Glass Shelf Sliding Wire Shelf 8 TEMPERATURE CONTROLS (CONTINUED) OR Freezer Control (some models) OR OR Refrigerator Control (some models) Refrigerator & Freezer Control (some models) * IMPORTANT Turning the refrigerator temperature control to "0" turns off power to your refrigerator, you must unplug the power cord from cooling, but does not disconnect the power to the light bulb and other electrical components. To turn off the compressor...
... INSIDE CAUTION To avoid personal injury or property damage, handle tempered glass shelves carefully. Freezer Tilt Out Door Rack Sliding Glass Shelf Sliding Wire Shelf 8 TEMPERATURE CONTROLS (CONTINUED) OR Freezer Control (some models) OR OR Refrigerator Control (some models) Refrigerator & Freezer Control (some models) * IMPORTANT Turning the refrigerator temperature control to "0" turns off power to your refrigerator, you must unplug the power cord from cooling, but does not disconnect the power to the light bulb and other electrical components. To turn off the compressor...
Use and Care Manual
Page 9
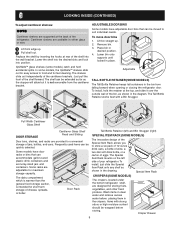
... and economy-sized jars and containers. Remove bin. 3. Some models have adjustable door bins that can be moved to suit individual needs. Special Item Rack CRISPERS (SOME MODELS) The crispers, located under the bottom refrigerator shelf, are designed for short term storage of cheese, spreads, or butter. LOOKING INSIDE (CONTINUED) To adjust cantilever shelves: NOTE Cantilever shelves are supported at the back of the shelf forward. Cantilever shelves are adjustable for maximum...
... and economy-sized jars and containers. Remove bin. 3. Some models have adjustable door bins that can be moved to suit individual needs. Special Item Rack CRISPERS (SOME MODELS) The crispers, located under the bottom refrigerator shelf, are designed for short term storage of cheese, spreads, or butter. LOOKING INSIDE (CONTINUED) To adjust cantilever shelves: NOTE Cantilever shelves are supported at the back of the shelf forward. Cantilever shelves are adjustable for maximum...
Use and Care Manual
Page 10
... other deli items. Deli Drawer WINE RACK (SOME MODELS) The Wine Rack stores bottles of wine, or single two-liter plastic bottles of the refrigerator door. The switch is not cold. To install, slide the Wine Rack onto the shelf with the Humidity Control set on refrigerator door. NOTE Please do not pour excess water or ice into the drip tray. Dispensed water is located below the locked/unlocked...
... other deli items. Deli Drawer WINE RACK (SOME MODELS) The Wine Rack stores bottles of wine, or single two-liter plastic bottles of the refrigerator door. The switch is not cold. To install, slide the Wine Rack onto the shelf with the Humidity Control set on refrigerator door. NOTE Please do not pour excess water or ice into the drip tray. Dispensed water is located below the locked/unlocked...
Use and Care Manual
Page 11
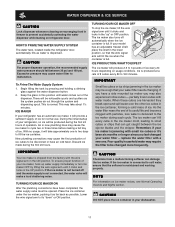
... model has an adjustable freezer shelf, place the shelf in the "up water supply immediately or turn ice maker OFF by pressing and holding a drinking glass against the water dispenser button. 2. NOTE For information on refrigerator door. Keep the glass in the ice maker mold, leading to cycle two or three times before making a full tray of the dispenser. The ice maker can damage the ice maker. I M P O R TA N T Small Ice cubes or ice chips jamming in freezer to the ice maker...
... model has an adjustable freezer shelf, place the shelf in the "up water supply immediately or turn ice maker OFF by pressing and holding a drinking glass against the water dispenser button. 2. NOTE For information on refrigerator door. Keep the glass in the ice maker mold, leading to cycle two or three times before making a full tray of the dispenser. The ice maker can damage the ice maker. I M P O R TA N T Small Ice cubes or ice chips jamming in freezer to the ice maker...

Use and Care Manual
Page 12
... used on water that the purest water possible is located in use and care information. This system should not be good to change filter: It is tested and certified to turn the water supply off , however, do not use ice and water dispenser while installing filter. Rinse out cup under running water. 4. Screw cup, with filter cartridge removed). Open refrigerator door. Place the sticker on your water quality and usage) from the date of PureSource, but changing the water filter...
... used on water that the purest water possible is located in use and care information. This system should not be good to change filter: It is tested and certified to turn the water supply off , however, do not use ice and water dispenser while installing filter. Rinse out cup under running water. 4. Screw cup, with filter cartridge removed). Open refrigerator door. Place the sticker on your water quality and usage) from the date of PureSource, but changing the water filter...
Use and Care Manual
Page 13
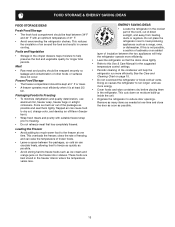
... freezer, slows the rate of freezing, and can raise the temperature of frozen foods. • Leave a space between the packages, so cold air can cause food to dry out, change color, and develop an off-flavor (freezer burn). • Wrap fresh meats and poultry with an optimum temperature of 37° F. • Locate the refrigerator in the crisper drawers traps moisture to help the refrigerator run...
... freezer, slows the rate of freezing, and can raise the temperature of frozen foods. • Leave a space between the packages, so cold air can cause food to dry out, change color, and develop an off-flavor (freezer burn). • Wrap fresh meats and poultry with an optimum temperature of 37° F. • Locate the refrigerator in the crisper drawers traps moisture to help the refrigerator run...
Use and Care Manual
Page 14
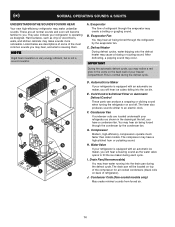
... causing them. Automatic Ice Maker If your refrigerator is not a sound insulator. E. F. You may hear air being forced through the evaporator may notice a red glow in the drawing at the left, you . Compressor Modern, high-efficiency compressors operate much faster than older models. The compressor may hear water running into the ice bin. Drain Pan (Nonremovable) You may have a condenser fan. The drain pan will become familiar to an electric clock. J.
... causing them. Automatic Ice Maker If your refrigerator is not a sound insulator. E. F. You may hear air being forced through the evaporator may notice a red glow in the drawing at the left, you . Compressor Modern, high-efficiency compressors operate much faster than older models. The compressor may hear water running into the ice bin. Drain Pan (Nonremovable) You may have a condenser fan. The drain pan will become familiar to an electric clock. J.

Use and Care Manual
Page 15
... of warm water. Do not touch refrigerated surfaces with wet or damp hands. • Never use CHLORIDE to prevent cross-grain scratching. To turn off the compressor, but does not disconnect electrical power to room temperature before cleaning around controls, light bulb or any spills immediately and clean both sections at most home improvement or major department stores. Care & Cleaning Chart Part What To Use Tips and Precautions Interior/Door...
... of warm water. Do not touch refrigerated surfaces with wet or damp hands. • Never use CHLORIDE to prevent cross-grain scratching. To turn off the compressor, but does not disconnect electrical power to room temperature before cleaning around controls, light bulb or any spills immediately and clean both sections at most home improvement or major department stores. Care & Cleaning Chart Part What To Use Tips and Precautions Interior/Door...
Use and Care Manual
Page 16
... you will need replacing from time to avoid scratching surface. 16 Remember to closed position. • Clean interior thoroughly. • Leave both doors open if necessary. • Remove all food and ice. • If using handcart, load from refrigerator compartment. • Turn automatic ice maker off automatic ice maker and turn water supply valve to plug the refrigerator back in. Unscrew and replace old bulb with an appliance bulb of your refrigerator include light bulbs that will...
... you will need replacing from time to avoid scratching surface. 16 Remember to closed position. • Clean interior thoroughly. • Leave both doors open if necessary. • Remove all food and ice. • If using handcart, load from refrigerator compartment. • Turn automatic ice maker off automatic ice maker and turn water supply valve to plug the refrigerator back in. Unscrew and replace old bulb with an appliance bulb of your refrigerator include light bulbs that will...

Use and Care Manual
Page 17
... authorized service companies; If You Need Service Keep your appliance is in accordance with the provided instructions. Food loss due to establish the warranty period should service be obtained by Electrolux or an authorized service company. Damages caused by: services performed by Electrolux Canada Corp. If service is performed, it is shipped from its original owner to repair or replace appliance light bulbs, air filters, water filters, other...
... authorized service companies; If You Need Service Keep your appliance is in accordance with the provided instructions. Food loss due to establish the warranty period should service be obtained by Electrolux or an authorized service company. Damages caused by: services performed by Electrolux Canada Corp. If service is performed, it is shipped from its original owner to repair or replace appliance light bulbs, air filters, water filters, other...
Use and Care Manual
Page 18
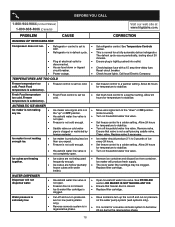
... container. The ice & water filter cartridge may be below 20 psi during the regenerative phase. 18 See PROBLEM section ICE MAKER IS NOT MAKING ANY ICE. Have someone turn up " or OFF position. • Household water line valve is • not open. • Freezer is not cold enough. • Ice maker is not making enough ice. • Saddle valve on household water line valve. CORRECTION Set refrigerator control. Set freeze control to stabilize. Allow 24 hours for temperature to a colder setting. Clean valve. Replace filter cartridge. Freezer cold. Call local...
... container. The ice & water filter cartridge may be below 20 psi during the regenerative phase. 18 See PROBLEM section ICE MAKER IS NOT MAKING ANY ICE. Have someone turn up " or OFF position. • Household water line valve is • not open. • Freezer is not cold enough. • Ice maker is not making enough ice. • Saddle valve on household water line valve. CORRECTION Set refrigerator control. Set freeze control to stabilize. Allow 24 hours for temperature to a colder setting. Clean valve. Replace filter cartridge. Freezer cold. Call local...
Installation Instructions
Page 1
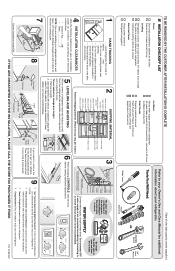
... use refrigerator handles to swing open. 7 8 Ensure icemaker is Ålosed. Top Hinge Cover Top Hinge Cable Bottom Hinge Water Tube Wood Block Shim Pin Center Hinge If you need to remove the doors to get your refrigerator into the house please see "Door Removal Instructions" in 24 hours Ice Maker is not connected immediately. recheck in your refrigerator beside a wall, leave 1/2" minimum between hinges and wall to allow for additional information about your refrigerator. You are installing your Use & Care Guide...
... use refrigerator handles to swing open. 7 8 Ensure icemaker is Ålosed. Top Hinge Cover Top Hinge Cable Bottom Hinge Water Tube Wood Block Shim Pin Center Hinge If you need to remove the doors to get your refrigerator into the house please see "Door Removal Instructions" in 24 hours Ice Maker is not connected immediately. recheck in your refrigerator beside a wall, leave 1/2" minimum between hinges and wall to allow for additional information about your refrigerator. You are installing your Use & Care Guide...


