Use and Care Manual
Page 1
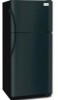
... Operating Sounds & Sights . 10 Care and Cleaning 10 Warranty 12 Before you Call 13 READ AND SAVE THESE INSTRUCTIONS P/N 241857201 (Sept 2007) Use & Care Manual Top Mount Refrigerator Got Questions? Need Parts or Service?
... Operating Sounds & Sights . 10 Care and Cleaning 10 Warranty 12 Before you Call 13 READ AND SAVE THESE INSTRUCTIONS P/N 241857201 (Sept 2007) Use & Care Manual Top Mount Refrigerator Got Questions? Need Parts or Service?

Use and Care Manual
Page 2
...8226; If the power cord is not covered under your old refrigerator or freezer, please follow the instructions below to prevent any other electrical components. PROPER DISPOSAL OF YOUR REFRIGERATOR OR FREEZER Risk of child entrapment Child entrapment and suffocation are still dangerous -...contact with rugs, bedspreads, plastic sheets or stretch wrap may not easily climb inside. • Have refrigerant removed by a qualified service technician. IMPORTANT Turning the Freezer and Fresh Food Controls to "0" turns off power to avoid electrical shock. • Performance may break...
...8226; If the power cord is not covered under your old refrigerator or freezer, please follow the instructions below to prevent any other electrical components. PROPER DISPOSAL OF YOUR REFRIGERATOR OR FREEZER Risk of child entrapment Child entrapment and suffocation are still dangerous -...contact with rugs, bedspreads, plastic sheets or stretch wrap may not easily climb inside. • Have refrigerant removed by a qualified service technician. IMPORTANT Turning the Freezer and Fresh Food Controls to "0" turns off power to avoid electrical shock. • Performance may break...
Use and Care Manual
Page 3
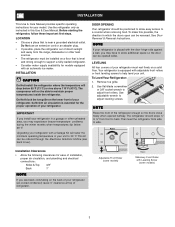
...circulation is level and strong enough to 34° F. To Level Your Refrigerator: 1. Use adjustable wrench to adjust front rollers. Do Not block the toe grille on a solid floor. IMPORTANT If you may experience freezer temperature problems during the winter months when temperatures dip below 55°F (...so the door can be ordered through the Electrolux Solutions Hotline (see black coils/tubing on the back of your refrigerator (air-cooled condenser) leave 3" clearance at top of direct sunlight and away from the range, dishwasher or other unheated area, you may have to allow easy...
...circulation is level and strong enough to 34° F. To Level Your Refrigerator: 1. Use adjustable wrench to adjust front rollers. Do Not block the toe grille on a solid floor. IMPORTANT If you may experience freezer temperature problems during the winter months when temperatures dip below 55°F (...so the door can be ordered through the Electrolux Solutions Hotline (see black coils/tubing on the back of your refrigerator (air-cooled condenser) leave 3" clearance at top of direct sunlight and away from the range, dishwasher or other unheated area, you may have to allow easy...
Use and Care Manual
Page 4
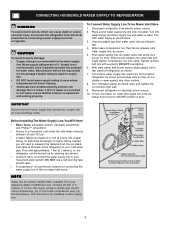
.../sleeves, and instructions for installing a water supply line. 4 IMPORTANT Ensure that your water supply line connections comply with a wrench; Disconnect refrigerator from water valve inlet and discard cap. 4. Slide ferrule (sleeve) into water valve inlet as far as it greatly increases the potential ... water supply line into valve inlet and finger tighten compression nut onto valve. Then add approximately 7 feet (2.1 meters), so the refrigerator can damage the ice maker. Manufacturer will need to measure the distance from the ice maker inlet valve at shutoff valve. 3. DO...
.../sleeves, and instructions for installing a water supply line. 4 IMPORTANT Ensure that your water supply line connections comply with a wrench; Disconnect refrigerator from water valve inlet and discard cap. 4. Slide ferrule (sleeve) into water valve inlet as far as it greatly increases the potential ... water supply line into valve inlet and finger tighten compression nut onto valve. Then add approximately 7 feet (2.1 meters), so the refrigerator can damage the ice maker. Manufacturer will need to measure the distance from the ice maker inlet valve at shutoff valve. 3. DO...
Use and Care Manual
Page 5
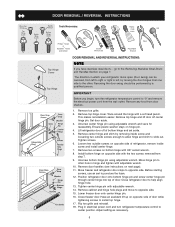
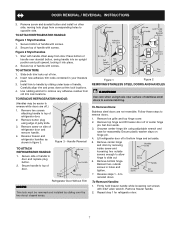
...adjustable wrench. 14. Remove any food from one side to install top hinge. 17. Unscrew center hinge pin using adjustable wrench. Move freezer and refrigerator door stops to help align hinge hole. 13. Lower freezer door onto center hinge pin. 16. Adjust setting as necessary. 5...toe grille and reinstall. 18. Move hinge pin to other . DOOR REMOVAL / REVERSAL INSTRUCTIONS Tools Necessary: Plastic Putty Awl Knife Phillips™ head or Quadrex™ head screwdriver (OR) OR Socket Wrench Set Adjustable Wrench Pliers Top Hinge Cover Top Hinge Door Stop Screw Door...
...adjustable wrench. 14. Remove any food from one side to install top hinge. 17. Unscrew center hinge pin using adjustable wrench. Move freezer and refrigerator door stops to help align hinge hole. 13. Lower freezer door onto center hinge pin. 16. Adjust setting as necessary. 5...toe grille and reinstall. 18. Move hinge pin to other . DOOR REMOVAL / REVERSAL INSTRUCTIONS Tools Necessary: Plastic Putty Awl Knife Phillips™ head or Quadrex™ head screwdriver (OR) OR Socket Wrench Set Adjustable Wrench Pliers Top Hinge Cover Top Hinge Door Stop Screw Door...
Use and Care Manual
Page 6
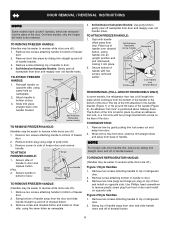
... by gently pulling trim lock areas out and away from door and slide handle down onto handle bracket. TO ATTACH FREEZER HANDLE: 1. Secure handle to top of refrigerator door. 2. An adhesive "trim lock" is held in place by sliding trim straight up and off of dovetail ... screws removed earlier. Place top of the door. TO ATTACH FREEZER HANDLE: 1. TO REMOVE FREEZER HANDLE: (Handles may be easier to gently peel off .) Figure 1 Style Handles 1. Self-Adhesive Nameplate Models: Use putty knife to reverse while doors are off .) 1. TO REMOVE REFRIGERATOR HANDLE: (Handles may be...
... by gently pulling trim lock areas out and away from door and slide handle down onto handle bracket. TO ATTACH FREEZER HANDLE: 1. Secure handle to top of refrigerator door. 2. An adhesive "trim lock" is held in place by sliding trim straight up and off of dovetail ... screws removed earlier. Place top of the door. TO ATTACH FREEZER HANDLE: 1. TO REMOVE FREEZER HANDLE: (Handles may be easier to gently peel off .) Figure 1 Style Handles 1. Self-Adhesive Nameplate Models: Use putty knife to reverse while doors are off .) 1. TO REMOVE REFRIGERATOR HANDLE: (Handles may be...
Use and Care Manual
Page 7
... doors are off.) 1. Follow these steps to reinstall doors To Remove Handles 1. Remove top hinge and lift freezer door off of handle. Set door aside. 3. Unscrew center hinge bin using edge of trim. 2. Lift refrigerator door off of handle to top of handle over the two donut shaped areas. Remove center hinge and shim...
... doors are off.) 1. Follow these steps to reinstall doors To Remove Handles 1. Remove top hinge and lift freezer door off of handle. Set door aside. 3. Unscrew center hinge bin using edge of trim. 2. Lift refrigerator door off of handle to top of handle over the two donut shaped areas. Remove center hinge and shim...
Use and Care Manual
Page 8
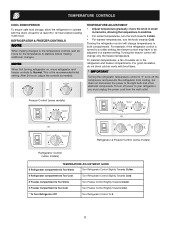
... to be adjusted to Normal. OR TEMPERATURE ADJUSTMENT • Adjust temperature gradually: move refrigerator and freezer controls to a warmer setting. Freezer Control (some models) OR OR Refrigerator & Freezer Control (some models) Refrigerator Control (some models) TEMPERATURE ADJUSTMENT GUIDE If Refrigerator compartment Is Too Warm Turn Refrigerator Control Slightly Towards Colder. To maintain temperatures, a fan circulates air in both...
... to be adjusted to Normal. OR TEMPERATURE ADJUSTMENT • Adjust temperature gradually: move refrigerator and freezer controls to a warmer setting. Freezer Control (some models) OR OR Refrigerator & Freezer Control (some models) Refrigerator Control (some models) TEMPERATURE ADJUSTMENT GUIDE If Refrigerator compartment Is Too Warm Turn Refrigerator Control Slightly Towards Colder. To maintain temperatures, a fan circulates air in both...

Use and Care Manual
Page 9
...completed, the water supply valve must be opened. New plumbing connections may cause the first production of your local dealer for normal use. Call your refrigerator, no usage, it will hit the ice when the container is full. To ensure proper function of ice. TURNING YOUR ICE MAKER ON After... be installed in the UP position. Place the ice container under the ice maker, pushing it clicks and locks in your model has an adjustable freezer shelf, place the shelf in the lower position, so that the softener is produced at any time. Ice is maintained and working properly. 9 ...
...completed, the water supply valve must be opened. New plumbing connections may cause the first production of your local dealer for normal use. Call your refrigerator, no usage, it will hit the ice when the container is full. To ensure proper function of ice. TURNING YOUR ICE MAKER ON After... be installed in the UP position. Place the ice container under the ice maker, pushing it clicks and locks in your model has an adjustable freezer shelf, place the shelf in the lower position, so that the softener is produced at any time. Ice is maintained and working properly. 9 ...
Use and Care Manual
Page 10
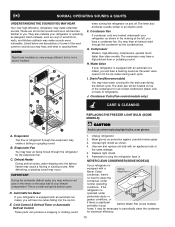
...produce a snapping or clicking sound REPLACING THE FREEZER LIGHT BULB (SOME MODELS) CAUTION Avoid cuts when replacing light bulbs, wear gloves. 1. NEVER CLEAN CONDENSER (SOME MODELS) If your freezer compartment. They also indicate your refrigerator is normal during each cycle. Drain Pan ... occur. Evaporator The flow of the compressor for maximum efficiency. 10 If the refrigerator is operated under normal operating conditions. After defrosting, a popping sound may be located on top of refrigerant through the evaporator may cause a hissing or sizzling sound. H.
...produce a snapping or clicking sound REPLACING THE FREEZER LIGHT BULB (SOME MODELS) CAUTION Avoid cuts when replacing light bulbs, wear gloves. 1. NEVER CLEAN CONDENSER (SOME MODELS) If your freezer compartment. They also indicate your refrigerator is normal during each cycle. Drain Pan ... occur. Evaporator The flow of the compressor for maximum efficiency. 10 If the refrigerator is operated under normal operating conditions. After defrosting, a popping sound may be located on top of refrigerant through the evaporator may cause a hissing or sizzling sound. H.
Use and Care Manual
Page 11
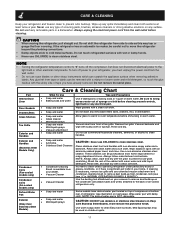
...surfaces. Do not wash any removable parts in a dishwasher. If cleaning is significant pet traffic in your refrigerator, you have defrost water pan located on top of compressor at bottom rear of refrigerator (see item "J" in dishwasher. NOTE: The defrost water pan is available from side to cold metal...• Soap and water • Soap and water • Mild liquid sprays Some models have already removed. CARE & CLEANING Keep your refrigerator and freezer clean to prevent odor build-up on the condenser coils (black tubes and wires) attached to the back of air-cooled...
...surfaces. Do not wash any removable parts in a dishwasher. If cleaning is significant pet traffic in your refrigerator, you have defrost water pan located on top of compressor at bottom rear of refrigerator (see item "J" in dishwasher. NOTE: The defrost water pan is available from side to cold metal...• Soap and water • Soap and water • Mild liquid sprays Some models have already removed. CARE & CLEANING Keep your refrigerator and freezer clean to prevent odor build-up on the condenser coils (black tubes and wires) attached to the back of air-cooled...

Use and Care Manual
Page 12
..., cabinets, walls, etc. 13. USA 1.800.944.9044 Electrolux Major Appliances North America P.O. Service calls which are subject to change or add to , any refrigerator or freezer failures. 6. or external causes such as -is warranted by Electrolux Canada Corp. ELECTROLUX SHALL NOT BE LIABLE FOR CONSEQUENTIAL OR INCIDENTAL DAMAGES SUCH AS PROPERTY...
..., cabinets, walls, etc. 13. USA 1.800.944.9044 Electrolux Major Appliances North America P.O. Service calls which are subject to change or add to , any refrigerator or freezer failures. 6. or external causes such as -is warranted by Electrolux Canada Corp. ELECTROLUX SHALL NOT BE LIABLE FOR CONSEQUENTIAL OR INCIDENTAL DAMAGES SUCH AS PROPERTY...
Use and Care Manual
Page 13
...Light switch may save you time and expense. Allow 24 hours for the temperature to stabilize. • Set refrigerator control to 3 pounds of defective workmanship or materials in refrigerator. Freezer temperature is satisfactory. Freezer temperature too cold. Refrigerator temperature is tightly pushed into electrical outlet. • Check/replace fuse with a 15 amp time-delay fuse... • Ice maker should be stuck. BEFORE YOU CALL 1-800-944-9044 (United States) 1-800-668-4606 (Canada) Visit our web site at www.frigidaire.com. Common Occurrences Refrigerator does not run.
...Light switch may save you time and expense. Allow 24 hours for the temperature to stabilize. • Set refrigerator control to 3 pounds of defective workmanship or materials in refrigerator. Freezer temperature is satisfactory. Freezer temperature too cold. Refrigerator temperature is tightly pushed into electrical outlet. • Check/replace fuse with a 15 amp time-delay fuse... • Ice maker should be stuck. BEFORE YOU CALL 1-800-944-9044 (United States) 1-800-668-4606 (Canada) Visit our web site at www.frigidaire.com. Common Occurrences Refrigerator does not run.


