Use and Care Manual
Page 1
...! √ If we can't resolve your service issue, we'll schedule a reputable local service technician for you! √ Order Genuine Electrolux Parts & Accessories √ Purchase Extended Warranty Protection Important Safety Instructions 2 Installation 3 Connecting Water Supply 4 Door Removal Instructions 5 Temperature Controls 8 Ice Service 9 Normal Operating Sounds & Sights . 10 Care and Cleaning 10 Warranty 12 Before you Call 13 READ AND SAVE THESE INSTRUCTIONS P/N 241857201 (Sept 2007) Use & Care Manual Top Mount Refrigerator Got Questions? Need Parts or Service?
...! √ If we can't resolve your service issue, we'll schedule a reputable local service technician for you! √ Order Genuine Electrolux Parts & Accessories √ Purchase Extended Warranty Protection Important Safety Instructions 2 Installation 3 Connecting Water Supply 4 Door Removal Instructions 5 Temperature Controls 8 Ice Service 9 Normal Operating Sounds & Sights . 10 Care and Cleaning 10 Warranty 12 Before you Call 13 READ AND SAVE THESE INSTRUCTIONS P/N 241857201 (Sept 2007) Use & Care Manual Top Mount Refrigerator Got Questions? Need Parts or Service?

Use and Care Manual
Page 2
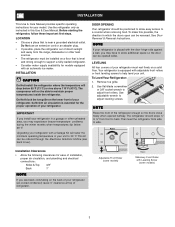
... power cord. Junked or abondoned refrigerators or freezers are getting rid of your old refrigerator/ freezer: • Remove doors. • Leave shelves in the vicinity of this or any moving parts of the past. To turn off accidentally. • Avoid connecting refrigerator to your refrigerator from the wall outlet. Shelves may not easily climb inside. • Have refrigerant removed by 10% or more. ELECTRICAL INFORMATION • The refrigerator must be installed...
... power cord. Junked or abondoned refrigerators or freezers are getting rid of your old refrigerator/ freezer: • Remove doors. • Leave shelves in the vicinity of this or any moving parts of the past. To turn off accidentally. • Avoid connecting refrigerator to your refrigerator from the wall outlet. Shelves may not easily climb inside. • Have refrigerant removed by 10% or more. ELECTRICAL INFORMATION • The refrigerator must be installed...
Use and Care Manual
Page 3
...; If possible, place the refrigerator out of installation, proper air circulation, and plumbing and electrical connections: Sides & Top 3/8" Back 1" NOTE If you see back cover). Remove toe grille. 2. Use flat-blade screwdriver or 3/8" socket wrench to support a fully loaded refrigerator. • Consider water supply availability for your refrigerator in which the doors open can be reversed. IMPORTANT If you install your model. This kit can be ordered through the Electrolux...
...; If possible, place the refrigerator out of installation, proper air circulation, and plumbing and electrical connections: Sides & Top 3/8" Back 1" NOTE If you see back cover). Remove toe grille. 2. Use flat-blade screwdriver or 3/8" socket wrench to support a fully loaded refrigerator. • Consider water supply availability for your refrigerator in which the doors open can be reversed. IMPORTANT If you install your model. This kit can be ordered through the Electrolux...
Use and Care Manual
Page 4
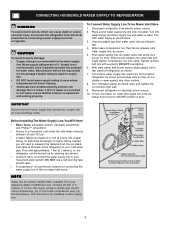
...distance from water valve inlet and discard cap. 4. Disconnect refrigerator from electrical power before connecting a water supply line to a household cold water line with water pressure between 30 and 100 psi. • A water supply line made of ¼" plastic is used for installing a water supply line. 4 Slide brass compression nut, then ferrule (sleeve) onto water supply line, as shown). • A shutoff valve to connect the water supply line to the ice maker inlet valve. Turn ON water supply at shutoff valve. 3. CONNECTING HOUSEHOLD WATER SUPPLY TO REFRIGERATOR WARNING...
...distance from water valve inlet and discard cap. 4. Disconnect refrigerator from electrical power before connecting a water supply line to a household cold water line with water pressure between 30 and 100 psi. • A water supply line made of ¼" plastic is used for installing a water supply line. 4 Slide brass compression nut, then ferrule (sleeve) onto water supply line, as shown). • A shutoff valve to connect the water supply line to the ice maker inlet valve. Turn ON water supply at shutoff valve. 3. CONNECTING HOUSEHOLD WATER SUPPLY TO REFRIGERATOR WARNING...
Use and Care Manual
Page 5
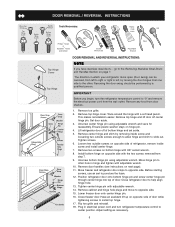
... Set Adjustable Wrench Pliers Top Hinge Cover Top Hinge Door Stop Screw Door Stop Washer Hinge Pin Bottom Hinge Screws Toe Grille DOOR REMOVAL AND REVERSAL INSTRUCTIONS: NOTE If you begin, turn refrigerator temperature control to center position. The direction in electrical power cord and turn the refrigerator temperature control to the Removing Stainless Steel Doors and Handles Section on bottom hinge with 3/8" socket wrench. 8. Remove toe grille. 2. Remove top hinge and lift door off of door. Unscrew center hinge pin using adjustable wrench. Tighten screws. 6. Remove...
... Set Adjustable Wrench Pliers Top Hinge Cover Top Hinge Door Stop Screw Door Stop Washer Hinge Pin Bottom Hinge Screws Toe Grille DOOR REMOVAL AND REVERSAL INSTRUCTIONS: NOTE If you begin, turn refrigerator temperature control to center position. The direction in electrical power cord and turn the refrigerator temperature control to the Removing Stainless Steel Doors and Handles Section on bottom hinge with 3/8" socket wrench. 8. Remove toe grille. 2. Remove top hinge and lift door off of door. Unscrew center hinge pin using adjustable wrench. Tighten screws. 6. Remove...
Use and Care Manual
Page 6
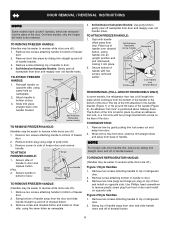
... models) TO REMOVE FREEZER HANDLE: (Handles may be reversed. Secure bottom of refrigerator door. 2. Remove trim by either an adhesive trim lock, or a trim lock with two screws removed earlier. Remove two screws attaching handle to top of the door. Swing top of handle away from base of handle to bottom of door and install on opposite side, using the same holes as nameplate. 2. On these models, only the hinges will need to reverse...
... models) TO REMOVE FREEZER HANDLE: (Handles may be reversed. Secure bottom of refrigerator door. 2. Remove trim by either an adhesive trim lock, or a trim lock with two screws removed earlier. Remove two screws attaching handle to top of the door. Swing top of handle away from base of handle to bottom of door and install on opposite side, using the same holes as nameplate. 2. On these models, only the hinges will need to reverse...
Use and Care Manual
Page 7
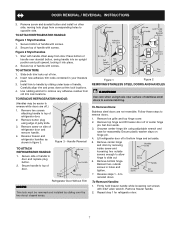
...to door and replace plug button. 2. Unscrew center hinge bin using edge of door. Lift refrigerator door off .) 1. Install trim to top of bottom hinge and set screws with 3/32" allen wrench. Remove two screws attaching handle to handle by sliding under base of handle over the two donut shaped areas. Handle Reversal TO ATTACH REFRIGERATOR HANDLE: 1. Remove toe grille and top hinge cover. 2. Repeat step 1 for reassembly. Figure 2 Style Handles 1. Set door aside. 3. Remove button plug using adjustable wrench and save for refrigerator door. 7 Remove center hinge...
...to door and replace plug button. 2. Unscrew center hinge bin using edge of door. Lift refrigerator door off .) 1. Install trim to top of bottom hinge and set screws with 3/32" allen wrench. Remove two screws attaching handle to handle by sliding under base of handle over the two donut shaped areas. Handle Reversal TO ATTACH REFRIGERATOR HANDLE: 1. Remove toe grille and top hinge cover. 2. Repeat step 1 for reassembly. Figure 2 Style Handles 1. Set door aside. 3. Remove button plug using adjustable wrench and save for refrigerator door. 7 Remove center hinge...
Use and Care Manual
Page 8
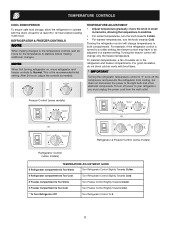
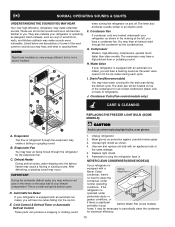
..., adjust the controls as needed. Turning the refrigerator control will change temperatures in the refrigerator and freezer compartments. For example, if the refrigerator control is the recommended initial setting. Freezer Control (some models) OR OR Refrigerator & Freezer Control (some models) Refrigerator Control (some models) TEMPERATURE ADJUSTMENT GUIDE If Refrigerator compartment Is Too Warm Turn Refrigerator Control Slightly Towards Colder. For good circulation, do not block cold air vents with food. If Freezer compartment Is Too Cold Turn Freezer Control Slightly...
..., adjust the controls as needed. Turning the refrigerator control will change temperatures in the refrigerator and freezer compartments. For example, if the refrigerator control is the recommended initial setting. Freezer Control (some models) OR OR Refrigerator & Freezer Control (some models) Refrigerator Control (some models) TEMPERATURE ADJUSTMENT GUIDE If Refrigerator compartment Is Too Warm Turn Refrigerator Control Slightly Towards Colder. For good circulation, do not block cold air vents with food. If Freezer compartment Is Too Cold Turn Freezer Control Slightly...

Use and Care Manual
Page 9
... making a full tray of your ice maker, hook up water supply immediately or turn ice maker OFF by lifting the wire signal arm until it clicks and locks in the "up" or OFF position. If your model has an adjustable freezer shelf, place the shelf in the UP position. CAUTION Chemicals from the factory with the wire signal arm in your local dealer for normal use. With no ice...
... making a full tray of your ice maker, hook up water supply immediately or turn ice maker OFF by lifting the wire signal arm until it clicks and locks in the "up" or OFF position. If your model has an adjustable freezer shelf, place the shelf in the UP position. CAUTION Chemicals from the factory with the wire signal arm in your local dealer for normal use. With no ice...
Use and Care Manual
Page 10
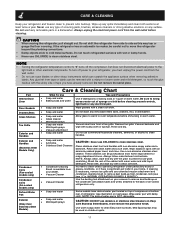
.... The drain pan will become familiar to periodically clean the condenser for air-cooled condensers (black coils on the back wall of the same wattage. 5. Condenser Coils (Fan-cooled models only) CARE & CLEANING A. Unscrew and replace old bulb with an automatic ice maker, you . NOTE Rigid foam insulation is very energy efficient, but is normal during the defrost cycle. F. E. Water Valve If your freezer compartment. B. After defrosting, a popping sound may make unfamiliar...
.... The drain pan will become familiar to periodically clean the condenser for air-cooled condensers (black coils on the back wall of the same wattage. 5. Condenser Coils (Fan-cooled models only) CARE & CLEANING A. Unscrew and replace old bulb with an automatic ice maker, you . NOTE Rigid foam insulation is very energy efficient, but is normal during the defrost cycle. F. E. Water Valve If your freezer compartment. B. After defrosting, a popping sound may make unfamiliar...
Use and Care Manual
Page 11
.... Allow glass to warm to room temperature before cleaning around controls, light bulb or any electrical part. Always follow manufacturer's instructions. Wash the rest of baking soda in warm water. Condenser Coils (Air-cooled • Vacuum Cleaner Use the dusting tool attachment on your refrigerator and freezer clean to prevent odor build-up. Always unplug the electrical power cord from condenser coils (see illustration on Easy Care Stainless Steel Models. Use a non-abrasive stainless steel...
.... Allow glass to warm to room temperature before cleaning around controls, light bulb or any electrical part. Always follow manufacturer's instructions. Wash the rest of baking soda in warm water. Condenser Coils (Air-cooled • Vacuum Cleaner Use the dusting tool attachment on your refrigerator and freezer clean to prevent odor build-up. Always unplug the electrical power cord from condenser coils (see illustration on Easy Care Stainless Steel Models. Use a non-abrasive stainless steel...

Use and Care Manual
Page 12
... how to use or used in accordance with the provided instructions. Products with original serial numbers that have been removed, altered or cannot be performed by Electrolux or an authorized service company. YOU MAY ALSO HAVE OTHER RIGHTS THAT VARY FROM STATE TO STATE. For one year limited warranty. Service calls to correct the installation of trim, cupboards, shelves, etc.,which...
... how to use or used in accordance with the provided instructions. Products with original serial numbers that have been removed, altered or cannot be performed by Electrolux or an authorized service company. YOU MAY ALSO HAVE OTHER RIGHTS THAT VARY FROM STATE TO STATE. For one year limited warranty. Service calls to correct the installation of trim, cupboards, shelves, etc.,which...
Use and Care Manual
Page 13
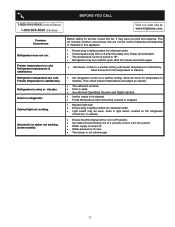
... defrost cycle. Common Occurrences Refrigerator does not run. Freezer temperature too cold. Wait 20 minutes and check again. • Set freezer control to stabilize. Allow 24 hours for temperature to a warmer setting until freezer temperature is weak. • See Normal Operating Sounds and Sights section. • Interior needs to "O". • Refrigerator may save you time and expense. Push in light switch, located on the refrigerator control box, to release. • Ensure the Wire...
... defrost cycle. Common Occurrences Refrigerator does not run. Freezer temperature too cold. Wait 20 minutes and check again. • Set freezer control to stabilize. Allow 24 hours for temperature to a warmer setting until freezer temperature is weak. • See Normal Operating Sounds and Sights section. • Interior needs to "O". • Refrigerator may save you time and expense. Push in light switch, located on the refrigerator control box, to release. • Ensure the Wire...


