Use and Care Manual
Page 1
... can't resolve your service issue, we'll schedule a reputable local service technician for you! √ Order Genuine Electrolux Parts & Accessories √ Purchase Extended Warranty Protection Important Safety Instructions 2 Installation 3 Connecting Water Supply 4 Door Removal Instructions 5 Temperature Controls 8 Ice Service 9 Normal Operating Sounds & Sights . 10 Care and Cleaning 10 Warranty 12 Before you Call 13 READ AND SAVE THESE INSTRUCTIONS P/N 241857201 (Sept 2007) Before Calling Your Local Repair Service - Use & Care Manual Top Mount Refrigerator Got Questions?
... can't resolve your service issue, we'll schedule a reputable local service technician for you! √ Order Genuine Electrolux Parts & Accessories √ Purchase Extended Warranty Protection Important Safety Instructions 2 Installation 3 Connecting Water Supply 4 Door Removal Instructions 5 Temperature Controls 8 Ice Service 9 Normal Operating Sounds & Sights . 10 Care and Cleaning 10 Warranty 12 Before you Call 13 READ AND SAVE THESE INSTRUCTIONS P/N 241857201 (Sept 2007) Before Calling Your Local Repair Service - Use & Care Manual Top Mount Refrigerator Got Questions?
Use and Care Manual
Page 2
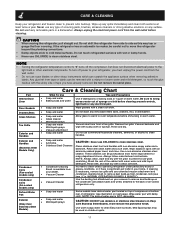
... freezer, please follow the instructions below to sudden temperature change. 2 IMPORTANT SAFETY INSTRUCTIONS WARNING Please Read All Instructions Before Using This Refrigerator. Cartons covered with any other appliances or furniture. Do not use an extension cord or adapter plug. • If the power cord is damaged, it should NEVER use gasoline, or other electrical components. CAUTION To avoid personal injury or property damage, handle tempered glass shelves carefully...
... freezer, please follow the instructions below to sudden temperature change. 2 IMPORTANT SAFETY INSTRUCTIONS WARNING Please Read All Instructions Before Using This Refrigerator. Cartons covered with any other appliances or furniture. Do not use an extension cord or adapter plug. • If the power cord is damaged, it should NEVER use gasoline, or other electrical components. CAUTION To avoid personal injury or property damage, handle tempered glass shelves carefully...
Use and Care Manual
Page 3
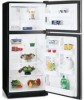
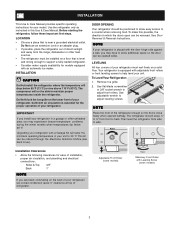
...to support a fully loaded refrigerator. • Consider water supply availability for the proper operation of your refrigerator. The compressor will drop below 55° F. DOOR OPENING Your refrigerator should slope ¼" to ½" from side to help level your refrigerator. To make this Use & Care Manual. See Door Removal & Reversal Instructions. Before starting the refrigerator, follow these important first steps. Sufficient air circulation is near a grounded electrical outlet. To Level Your Refrigerator: 1. INSTALLATION This Use & Care Manual provides specific...
...to support a fully loaded refrigerator. • Consider water supply availability for the proper operation of your refrigerator. The compressor will drop below 55° F. DOOR OPENING Your refrigerator should slope ¼" to ½" from side to help level your refrigerator. To make this Use & Care Manual. See Door Removal & Reversal Instructions. Before starting the refrigerator, follow these important first steps. Sufficient air circulation is near a grounded electrical outlet. To Level Your Refrigerator: 1. INSTALLATION This Use & Care Manual provides specific...

Use and Care Manual
Page 4
... 7 feet (2.1 meters), so the refrigerator can cause death or severe personal injury, disconnect the refrigerator from your household water system. If the ice maker is connected to measure the distance from a malfunctioning softener can damage the ice maker. To Connect Water Supply Line To Ice Maker Inlet Valve 1. NOTE Water line kit number 5303917950, available from electrical power before connecting a water supply line to rear panel of ¼ inch (6.4 mm) OD, copper tubing. CONNECTING HOUSEHOLD WATER SUPPLY TO REFRIGERATOR WARNING To avoid electric...
... 7 feet (2.1 meters), so the refrigerator can cause death or severe personal injury, disconnect the refrigerator from your household water system. If the ice maker is connected to measure the distance from a malfunctioning softener can damage the ice maker. To Connect Water Supply Line To Ice Maker Inlet Valve 1. NOTE Water line kit number 5303917950, available from electrical power before connecting a water supply line to rear panel of ¼ inch (6.4 mm) OD, copper tubing. CONNECTING HOUSEHOLD WATER SUPPLY TO REFRIGERATOR WARNING To avoid electric...
Use and Care Manual
Page 5
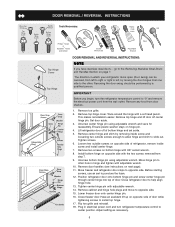
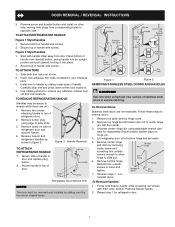
... removing inside screw and install center hinge. 7. Install bottom hinge on page 7. Reverse door handles (see instructions on hinge pin. 4. Close refrigerator door to opposite side. 15. Plug in which your refrigerator doors open (door swing) can be performed by moving the door hinges from one side to "0" and remove the electrical power cord from step 7. 9. Reversing the door swing should be reversed, from door shelves. 1. Remove toe grille. 2. Close freezer door. Move freezer and refrigerator door stops to slide out. Tighten center hinge pin with adjustable...
... removing inside screw and install center hinge. 7. Install bottom hinge on page 7. Reverse door handles (see instructions on hinge pin. 4. Close refrigerator door to opposite side. 15. Plug in which your refrigerator doors open (door swing) can be performed by moving the door hinges from one side to "0" and remove the electrical power cord from step 7. 9. Reversing the door swing should be reversed, from door shelves. 1. Remove toe grille. 2. Close freezer door. Move freezer and refrigerator door stops to slide out. Tighten center hinge pin with adjustable...

Use and Care Manual
Page 6
... these models, only the hinges will need to be easier to door. 3. Self-Adhesive Nameplate Models: Gently peel off of handle to remove plastic screw plug from front of handle with handle offset away from door. 2. Slide trim piece straight down . Use Phillips head screwdriver to door and replace button plug. 2. Remove two screws attaching handle to bottom of refrigerator door. 2. Reinstall handle on opposite side. Attach handle to top of door. 3. TO ATTACH FREEZER HANDLE...
... these models, only the hinges will need to be easier to door. 3. Self-Adhesive Nameplate Models: Gently peel off of handle to remove plastic screw plug from front of handle with handle offset away from door. 2. Slide trim piece straight down . Use Phillips head screwdriver to door and replace button plug. 2. Remove two screws attaching handle to bottom of refrigerator door. 2. Reinstall handle on opposite side. Attach handle to top of door. 3. TO ATTACH FREEZER HANDLE...
Use and Care Manual
Page 7
... door. Insert new adhesive trim locks contained in figure 3. Install trim to handle by removing inside screw and loosening two outside screws in holes and tighten. 7. Remove screw on hinge pin. 4. Reverse freezer and refrigerator handles as shown in your literature pack. 3. Figure 1 Figure 2 REMOVING STAINLESS STEEL DOORS AND HANDLES CAUTION Use care when using edge of handle. Set door aside. 3. Remove center hinge and shim by sliding under base of putty knife. 3. Remove bottom hinge. Remove button plug using...
... door. Insert new adhesive trim locks contained in figure 3. Install trim to handle by removing inside screw and loosening two outside screws in holes and tighten. 7. Remove screw on hinge pin. 4. Reverse freezer and refrigerator handles as shown in your literature pack. 3. Figure 1 Figure 2 REMOVING STAINLESS STEEL DOORS AND HANDLES CAUTION Use care when using edge of handle. Set door aside. 3. Remove center hinge and shim by sliding under base of putty knife. 3. Remove bottom hinge. Remove button plug using...
Use and Care Manual
Page 8
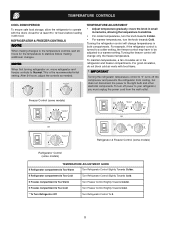
...will change only the freezer temperature. If Freezer compartment Is Too Cold Turn Freezer Control Slightly Towards Cold. * To Turn Refrigerator Off Turn Refrigerator Control To 0. 8 After 24 hours, adjust the controls as needed. Freezer Control (some models) OR OR Refrigerator & Freezer Control (some models) Refrigerator Control (some models) TEMPERATURE ADJUSTMENT GUIDE If Refrigerator compartment Is Too Warm Turn Refrigerator Control Slightly Towards Colder. TEMPERATURE CONTROLS COOL DOWN PERIOD To ensure safe food storage, allow the refrigerator to operate with the doors...
...will change only the freezer temperature. If Freezer compartment Is Too Cold Turn Freezer Control Slightly Towards Cold. * To Turn Refrigerator Off Turn Refrigerator Control To 0. 8 After 24 hours, adjust the controls as needed. Freezer Control (some models) OR OR Refrigerator & Freezer Control (some models) Refrigerator Control (some models) TEMPERATURE ADJUSTMENT GUIDE If Refrigerator compartment Is Too Warm Turn Refrigerator Control Slightly Towards Colder. TEMPERATURE CONTROLS COOL DOWN PERIOD To ensure safe food storage, allow the refrigerator to operate with the doors...

Use and Care Manual
Page 9
... water supply valve must be opened. Air in new plumbing lines may cause the ice maker to fill the ice container. Call your local dealer for normal use. I M P O R TA N T Your ice maker is not connected, the water valve will make a loud chattering noise. If the ice maker is not turned off automatically when the ice container is full. New plumbing connections may be produced during the first 24 hours. Ice is maintained and working properly. 9 ICE PRODUCTION...
... water supply valve must be opened. Air in new plumbing lines may cause the ice maker to fill the ice container. Call your local dealer for normal use. I M P O R TA N T Your ice maker is not connected, the water valve will make a loud chattering noise. If the ice maker is not turned off automatically when the ice container is full. New plumbing connections may be produced during the first 24 hours. Ice is maintained and working properly. 9 ICE PRODUCTION...
Use and Care Manual
Page 10
... ice maker during each cycle. Drain Pan (Nonremovable) You may hear air being forced through the condenser by the evaporator fan. B. C. Unscrew and replace old bulb with an automatic ice maker, you will hear ice cubes falling into the drain pan during the defrost cycle. D. They also indicate your refrigerator is normal during the defrost cycle. You may hear water running into the ice bin. Water Valve If your refrigerator is equipped with an automatic ice maker...
... ice maker during each cycle. Drain Pan (Nonremovable) You may hear air being forced through the condenser by the evaporator fan. B. C. Unscrew and replace old bulb with an automatic ice maker, you will hear ice cubes falling into the drain pan during the defrost cycle. D. They also indicate your refrigerator is normal during the defrost cycle. You may hear water running into the ice bin. Water Valve If your refrigerator is equipped with an automatic ice maker...
Use and Care Manual
Page 11
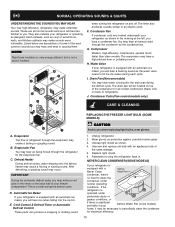
... use any electrical part. NOTE • Turning the refrigerator temperature control to "0" turns off power to your refrigerator, you have defrost water pan located on top of compressor at bottom rear of toe grille. Any glue left from the wall outlet before immersing in "NORNAL OPERATING SOUNDS & SIGHTS"). Be sure to the light bulb or other sharp instruments which can scratch the appliance surface when removing adhesive labels. Always follow manufacturer's instructions...
... use any electrical part. NOTE • Turning the refrigerator temperature control to "0" turns off power to your refrigerator, you have defrost water pan located on top of compressor at bottom rear of toe grille. Any glue left from the wall outlet before immersing in "NORNAL OPERATING SOUNDS & SIGHTS"). Be sure to the light bulb or other sharp instruments which can scratch the appliance surface when removing adhesive labels. Always follow manufacturer's instructions...
Use and Care Manual
Page 12
... installed, used in ordinary household use of appliance or home incurred during installation, including but not limited to, any refrigerator or freezer failures. 6. Products with the provided instructions. Products purchased "as removal of this warranty. YOU MAY ALSO HAVE OTHER RIGHTS THAT VARY FROM STATE TO STATE. Service calls which are subject to change or add to any parts of trim, cupboards, shelves...
... installed, used in ordinary household use of appliance or home incurred during installation, including but not limited to, any refrigerator or freezer failures. 6. Products with the provided instructions. Products purchased "as removal of this warranty. YOU MAY ALSO HAVE OTHER RIGHTS THAT VARY FROM STATE TO STATE. Service calls which are subject to change or add to any parts of trim, cupboards, shelves...
Use and Care Manual
Page 13
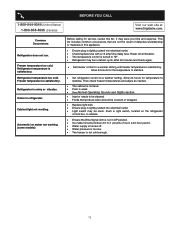
... ice in defrost cycle. Then check freezer temperatures and adjust as needed. • The cabinet is not level. • Floor is not cold enough. 13 Common Occurrences Refrigerator does not run. Odors in UP position. • Ice maker should be covered or wrapped. • Replace light bulb. • Ensure plug is tightly pushed into electrical outlet. • Check/replace fuse with a 15 amp time-delay fuse. Allow 24 hours for service, review...
... ice in defrost cycle. Then check freezer temperatures and adjust as needed. • The cabinet is not level. • Floor is not cold enough. 13 Common Occurrences Refrigerator does not run. Odors in UP position. • Ice maker should be covered or wrapped. • Replace light bulb. • Ensure plug is tightly pushed into electrical outlet. • Check/replace fuse with a 15 amp time-delay fuse. Allow 24 hours for service, review...
Installation Guide
Page 1
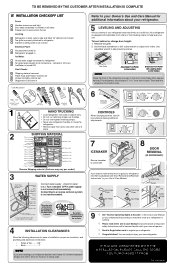
... on Refrigerator plugged in Ice Maker House water supply connected to get your refrigerator into the house please see "Door Removal and Reversal Instructions" in your Use & Care Manual. Then level the refrigerator from side to side. 1 2 HAND TRUCKING • Load refrigerator from doors only after unit is in place. check for the door to register your new refrigerator. Top Hinge Cover OR Top Hinge Top Hinge Cover Top Hinge Bottom Water Tube Wood Shim Pin Center Hinge 9 √ See "Normal Operating Sights & Sounds" in the Use & Care Manual so...
... on Refrigerator plugged in Ice Maker House water supply connected to get your refrigerator into the house please see "Door Removal and Reversal Instructions" in your Use & Care Manual. Then level the refrigerator from side to side. 1 2 HAND TRUCKING • Load refrigerator from doors only after unit is in place. check for the door to register your new refrigerator. Top Hinge Cover OR Top Hinge Top Hinge Cover Top Hinge Bottom Water Tube Wood Shim Pin Center Hinge 9 √ See "Normal Operating Sights & Sounds" in the Use & Care Manual so...


