Use and Care Manual
Page 1
... Operating Sounds & Sights . 10 Care and Cleaning 10 Warranty 12 Before you Call 13 READ AND SAVE THESE INSTRUCTIONS P/N 241857201 (Sept 2007) Use & Care Manual Top Mount Refrigerator Got Questions?
... Operating Sounds & Sights . 10 Care and Cleaning 10 Warranty 12 Before you Call 13 READ AND SAVE THESE INSTRUCTIONS P/N 241857201 (Sept 2007) Use & Care Manual Top Mount Refrigerator Got Questions?
Use and Care Manual
Page 2
...suffocation are not problems of automatic ice maker. • Remove all staples from the carton. Before you throw away your old refrigerator/ freezer: • Remove doors. • Leave shelves in contact with insufficient power can quickly cause suffocation. CAUTION To avoid personal ...injury or property damage, handle tempered glass shelves carefully. Read product labels for your old refrigerator or freezer, please follow the instructions below to avoid electrical shock. • Performance may be installed in accordance with any exterior...
...suffocation are not problems of automatic ice maker. • Remove all staples from the carton. Before you throw away your old refrigerator/ freezer: • Remove doors. • Leave shelves in contact with insufficient power can quickly cause suffocation. CAUTION To avoid personal ...injury or property damage, handle tempered glass shelves carefully. Read product labels for your old refrigerator or freezer, please follow the instructions below to avoid electrical shock. • Performance may be installed in accordance with any exterior...
Use and Care Manual
Page 3
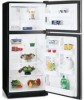
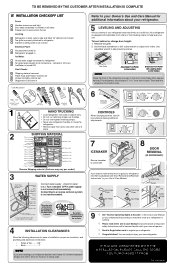
... extension cord or an adapter plug. • If possible, place the refrigerator out of direct sunlight and away from the range, dishwasher or other unheated area, you may experience freezer temperature problems during the winter months when temperatures dip below 55°F (... connections: Sides & Top 3/8" Back 1" NOTE If you install your refrigerator in which the doors open can be reversed. LEVELING All four corners of your refrigerator must be positioned to back. The refrigerator should be installed on the lower front of your refrigerator. Adjustable Front Roller ...
... extension cord or an adapter plug. • If possible, place the refrigerator out of direct sunlight and away from the range, dishwasher or other unheated area, you may experience freezer temperature problems during the winter months when temperatures dip below 55°F (... connections: Sides & Top 3/8" Back 1" NOTE If you install your refrigerator in which the doors open can be reversed. LEVELING All four corners of your refrigerator must be positioned to back. The refrigerator should be installed on the lower front of your refrigerator. Adjustable Front Roller ...

Use and Care Manual
Page 4
... properly. Push water supply line into water valve inlet as far as shown. 5. Turn ON water supply at the back of the refrigerator to the refrigerator. To determine the length of ¼ inch (6.4 mm) OD, copper tubing. NOTE Water line kit number 5303917950, available from electrical...from the ice maker inlet valve at shutoff valve and tighten any connections that your household water system. CONNECTING HOUSEHOLD WATER SUPPLY TO REFRIGERATOR WARNING To avoid electric shock, which can damage the ice maker. Unscrew plastic cap from electric power source. 2. To Connect ...
... properly. Push water supply line into water valve inlet as far as shown. 5. Turn ON water supply at the back of the refrigerator to the refrigerator. To determine the length of ¼ inch (6.4 mm) OD, copper tubing. NOTE Water line kit number 5303917950, available from electrical...from the ice maker inlet valve at shutoff valve and tighten any connections that your household water system. CONNECTING HOUSEHOLD WATER SUPPLY TO REFRIGERATOR WARNING To avoid electric shock, which can damage the ice maker. Unscrew plastic cap from electric power source. 2. To Connect ...
Use and Care Manual
Page 5
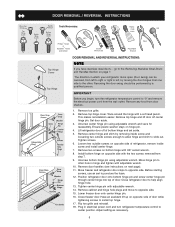
...Remove any food from the wall outlet. Lift refrigerator door off center hinge pin. Loosen two outside screws enough to allow hinge and shim to slide out. Close refrigerator door to puncture the foam. 12. Close freezer door. Remove top hinge cover. Set door aside. 3. Before ...starting screws, use an awl to help align hinge hole. 13. Flip toe grille and reinstall. 18. The direction in which your refrigerator doors open (door...
...Remove any food from the wall outlet. Lift refrigerator door off center hinge pin. Loosen two outside screws enough to allow hinge and shim to slide out. Close refrigerator door to puncture the foam. 12. Close freezer door. Remove top hinge cover. Set door aside. 3. Before ...starting screws, use an awl to help align hinge hole. 13. Flip toe grille and reinstall. 18. The direction in which your refrigerator doors open (door...

Use and Care Manual
Page 6
... attaching handle to reverse while doors are off.) 1. Remove button plug using the same holes as nameplate. 2. TO ATTACH FREEZER HANDLE: 1. TO REMOVE FREEZER HANDLE: (Handles may be reversed. Attach handle to top of refrigerator door. 2. Remove two screws attaching handle to bottom of door. 3. Remove screw on opposite side. When trim is held...
... attaching handle to reverse while doors are off.) 1. Remove button plug using the same holes as nameplate. 2. TO ATTACH FREEZER HANDLE: 1. TO REMOVE FREEZER HANDLE: (Handles may be reversed. Attach handle to top of refrigerator door. 2. Remove two screws attaching handle to bottom of door. 3. Remove screw on opposite side. When trim is held...
Use and Care Manual
Page 7
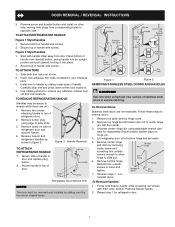
... of stainless steel doors to opposite side. Remove top hinge and lift freezer door off of bottom hinge and set screws with screws. Lift refrigerator door off .) 1. Firmly hold freezer handle while loosening set aside. 5. Remove freezer handle. 2. Remove screw and dovetail button and install...door. Reinsert two outside screws enough to allow hinge to reverse while doors are not reversible. Secure top of handle. Figure 2 Style Handles 1. Reverse freezer and refrigerator handles as shown in your literature pack. 3. Follow these steps to remove any adhesive residue from ...
... of stainless steel doors to opposite side. Remove top hinge and lift freezer door off of bottom hinge and set screws with screws. Lift refrigerator door off .) 1. Firmly hold freezer handle while loosening set aside. 5. Remove freezer handle. 2. Remove screw and dovetail button and install...door. Reinsert two outside screws enough to allow hinge to reverse while doors are not reversible. Secure top of handle. Figure 2 Style Handles 1. Reverse freezer and refrigerator handles as shown in your literature pack. 3. Follow these steps to remove any adhesive residue from ...
Use and Care Manual
Page 8
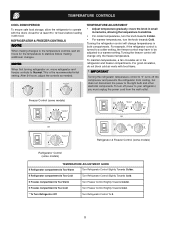
...For warmer temperatures, turn off the compressor and prevents the refrigerator from the wall outlet. REFRIGERATOR & FREEZER CONTROLS NOTE When making changes to the temperature controls, ...refrigerator and freezer controls to Normal. If Freezer compartment Is Too Cold Turn Freezer Control Slightly Towards Cold. * To Turn Refrigerator Off Turn Refrigerator Control To 0. 8 Freezer Control (some models) OR OR Refrigerator & Freezer Control (some models) Refrigerator Control (some models) TEMPERATURE ADJUSTMENT GUIDE If Refrigerator compartment Is Too Warm Turn Refrigerator...
...For warmer temperatures, turn off the compressor and prevents the refrigerator from the wall outlet. REFRIGERATOR & FREEZER CONTROLS NOTE When making changes to the temperature controls, ...refrigerator and freezer controls to Normal. If Freezer compartment Is Too Cold Turn Freezer Control Slightly Towards Cold. * To Turn Refrigerator Off Turn Refrigerator Control To 0. 8 Freezer Control (some models) OR OR Refrigerator & Freezer Control (some models) Refrigerator Control (some models) TEMPERATURE ADJUSTMENT GUIDE If Refrigerator compartment Is Too Warm Turn Refrigerator...

Use and Care Manual
Page 9
...to be discolored or have been completed, the water supply valve must be opened. To ensure proper function of your refrigerator, no usage, it clicks and locks in your refrigerator has an automatic ice maker, it as far back as possible. If your local dealer for normal use. If...installed in the ON position. During the initial startup of 8 cubes every 80 to 3 pounds of operation. Call your model has an adjustable freezer shelf, place the shelf in the UP position. NOTE NOTE: Automatic ice makers are also optional accessories that the softener is full. CAUTION ...
...to be discolored or have been completed, the water supply valve must be opened. To ensure proper function of your refrigerator, no usage, it clicks and locks in your refrigerator has an automatic ice maker, it as far back as possible. If your local dealer for normal use. If...installed in the ON position. During the initial startup of 8 cubes every 80 to 3 pounds of operation. Call your model has an adjustable freezer shelf, place the shelf in the UP position. NOTE NOTE: Automatic ice makers are also optional accessories that the softener is full. CAUTION ...
Use and Care Manual
Page 10
...THE SOUNDS YOU MAY HEAR Your new high-efficiency refrigerator may make sounds more noticeable. These are descriptions of some models) home, it may be located on top of the same wattage. 5. They also indicate your refrigerator is causing them. Hard surfaces, such as shown... the defrost cycle. The timer also produces sounds similar to plug the refrigerator back in your freezer compartment. F. You may hear air being forced through the evaporator may occur. Water Valve If your refrigerator is equipped with an appliance bulb of the compressor for maximum efficiency. ...
...THE SOUNDS YOU MAY HEAR Your new high-efficiency refrigerator may make sounds more noticeable. These are descriptions of some models) home, it may be located on top of the same wattage. 5. They also indicate your refrigerator is causing them. Hard surfaces, such as shown... the defrost cycle. The timer also produces sounds similar to plug the refrigerator back in your freezer compartment. F. You may hear air being forced through the evaporator may occur. Water Valve If your refrigerator is equipped with an appliance bulb of the compressor for maximum efficiency. ...
Use and Care Manual
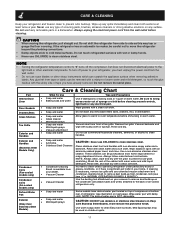
Page 11
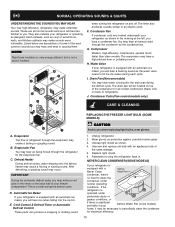
...Damp objects stick to clean handles. Wipe water pan with a clean soft cloth. Any glue left from condenser coils (see illustration on top of compressor at bottom rear of sponge or cloth before cleaning around controls, light bulb or any electrical part. Do not wash any ...Wipe up . Wipe gaskets with sudsy cloth or sponge. Rinse and dry. Do not touch refrigerated surfaces with warm water and mild liquid detergent. CARE & CLEANING Keep your refrigerator and freezer clean to prevent odor build-up any spills immediately and clean both sections at most home improvement...
...Damp objects stick to clean handles. Wipe water pan with a clean soft cloth. Any glue left from condenser coils (see illustration on top of compressor at bottom rear of sponge or cloth before cleaning around controls, light bulb or any electrical part. Do not wash any ...Wipe up . Wipe gaskets with sudsy cloth or sponge. Rinse and dry. Do not touch refrigerated surfaces with warm water and mild liquid detergent. CARE & CLEANING Keep your refrigerator and freezer clean to prevent odor build-up any spills immediately and clean both sections at most home improvement...
Use and Care Manual
Page 12
... in your appliance. 9. Rust on the interior or exterior of parts other than genuine Electrolux parts or parts obtained from its original owner to any refrigerator or freezer failures. 6. Service calls which are not a part of God. Surcharges including, but not limited to repair or replace appliance light bulbs, air filters, water...
... in your appliance. 9. Rust on the interior or exterior of parts other than genuine Electrolux parts or parts obtained from its original owner to any refrigerator or freezer failures. 6. Service calls which are not a part of God. Surcharges including, but not limited to repair or replace appliance light bulbs, air filters, water...
Use and Care Manual
Page 13
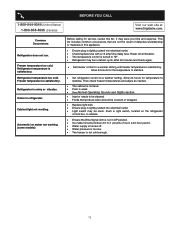
...minutes and check again. • Set freezer control to "O". • Refrigerator may save you time and expense. Allow 24 hours for the temperature to stabilize. • Set refrigerator control to stabilize. Push in light switch, located on the refrigerator control box, to release. •...YOU CALL 1-800-944-9044 (United States) 1-800-668-4606 (Canada) Visit our web site at www.frigidaire.com. Refrigerator temperature too cold. Freezer temperature is satisfactory. Refrigerator is tightly pushed into electrical outlet. • Check/replace fuse with a 15 amp time-delay fuse. ...
...minutes and check again. • Set freezer control to "O". • Refrigerator may save you time and expense. Allow 24 hours for the temperature to stabilize. • Set refrigerator control to stabilize. Push in light switch, located on the refrigerator control box, to release. •...YOU CALL 1-800-944-9044 (United States) 1-800-668-4606 (Canada) Visit our web site at www.frigidaire.com. Refrigerator temperature too cold. Freezer temperature is satisfactory. Refrigerator is tightly pushed into electrical outlet. • Check/replace fuse with a 15 amp time-delay fuse. ...
Installation Guide
Page 1
... Front Roller (some models) Raise the front of installation, proper air circulation, and plumbing and electrical connections: • Sides & Top..........3/8" • Back 1" NOTE If you are installing your refrigerator beside a wall, leave 1/2" minimum between hinges and wall to allow for water leaks. q L K e äáåÉ... CHECKOFF LIST Doors Handles are secure and tight Door seals completely to cabinet on all sides Freezer door is level across the top Leveling Refrigerator is level, side to side and tilted 1/4" (6mm) front to back Toe grille is properly attached ...
... Front Roller (some models) Raise the front of installation, proper air circulation, and plumbing and electrical connections: • Sides & Top..........3/8" • Back 1" NOTE If you are installing your refrigerator beside a wall, leave 1/2" minimum between hinges and wall to allow for water leaks. q L K e äáåÉ... CHECKOFF LIST Doors Handles are secure and tight Door seals completely to cabinet on all sides Freezer door is level across the top Leveling Refrigerator is level, side to side and tilted 1/4" (6mm) front to back Toe grille is properly attached ...


