Use and Care Manual
Page 2
... the range must be made by a qualified technician. Any additions, changes or conversions required in order for this warning can cause serious injury, fire or death. Gas) This natural gas range is correctly... polarized and properly grounded. For maximum safety, the power cord must be practiced when installing, operating and maintaining any appliance. Use your new range and Thank You for choosing our product. The selfaddressed PRODUCT REGISTRATION CARD should be properly grounded. Welcome & Congratulations Congratulations on your model...
... the range must be made by a qualified technician. Any additions, changes or conversions required in order for this warning can cause serious injury, fire or death. Gas) This natural gas range is correctly... polarized and properly grounded. For maximum safety, the power cord must be practiced when installing, operating and maintaining any appliance. Use your new range and Thank You for choosing our product. The selfaddressed PRODUCT REGISTRATION CARD should be properly grounded. Welcome & Congratulations Congratulations on your model...
Use and Care Manual
Page 4
... Grease Fires-Smother the fire with aluminum foil. The broiler pan and its insert. IMPORTANT INSTRUCTIONS FOR CLEANING YOUR RANGE • Clean the range regularly to keep all utensils from the high heat of grease that could catch fire. Before self cleaning the oven...door gasket is operating may cause severe burns. Refer to the range manufacturer's instructions for cleaning. • Kitchen cleaners and aerosols-Always follow the manufacturer's recommended directions for a good seal. IMPORTANT-ELECTRIC IGNITION MODELS ONLY: Do not attempt to cause burns. If the power fails...
... Grease Fires-Smother the fire with aluminum foil. The broiler pan and its insert. IMPORTANT INSTRUCTIONS FOR CLEANING YOUR RANGE • Clean the range regularly to keep all utensils from the high heat of grease that could catch fire. Before self cleaning the oven...door gasket is operating may cause severe burns. Refer to the range manufacturer's instructions for cleaning. • Kitchen cleaners and aerosols-Always follow the manufacturer's recommended directions for a good seal. IMPORTANT-ELECTRIC IGNITION MODELS ONLY: Do not attempt to cause burns. If the power fails...
Use and Care Manual
Page 5
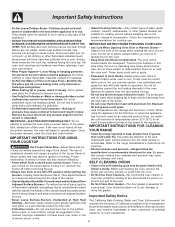
... Rear Burner Valve & Knob. 7. Dishwasher safe Burner Grates (styles & colors vary by model). 10. Adjustable Oven Rack(s). 16. Broil Pan Insert (some models). 13. Features At A Glance 1 2 Your Gas Range Features Include: 1. Automatic Oven Door Light Switch (some models). 28. Large 1 piece Oven Door Handle. 18. Bake-n-Warm™ Double Oven, Drawer 29 Rack, Drawer...
... Rear Burner Valve & Knob. 7. Dishwasher safe Burner Grates (styles & colors vary by model). 10. Adjustable Oven Rack(s). 16. Broil Pan Insert (some models). 13. Features At A Glance 1 2 Your Gas Range Features Include: 1. Automatic Oven Door Light Switch (some models). 28. Large 1 piece Oven Door Handle. 18. Bake-n-Warm™ Double Oven, Drawer 29 Rack, Drawer...
Use and Care Manual
Page 6
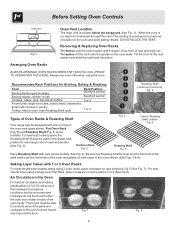
...hot air must be sure pans and cookware do not touch each other, the oven door, sides or back of Oven Racks & Roasting Shelf Your range may be used in the oven and good baking results. To replace, fit the rack onto the guides on rack positions 2 & 5 (See Fig. ...7). some models; Baking Layer Cakes with care (some models). Flat Oven Rack (Fig. 5) and Roasting Shelf (Fig. 6; Removing & Replacing Oven Racks To remove, pull the rack forward until it stops....
...hot air must be sure pans and cookware do not touch each other, the oven door, sides or back of Oven Racks & Roasting Shelf Your range may be used in the oven and good baking results. To replace, fit the rack onto the guides on rack positions 2 & 5 (See Fig. ...7). some models; Baking Layer Cakes with care (some models). Flat Oven Rack (Fig. 5) and Roasting Shelf (Fig. 6; Removing & Replacing Oven Racks To remove, pull the rack forward until it stops....
Use and Care Manual
Page 7
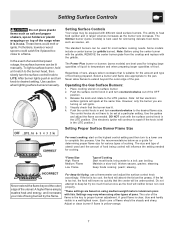
... the cooktop and replace with different sized surface burners. The Power Plus burner or burners (some models) is best used for the amount and type of the OFF position. 3. Operating the Gas Surface Burners: 1. Place cooking utensil on using other types of an electrical power outage, the ... the event of pans. After burner lights push in use a thermometer and adjust the surface control knob accordingly. Setting Surface Controls Your range may vary when using medium-weight metal or aluminum pans with the surface control knob in larger volumes increases as salt and pepper shakers,...
... the cooktop and replace with different sized surface burners. The Power Plus burner or burners (some models) is best used for the amount and type of the OFF position. 3. Operating the Gas Surface Burners: 1. Place cooking utensil on using other types of an electrical power outage, the ... the event of pans. After burner lights push in use a thermometer and adjust the surface control knob accordingly. Setting Surface Controls Your range may vary when using medium-weight metal or aluminum pans with the surface control knob in larger volumes increases as salt and pepper shakers,...
Use and Care Manual
Page 16
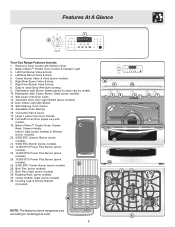
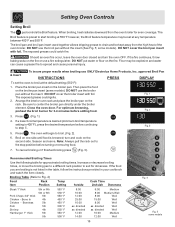
... 8:00 Well 15:00 Well 8:00 Well as directed Well as directed Well 10:00 Medium 12:00 Well 16 3 2 1 Fig. 4 Fig. 5 some models). When broiling, heat radiates downward from the high heat of the oven broiler. Place the broiler pan insert on the broiler pan insert (some... is 400°F), press the desired temperature before continuing Fig. 3 to spread and cause personal injury. & Insert. DO NOT use a fire extinguisher. some models Should an oven fire occur, leave the oven door closed and turn and cook on the rack. If the fire continues, throw baking soda on...
... 8:00 Well 15:00 Well 8:00 Well as directed Well as directed Well 10:00 Medium 12:00 Well 16 3 2 1 Fig. 4 Fig. 5 some models). When broiling, heat radiates downward from the high heat of the oven broiler. Place the broiler pan insert on the broiler pan insert (some... is 400°F), press the desired temperature before continuing Fig. 3 to spread and cause personal injury. & Insert. DO NOT use a fire extinguisher. some models Should an oven fire occur, leave the oven door closed and turn and cook on the rack. If the fire continues, throw baking soda on...
Use and Care Manual
Page 18
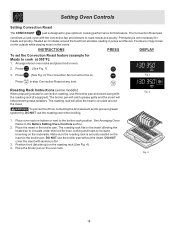
Press . (See Fig. 1) 3. Roasting Rack Instructions (some models) Fig. 2 When preparing meats for convection roasting, use the broiler pan and insert along with the convection fan and element to roast meats and poultry. ...
Press . (See Fig. 1) 3. Roasting Rack Instructions (some models) Fig. 2 When preparing meats for convection roasting, use the broiler pan and insert along with the convection fan and element to roast meats and poultry. ...

Use and Care Manual
Page 22
... Bake or Delay Start (Delayed Timed Bake). 4. At the same time press and hold both the and pads for proper usage, and a complete list of models with all normal functions. For further assistance, guidelines for at http:\\www.star-k.org. Fig. 1 Note: If no further pads are touched within 25 seconds...
... Bake or Delay Start (Delayed Timed Bake). 4. At the same time press and hold both the and pads for proper usage, and a complete list of models with all normal functions. For further assistance, guidelines for at http:\\www.star-k.org. Fig. 1 Note: If no further pads are touched within 25 seconds...
Use and Care Manual
Page 25
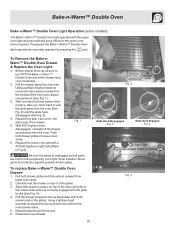
...BOTH glide hooks disengaged, carefully lift the drawer up the drawer with both drawer glides into lower oven cavity. 6. Fig. 1 Be sure the range is opened. Carefully rest the drawer on top of the drawer side slots are COOL before replacing oven light. Replace drawer rack if removed. 6. ... remove the two drawer screws from lower oven cavity. 2. Bake-n-Warm™ Double Oven Bake-n-Warm™ Double Oven Light Operation (some models): The Bake-n-Warm™ Double Oven light operates with the upper oven light and automatically turns ON when the upper oven door is unplugged ...
...BOTH glide hooks disengaged, carefully lift the drawer up the drawer with both drawer glides into lower oven cavity. 6. Fig. 1 Be sure the range is opened. Carefully rest the drawer on top of the drawer side slots are COOL before replacing oven light. Replace drawer rack if removed. 6. ... remove the two drawer screws from lower oven cavity. 2. Bake-n-Warm™ Double Oven Bake-n-Warm™ Double Oven Light Operation (some models): The Bake-n-Warm™ Double Oven light operates with the upper oven light and automatically turns ON when the upper oven door is unplugged ...
Use and Care Manual
Page 30
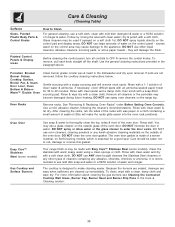
... a soapy scouring pad will remove most spots. DO NOT spray liquids directly on the range top. Gentle scouring with a soft cloth. Rinse & wipe dry with Easy Care™ Stainless Steel (some models). DO NOT use ANY store bought cleaners like Stainless Steel cleaners or any abrasive, chlorides...with wax paper or a cloth containing a small amount of cleaners containing any other liquid cleaners, abrasive cleaners, scouring pads, or some models) Gas Cooktop and Surface Burners Use soap & water to use other types of salad oil (this gasket. The cooktop is essential for 30 to...
... a soapy scouring pad will remove most spots. DO NOT spray liquids directly on the range top. Gentle scouring with a soft cloth. Rinse & wipe dry with Easy Care™ Stainless Steel (some models). DO NOT use ANY store bought cleaners like Stainless Steel cleaners or any abrasive, chlorides...with wax paper or a cloth containing a small amount of cleaners containing any other liquid cleaners, abrasive cleaners, scouring pads, or some models) Gas Cooktop and Surface Burners Use soap & water to use other types of salad oil (this gasket. The cooktop is essential for 30 to...
Use and Care Manual
Page 31
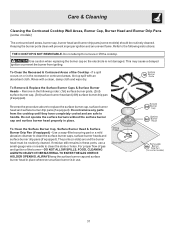
... burner grate, (2nd) surface burner cap, (3rd) surface burner head and (4th) surface burner drip pan (if equipped). For proper flow of gas and ignition of the Cooktop - Care & Cleaning Cleaning the Contoured Cooktop Well Areas, Burner Cap, Burner Head and Burner Drip Pans (some... models) The contoured well areas, burner cap, burner head and burner drip pans (some models) should be routinely cleaned. To Clean the Surface Burner Cap, Surface Burner Head & Surface Burner Drip Pan ...
... burner grate, (2nd) surface burner cap, (3rd) surface burner head and (4th) surface burner drip pan (if equipped). For proper flow of gas and ignition of the Cooktop - Care & Cleaning Cleaning the Contoured Cooktop Well Areas, Burner Cap, Burner Head and Burner Drip Pans (some... models) The contoured well areas, burner cap, burner head and burner drip pans (some models) should be routinely cleaned. To Clean the Surface Burner Cap, Surface Burner Head & Surface Burner Drip Pan ...
Use and Care Manual
Page 33
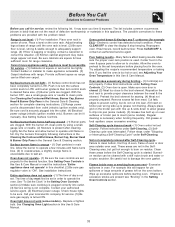
...Cleaning. Old grease or food spatters cause excessive smoking. Flames inside oven or smoking from meat. For example this checklist. (2) Be sure gas regulator valve is orange - (1) Dust particles in bold) that are provided with a stiff nylon brush and water or a nylon scrubber. Provide.... Entire appliance does not operate - (1) The time of oven. Check house lights to be cleaned with the problem listed: Range is plugged correctly into pan (some models) - See Changing Oven Light section in the Setting Oven Controls section.(2) Make sure cord/plug is not level - (1) Poor...
...Cleaning. Old grease or food spatters cause excessive smoking. Flames inside oven or smoking from meat. For example this checklist. (2) Be sure gas regulator valve is orange - (1) Dust particles in bold) that are provided with a stiff nylon brush and water or a nylon scrubber. Provide.... Entire appliance does not operate - (1) The time of oven. Check house lights to be cleaned with the problem listed: Range is plugged correctly into pan (some models) - See Changing Oven Light section in the Setting Oven Controls section.(2) Make sure cord/plug is not level - (1) Poor...


