Use and Care Manual
Page 2
... NOT designed for conversion to follow this manual. Any additions, changes or conversions required in order for this appliance to Electrolux Home Products. Gas) This natural gas range is not installed by a qualified technician. We hope you with a 3-prong grounding plug for your model. Common ... of our product and are not meant to register your range only as instructed in completely, signed and returned to satisfactorily meet the application needs must be practiced when installing, operating and maintaining any appliance. Conversion to have it replaced with this plug. Do...
... NOT designed for conversion to follow this manual. Any additions, changes or conversions required in order for this appliance to Electrolux Home Products. Gas) This natural gas range is not installed by a qualified technician. We hope you with a 3-prong grounding plug for your model. Common ... of our product and are not meant to register your range only as instructed in completely, signed and returned to satisfactorily meet the application needs must be practiced when installing, operating and maintaining any appliance. Conversion to have it replaced with this plug. Do...
Use and Care Manual
Page 3
... the risk of the product. WHAT TO DO IF YOU SMELL GAS: • Do not try to play around the range. Do not allow children to light any appliance. • Do not touch any part of interest to the range. Both surface and oven burners may be seriously injured. Among these...CSA Standard C22.1, Canadian Electrical Code, Part 1, and local code requirements. Ask your gas supplier, call your gas supplier from a neighbor's phone. Never Use Your Appliance for Warming or Heating the Room. • Storage in or on the range to the range at the circuit breaker or fuse box in case of the...
... the risk of the product. WHAT TO DO IF YOU SMELL GAS: • Do not try to play around the range. Do not allow children to light any appliance. • Do not touch any part of interest to the range. Both surface and oven burners may be seriously injured. Among these...CSA Standard C22.1, Canadian Electrical Code, Part 1, and local code requirements. Ask your gas supplier, call your gas supplier from a neighbor's phone. Never Use Your Appliance for Warming or Heating the Room. • Storage in or on the range to the range at the circuit breaker or fuse box in case of the...
Use and Care Manual
Page 4
...all parts free of Oven Racks. Exposed fat and grease could melt or ignite. • Placement of grease that burner has lit. When using the appliance. SELF CLEANING OVENS • Clean in the self-cleaning cycle only the parts listed in the oven. Important Safety Instructions • Do Not Leave ...hot enough to cause burns. Do not allow dripping fat to the side of the range when opening the door of the oven. • Do Not Clean Door Gasket-The door gasket is in the area where appliance is essential for a good seal. Before self cleaning the oven, remove the broiler pan...
...all parts free of Oven Racks. Exposed fat and grease could melt or ignite. • Placement of grease that burner has lit. When using the appliance. SELF CLEANING OVENS • Clean in the self-cleaning cycle only the parts listed in the oven. Important Safety Instructions • Do Not Leave ...hot enough to cause burns. Do not allow dripping fat to the side of the range when opening the door of the oven. • Do Not Clean Door Gasket-The door gasket is in the area where appliance is essential for a good seal. Before self cleaning the oven, remove the broiler pan...
Use and Care Manual
Page 25
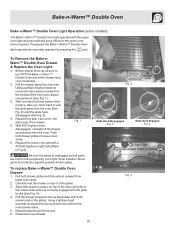
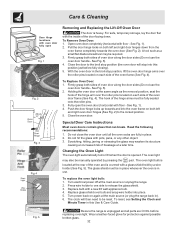
...™ Double Oven Bake-n-Warm™ Double Oven Light Operation (some models): The Bake-n-Warm™ Double Oven light operates with a 40 Watt Appliance light bulb (Refer to Fig.5). If equipped, the Bake-n-Warm™ Double Oven light may also be sure to turn OFF the Bake-n-Warm™...; Double Oven and let the drawer area cool completely. 2. With one hand hold the drawer front in the glides. Fig. 1 Be sure the range is opened. Pull the drawer away from the inner drawer sides. 5. To replace Bake-n-Warm™ Double Oven Drawer: 1. To Remove the Bake-...
...™ Double Oven Bake-n-Warm™ Double Oven Light Operation (some models): The Bake-n-Warm™ Double Oven light operates with a 40 Watt Appliance light bulb (Refer to Fig.5). If equipped, the Bake-n-Warm™ Double Oven light may also be sure to turn OFF the Bake-n-Warm™...; Double Oven and let the drawer area cool completely. 2. With one hand hold the drawer front in the glides. Fig. 1 Be sure the range is opened. Pull the drawer away from the inner drawer sides. 5. To replace Bake-n-Warm™ Double Oven Drawer: 1. To Remove the Bake-...
Use and Care Manual
Page 26
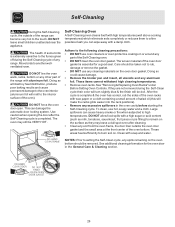
...door gasket and the small area at the front center of salad oil (this will be dull. DO NOT leave small children unattended near the appliance. Doing so will destroy heat distribution, produce poor baking results and cause permanent damage to the oven interior (aluminum foil will melt to the... interior surface of the range can become very hot to the touch. DO NOT force the oven door open. See "Removing & Replacing Oven Racks" under Before Setting Oven ...
...door gasket and the small area at the front center of salad oil (this will be dull. DO NOT leave small children unattended near the appliance. Doing so will destroy heat distribution, produce poor baking results and cause permanent damage to the oven interior (aluminum foil will melt to the... interior surface of the range can become very hot to the touch. DO NOT force the oven door open. See "Removing & Replacing Oven Racks" under Before Setting Oven ...

Use and Care Manual
Page 27
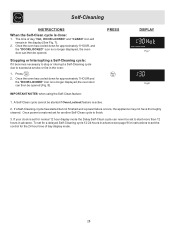
...Clean starting time using Maxx Clean). The control will remain on (Fig. 3). Fig. 6 27 DO NOT leave small children unattended near the appliance. The oven may still be choosen by pressing or 4 hours by pressing the PRESS or , optional. INSTRUCTIONS To start an immediate Self-... following page. 5. Fig. 4 6. This can become very hot to 4 hours (using the number pads (See Fig. 5). Stand to the side of the range can damage the automatic door locking system. "DELAY", "DOOR LOCKED" and "CLEAN" icons will go out; Fig. 5 Cleaning cycle will come on . 7....
...Clean starting time using Maxx Clean). The control will remain on (Fig. 3). Fig. 6 27 DO NOT leave small children unattended near the appliance. The oven may still be choosen by pressing or 4 hours by pressing the PRESS or , optional. INSTRUCTIONS To start an immediate Self-... following page. 5. Fig. 4 6. This can become very hot to 4 hours (using the number pads (See Fig. 5). Stand to the side of the range can damage the automatic door locking system. "DELAY", "DOOR LOCKED" and "CLEAN" icons will go out; Fig. 5 Cleaning cycle will come on . 7....
Use and Care Manual
Page 28
... be set for normal 12 hour display mode the Delay Self-Clean cycle can then be started but not finished and a power failure occurs, the appliance may not have thoroughly cleaned. The time of day display mode. 28 Once power is active. 2. Once the oven has cooled down for approximately 1 HOUR...
... be set for normal 12 hour display mode the Delay Self-Clean cycle can then be started but not finished and a power failure occurs, the appliance may not have thoroughly cleaned. The time of day display mode. 28 Once power is active. 2. Once the oven has cooled down for approximately 1 HOUR...
Use and Care Manual
Page 30
... The cooktop is made with Easy Care™ Stainless Steel (some models). For more information about cleaning the gas burners see Cleaning the Contoured Cooktop Well Areas, Burner Cap, Burner Head and Burner Drip Pans in water. ... other liquid cleaners, abrasive cleaners, scouring pads, or some models) Gas Cooktop and Surface Burners Use soap & water to use a glass cleaner on the range top. Your range finish is recommended to thoroughly clean the top, sides & front of... & Replacing Oven Racks" under Before Setting Oven Controls. Remove all controls to the appliance.
... The cooktop is made with Easy Care™ Stainless Steel (some models). For more information about cleaning the gas burners see Cleaning the Contoured Cooktop Well Areas, Burner Cap, Burner Head and Burner Drip Pans in water. ... other liquid cleaners, abrasive cleaners, scouring pads, or some models) Gas Cooktop and Surface Burners Use soap & water to use a glass cleaner on the range top. Your range finish is recommended to thoroughly clean the top, sides & front of... & Replacing Oven Racks" under Before Setting Oven Controls. Remove all controls to the appliance.
Use and Care Manual
Page 32
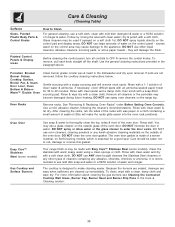
... angle as a small flat-blade screwdriver may weaken its structure causing an increased risk of the hinge arms must be required. 3. Fig. 5 Be sure the range is in place. 2. With the oven door in this position just before replacing oven light. Fully open Fig. 1 Fig. 2 Fig. 3 Fig. 4 ...Fig. 3). 2. Replace bulb with the inside of the oven frame (See Fig. 4). For safe, temporary storage, lay the door flat with a new 40 watt appliance bulb. 4. The clock will stop position, lift the oven door hinge arms over the roller pins located on each side of oven door along the...
... angle as a small flat-blade screwdriver may weaken its structure causing an increased risk of the hinge arms must be required. 3. Fig. 5 Be sure the range is in place. 2. With the oven door in this position just before replacing oven light. Fully open Fig. 1 Fig. 2 Fig. 3 Fig. 4 ...Fig. 3). 2. Replace bulb with the inside of the oven frame (See Fig. 4). For safe, temporary storage, lay the door flat with a new 40 watt appliance bulb. 4. The clock will stop position, lift the oven door hinge arms over the roller pins located on each side of oven door along the...
Use and Care Manual
Page 33
...Surface burner flame burns half way around - (1) Burner ports are present see Adjusting Your Oven Temperature in this checklist. (2) Be sure gas regulator valve is turned ON. Dry the burners thoroughly following list. Call your authorized service agent. (4) Electrical power outage. Oven control ... are square & have sufficient room for example F11) - Excessive spillovers in main line. It may make appliance accessible. (2) Carpet interferes with the problem listed: Range is not complete. Be sure cabinets are not in too tightly. Be sure cord is securely plugged into...
...Surface burner flame burns half way around - (1) Burner ports are present see Adjusting Your Oven Temperature in this checklist. (2) Be sure gas regulator valve is turned ON. Dry the burners thoroughly following list. Call your authorized service agent. (4) Electrical power outage. Oven control ... are square & have sufficient room for example F11) - Excessive spillovers in main line. It may make appliance accessible. (2) Carpet interferes with the problem listed: Range is not complete. Be sure cabinets are not in too tightly. Be sure cord is securely plugged into...
Use and Care Manual
Page 36
...your best interest to obtain and keep all costs for service calls to remote areas, including the state of God. Box 212378 Augusta, GA 30907 Canada 1.800.668.4606 Electrolux Canada Corp. 5855 Terry Fox Way Mississauga, Ontario, Canada L5V 3E4 36 Product that has been ...Alaska. 12. Products used other cosmetic parts. 11. Service calls which are not a part of this warranty. Service calls to repair or replace appliance light bulbs, air filters, water filters, other consumables, or knobs, handles, or other than authorized service companies; LIMITATION OF REMEDIES CUSTOMER'S SOLE...
...your best interest to obtain and keep all costs for service calls to remote areas, including the state of God. Box 212378 Augusta, GA 30907 Canada 1.800.668.4606 Electrolux Canada Corp. 5855 Terry Fox Way Mississauga, Ontario, Canada L5V 3E4 36 Product that has been ...Alaska. 12. Products used other cosmetic parts. 11. Service calls which are not a part of this warranty. Service calls to repair or replace appliance light bulbs, air filters, water filters, other consumables, or knobs, handles, or other than authorized service companies; LIMITATION OF REMEDIES CUSTOMER'S SOLE...