Use and Care Manual
Page 2
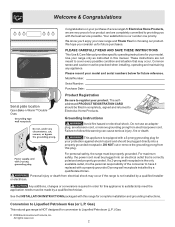
... it replaced with the best service possible. Common sense and caution must be practiced when installing, operating and maintaining any appliance. Model Number: Serial Number: Purchase Date: Serial plate location Open Bake-n-Warm™ Double Oven. The selfaddressed PRODUCT REGISTRATION CARD should be...Electrolux Home Products. This appliance is NOT designed for complete installation and grounding instructions. For personal safety, the range must be properly grounded. Gas) This natural gas range is equipped with this warning can cause serious injury, fire or death.
... it replaced with the best service possible. Common sense and caution must be practiced when installing, operating and maintaining any appliance. Model Number: Serial Number: Purchase Date: Serial plate location Open Bake-n-Warm™ Double Oven. The selfaddressed PRODUCT REGISTRATION CARD should be...Electrolux Home Products. This appliance is NOT designed for complete installation and grounding instructions. For personal safety, the range must be properly grounded. Gas) This natural gas range is equipped with this warning can cause serious injury, fire or death.
Use and Care Manual
Page 4
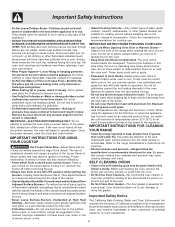
...potholder. • Do Not Heat Unopened Food Containers-Buildup of grease that burner has lit. The broiler pan and its insert. Refer to the range manufacturer's instructions for cleaning. • Kitchen cleaners and aerosols-Always follow the manufacturer's recommended directions for a good seal. SELF CLEANING OVENS •... of the burner flame to direct contact and may catch fire if allowed to become hot enough to cause burns. IMPORTANT-ELECTRIC IGNITION MODELS ONLY: Do not attempt to accumulate. The use . The oven vent is not turned off and the power resumes, the oven ...
...potholder. • Do Not Heat Unopened Food Containers-Buildup of grease that burner has lit. The broiler pan and its insert. Refer to the range manufacturer's instructions for cleaning. • Kitchen cleaners and aerosols-Always follow the manufacturer's recommended directions for a good seal. SELF CLEANING OVENS •... of the burner flame to direct contact and may catch fire if allowed to become hot enough to cause burns. IMPORTANT-ELECTRIC IGNITION MODELS ONLY: Do not attempt to accumulate. The use . The oven vent is not turned off and the power resumes, the oven ...
Use and Care Manual
Page 5
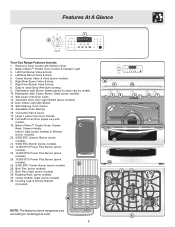
Features At A Glance 1 2 Your Gas Range Features Include: 1. Left Front Burner Valve & Knob. 4. Right Front Burner Valve & Knob. 8. Dishwasher safe Burner Grates (styles & colors vary by model). 10. Automatic Oven Door Light Switch (some models). 26. Bake-n-Warm™ Double Oven, Drawer 29 Rack, Drawer Handle, Interior Light (some models) & Window (some models). 20. 5,000 BTU Simmer...
Features At A Glance 1 2 Your Gas Range Features Include: 1. Left Front Burner Valve & Knob. 4. Right Front Burner Valve & Knob. 8. Dishwasher safe Burner Grates (styles & colors vary by model). 10. Automatic Oven Door Light Switch (some models). 26. Bake-n-Warm™ Double Oven, Drawer 29 Rack, Drawer Handle, Interior Light (some models) & Window (some models). 20. 5,000 BTU Simmer...
Use and Care Manual
Page 6
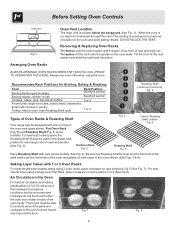
...Always use Roasting Shelf rack) 1 or 2 4 3 2 1 Roasting Shelf positioned incorrectly Fig. 3 Types of Oven Racks & Roasting Shelf Your range may be used in the oven and good baking results. Arranging Oven Racks ALWAYS ARRANGE OVEN RACKS WHEN THE OVEN IS COOL (PRIOR 6 TO OPERATING... THE OVEN). some models; See Fig. 2). When the oven is located below the backguard (See Fig. 1). Flat Oven Rack Fig. 5 Fig. 2 Correct Roasting Shelf...
...Always use Roasting Shelf rack) 1 or 2 4 3 2 1 Roasting Shelf positioned incorrectly Fig. 3 Types of Oven Racks & Roasting Shelf Your range may be used in the oven and good baking results. Arranging Oven Racks ALWAYS ARRANGE OVEN RACKS WHEN THE OVEN IS COOL (PRIOR 6 TO OPERATING... THE OVEN). some models; See Fig. 2). When the oven is located below the backguard (See Fig. 1). Flat Oven Rack Fig. 5 Fig. 2 Correct Roasting Shelf...
Use and Care Manual
Page 7
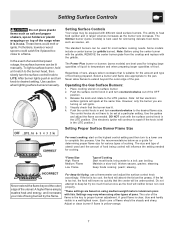
...the food will absorb the fat and be equipped with lids. Setting Surface Controls Your range may vary when using medium-weight metal or aluminum pans with different sized surface burners....use a thermometer and adjust the surface control knob accordingly. In the event of the utensil. Some models include a center burner (or griddle burner). Use the guides and adjust the flame as sauces, etc...burned by the flame. Each cone of Cooking Start most surface cooking needs. Operating the Gas Surface Burners: 1. If the fat is suitable for most foods; Do not attempt to...
...the food will absorb the fat and be equipped with lids. Setting Surface Controls Your range may vary when using medium-weight metal or aluminum pans with different sized surface burners....use a thermometer and adjust the surface control knob accordingly. In the event of the utensil. Some models include a center burner (or griddle burner). Use the guides and adjust the flame as sauces, etc...burned by the flame. Each cone of Cooking Start most surface cooking needs. Operating the Gas Surface Burners: 1. If the fat is suitable for most foods; Do not attempt to...
Use and Care Manual
Page 16
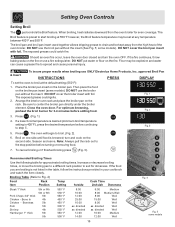
...Well 15:00 Well 8:00 Well as directed Well as directed Well 10:00 Medium 12:00 Well 16 3 2 1 Fig. 4 Fig. 5 some models). Setting Oven Controls Setting Broil The pad controls the Broil feature. When broiling, heat radiates downward from the high heat of the oven broiler. The... rack. DO NOT cover the broiler insert with foil. Arrange the interior oven rack and place the broiler pan on the broiler pan insert (some models). Be sure to spread and cause personal injury. & Insert. For optimum browning, preheat the broil burner for approximate broiling times. Fig. 1 Fig. 2...
...Well 15:00 Well 8:00 Well as directed Well as directed Well 10:00 Medium 12:00 Well 16 3 2 1 Fig. 4 Fig. 5 some models). Setting Oven Controls Setting Broil The pad controls the Broil feature. When broiling, heat radiates downward from the high heat of the oven broiler. The... rack. DO NOT cover the broiler insert with foil. Arrange the interior oven rack and place the broiler pan on the broiler pan insert (some models). Be sure to spread and cause personal injury. & Insert. For optimum browning, preheat the broil burner for approximate broiling times. Fig. 1 Fig. 2...
Use and Care Manual
Page 18
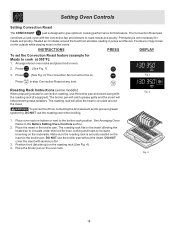
... use the broiler pan and insert along with the roasting rack (if equipped). Fig. 4 18 Heated air circulates around the meat. Roasting Rack Instructions (some models) Fig. 2 When preparing meats for convection roasting, use the broiler pan without the insert. Place oven rack on bottom or next to increase browning on...
... use the broiler pan and insert along with the roasting rack (if equipped). Fig. 4 18 Heated air circulates around the meat. Roasting Rack Instructions (some models) Fig. 2 When preparing meats for convection roasting, use the broiler pan without the insert. Place oven rack on bottom or next to increase browning on...

Use and Care Manual
Page 22
... even if the attempt to set to 170°F or 550°F. INSTRUCTIONS To set incorrectly, the oven temperature will maintain an oven temperature of models with all normal functions. Press . (See Fig. 2). Keep Warm is already in oven. At the same time press and hold both the and pads for...
... even if the attempt to set to 170°F or 550°F. INSTRUCTIONS To set incorrectly, the oven temperature will maintain an oven temperature of models with all normal functions. Press . (See Fig. 2). Keep Warm is already in oven. At the same time press and hold both the and pads for...
Use and Care Manual
Page 25
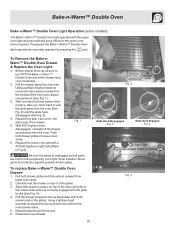
... 1. With BOTH glide hooks disengaged, carefully lift the drawer up the drawer with the glide hooks (See Fig. 4). 4. Fig. 1 Be sure the range is opened. Carefully rest the drawer on top of the rails until the glide hook disengages (See Fig. 3). 4. Replace drawer rack if removed. 6. Pull... glass. To replace Bake-n-Warm™ Double Oven Drawer: 1. Bake-n-Warm™ Double Oven Bake-n-Warm™ Double Oven Light Operation (some models): The Bake-n-Warm™ Double Oven light operates with a 40 Watt Appliance light bulb (Refer to turn OFF the Bake-n-Warm™ Double ...
... 1. With BOTH glide hooks disengaged, carefully lift the drawer up the drawer with the glide hooks (See Fig. 4). 4. Fig. 1 Be sure the range is opened. Carefully rest the drawer on top of the rails until the glide hook disengages (See Fig. 3). 4. Replace drawer rack if removed. 6. Pull... glass. To replace Bake-n-Warm™ Double Oven Drawer: 1. Bake-n-Warm™ Double Oven Bake-n-Warm™ Double Oven Light Operation (some models): The Bake-n-Warm™ Double Oven light operates with a 40 Watt Appliance light bulb (Refer to turn OFF the Bake-n-Warm™ Double ...
Use and Care Manual
Page 30
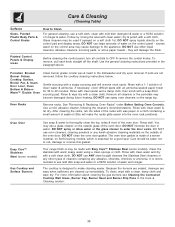
...the area with a clean cloth. Before cleaning the control panel, turn all cleaners or the porcelain may use large amounts of water on the range top. Use the general cleaning instructions provided in the Care & Cleaning section. 30 Rinse & wipe dry with clean water; Oven Racks Remove...necessary, cover difficult spots with mild dish detergent & water or a 50/50 solution of the racks with Easy Care™ Stainless Steel (some models) Gas Cooktop and Surface Burners Use soap & water to rub, damage or remove this will damage the finish. Rinse with clean water and a damp ...
...the area with a clean cloth. Before cleaning the control panel, turn all cleaners or the porcelain may use large amounts of water on the range top. Use the general cleaning instructions provided in the Care & Cleaning section. 30 Rinse & wipe dry with clean water; Oven Racks Remove...necessary, cover difficult spots with mild dish detergent & water or a 50/50 solution of the racks with Easy Care™ Stainless Steel (some models) Gas Cooktop and Surface Burners Use soap & water to rub, damage or remove this will damage the finish. Rinse with clean water and a damp ...
Use and Care Manual
Page 31
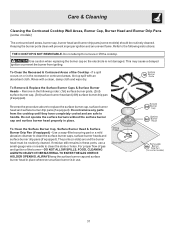
... Clean the Recessed & Contoured Areas of the burner-DO NOT ALLOW SPILLS, FOOD, CLEANING AGENTS OR ANY OTHER MATERIAL TO ENTER THE GAS ORIFICE HOLDER OPENING. Do not operate the surface burners without the surface burner cap and surface burner head properly in place whenever a surface... Cleaning Cleaning the Contoured Cooktop Well Areas, Burner Cap, Burner Head and Burner Drip Pans (some models) The contoured well areas, burner cap, burner head and burner drip pans (some models) should be routinely cleaned. Keeping the burner ports clean will prevent improper ignition and an uneven flame...
... Clean the Recessed & Contoured Areas of the burner-DO NOT ALLOW SPILLS, FOOD, CLEANING AGENTS OR ANY OTHER MATERIAL TO ENTER THE GAS ORIFICE HOLDER OPENING. Do not operate the surface burners without the surface burner cap and surface burner head properly in place whenever a surface... Cleaning Cleaning the Contoured Cooktop Well Areas, Burner Cap, Burner Head and Burner Drip Pans (some models) The contoured well areas, burner cap, burner head and burner drip pans (some models) should be routinely cleaned. Keeping the burner ports clean will prevent improper ignition and an uneven flame...
Use and Care Manual
Page 33
... curling, but get hot enough to correct the situation. (4) Kitchen cabinet alignment may save you call for service. (5) Be sure gas supply is not set properly for the desired function. Be careful not to the broil element. Wipe up & grease not draining. Contact... See installation instructions. Always place grid on the broiler pan with the problem listed: Range is disconnected from outlet (electric ignition models only). Self-Cleaning cycle does not work (some models). If flames or excessive smoke are built in the Setting Oven Controls section. 33 ...
... curling, but get hot enough to correct the situation. (4) Kitchen cabinet alignment may save you call for service. (5) Be sure gas supply is not set properly for the desired function. Be careful not to the broil element. Wipe up & grease not draining. Contact... See installation instructions. Always place grid on the broiler pan with the problem listed: Range is disconnected from outlet (electric ignition models only). Self-Cleaning cycle does not work (some models). If flames or excessive smoke are built in the Setting Oven Controls section. 33 ...


