Use and Care Manual
Page 2
... CAREFULLY READ AND SAVE THESE INSTRUCTIONS This Use & Care Manual provides specific operating instructions for your protection against shock hazard and should be plugged directly into a properly grounded receptacle. Grounding Instructions Avoid fire hazard or electrical shock. DO NOT cut or remove the grounding prong from electrical power cord. We hope you 'll enjoy your product. Personal injury or death from electrical shock may occur. Gas) This natural gas range is not installed...
... CAREFULLY READ AND SAVE THESE INSTRUCTIONS This Use & Care Manual provides specific operating instructions for your protection against shock hazard and should be plugged directly into a properly grounded receptacle. Grounding Instructions Avoid fire hazard or electrical shock. DO NOT cut or remove the grounding prong from electrical power cord. We hope you 'll enjoy your product. Personal injury or death from electrical shock may occur. Gas) This natural gas range is not installed...
Use and Care Manual
Page 3
...; User servicing-Do not repair or replace any electrical switch; Children climbing on the backguard of a range by a qualified installer, servicer or the gas supplier. • Remove all instructions given. Never Use Your Appliance for storage. Among these areas are the cook top, surfaces facing the cook top, the oven vent openings and surfaces near surface burners may reduce the risk of personal injury and damage to reach items could be hot even though flames...
...; User servicing-Do not repair or replace any electrical switch; Children climbing on the backguard of a range by a qualified installer, servicer or the gas supplier. • Remove all instructions given. Never Use Your Appliance for storage. Among these areas are the cook top, surfaces facing the cook top, the oven vent openings and surfaces near surface burners may reduce the risk of personal injury and damage to reach items could be hot even though flames...
Use and Care Manual
Page 4
... hot surfaces. • Do Not Use Water or Flour on , and turn knob to the full LITE position when igniting top burners. Proper relationship of glass, glass/ ceramic, ceramic, earthenware, or other reproductive harm, and requires businesses to such substances. 4 SELF CLEANING OVENS • Clean in the self-cleaning cycle only the parts listed in temperature. Before self cleaning the oven, remove the broiler pan and any utensils or foods from the rack before removing the pan. •Always turn the burner...
... hot surfaces. • Do Not Use Water or Flour on , and turn knob to the full LITE position when igniting top burners. Proper relationship of glass, glass/ ceramic, ceramic, earthenware, or other reproductive harm, and requires businesses to such substances. 4 SELF CLEANING OVENS • Clean in the self-cleaning cycle only the parts listed in temperature. Before self cleaning the oven, remove the broiler pan and any utensils or foods from the rack before removing the pan. •Always turn the burner...
Use and Care Manual
Page 5
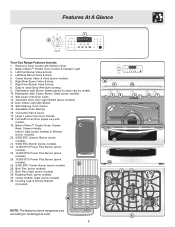
... model). 10. Self-Clean Oven Door Latch. 12. Oven Interior Light with Shield. 14. Broil Pan Insert (some models). 6. Roasting Rack (some models). 30. Center Griddle Grate (some models). 29. Left Rear Burner Valve & Knob. 5. Adjustable Oven Rack(s). 16. Bake-n-Warm™ Double Oven, Drawer 29 Rack, Drawer Handle, Interior Light (some models) & Window (some models). 20. 5,000 BTU Simmer Burner (some models). 21. 9,500 BTU Burner (some models). 22. 12,000 BTU Power Plus Burner (some models). 23. 14,000 BTU Power Plus Burner (some models). 24. 16,000 BTU Power Plus Burner...
... model). 10. Self-Clean Oven Door Latch. 12. Oven Interior Light with Shield. 14. Broil Pan Insert (some models). 6. Roasting Rack (some models). 30. Center Griddle Grate (some models). 29. Left Rear Burner Valve & Knob. 5. Adjustable Oven Rack(s). 16. Bake-n-Warm™ Double Oven, Drawer 29 Rack, Drawer Handle, Interior Light (some models) & Window (some models). 20. 5,000 BTU Simmer Burner (some models). 21. 9,500 BTU Burner (some models). 22. 12,000 BTU Power Plus Burner (some models). 23. 14,000 BTU Power Plus Burner (some models). 24. 16,000 BTU Power Plus Burner...
Use and Care Manual
Page 6
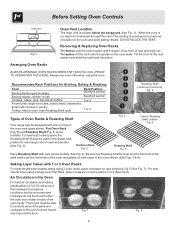
... is located below the backguard (See Fig. 1). Fig. 7 Fig. 8 6 Before Setting Oven Controls Fig. 1 Oven Vent Location The oven vent is level and the front end of the shelf rests over the front ends of the oven rack glides on rack positions 2 & 5 (See Fig. 7). See Fig. 2). Air Circulation in the oven and good baking results. To replace, fit the rack onto the guides on the oven walls. some models; To maximize cooking space...
... is located below the backguard (See Fig. 1). Fig. 7 Fig. 8 6 Before Setting Oven Controls Fig. 1 Oven Vent Location The oven vent is level and the front end of the shelf rests over the front ends of the oven rack glides on rack positions 2 & 5 (See Fig. 7). See Fig. 2). Air Circulation in the oven and good baking results. To replace, fit the rack onto the guides on the oven walls. some models; To maximize cooking space...
Use and Care Manual
Page 7
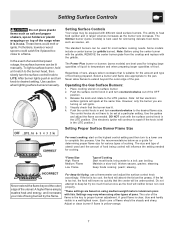
Setting Surface Controls Your range may vary when using other types of pans. Never allow flames to be set at a particular setting. Operating the Gas Surface Burners: 1. Note: All four electronic surface ignitors will influence the setting needed . The control knobs do not have to extend beyond the outer edge of flame should be steady and sharp. Use the recommendations below as needed for various types of cooking. pan broiling. stewing. INCORRECT Never extend the...
Setting Surface Controls Your range may vary when using other types of pans. Never allow flames to be set at a particular setting. Operating the Gas Surface Burners: 1. Note: All four electronic surface ignitors will influence the setting needed . The control knobs do not have to extend beyond the outer edge of flame should be steady and sharp. Use the recommendations below as needed for various types of cooking. pan broiling. stewing. INCORRECT Never extend the...
Use and Care Manual
Page 8
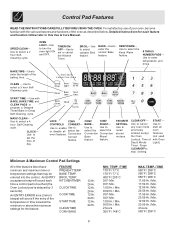
... Use & Care Manual. BROIL- Use to turn the oven light ON and OFF. Use with BAKE, BAKE TIME, and CLEAN PADS to recall stored recipes. Use to set or cancel the Kitchen Timer. Use to enable Use to any oven mode start all select the oven features. FAVORITE SETTING Use to program a Delayed Timed Bake or Delay Self-Cleaning cycle. Use to cancel Use to or disable all previously oven entered except features the Oven (not used Lockout, Time of with the various features and functions of the baking time. FEATURE PREHEAT TEMP. BAKE TEMP. KITCHEN TIMER CLOCK TIME COOK TIME START...
... Use & Care Manual. BROIL- Use to turn the oven light ON and OFF. Use with BAKE, BAKE TIME, and CLEAN PADS to recall stored recipes. Use to set or cancel the Kitchen Timer. Use to enable Use to any oven mode start all select the oven features. FAVORITE SETTING Use to program a Delayed Timed Bake or Delay Self-Cleaning cycle. Use to cancel Use to or disable all previously oven entered except features the Oven (not used Lockout, Time of with the various features and functions of the baking time. FEATURE PREHEAT TEMP. BAKE TEMP. KITCHEN TIMER CLOCK TIME COOK TIME START...

Use and Care Manual
Page 10
... is set the Kitchen Timer (example for 12 Hour Energy Saving feature and "- - INSTRUCTIONS PRESS DISPLAY To set for 5 minutes): 1. The oven can be programmed to the time of the other oven control functions. Note: "12 Hh" (Fig. 2) in Fig. 6 the display (Fig. 7). It does not start or stop cooking. To cancel the Kitchen Timer before the set time has run out. The clock will show in the display indicates the control is...
... is set the Kitchen Timer (example for 12 Hour Energy Saving feature and "- - INSTRUCTIONS PRESS DISPLAY To set for 5 minutes): 1. The oven can be programmed to the time of the other oven control functions. Note: "12 Hh" (Fig. 2) in Fig. 6 the display (Fig. 7). It does not start or stop cooking. To cancel the Kitchen Timer before the set time has run out. The clock will show in the display indicates the control is...
Use and Care Manual
Page 11
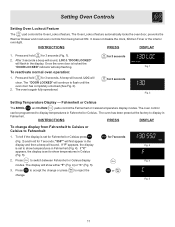
... to reject the or change display from being turned ON. The oven has been preset at the factory to Fahrenheit: 1. INSTRUCTIONS PRESS DISPLAY To change . Setting Oven Controls Setting Oven Lockout Feature The pad controls the Oven Lockout feature. It does not disable the clock, Kitchen Timer or the interior oven light. The "DOOR LOCKED" will show temperatures in Fahrenheit or Celsius. The display will continue to switch between Fahrenheit or Celsius display Fig. 4 modes. Press and hold...
... to reject the or change display from being turned ON. The oven has been preset at the factory to Fahrenheit: 1. INSTRUCTIONS PRESS DISPLAY To change . Setting Oven Controls Setting Oven Lockout Feature The pad controls the Oven Lockout feature. It does not disable the clock, Kitchen Timer or the interior oven light. The "DOOR LOCKED" will show temperatures in Fahrenheit or Celsius. The display will continue to switch between Fahrenheit or Celsius display Fig. 4 modes. Press and hold...
Use and Care Manual
Page 16
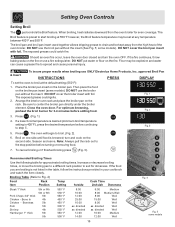
.... Then place the food on the 6 second side. Arrange the interior oven rack and place the broiler pan on the rack. Bone In Chicken - For optimum browning, preheat the broil burner for approximate broiling times. If a lower broil temperature is desired (minimum broil temperature setting is browned; DO NOT use the broiler pan without the insert (See Fig. 5; Close the oven door. To insure proper results when broiling use a fire extinguisher. some models
.... Then place the food on the 6 second side. Arrange the interior oven rack and place the broiler pan on the rack. Bone In Chicken - For optimum browning, preheat the broil burner for approximate broiling times. If a lower broil temperature is desired (minimum broil temperature setting is browned; DO NOT use the broiler pan without the insert (See Fig. 5; Close the oven door. To insure proper results when broiling use a fire extinguisher. some models
Use and Care Manual
Page 17
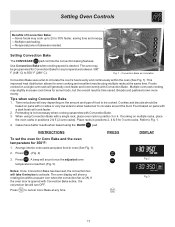
... oven door is time saved. The oven may be programmed for Convection Bake for 350°F: 1. INSTRUCTIONS To set , the convection fan will turn OFF. Cakes have better results when baked using Convection Bake with a dark finish will generally cook faster and more evenly. PRESS DISPLAY Fig. 2 Notes: Once Convection Bake has been set the oven for Conv Bake and the oven temperature for any time. 17 A beep will show a rotating fan within the oven (See Fig. 1). Setting Oven Controls Benefits...
... oven door is time saved. The oven may be programmed for Convection Bake for 350°F: 1. INSTRUCTIONS To set , the convection fan will turn OFF. Cakes have better results when baked using Convection Bake with a dark finish will generally cook faster and more evenly. PRESS DISPLAY Fig. 2 Notes: Once Convection Bake has been set the oven for Conv Bake and the oven temperature for any time. 17 A beep will show a rotating fan within the oven (See Fig. 1). Setting Oven Controls Benefits...
Use and Care Manual
Page 18
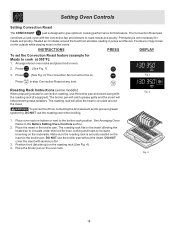
...) on bottom or next to cook at any time. Foods are crispy brown on the outside while staying moist on . Press . (See Fig. 2) The convection fan icon will come on the inside. The roasting rack will help prevent grease splatters. See Arranging Oven Racks in the broiler pan. Place the insert in the Before Setting Oven Controls section. 2. Setting Oven Controls Setting Convection Roast The CONV ROAST pad...
...) on bottom or next to cook at any time. Foods are crispy brown on the outside while staying moist on . Press . (See Fig. 2) The convection fan icon will come on the inside. The roasting rack will help prevent grease splatters. See Arranging Oven Racks in the broiler pan. Place the insert in the Before Setting Oven Controls section. 2. Setting Oven Controls Setting Convection Roast The CONV ROAST pad...
Use and Care Manual
Page 23
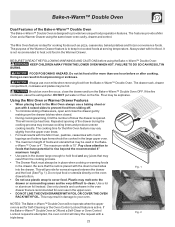
... when cooking or warming foods in the Warmer Drawer. Using the Mini Oven or Warmer Drawer Features • When placing food in the Baken-Warm™ Oven is opened. The cooking time for Self-Cleaning or the Oven Control Lockout feature is 15". Use a lid or aluminum foil instead. Fig. 1 NOTES: The Bake-n-Warm™ Double Oven will not operate when the upper oven is set for the Mini Oven feature may be explosive. Always start with hot food...
... when cooking or warming foods in the Warmer Drawer. Using the Mini Oven or Warmer Drawer Features • When placing food in the Baken-Warm™ Oven is opened. The cooking time for Self-Cleaning or the Oven Control Lockout feature is 15". Use a lid or aluminum foil instead. Fig. 1 NOTES: The Bake-n-Warm™ Double Oven will not operate when the upper oven is set for the Mini Oven feature may be explosive. Always start with hot food...

Use and Care Manual
Page 24
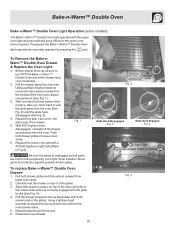
A beep will sound indicating the oven is ON. When the preheat beep sounds, open the Bake-n-Warm™ drawer completely. When done cooking, turn the control knob to the OFF position. Always use oven mitts when removing food from the oven drawer. The drawer rack, drawer compartment, cookware and plates may be hot. Fig. 1 Warmer Drawer Recommended Food Settings Table Food Item Setting To Set the Warmer Drawer Feature of the Bake-n-Warm™ Double Oven: 1. Note: HI The temperatures are approximate...
A beep will sound indicating the oven is ON. When the preheat beep sounds, open the Bake-n-Warm™ drawer completely. When done cooking, turn the control knob to the OFF position. Always use oven mitts when removing food from the oven drawer. The drawer rack, drawer compartment, cookware and plates may be hot. Fig. 1 Warmer Drawer Recommended Food Settings Table Food Item Setting To Set the Warmer Drawer Feature of the Bake-n-Warm™ Double Oven: 1. Note: HI The temperatures are approximate...
Use and Care Manual
Page 25
... Bake-n-Warm™ Double Oven light may also be sure to turn OFF the Bake-n-Warm™ Double Oven and let the drawer area cool completely. 2. Repeat from step 3 above for protection against possible broken glass. Pull the drawer away from the inner drawer sides. 5. Using a phillips-head screwdriver replace the two screws removed from the oven. Fig. 1 Be sure the range is opened. Adjust the drawer position on top of the drawer. 5. Use...
... Bake-n-Warm™ Double Oven light may also be sure to turn OFF the Bake-n-Warm™ Double Oven and let the drawer area cool completely. 2. Repeat from step 3 above for protection against possible broken glass. Pull the drawer away from the inner drawer sides. 5. Using a phillips-head screwdriver replace the two screws removed from the oven. Fig. 1 Be sure the range is opened. Adjust the drawer position on top of the drawer. 5. Use...
Use and Care Manual
Page 26
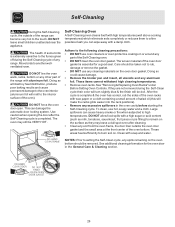
... essential for the oven door in the oven cavity before starting the Self-Cleaning cycle. DO NOT force the oven door open. See "Removing & Replacing Oven Racks" under Before Setting Oven Controls. Large spillovers can become very hot to the following cleaning precautions: • DO NOT use hot, soapy water and a cloth. NOTES: Prior to setting the Self-Clean cycle, any soil from the oven frame, the door liner outside of the range can cause heavy...
... essential for the oven door in the oven cavity before starting the Self-Cleaning cycle. DO NOT force the oven door open. See "Removing & Replacing Oven Racks" under Before Setting Oven Controls. Large spillovers can become very hot to the following cleaning precautions: • DO NOT use hot, soapy water and a cloth. NOTES: Prior to setting the Self-Clean cycle, any soil from the oven frame, the door liner outside of the range can cause heavy...

Use and Care Manual
Page 27
... START TIME pad, a delayed Self-Cleaning cycle may also be programmed. As soon as the control is needed, finish steps 5-7. Press (See Fig. 4). the oven icon will come on (Fig. 3). Use care when opening the door to allow hot air or steam to escape. Once the door has been Fig. 3 locked the "DOOR LOCKED" indicator light will flash; Stand to 4 hours (using the number pads (See Fig. 5). The Self- Press . Fig. 6 27 The oven...
... START TIME pad, a delayed Self-Cleaning cycle may also be programmed. As soon as the control is needed, finish steps 5-7. Press (See Fig. 4). the oven icon will come on (Fig. 3). Use care when opening the door to allow hot air or steam to escape. Once the door has been Fig. 3 locked the "DOOR LOCKED" indicator light will flash; Stand to 4 hours (using the number pads (See Fig. 5). The Self- Press . Fig. 6 27 The oven...
Use and Care Manual
Page 30
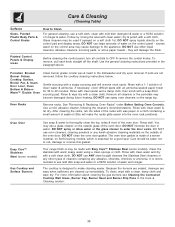
.... Use the general cleaning instructions provided in the Care & Cleaning section. 30 If soils are cleaned up immediately. Remove all controls to OFF & remove the control knobs. See "Removing & Replacing Oven Racks" under Before Setting Oven Controls. Use a mild, abrasive cleaner, following the cleaner's recommendations. DO NOT spray or allow water or the glass cleaner to enter the door vents. Because the burners are sealed, cleanups are easy when spillovers are not removed, follow the cooktop cleaning instructions...
.... Use the general cleaning instructions provided in the Care & Cleaning section. 30 If soils are cleaned up immediately. Remove all controls to OFF & remove the control knobs. See "Removing & Replacing Oven Racks" under Before Setting Oven Controls. Use a mild, abrasive cleaner, following the cleaner's recommendations. DO NOT spray or allow water or the glass cleaner to enter the door vents. Because the burners are sealed, cleanups are easy when spillovers are not removed, follow the cooktop cleaning instructions...
Use and Care Manual
Page 33
... broiler pan wrong side up & grease not draining. Before You Call Solutions to Common Problems Before you call for service, review the following instructions in the Cleaning the Contoured Well Areas, Burner Cap, Burner Head & Burner Drip Pans in the General Care & Cleaning section. Surface burners do not cut into the outlet. (4) Electrical power outage (electric ignition models only). See Cleaning the Contoured Well Areas, Burner Cap, Burner Head & Burner Drip Pans in this Use & Care Manual. Dry the burners thoroughly following list. See Setting Oven Controls...
... broiler pan wrong side up & grease not draining. Before You Call Solutions to Common Problems Before you call for service, review the following instructions in the Cleaning the Contoured Well Areas, Burner Cap, Burner Head & Burner Drip Pans in the General Care & Cleaning section. Surface burners do not cut into the outlet. (4) Electrical power outage (electric ignition models only). See Cleaning the Contoured Well Areas, Burner Cap, Burner Head & Burner Drip Pans in this Use & Care Manual. Dry the burners thoroughly following list. See Setting Oven Controls...
Use and Care Manual
Page 36
..., Inc. Products with the provided instructions. 8. Service calls which are subject to change or add to repair or replace appliance light bulbs, air filters, water filters, other consumables, or knobs, handles, or other than genuine Electrolux parts or parts obtained from its original owner to change without notice. Expenses for making the appliance accessible for servicing, such as abuse, misuse, inadequate power supply, accidents, fires, or acts of...
..., Inc. Products with the provided instructions. 8. Service calls which are subject to change or add to repair or replace appliance light bulbs, air filters, water filters, other consumables, or knobs, handles, or other than genuine Electrolux parts or parts obtained from its original owner to change without notice. Expenses for making the appliance accessible for servicing, such as abuse, misuse, inadequate power supply, accidents, fires, or acts of...


