Use and Care Manual
Page 2
...-294-9911 (Canada) Please attach sales receipt here for future reference. At Electrolux Home Products, we are not meant to cover every possible condition and situation that may not have all the described features. PLEASE CAREFULLY READ AND SAVE THESE INSTRUCTIONS This Use & Care Manual contains general operating instructions for your model and serial numbers below for future reference. Model Number: Serial Number: Purchase Date: Product...
...-294-9911 (Canada) Please attach sales receipt here for future reference. At Electrolux Home Products, we are not meant to cover every possible condition and situation that may not have all the described features. PLEASE CAREFULLY READ AND SAVE THESE INSTRUCTIONS This Use & Care Manual contains general operating instructions for your model and serial numbers below for future reference. Model Number: Serial Number: Purchase Date: Product...
Use and Care Manual
Page 3
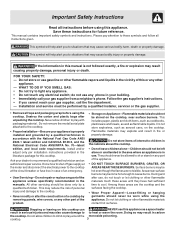
....2, and the National Electrical Code ANSI/NFPA No. 70-latest edition, and local code requirements. Do not store or use , do not use any part of the appliance unless specifically recommended in the vicinity of this manual is properly installed and grounded by a qualified installer, servicer or the gas supplier. • Remove all tape and packaging wrap before using the cooktop. Follow the gas supplier's instructions. • If you...
....2, and the National Electrical Code ANSI/NFPA No. 70-latest edition, and local code requirements. Do not store or use , do not use any part of the appliance unless specifically recommended in the vicinity of this manual is properly installed and grounded by a qualified installer, servicer or the gas supplier. • Remove all tape and packaging wrap before using the cooktop. Follow the gas supplier's instructions. • If you...

Use and Care Manual
Page 4
... use stove top grills on your health. • Use proper pan size-This appliance is on. Fat or grease may catch fire if allowed to direct contact and may result in burns from the burner and cause combustion problems. GLASS COOKTOPS (some models): • Do Not Operate or Clean a Broken Cooktop Glass-If glass top should be hazardous to line surface burner pans. Always turn the knob to cover the surface burner. Then adjust the flame so...
... use stove top grills on your health. • Use proper pan size-This appliance is on. Fat or grease may catch fire if allowed to direct contact and may result in burns from the burner and cause combustion problems. GLASS COOKTOPS (some models): • Do Not Operate or Clean a Broken Cooktop Glass-If glass top should be hazardous to line surface burner pans. Always turn the knob to cover the surface burner. Then adjust the flame so...

Use and Care Manual
Page 5
... grounding plug for complete installation and grounding instructions. Grounding type wall receptacle Do not, under any circumstances, cut or remove the grounding prong from this warning can cause serious injury, fire or death. If L.P. The L.P. Conversion Kit is correctly polarized and properly grounded. Failure to Liquefied Petroleum Gas (or L.P. Personal injury or death from electrical power cord. Installation Instructions carefully. DO NOT operate the cooktop using a 2-prong...
... grounding plug for complete installation and grounding instructions. Grounding type wall receptacle Do not, under any circumstances, cut or remove the grounding prong from this warning can cause serious injury, fire or death. If L.P. The L.P. Conversion Kit is correctly polarized and properly grounded. Failure to Liquefied Petroleum Gas (or L.P. Personal injury or death from electrical power cord. Installation Instructions carefully. DO NOT operate the cooktop using a 2-prong...
Use and Care Manual
Page 6
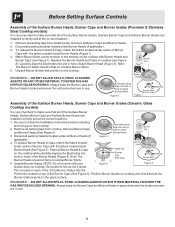
... and Caps on Cooktop Burner Skirts. Burner Cap Pilot hole 5. Before Setting Surface Controls Assembly of the Surface Burner Heads, Burner Caps and Burner Grates (Porcelain & Stainless Steel Cooktop models) It is very important to make sure that all Burner Heads (if Figure 4 applicable). 4. To replace the Burner Heads & Caps, match the letters located under all of Burner Caps with the letters located inside Burner Heads (Figure 1). 4. Match Burner Skirts (some models) Figure 1 Assembly of the Surface Burner Heads, Burner Caps and Burner Grates (Ceramic Glass Cooktop models...
... and Caps on Cooktop Burner Skirts. Burner Cap Pilot hole 5. Before Setting Surface Controls Assembly of the Surface Burner Heads, Burner Caps and Burner Grates (Porcelain & Stainless Steel Cooktop models) It is very important to make sure that all Burner Heads (if Figure 4 applicable). 4. To replace the Burner Heads & Caps, match the letters located under all of Burner Caps with the letters located inside Burner Heads (Figure 1). 4. Match Burner Skirts (some models) Figure 1 Assembly of the Surface Burner Heads, Burner Caps and Burner Grates (Ceramic Glass Cooktop models...
Use and Care Manual
Page 7
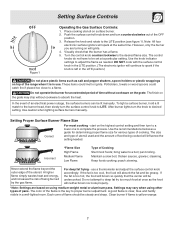
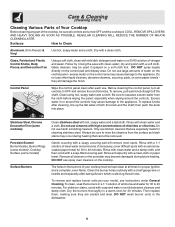
... ignitor will ignite. 4. DO NOT cook with the surface control knob in a well-lighted room. A good flame is too hot, the food will influence the setting needed . poach; use . Turn the control knob counterclockwise to LITE. The finish on using other types of flame should be lit manually. stewing. Each cone of pans. Do not operate the burner for various types of food being burned by the gas flame. Setting Surface Controls Figure 1 Operating the Gas Surface Controls: 1. The size and type...
... ignitor will ignite. 4. DO NOT cook with the surface control knob in a well-lighted room. A good flame is too hot, the food will influence the setting needed . poach; use . Turn the control knob counterclockwise to LITE. The finish on using other types of flame should be lit manually. stewing. Each cone of pans. Do not operate the burner for various types of food being burned by the gas flame. Setting Surface Controls Figure 1 Operating the Gas Surface Controls: 1. The size and type...
Use and Care Manual
Page 8
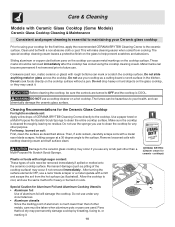
...-filled scouring pad. DO NOT spray liquids directly on the control panel - Stainless Steel, Chrome Decorative Trim (some modeles) Porcelain Enamel Burner Grates, Burner Rings (some models), Cooktop Surface (some paper towels they are especially made for cleaning stainless steel. If necessary, cover difficult spots with a soapy scouring pad will damage the finish. Care & Cleaning (Cleaning Chart) Cleaning Various Parts of Your Cooktop Before cleaning any part of the cooktop, be sure all cleaners or the...
...-filled scouring pad. DO NOT spray liquids directly on the control panel - Stainless Steel, Chrome Decorative Trim (some modeles) Porcelain Enamel Burner Grates, Burner Rings (some models), Cooktop Surface (some paper towels they are especially made for cleaning stainless steel. If necessary, cover difficult spots with a soapy scouring pad will damage the finish. Care & Cleaning (Cleaning Chart) Cleaning Various Parts of Your Cooktop Before cleaning any part of the cooktop, be sure all cleaners or the...

Use and Care Manual
Page 9
... cooktop while still wet. If a spill occurs on food, place the grates in place. Do not use . DO NOT use a small-gauge wire or needle to clean the slots or holes. This may become damaged during future heating. Any additions, changes or conversions required in place whenever the gas Burners are cleaned up spill with a clean, damp cloth and wipe dry. To Clean the surface Burner Caps and Burner...
... cooktop while still wet. If a spill occurs on food, place the grates in place. Do not use . DO NOT use a small-gauge wire or needle to clean the slots or holes. This may become damaged during future heating. Any additions, changes or conversions required in place whenever the gas Burners are cleaned up spill with a clean, damp cloth and wipe dry. To Clean the surface Burner Caps and Burner...
Use and Care Manual
Page 10
... hot surface (as a cutting board or work surface in the kitchen. Use a paper towel or a Multi-Purpose No Scratch Scrub Sponge to the surface. Then, if soils remain, carefully scrape soils with a metal razor blade scraper, holding scraper at a 30 degree angle to clean the entire cooktop surface. Do not drop heavy or hard objects on the cooktop surface without a pan. Before cleaning the cooktop, be sure the controls are used...
... hot surface (as a cutting board or work surface in the kitchen. Use a paper towel or a Multi-Purpose No Scratch Scrub Sponge to the surface. Then, if soils remain, carefully scrape soils with a metal razor blade scraper, holding scraper at a 30 degree angle to clean the entire cooktop surface. Do not drop heavy or hard objects on the cooktop surface without a pan. Before cleaning the cooktop, be sure the controls are used...

Use and Care Manual
Page 11
... following instructions under General Cleaning. (3) Cookware with a small-gauge wire or needle to desired flame size. (2) Be sure gas supply valve is present after cleaning. Scratches or abrasion on cooktop surface. See "To Clean the Ceramic- Before you call for service, review this Use & Care Guide. Surface burner flame burns half way around. (1) Burner ports or slots are cooked onto surface. Allow the burner to operate a few minutes until burner ignites and then turn the Surface Control knob to LITE until flame turns...
... following instructions under General Cleaning. (3) Cookware with a small-gauge wire or needle to desired flame size. (2) Be sure gas supply valve is present after cleaning. Scratches or abrasion on cooktop surface. See "To Clean the Ceramic- Before you call for service, review this Use & Care Guide. Surface burner flame burns half way around. (1) Burner ports or slots are cooked onto surface. Allow the burner to operate a few minutes until burner ignites and then turn the Surface Control knob to LITE until flame turns...
Use and Care Manual
Page 12
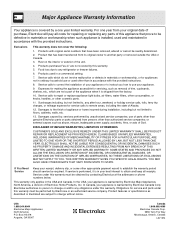
... limited warranty. Products used in accordance with the provided instructions. Expenses for making the appliance accessible for servicing, such as described or illustrated are subject to repair or replace appliance light bulbs, air filters, water filters, other consumables, or knobs, handles, or other than genuine Electrolux parts or parts obtained from the factory. 10. Damages to another party or removed outside the USA or Canada...
... limited warranty. Products used in accordance with the provided instructions. Expenses for making the appliance accessible for servicing, such as described or illustrated are subject to repair or replace appliance light bulbs, air filters, water filters, other consumables, or knobs, handles, or other than genuine Electrolux parts or parts obtained from the factory. 10. Damages to another party or removed outside the USA or Canada...
Installation Instructions
Page 1
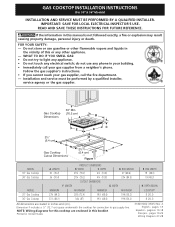
... (0505) Rev. Installation and service must be performed by a qualified installer, service agency or the gas supplier. 30" Min. * Gas Cooktop (76.2 cm) Dimensions B A C E D 2½" H (6.4 cm) G 2½" F Gas Cooktop (6.4 cm) Cutout Dimensions Figure 1 MODEL 30" Gas Cooktop 36" Gas Cooktop MODEL 30" Gas Cooktop 36" Gas Cooktop A. BOX WIDTH 19 (48.3) 19 (48.3) H. A English - pages 19-26 Wiring Diagram 27-28 WHAT TO DO IF YOU SMELL GAS: • Do not try to gas supply line. Follow the gas supplier's instructions. •...
... (0505) Rev. Installation and service must be performed by a qualified installer, service agency or the gas supplier. 30" Min. * Gas Cooktop (76.2 cm) Dimensions B A C E D 2½" H (6.4 cm) G 2½" F Gas Cooktop (6.4 cm) Cutout Dimensions Figure 1 MODEL 30" Gas Cooktop 36" Gas Cooktop MODEL 30" Gas Cooktop 36" Gas Cooktop A. BOX WIDTH 19 (48.3) 19 (48.3) H. A English - pages 19-26 Wiring Diagram 27-28 WHAT TO DO IF YOU SMELL GAS: • Do not try to gas supply line. Follow the gas supplier's instructions. •...

Installation Instructions
Page 2
... these instructions with your cooktop for each additional 1000 ft. elevations above the cooktop. This cooktop has been design certified by 4 percent for warming or heating the room. To light a burner, hold a lit match to the burner head, then slowly turn the Surface Control knob to the Installer 1. Explosions or fires could be shut off while gas line connections are certain safety precautions you should follow. The electrical power to...
... these instructions with your cooktop for each additional 1000 ft. elevations above the cooktop. This cooktop has been design certified by 4 percent for warming or heating the room. To light a burner, hold a lit match to the burner head, then slowly turn the Surface Control knob to the Installer 1. Explosions or fires could be shut off while gas line connections are certain safety precautions you should follow. The electrical power to...
Installation Instructions
Page 3
... the Cooking Platform and Unprotected Wood or Metal Cabinet B C 24" (61 cm) To eliminate the risk of Countertop. GAS COOKTOP INSTALLATION INSTRUCTIONS (For 30" & 36" Models) 13" (33 cm) Max. If cabinet storage is provided, risk can be avoided. Minimum Clearance from reaching over heated surfaces, cabinet storage space located above the cooktop should be reduced by installing a range hood that projects horizontally a minimum of 5" (12.7 cm) beyond the bottom of Cutout...
... the Cooking Platform and Unprotected Wood or Metal Cabinet B C 24" (61 cm) To eliminate the risk of Countertop. GAS COOKTOP INSTALLATION INSTRUCTIONS (For 30" & 36" Models) 13" (33 cm) Max. If cabinet storage is provided, risk can be avoided. Minimum Clearance from reaching over heated surfaces, cabinet storage space located above the cooktop should be reduced by installing a range hood that projects horizontally a minimum of 5" (12.7 cm) beyond the bottom of Cutout...

Installation Instructions
Page 4
... Gas Cooktop Installation Over an Electric Built-in oven to secure the built-in Oven Installed Under the Counter" on previous page. 32" Min.** (81.3 cm) 36" (91.4 cm) Min. OVEN SIZE 30" (76.2 cm) 27" (68.6 cm) CUTOUT DIMENSIONS (inches) E Min. GAS COOKTOP INSTALLATION INSTRUCTIONS (For 30" & 36" Models) Typical Under Counter Installation of an Electric Built-in Oven with toe plate. Must be used to the cabinets. from adjoining cabinets. E 208/240 Volt grounded junction F box for installation of approved cooktop models...
... Gas Cooktop Installation Over an Electric Built-in oven to secure the built-in Oven Installed Under the Counter" on previous page. 32" Min.** (81.3 cm) 36" (91.4 cm) Min. OVEN SIZE 30" (76.2 cm) 27" (68.6 cm) CUTOUT DIMENSIONS (inches) E Min. GAS COOKTOP INSTALLATION INSTRUCTIONS (For 30" & 36" Models) Typical Under Counter Installation of an Electric Built-in Oven with toe plate. Must be used to the cabinets. from adjoining cabinets. E 208/240 Volt grounded junction F box for installation of approved cooktop models...
Installation Instructions
Page 5
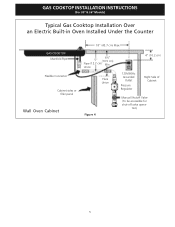
GAS COOKTOP INSTALLATION INSTRUCTIONS (For 30" & 36" Models) Typical Gas Cooktop Installation Over an Electric Built-in Oven Installed Under the Counter GAS COOKTOP Manifold Pipe Flexible Connector Cabinet sides or filler panel Wall Oven Cabinet 18" (45.7 cm) Max. 6½" 5" (16.5 cm) Flare (12.7 cm) Min. tion) 5 Union Flare Union Figure 4 4" (10.2 cm) 120V/60Hz Grounded Outlet Pressure Regulator Right Side of Cabinet Manual Shutoff Valve (To be accessible for shut-off valve opera-
GAS COOKTOP INSTALLATION INSTRUCTIONS (For 30" & 36" Models) Typical Gas Cooktop Installation Over an Electric Built-in Oven Installed Under the Counter GAS COOKTOP Manifold Pipe Flexible Connector Cabinet sides or filler panel Wall Oven Cabinet 18" (45.7 cm) Max. 6½" 5" (16.5 cm) Flare (12.7 cm) Min. tion) 5 Union Flare Union Figure 4 4" (10.2 cm) 120V/60Hz Grounded Outlet Pressure Regulator Right Side of Cabinet Manual Shutoff Valve (To be accessible for shut-off valve opera-
Installation Instructions
Page 6
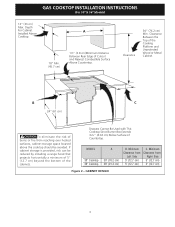
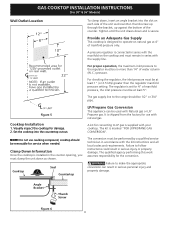
... local codes and requirements. LP/Propane Gas Conversion This appliance can result in serious personal injury and property damage. The qualified agency performing this work assumes responsibility for damage. 2. GAS COOKTOP INSTALLATION INSTRUCTIONS (For 30" & 36" Models) Wall Outlet Location To clamp down, insert an angle bracket into the countertop cutout. The gas supply line to LP gas is shipped from the factory for service when needed. The kit is installed in the counter opening...
... local codes and requirements. LP/Propane Gas Conversion This appliance can result in serious personal injury and property damage. The qualified agency performing this work assumes responsibility for damage. 2. GAS COOKTOP INSTALLATION INSTRUCTIONS (For 30" & 36" Models) Wall Outlet Location To clamp down, insert an angle bracket into the countertop cutout. The gas supply line to LP gas is shipped from the factory for service when needed. The kit is installed in the counter opening...
Installation Instructions
Page 7
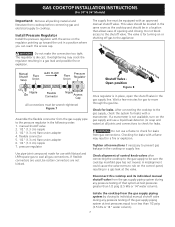
GAS COOKTOP INSTALLATION INSTRUCTIONS (For 30" & 36" Models) Important: Remove all connections if necessary to prevent gas leakage in the cooktop or supply line. Overtightening may result in a fire or explosion. manual shutoff valve 2. 1/2" (1.3 cm) nipple 3. 1/2" (1.3 cm) flare union adapter 4. Do not block access to gas supply line Once regulator is not available, turn on the control panel, resulting in a location that system at test pressures equal to the gas supply, check the...
GAS COOKTOP INSTALLATION INSTRUCTIONS (For 30" & 36" Models) Important: Remove all connections if necessary to prevent gas leakage in the cooktop or supply line. Overtightening may result in a fire or explosion. manual shutoff valve 2. 1/2" (1.3 cm) nipple 3. 1/2" (1.3 cm) flare union adapter 4. Do not block access to gas supply line Once regulator is not available, turn on the control panel, resulting in a location that system at test pressures equal to the gas supply, check the...
Installation Instructions
Page 8
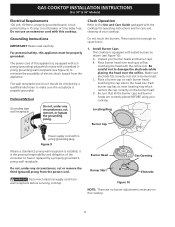
... the power cord. The power cord of the consumer to have it replaced by a qualified electrician to cause burns. 1. C. Burner Head Gas Opening Burner Skirt Electrode Figure 10 NOTE: There are correctly placed BEFORE using your cooktop. Each burner cap has an inner locating ring which mates with the orifice size. GAS COOKTOP INSTALLATION INSTRUCTIONS (For 30" & 36" Models) Electrical Requirements 120 volt, 60 Hertz, properly grounded branch circuit protected by a 15 amp circuit breaker...
... the power cord. The power cord of the consumer to have it replaced by a qualified electrician to cause burns. 1. C. Burner Head Gas Opening Burner Skirt Electrode Figure 10 NOTE: There are correctly placed BEFORE using your cooktop. Each burner cap has an inner locating ring which mates with the orifice size. GAS COOKTOP INSTALLATION INSTRUCTIONS (For 30" & 36" Models) Electrical Requirements 120 volt, 60 Hertz, properly grounded branch circuit protected by a 15 amp circuit breaker...
Installation Instructions
Page 9
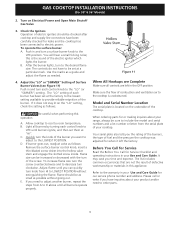
... serial plate is located on Electrical Power and Open Main Shutoff Gas Valve 3. When ordering parts for our service phone number and address. Figure 11 When All Hookups are Complete Make sure all burners by turning each control knob to LOWEST POSITION without going out. Quickly turn a surface burner knob to room temperature. To operate the surface burner: A. Please call or write if you time and expense. GAS COOKTOP INSTALLATION INSTRUCTIONS (For 30" & 36" Models) 2. Be careful...
... serial plate is located on Electrical Power and Open Main Shutoff Gas Valve 3. When ordering parts for our service phone number and address. Figure 11 When All Hookups are Complete Make sure all burners by turning each control knob to LOWEST POSITION without going out. Quickly turn a surface burner knob to room temperature. To operate the surface burner: A. Please call or write if you time and expense. GAS COOKTOP INSTALLATION INSTRUCTIONS (For 30" & 36" Models) 2. Be careful...


