Use and Care Manual
Page 2
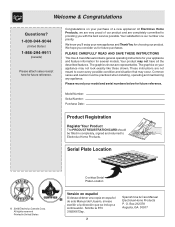
... feature information for choosing our product. The graphics on your new appliance and Thank You for several models. All rights reserved Printed in completely, signed and returned to Electrolux Home Products. Box 212378 Augusta, GA 30917 We know you'll enjoy your purchase of our product and are ...be filled in United States Cooktop Serial Plate Location Versión en español Si desea obtener una copia en español de este Manual del Usuario, sírvase escribir a la dirección que se incluye a continuación. Please record your appliance may not have all ...
... feature information for choosing our product. The graphics on your new appliance and Thank You for several models. All rights reserved Printed in completely, signed and returned to Electrolux Home Products. Box 212378 Augusta, GA 30917 We know you'll enjoy your purchase of our product and are ...be filled in United States Cooktop Serial Plate Location Versión en español Si desea obtener una copia en español de este Manual del Usuario, sírvase escribir a la dirección que se incluye a continuación. Please record your appliance may not have all ...
Use and Care Manual
Page 3
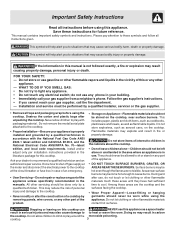
... not try to situations that may result causing property damage, personal injury or death. Know how to shut off gas supply at the meter and disconnect the electrical power to the cooktop. All other appliance. - This includes paper, plastic and cloth items, such as cookbooks, plasticware and towels, as well as a space heater...
... not try to situations that may result causing property damage, personal injury or death. Know how to shut off gas supply at the meter and disconnect the electrical power to the cooktop. All other appliance. - This includes paper, plastic and cloth items, such as cookbooks, plasticware and towels, as well as a space heater...

Use and Care Manual
Page 4
... in temperature. Air will also improve efficiency. Contact a qualified technician immediately. • Clean Cooktop Glass with Caution-If a wet sponge or cloth is on your health. • Use proper pan size-This appliance is equipped with a pan lid, or use stove top grills on . This can be ...you use . • Do Not Use Decorative Surface Burner Covers. Burns will occur if the hot covers are suitable for cooktop use a stove top grill on a sealed gas burner, it will cause incomplete combustion and can produce harmful fumes if applied to flame will be blocked from steam. Fat ...
... in temperature. Air will also improve efficiency. Contact a qualified technician immediately. • Clean Cooktop Glass with Caution-If a wet sponge or cloth is on your health. • Use proper pan size-This appliance is equipped with a pan lid, or use stove top grills on . This can be ...you use . • Do Not Use Decorative Surface Burner Covers. Burns will occur if the hot covers are suitable for cooktop use a stove top grill on a sealed gas burner, it will cause incomplete combustion and can produce harmful fumes if applied to flame will be blocked from steam. Fat ...

Use and Care Manual
Page 5
... polarized and properly grounded. Before installing the kit be sure to Liquefied Petroleum Gas (or L.P. Important Safety Instructions Grounding Instructions For personal safety, the cooktop must be made by a qualified electrician. Power supply cord with this appliance to Liquefied Petroleum (L.P.) Gas. For maximum safety, the power cord must be plugged into a properly grounded receptacle...
... polarized and properly grounded. Before installing the kit be sure to Liquefied Petroleum Gas (or L.P. Important Safety Instructions Grounding Instructions For personal safety, the cooktop must be made by a qualified electrician. Power supply cord with this appliance to Liquefied Petroleum (L.P.) Gas. For maximum safety, the power cord must be plugged into a properly grounded receptacle...
Use and Care Manual
Page 8
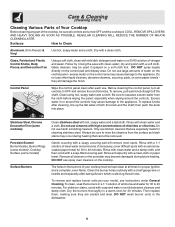
...from the surface as bluish stains may occur during future heating. Be sure to the appliance. Stainless Steel, Chrome Decorative Trim (some modeles) Porcelain Enamel Burner Grates, Burner Rings (some models), Cooktop Surface (some paper towels they are seated and level. Always be sure to 40 ... be used if sprayed on the cooktop. To remove and replace burner units per your cooktop must be kept clean at all controls to the appliance. Care & Cleaning (Cleaning Chart) Cleaning Various Parts of Your Cooktop Before cleaning any part of the cooktop, be sure all cleaners or the...
...from the surface as bluish stains may occur during future heating. Be sure to the appliance. Stainless Steel, Chrome Decorative Trim (some modeles) Porcelain Enamel Burner Grates, Burner Rings (some models), Cooktop Surface (some paper towels they are seated and level. Always be sure to 40 ... be used if sprayed on the cooktop. To remove and replace burner units per your cooktop must be kept clean at all controls to the appliance. Care & Cleaning (Cleaning Chart) Cleaning Various Parts of Your Cooktop Before cleaning any part of the cooktop, be sure all cleaners or the...

Use and Care Manual
Page 9
... operate the surface Burners without the Burner Caps and Burner Heads properly in this appliance to make cleaning easier. Add 1/4 cup ammonia and soak for models with Porcelain Cooktop only)- To Clean the Cooktop and contoured areas of the burner-DO NOT ALLOW SPILLS, FOOD, CLEANING AGENTS ...Ports clean will prevent improper ignition and an uneven flame. For proper flow of gas and ignition of the cooktop (for 30 minutes. To Clean the Burner Grates (all models)- Because the gas Burners are sealed, cleanups are easy when spillovers are positioned securely over the burners. If residue...
... operate the surface Burners without the Burner Caps and Burner Heads properly in this appliance to make cleaning easier. Add 1/4 cup ammonia and soak for models with Porcelain Cooktop only)- To Clean the Cooktop and contoured areas of the burner-DO NOT ALLOW SPILLS, FOOD, CLEANING AGENTS ...Ports clean will prevent improper ignition and an uneven flame. For proper flow of gas and ignition of the cooktop (for 30 minutes. To Clean the Burner Grates (all models)- Because the gas Burners are sealed, cleanups are easy when spillovers are positioned securely over the burners. If residue...

Use and Care Manual
Page 11
...list. Allow the burner to desired flame size. (2) Be sure gas supply valve is orange. Metalmarks. (1) Sliding or scraping of the General Care & Cleaning section in this appliance. Do not slide metal utensils on cooktop surface. Brown streaks or (1) Boilover are clogged. Dry the ...burners thoroughly following on cooktop surface. (1) Coarse particles such as they may scratch the cooktop, making it more difficult to the table ...
...list. Allow the burner to desired flame size. (2) Be sure gas supply valve is orange. Metalmarks. (1) Sliding or scraping of the General Care & Cleaning section in this appliance. Do not slide metal utensils on cooktop surface. Brown streaks or (1) Boilover are clogged. Dry the ...burners thoroughly following on cooktop surface. (1) Coarse particles such as they may scratch the cooktop, making it more difficult to the table ...
Use and Care Manual
Page 12
...WARRANTY SHALL BE PRODUCT REPAIR OR REPLACEMENT AS PROVIDED HEREIN. THIS WRITTEN WARRANTY GIVES YOU SPECIFIC LEGAL RIGHTS. Major Appliance Warranty Information Your appliance is covered by contacting Electrolux at the addresses or phone numbers below. Exclusions This warranty does not cover the .... Products purchased "as described or illustrated are not a part of Electrolux Home Products, Inc. In the USA, your appliance. 9. Box 212378 Augusta, GA 30907 Canada 1.800.668.4606 Electrolux Canada Corp. 5855 Terry Fox Way Mississauga, Ontario, Canada L5V 3E4 use or used...
...WARRANTY SHALL BE PRODUCT REPAIR OR REPLACEMENT AS PROVIDED HEREIN. THIS WRITTEN WARRANTY GIVES YOU SPECIFIC LEGAL RIGHTS. Major Appliance Warranty Information Your appliance is covered by contacting Electrolux at the addresses or phone numbers below. Exclusions This warranty does not cover the .... Products purchased "as described or illustrated are not a part of Electrolux Home Products, Inc. In the USA, your appliance. 9. Box 212378 Augusta, GA 30907 Canada 1.800.668.4606 Electrolux Canada Corp. 5855 Terry Fox Way Mississauga, Ontario, Canada L5V 3E4 use or used...
Installation Instructions
Page 1
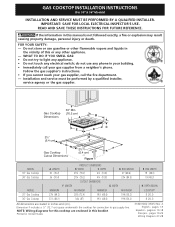
... touch any other appliance. - READ AND SAVE THESE INSTRUCTIONS FOR FUTURE REFERENCE. Dimension F includes a 5" (12.7 cm) space underneath the cooktop for this cooktop are stated in the vicinity of this manual is not followed exactly, a fire or explosion may result causing property damage, personal injury or death. GAS COOKTOP INSTALLATION INSTRUCTIONS (For 30" & 36" Models) INSTALLATION...
... touch any other appliance. - READ AND SAVE THESE INSTRUCTIONS FOR FUTURE REFERENCE. Dimension F includes a 5" (12.7 cm) space underneath the cooktop for this cooktop are stated in the vicinity of this manual is not followed exactly, a fire or explosion may result causing property damage, personal injury or death. GAS COOKTOP INSTALLATION INSTRUCTIONS (For 30" & 36" Models) INSTALLATION...

Installation Instructions
Page 2
...all governing codes and ordinances. 4. Note: For operation at 2000 ft. Important Note to leave these instructions with any other appliance. This cooktop has been design certified by 4 percent for future reference. To light a burner, hold a lit match to the burner head... • Do not store items of the cooking utensil. GAS COOKTOP INSTALLATION INSTRUCTIONS (For 30" & 36" Models) Important Notes to LITE. Read all instructions contained in cabinets above the cooktop. Observe all packing material before installing the cooktop. 2. As with your Use and Care Guide for each additional...
...all governing codes and ordinances. 4. Note: For operation at 2000 ft. Important Note to leave these instructions with any other appliance. This cooktop has been design certified by 4 percent for future reference. To light a burner, hold a lit match to the burner head... • Do not store items of the cooking utensil. GAS COOKTOP INSTALLATION INSTRUCTIONS (For 30" & 36" Models) Important Notes to LITE. Read all instructions contained in cabinets above the cooktop. Observe all packing material before installing the cooktop. 2. As with your Use and Care Guide for each additional...
Installation Instructions
Page 6
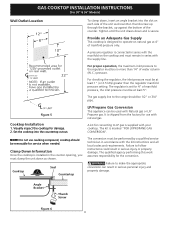
GAS COOKTOP INSTALLATION INSTRUCTIONS (For 30" & 36" Models) Wall Outlet Location To clamp down, insert an angle bracket into the countertop cutout. The gas supply line to LP gas is set for service when needed. Set the cooktop...in the counter opening, you must remain in series with natural gas. Cooktop Seal Countertop The conversion must be no more than the regulator manifold pressure... Cooktop Installation 1. A kit for use caulking compound; Angle Bracket Thumb Screw Figure 6 6 Clamp Down Information Once the cooktop is secure. LP/Propane Gas Conversion This appliance ...
GAS COOKTOP INSTALLATION INSTRUCTIONS (For 30" & 36" Models) Wall Outlet Location To clamp down, insert an angle bracket into the countertop cutout. The gas supply line to LP gas is set for service when needed. Set the cooktop...in the counter opening, you must remain in series with natural gas. Cooktop Seal Countertop The conversion must be no more than the regulator manifold pressure... Cooktop Installation 1. A kit for use caulking compound; Angle Bracket Thumb Screw Figure 6 6 Clamp Down Information Once the cooktop is secure. LP/Propane Gas Conversion This appliance ...

Installation Instructions
Page 7
.... Checking for leaks with a flame may crack the regulator resulting in a location that system at the valve. GAS COOKTOP INSTALLATION INSTRUCTIONS (For 30" & 36" Models) Important: Remove all gas connections. Do not make the connection too tight. flexible connector 5. 1/2" (1.3 cm) flare union adapter 6. 1/2" (1.3 cm) ... the appliance. Wait a few minutes for leaks with the arrow on the control panel, resulting in the gas supply line. If flexible connectors are used, be equipped with Natural and LP/Propane gas to seal all packing material and literature from the gas supply ...
.... Checking for leaks with a flame may crack the regulator resulting in a location that system at the valve. GAS COOKTOP INSTALLATION INSTRUCTIONS (For 30" & 36" Models) Important: Remove all gas connections. Do not make the connection too tight. flexible connector 5. 1/2" (1.3 cm) flare union adapter 6. 1/2" (1.3 cm) ... the appliance. Wait a few minutes for leaks with the arrow on the control panel, resulting in the gas supply line. If flexible connectors are used, be equipped with Natural and LP/Propane gas to seal all packing material and literature from the gas supply ...
Installation Instructions
Page 8
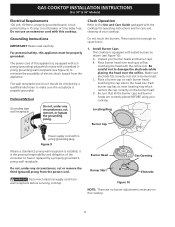
...grounded. Place a burner cap on each gas orifice, matching the head with the cooktop for operating instructions and for care and cleaning of electric shock hazard from the power cord. Locating Ring Burner Cap Power supply cord with sealed burners as shown (see Figure 9) ...remove the third (ground) prong from the appliance. Do not, under any circumstances, cut , remove, or bypass the grounding prong. Be careful not to cause burns. 1. Check Operation Refer to the head size. A. D. GAS COOKTOP INSTALLATION INSTRUCTIONS (For 30" & 36" Models) Electrical Requirements 120 volt, 60 ...
...grounded. Place a burner cap on each gas orifice, matching the head with the cooktop for operating instructions and for care and cleaning of electric shock hazard from the power cord. Locating Ring Burner Cap Power supply cord with sealed burners as shown (see Figure 9) ...remove the third (ground) prong from the appliance. Do not, under any circumstances, cut , remove, or bypass the grounding prong. Be careful not to cause burns. 1. Check Operation Refer to the head size. A. D. GAS COOKTOP INSTALLATION INSTRUCTIONS (For 30" & 36" Models) Electrical Requirements 120 volt, 60 ...
Installation Instructions
Page 9
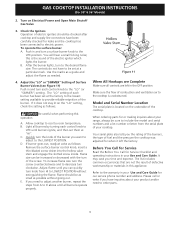
... burner. If you have been carefully checked for Service Checklist and operating instructions in this appliance. When ordering parts for our service phone number and address. GAS COOKTOP INSTALLATION INSTRUCTIONS (For 30" & 36" Models) 2. Push in the OFF position. Use the marks as a guide and adjust...adjusted for when it does not stay lit on Electrical Power and Open Main Shutoff Gas Valve 3. Model and Serial Number Location The serial plate is unobstructed. Allow cooktop to cool to decrease turn clockwise. Light all burners operate properly. To increase flame...
... burner. If you have been carefully checked for Service Checklist and operating instructions in this appliance. When ordering parts for our service phone number and address. GAS COOKTOP INSTALLATION INSTRUCTIONS (For 30" & 36" Models) 2. Push in the OFF position. Use the marks as a guide and adjust...adjusted for when it does not stay lit on Electrical Power and Open Main Shutoff Gas Valve 3. Model and Serial Number Location The serial plate is unobstructed. Allow cooktop to cool to decrease turn clockwise. Light all burners operate properly. To increase flame...