Use and Care Manual
Page 2
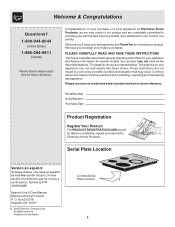
... for your purchase of our product and are representative. Common sense and caution must be filled in United States Cooktop Serial Plate Location 2 Spanish Use & Care Manual Electrolux Home Products P. PLEASE CAREFULLY READ AND SAVE THESE INSTRUCTIONS... This Use & Care Manual contains general operating instructions for future reference. Model Number: Serial Number: Purchase Date: Product Registration Register Your Product The PRODUCT REGISTRATION CARD should be practiced when installing, operating and...
... for your purchase of our product and are representative. Common sense and caution must be filled in United States Cooktop Serial Plate Location 2 Spanish Use & Care Manual Electrolux Home Products P. PLEASE CAREFULLY READ AND SAVE THESE INSTRUCTIONS... This Use & Care Manual contains general operating instructions for future reference. Model Number: Serial Number: Purchase Date: Product Registration Register Your Product The PRODUCT REGISTRATION CARD should be practiced when installing, operating and...
Use and Care Manual
Page 4
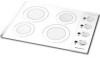
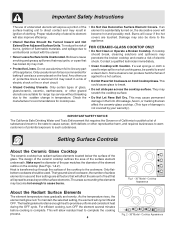
... in a risk of the surface element underneath. The design of the ceramic cooktop outlines the area of electric shock or fire or short circuit. • Do Not Place Hot Cookware on Cold Cooktop Glass. Only flatbottom cookware should break, cleaning solutions and spillovers may also be... 30" Model - As the temperature rises, the element will ignition of clothing. The heating element retains enough heat to break. • Glazed Cooking Utensils. covers are suitable for a steam burn. If a wet sponge or cloth is complete. Any other glazed • Do not slide pan across the cooktop ...
... in a risk of the surface element underneath. The design of the ceramic cooktop outlines the area of electric shock or fire or short circuit. • Do Not Place Hot Cookware on Cold Cooktop Glass. Only flatbottom cookware should break, cleaning solutions and spillovers may also be... 30" Model - As the temperature rises, the element will ignition of clothing. The heating element retains enough heat to break. • Glazed Cooking Utensils. covers are suitable for a steam burn. If a wet sponge or cloth is complete. Any other glazed • Do not slide pan across the cooktop ...
Installation Instructions
Page 1
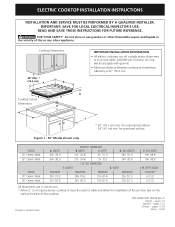
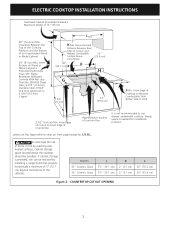
...protected surface Figure 1 - 30" Model shown only MODEL 30" Ceramic Model 36" Ceramic Model MODEL 30" Ceramic Model 36" Ceramic Model A. WIDTH C. DEPTH D. LENGTH G. Printed in the vicinity of the cooktop. pages 7-12 Franç...Cooktop Dimensions IMPORTANT INSTALLATION INFORMATION • All electric cooktops run off a single phase, three-wire or four-wire cable, 240/208 volt, 60 hertz, AC only electrical supply with ground. • Minimum distance between cooktop and overhead cabinetry is 30" (76.2 cm). LENGTH PRODUCT DIMENSIONS B. Cooktop Cutout Dimensions * 30...
...protected surface Figure 1 - 30" Model shown only MODEL 30" Ceramic Model 36" Ceramic Model MODEL 30" Ceramic Model 36" Ceramic Model A. WIDTH C. DEPTH D. LENGTH G. Printed in the vicinity of the cooktop. pages 7-12 Franç...Cooktop Dimensions IMPORTANT INSTALLATION INFORMATION • All electric cooktops run off a single phase, three-wire or four-wire cable, 240/208 volt, 60 hertz, AC only electrical supply with ground. • Minimum distance between cooktop and overhead cabinetry is 30" (76.2 cm). LENGTH PRODUCT DIMENSIONS B. Cooktop Cutout Dimensions * 30...
Installation Instructions
Page 2
...cm) 18" (45.7 cm) 24" (61 cm) 12" (30.5 cm) J Min. COUNTERTOP CUTOUT OPENING 2 MODEL 30" Ceramic Glass 36" Ceramic Glass J 7½" (19.1 cm) 7½" (19.1 cm) K 2" (5.1 cm) 2" (5.1 cm) L 30" (76.2 cm) 36" (91.4 cm) Figure 2 - ...Clearance Between the Top of the Cooking Platform and the Bottom of Junction Box It is not recommended to chart on this figure refer to use drawer underneath cooktop. ELECTRIC COOKTOP...
...cm) 18" (45.7 cm) 24" (61 cm) 12" (30.5 cm) J Min. COUNTERTOP CUTOUT OPENING 2 MODEL 30" Ceramic Glass 36" Ceramic Glass J 7½" (19.1 cm) 7½" (19.1 cm) K 2" (5.1 cm) 2" (5.1 cm) L 30" (76.2 cm) 36" (91.4 cm) Figure 2 - ...Clearance Between the Top of the Cooking Platform and the Bottom of Junction Box It is not recommended to chart on this figure refer to use drawer underneath cooktop. ELECTRIC COOKTOP...
Installation Instructions
Page 4
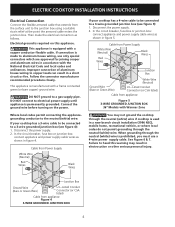
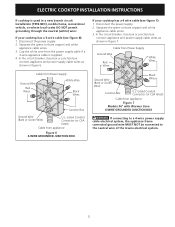
...to the neutral (white) wire: If your cooktop has a 4-wire cable to be connected to a 3-wire grounded junction box (see figure 4): 1. Cable from appliance Figure 5 3-WIRE GROUNDED JUNCTION BOX 36" Models with Warmer Zone You may result in electrocution ... as shown in figure 4. This appliance is manufactured with a copper conductor flexible cable. Disconnect the power supply. 2. ELECTRIC COOKTOP INSTALLATION INSTRUCTIONS Electrical Connection Connect the flexible armored cable that extends from appliance Figure 4 3-WIRE GROUNDED JUNCTION BOX 4 If connection is made...
...to the neutral (white) wire: If your cooktop has a 4-wire cable to be connected to a 3-wire grounded junction box (see figure 4): 1. Cable from appliance Figure 5 3-WIRE GROUNDED JUNCTION BOX 36" Models with Warmer Zone You may result in electrocution ... as shown in figure 4. This appliance is manufactured with a copper conductor flexible cable. Disconnect the power supply. 2. ELECTRIC COOKTOP INSTALLATION INSTRUCTIONS Electrical Connection Connect the flexible armored cable that extends from appliance Figure 4 3-WIRE GROUNDED JUNCTION BOX 4 If connection is made...
Installation Instructions
Page 5
...Figure 7 Models 36" with Warmer Zone 4-WIRE GROUNDED JUNCTION BOX WARNING If connecting to a 4-wire power supply cable electrical system, the appliance frame connected ground wire MUST NOT be connected to the neutral wire of the 4-wire electrical system. 5 ELECTRIC COOKTOP INSTALLATION INSTRUCTIONS If cooktop is ... (1996 NEC), mobile home, recreational vehicle, or where local codes DO NOT permit grounding through the neutral (white) wire: If your cooktop has a 4 wire cable (see figure 6): 1. Disconnect the power supply. 2. Cap the white wire from the power supply cable if...
...Figure 7 Models 36" with Warmer Zone 4-WIRE GROUNDED JUNCTION BOX WARNING If connecting to a 4-wire power supply cable electrical system, the appliance frame connected ground wire MUST NOT be connected to the neutral wire of the 4-wire electrical system. 5 ELECTRIC COOKTOP INSTALLATION INSTRUCTIONS If cooktop is ... (1996 NEC), mobile home, recreational vehicle, or where local codes DO NOT permit grounding through the neutral (white) wire: If your cooktop has a 4 wire cable (see figure 6): 1. Disconnect the power supply. 2. Cap the white wire from the power supply cable if...
Installation Instructions
Page 6
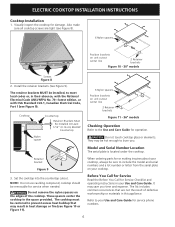
...cooktop glass or elements. Model and Serial Number Location The serial plate is located under the cooktop. NOTE: Do not use caulking compound; cooktop should be installed, to the Use and Care Guide for service when needed. These spacers center the cooktop in this appliance. It may save you . ELECTRIC COOKTOP INSTALLATION INSTRUCTIONS Cooktop... on unit cutout center line 2 Retainer brackets Figure 10 - 30" models Screws Figure 8 2. Visually inspect the cooktop for or making inquires about your cooktop. 3. Cooktop Countertop Retainer Brackets Must Be Installed At Least 1/16" (0.16...
...cooktop glass or elements. Model and Serial Number Location The serial plate is located under the cooktop. NOTE: Do not use caulking compound; cooktop should be installed, to the Use and Care Guide for service when needed. These spacers center the cooktop in this appliance. It may save you . ELECTRIC COOKTOP INSTALLATION INSTRUCTIONS Cooktop... on unit cutout center line 2 Retainer brackets Figure 10 - 30" models Screws Figure 8 2. Visually inspect the cooktop for or making inquires about your cooktop. 3. Cooktop Countertop Retainer Brackets Must Be Installed At Least 1/16" (0.16...


