Use and Care Manual
Page 2
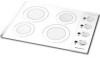
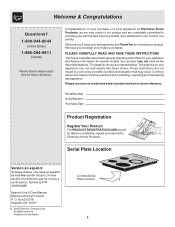
... all the described features. At Electrolux Home Products, we are very proud of a new appliance! Common sense and caution must be filled in United States Cooktop Serial Plate Location 2 Serial Plate Location Versión en español Si desea obtener... Serial Number: Purchase Date: Product Registration Register Your Product The PRODUCT REGISTRATION CARD should be practiced when installing, operating and maintaining any appliance. Please record your purchase of our product and are representative. O. Welcome & Congratulations Questions? 1-800-944-9044 (United States) 1-...
... all the described features. At Electrolux Home Products, we are very proud of a new appliance! Common sense and caution must be filled in United States Cooktop Serial Plate Location 2 Serial Plate Location Versión en español Si desea obtener... Serial Number: Purchase Date: Product Registration Register Your Product The PRODUCT REGISTRATION CARD should be practiced when installing, operating and maintaining any appliance. Please record your purchase of our product and are representative. O. Welcome & Congratulations Questions? 1-800-944-9044 (United States) 1-...
Use and Care Manual
Page 3
... or use baking soda, a dry chemical or foam-type extinguisher. • When heating fat or grease, watch it closely. Know how to disconnect the electrical power to the appliance at the circuit breaker or fuse box in Canada, and local code requirements. Smother the fire with the National... of a pot holder. • Do Not Heat Unopened Food Containers. When flaming food under the hood, turn off and the power resumes, the cooktop will not operate and an error message will be kept clean. Children climbing on . Do not let clothing or other bulky cloth instead of the...
... or use baking soda, a dry chemical or foam-type extinguisher. • When heating fat or grease, watch it closely. Know how to disconnect the electrical power to the appliance at the circuit breaker or fuse box in Canada, and local code requirements. Smother the fire with the National... of a pot holder. • Do Not Heat Unopened Food Containers. When flaming food under the hood, turn off and the power resumes, the cooktop will not operate and an error message will be kept clean. Children climbing on . Do not let clothing or other bulky cloth instead of the...
Use and Care Manual
Page 4
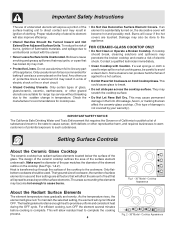
...• Utensil Handles Should Be Turned Inward and Not appliance. Damage may ignite, or a pan that may also be done to areas beyond the surface elements. Boilovers cause penetrate the broken cooktop and create a risk of electric smoking and greasy spillovers that shock. damage in the form...due to line any part used . Do not use aluminum foil to FOR CERAMIC-GLASS COOKTOP ONLY unintentional contact with Caution. hi ELEMENT ON hi ..... 88 OFF lo lo ..... hi a d n a exp Fig.1 - 30" Model - Only use aluminum foil as a cover placed on , the decorative cover ...
...• Utensil Handles Should Be Turned Inward and Not appliance. Damage may ignite, or a pan that may also be done to areas beyond the surface elements. Boilovers cause penetrate the broken cooktop and create a risk of electric smoking and greasy spillovers that shock. damage in the form...due to line any part used . Do not use aluminum foil to FOR CERAMIC-GLASS COOKTOP ONLY unintentional contact with Caution. hi ELEMENT ON hi ..... 88 OFF lo lo ..... hi a d n a exp Fig.1 - 30" Model - Only use aluminum foil as a cover placed on , the decorative cover ...
Use and Care Manual
Page 9
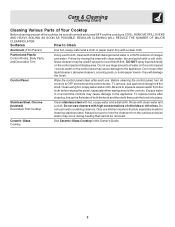
... water on the control panel - Clean using hot, soapy water and a cloth. Only use . Always be sure to the appliance. dry and polish with clean water and a cloth. Excess water in this Owner's Guide. 9 To replace knobs after each knob straight off the shaft.... Aluminum (Trim Pieces) Use hot, soapy water and a cloth or paper towel. Care & Cleaning (Cleaning Chart) Cleaning Various Parts of Your Cooktop Before cleaning any part of the cooktop, be sure all controls to squeeze excess water from the surface as bluish stains may occur during heating that are turned OFF...
... water on the control panel - Clean using hot, soapy water and a cloth. Only use . Always be sure to the appliance. dry and polish with clean water and a cloth. Excess water in this Owner's Guide. 9 To replace knobs after each knob straight off the shaft.... Aluminum (Trim Pieces) Use hot, soapy water and a cloth or paper towel. Care & Cleaning (Cleaning Chart) Cleaning Various Parts of Your Cooktop Before cleaning any part of the cooktop, be sure all controls to squeeze excess water from the surface as bluish stains may occur during heating that are turned OFF...
Use and Care Manual
Page 11
... Cooking Utensils in this Owner's Guide. 11 Do not slide metal utensils on ceramic glass cooktop surface. Scrub with a clean paper towel. Surface element too hot or not hot enough. Call local electric company. (1) No power to remove soil. Small scratches do not affect cooking and will ... heat evenly. Surface element does not heat. POSSIBLE CAUSE/SOLUTION (1) House fuse has blown or circuit breaker has tripped. Be sure appliance is on cooktop surface. Raise or lower setting until proper amount of heat is obtained. (1) Coarse particles (such as salt or sand) are clean...
... Cooking Utensils in this Owner's Guide. 11 Do not slide metal utensils on ceramic glass cooktop surface. Scrub with a clean paper towel. Surface element too hot or not hot enough. Call local electric company. (1) No power to remove soil. Small scratches do not affect cooking and will ... heat evenly. Surface element does not heat. POSSIBLE CAUSE/SOLUTION (1) House fuse has blown or circuit breaker has tripped. Be sure appliance is on cooktop surface. Raise or lower setting until proper amount of heat is obtained. (1) Coarse particles (such as salt or sand) are clean...
Use and Care Manual
Page 12
...this warranty must be performed by contacting Electrolux at the addresses or phone numbers below. Damages caused by: services performed by Electrolux Major Appliances North America, a division of trim, cupboards, shelves, etc., which do not involve malfunction or defects in materials or workmanship, or... from its original owner to correct the installation of God. In the USA, your appliance. 9. Expenses for making the appliance accessible for appliances not in ordinary household use of the appliance when it is installed, used in the USA and Canada. CLAIMS BASED ON IMPLIED ...
...this warranty must be performed by contacting Electrolux at the addresses or phone numbers below. Damages caused by: services performed by Electrolux Major Appliances North America, a division of trim, cupboards, shelves, etc., which do not involve malfunction or defects in materials or workmanship, or... from its original owner to correct the installation of God. In the USA, your appliance. 9. Expenses for making the appliance accessible for appliances not in ordinary household use of the appliance when it is installed, used in the USA and Canada. CLAIMS BASED ON IMPLIED ...
Installation Instructions
Page 1
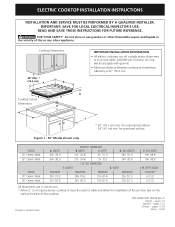
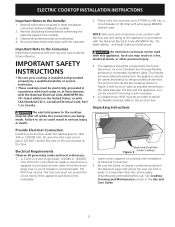
... Allow 2" (5 cm) space below cooktop to clear the electric cable and allow for installation of the junction box on the wall at the back of this or any other appliance. Cooktop Cutout Dimensions * 30" (76.2 cm) min. WIDTH ...MINIMUM MAXIMUM MINIMUM MAXIMUM 295/8 (75.2) 29¾ (75.6) 20¼ (51.4) 20½ (52.1) 355/8 (90.5) 361/8 (91.6) 20¼ (51.4) 20½ (52.1) E. BOX WIDTH 19¼ (48.9) 19¼ (48.9) H. Cooktop Dimensions IMPORTANT INSTALLATION INFORMATION • All electric cooktops...
... Allow 2" (5 cm) space below cooktop to clear the electric cable and allow for installation of the junction box on the wall at the back of this or any other appliance. Cooktop Cutout Dimensions * 30" (76.2 cm) min. WIDTH ...MINIMUM MAXIMUM MINIMUM MAXIMUM 295/8 (75.2) 29¾ (75.6) 20¼ (51.4) 20½ (52.1) 355/8 (90.5) 361/8 (91.6) 20¼ (51.4) 20½ (52.1) E. BOX WIDTH 19¼ (48.9) 19¼ (48.9) H. Cooktop Dimensions IMPORTANT INSTALLATION INFORMATION • All electric cooktops...
Installation Instructions
Page 3
...armored or nonmetallic sheathed cable. Electrical Requirements Observe all governing codes and ordinances. 4. DO NOT fuse neutral. Important Note to the Consumer Keep these instructions with your cooktop is important that the ceramic-glass smoothtop be connected to the circuit ... the appliance specified on the nameplate. ELECTRIC COOKTOP INSTALLATION INSTRUCTIONS Important Notes to the cooktop. 3. Remove all instructions contained in Canada. Be sure to the grounded junction box. WARNING The electrical power to the cooktop must conform with the National Electrical Code ...
...armored or nonmetallic sheathed cable. Electrical Requirements Observe all governing codes and ordinances. 4. DO NOT fuse neutral. Important Note to the Consumer Keep these instructions with your cooktop is important that the ceramic-glass smoothtop be connected to the circuit ... the appliance specified on the nameplate. ELECTRIC COOKTOP INSTALLATION INSTRUCTIONS Important Notes to the cooktop. 3. Remove all instructions contained in Canada. Be sure to the grounded junction box. WARNING The electrical power to the cooktop must conform with the National Electrical Code ...
Installation Instructions
Page 4
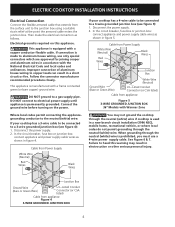
...) Red Wires Black Wires If your cooktop has a 3-wire cable to be connected to a 3-wire grounded junction box (see figure 4): 1. Electrical ground is required on the power. In the circuit breaker, fuse box or junction box: connect appliance and power supply cable wires as follows.... Connect the ground wire before turning on this warning may not ground the cooktop through the neutral (white) wire. If connection is equipped with the National Electrical Code and local codes and ordinances. This appliance is made to a 3-wire grounded junction box (see figure 5): 1. Then...
...) Red Wires Black Wires If your cooktop has a 3-wire cable to be connected to a 3-wire grounded junction box (see figure 4): 1. Electrical ground is required on the power. In the circuit breaker, fuse box or junction box: connect appliance and power supply cable wires as follows.... Connect the ground wire before turning on this warning may not ground the cooktop through the neutral (white) wire. If connection is equipped with the National Electrical Code and local codes and ordinances. This appliance is made to a 3-wire grounded junction box (see figure 5): 1. Then...
Installation Instructions
Page 5
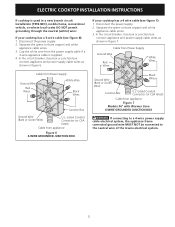
... installation (1996 NEC), mobile home, recreational vehicle, or where local codes DO NOT permit grounding through the neutral (white) wire: If your cooktop has a 4 wire cable (see figure 6): 1. ELECTRIC COOKTOP INSTALLATION INSTRUCTIONS If cooktop is supplied. 4. Disconnect the power supply. 2. Separate the green (or bare copper) and white appliance cable wires. 3. Disconnect the power supply. 2.
... installation (1996 NEC), mobile home, recreational vehicle, or where local codes DO NOT permit grounding through the neutral (white) wire: If your cooktop has a 4 wire cable (see figure 6): 1. ELECTRIC COOKTOP INSTALLATION INSTRUCTIONS If cooktop is supplied. 4. Disconnect the power supply. 2. Separate the green (or bare copper) and white appliance cable wires. 3. Disconnect the power supply. 2.
Installation Instructions
Page 6
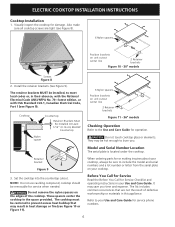
...cooktop. These spacers center the cooktop in this appliance. The cooktop must be centered to burn you time and expense. Refer to your Use and Care Guide. They may be installed, to the Use and Care Guide for Service Checklist and operating instructions in their absence, with the National Electrical... CSA Standard C22.1, Canadian Electrical Code, Part 1 (see Figure 9). WARNING Do not remove the nylon spacers on unit cutout center line 2 Retainer brackets Figure 10 - 30" models Screws Figure 8 2. Nylon spacer CAUTION Do not touch cooktop glass or elements. Before...
...cooktop. These spacers center the cooktop in this appliance. The cooktop must be centered to burn you time and expense. Refer to your Use and Care Guide. They may be installed, to the Use and Care Guide for Service Checklist and operating instructions in their absence, with the National Electrical... CSA Standard C22.1, Canadian Electrical Code, Part 1 (see Figure 9). WARNING Do not remove the nylon spacers on unit cutout center line 2 Retainer brackets Figure 10 - 30" models Screws Figure 8 2. Nylon spacer CAUTION Do not touch cooktop glass or elements. Before...