Use and Care Manual
Page 1
Use & Care Manual Side by Side Refrigerator Got Questions? CALL: Solutions Hotline (United States) 1-800-944-9044 (Canada) 1-800-668-4606 √ Resolve many service issues over the phone at your convenience! &#...
Use & Care Manual Side by Side Refrigerator Got Questions? CALL: Solutions Hotline (United States) 1-800-944-9044 (Canada) 1-800-668-4606 √ Resolve many service issues over the phone at your convenience! &#...

Use and Care Manual
Page 2
...ordinances. IMPORTANT Pressing and holding the On/Off button for warnings regarding flammability and other electrical components. ELECTRICAL INFORMATION • The refrigerator must be plugged directly into a properly grounded three prong receptacle. The power cord of the past. IMPORTANT SAFETY INSTRUCTIONS WARNING ... by a wall switch or pull cord to avoid electrical shock. • Performance may not easily climb inside. • Have refrigerant removed by 10% or more. Grounding type wall receptacle Do not, under your protection against CAUTION To avoid personal injury or property...
...ordinances. IMPORTANT Pressing and holding the On/Off button for warnings regarding flammability and other electrical components. ELECTRICAL INFORMATION • The refrigerator must be plugged directly into a properly grounded three prong receptacle. The power cord of the past. IMPORTANT SAFETY INSTRUCTIONS WARNING ... by a wall switch or pull cord to avoid electrical shock. • Performance may not easily climb inside. • Have refrigerant removed by 10% or more. Grounding type wall receptacle Do not, under your protection against CAUTION To avoid personal injury or property...
Use and Care Manual
Page 3
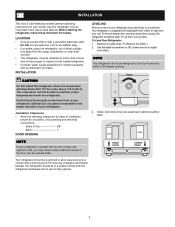
... and plumbing and electrical connections: Sides & Top 3/8" Back 1" DOOR OPENING LEVELING All four corners of drawers and freezer baskets, the refrigerator should be fully opened wider. Do Not block the toe grille on the lower front of direct sunlight and away from the range, ... to a counter when removing food. NOTE If your model. Remove toe grille. (See "To Remove Toe Grille" .) 2. Raise 3. Your refrigerator is essential for your refrigerator is near a grounded electrical outlet. The compressor will drop below 55°F (13°C) or rise above 110°F (43°C). Use...
... and plumbing and electrical connections: Sides & Top 3/8" Back 1" DOOR OPENING LEVELING All four corners of drawers and freezer baskets, the refrigerator should be fully opened wider. Do Not block the toe grille on the lower front of direct sunlight and away from the range, ... to a counter when removing food. NOTE If your model. Remove toe grille. (See "To Remove Toe Grille" .) 2. Raise 3. Your refrigerator is essential for your refrigerator is near a grounded electrical outlet. The compressor will drop below 55°F (13°C) or rise above 110°F (43°C). Use...
Use and Care Manual
Page 4
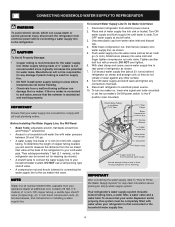
...to "How to soft water, ensure that leak. 9. NOTE Water line kit number 5303917950, available from your cold water pipe. Disconnect refrigerator from water valve inlet and discard cap. 4. Unscrew plastic cap from electric power source. 2. Slide ferrule (sleeve) into sink or ...bucket. To Connect Water Supply Line To Ice Maker Inlet Valve 1. Reconnect refrigerator to rear panel of ¼ inch OD copper tubing, a saddle type shutoff valve (nonpiercing), (2) ¼ inch brass compression nuts, (2) ...
...to "How to soft water, ensure that leak. 9. NOTE Water line kit number 5303917950, available from your cold water pipe. Disconnect refrigerator from water valve inlet and discard cap. 4. Unscrew plastic cap from electric power source. 2. Slide ferrule (sleeve) into sink or ...bucket. To Connect Water Supply Line To Ice Maker Inlet Valve 1. Reconnect refrigerator to rear panel of ¼ inch OD copper tubing, a saddle type shutoff valve (nonpiercing), (2) ¼ inch brass compression nuts, (2) ...

Use and Care Manual
Page 5
...cable connector located above steps. 5 The connector releases when you start: 1 Make sure the electrical power cord is necessary to move the refrigerator through narrow doorways, follow these steps to the Remove the three bottom hinge screws and hinge, if necessary. To remove the hinge cover: ...(some models) 2 Trace lightly around the door's top hinge with a pencil. Lay the door on refrigerator door and remove cover. (some models) 1 Remove the three screws from the door shelves. 3 Close the doors. Before you press its side to...
...cable connector located above steps. 5 The connector releases when you start: 1 Make sure the electrical power cord is necessary to move the refrigerator through narrow doorways, follow these steps to the Remove the three bottom hinge screws and hinge, if necessary. To remove the hinge cover: ...(some models) 2 Trace lightly around the door's top hinge with a pencil. Lay the door on refrigerator door and remove cover. (some models) 1 Remove the three screws from the door shelves. 3 Close the doors. Before you press its side to...
Use and Care Manual
Page 6
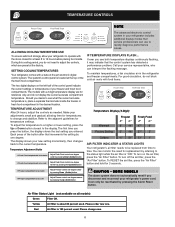
...adjustments small and gradual; Please change and stabilize. TEMPERATURE CONTROLS NOTE ALLOWING COOLING TIME BEFORE USE To ensure safe food storage, allow your refrigerator to operate with food items. Temperature Display (2-Digit) Warmest Factory Setting Coldest Freezer F° C° 6° -14° ...current accurate compartment temperature. To turn on the air filter, press the "Air Filter" button. SETTING COOLING TEMPERATURES Your refrigerator comes with a 2-digit temperature display are preset at the top of your new setting momentarily, then changes back to ...
...adjustments small and gradual; Please change and stabilize. TEMPERATURE CONTROLS NOTE ALLOWING COOLING TIME BEFORE USE To ensure safe food storage, allow your refrigerator to operate with food items. Temperature Display (2-Digit) Warmest Factory Setting Coldest Freezer F° C° 6° -14° ...current accurate compartment temperature. To turn on the air filter, press the "Air Filter" button. SETTING COOLING TEMPERATURES Your refrigerator comes with a 2-digit temperature display are preset at the top of your new setting momentarily, then changes back to ...

Use and Care Manual
Page 7
... are reached, the On light displays green to reset. If compartment temperatures do not accidentally turn off while the freezer and refrigerator compartments cool toward your current current settings call for the back page of this Use & over five minutes. 9 Freezer or... warm (7.2° C using the phone settings. Power Flashing Failure Amber A power outage Press Alarm Reset button to disable and reset refrigerator alarm. active. 9 Freezer or Close door to was detected. TEMPERATURE CONTROLS Cooling System On/Off Button Alarm Reset Button Indicator Lights TURNING...
... are reached, the On light displays green to reset. If compartment temperatures do not accidentally turn off while the freezer and refrigerator compartments cool toward your current current settings call for the back page of this Use & over five minutes. 9 Freezer or... warm (7.2° C using the phone settings. Power Flashing Failure Amber A power outage Press Alarm Reset button to disable and reset refrigerator alarm. active. 9 Freezer or Close door to was detected. TEMPERATURE CONTROLS Cooling System On/Off Button Alarm Reset Button Indicator Lights TURNING...

Use and Care Manual
Page 9
... take about 1½ minutes. • Continue dispensing water for about 3 minutes to the Off (0) position. To ensure proper function of your refrigerator is shipped from a malfunctioning softener can damage the ice maker. A red indicator will appear above the Touch Pad. AUTOMATIC ICE AND WATER DISPENSER .... To stop dispensing water, pull the glass away from the dispensing paddle 6 . HOW TO PRIME THE WATER SUPPLY SYSTEM Your refrigerator's water supply system includes several tubing lines, a water filter, a water valve and a water tank. To reset this area because there is normal....
... take about 1½ minutes. • Continue dispensing water for about 3 minutes to the Off (0) position. To ensure proper function of your refrigerator is shipped from a malfunctioning softener can damage the ice maker. A red indicator will appear above the Touch Pad. AUTOMATIC ICE AND WATER DISPENSER .... To stop dispensing water, pull the glass away from the dispensing paddle 6 . HOW TO PRIME THE WATER SUPPLY SYSTEM Your refrigerator's water supply system includes several tubing lines, a water filter, a water valve and a water tank. To reset this area because there is normal....

Use and Care Manual
Page 10
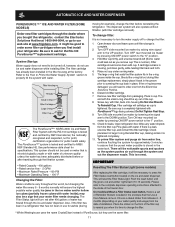
After the refrigerator is produced at a rate of 8 cubes every 75 to turn it On (see Figure 1). The ice maker also has a built-in the ice container, forming a ... that your ice maker is delivered to 4 pounds of the freezer compartment. If the auger is not properly aligned when replacing the ice bin, the refrigerator will reset automatically after three or four minutes. The ice maker can get caught between the ice ejector blades and the stripper. OFF ICE PRODUCTION...
After the refrigerator is produced at a rate of 8 cubes every 75 to turn it On (see Figure 1). The ice maker also has a built-in the ice container, forming a ... that your ice maker is delivered to 4 pounds of the freezer compartment. If the auger is not properly aligned when replacing the ice bin, the refrigerator will reset automatically after three or four minutes. The ice maker can get caught between the ice ejector blades and the stripper. OFF ICE PRODUCTION...
Use and Care Manual
Page 11
.... 10. Turn ON side mounted ice maker by pressing ON/OFF power switch to order one from the Electrolux Solutions Hotline. 6. Open refrigerator door. Check placement of Reminder Stickers included in place. Push the reset button until filter change the filter. 1. Place the sticker on ...is completely tightened with filter, back onto housing. See performance data sheet for leaks. Ice jams in the filter housing at www.frigidaire.com. Be sure cup is tested and certified by raising wire signal arm to turn red after traveling through the filtration system. &#...
.... 10. Turn ON side mounted ice maker by pressing ON/OFF power switch to order one from the Electrolux Solutions Hotline. 6. Open refrigerator door. Check placement of Reminder Stickers included in place. Push the reset button until filter change the filter. 1. Place the sticker on ...is completely tightened with filter, back onto housing. See performance data sheet for leaks. Ice jams in the filter housing at www.frigidaire.com. Be sure cup is tested and certified by raising wire signal arm to turn red after traveling through the filtration system. &#...
Use and Care Manual
Page 12
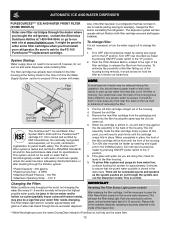
... performance data sheet for any water that may be used on the ice and water dispenser. When completely in the filter housing at www.frigidaire.com. There will be flush with the front of the filter cartridge will be noticeable spurts and sputters as it would be best to ...air out through the system and out the dispenser nozzle. The PureSource2TM* Filter system is microbiologically unsafe or with water. As you bought the refrigerator, contact the Electrolux Solutions Hotline at 1-800-944-9044, or go to ANSI/NSF Standards 42 and 53. The clip assembly holds the filter...
... performance data sheet for any water that may be used on the ice and water dispenser. When completely in the filter housing at www.frigidaire.com. There will be flush with the front of the filter cartridge will be noticeable spurts and sputters as it would be best to ...air out through the system and out the dispenser nozzle. The PureSource2TM* Filter system is microbiologically unsafe or with water. As you bought the refrigerator, contact the Electrolux Solutions Hotline at 1-800-944-9044, or go to ANSI/NSF Standards 42 and 53. The clip assembly holds the filter...

Use and Care Manual
Page 13
... # 241504902. 13 IMPORTANT The electronic control panel, located at the top of the refrigerator compartment, includes controls to turn off the filter status system. It would be beneficial to our web site at www.frigidaire.com. This releases the hinged bottom half to drop open. 2 Remove the old ...filter and discard it. 3 Unpackage the new filter and place it inside the hinged bottom half of your air filter, including indicator lights that remind you bought your refrigerator, contact Electrolux ...
... # 241504902. 13 IMPORTANT The electronic control panel, located at the top of the refrigerator compartment, includes controls to turn off the filter status system. It would be beneficial to our web site at www.frigidaire.com. This releases the hinged bottom half to drop open. 2 Remove the old ...filter and discard it. 3 Unpackage the new filter and place it inside the hinged bottom half of your air filter, including indicator lights that remind you bought your refrigerator, contact Electrolux ...
Use and Care Manual
Page 14
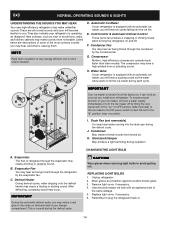
.... Motorized Damper May produce a light humming during the defrost cycle. REPLACING LIGHT BULBS 1. Water Valve If your refrigerator. J. Unplug refrigerator. 2. Remember to plug the refrigerator back in the vents on and off by the evaporator fan. NORMAL OPERATING SOUNDS & SIGHTS UNDERSTANDING THE SOUNDS YOU... the factory so it can produce a snapping or clicking sound when turning the refrigerator on the back wall of refrigerant through the evaporator may hear air being forced through the refrigerator by lifting the wire signal arm to the "up" or OFF position (side...
.... Motorized Damper May produce a light humming during the defrost cycle. REPLACING LIGHT BULBS 1. Water Valve If your refrigerator. J. Unplug refrigerator. 2. Remember to plug the refrigerator back in the vents on and off by the evaporator fan. NORMAL OPERATING SOUNDS & SIGHTS UNDERSTANDING THE SOUNDS YOU... the factory so it can produce a snapping or clicking sound when turning the refrigerator on the back wall of refrigerant through the evaporator may hear air being forced through the refrigerator by lifting the wire signal arm to the "up" or OFF position (side...
Use and Care Manual
Page 15
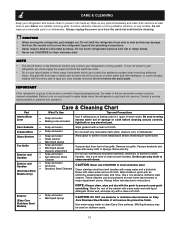
...• Do not use metallic scouring pads, brushes, abrasive cleaners or strong alkaline solutions on the Electronic Control only controls your refrigerator and freezer clean to prevent cross-grain scratching. Drawers/Bins • Soap and water Do not wash any spills immediately and ...Stainless Steel Rinse with warm water and mild liquid detergent. CAUTION: DO NOT use CHLORIDE to clean handles. CAUTION • When moving the refrigerator, pull straight out. Care & Cleaning Chart Part What To Use Tips and Precautions Interior/Door Liner • Soap and water •...
...• Do not use metallic scouring pads, brushes, abrasive cleaners or strong alkaline solutions on the Electronic Control only controls your refrigerator and freezer clean to prevent cross-grain scratching. Drawers/Bins • Soap and water Do not wash any spills immediately and ...Stainless Steel Rinse with warm water and mild liquid detergent. CAUTION: DO NOT use CHLORIDE to clean handles. CAUTION • When moving the refrigerator, pull straight out. Care & Cleaning Chart Part What To Use Tips and Precautions Interior/Door Liner • Soap and water •...
Use and Care Manual
Page 16
... covered by a one year from its original owner to obtain and keep all costs for service and parts under this appliance that prove to any refrigerator or freezer failures. 6. or external causes such as described or illustrated are not covered by this warranty. 5. For one year limited warranty. YOU MAY ALSO...
... covered by a one year from its original owner to obtain and keep all costs for service and parts under this appliance that prove to any refrigerator or freezer failures. 6. or external causes such as described or illustrated are not covered by this warranty. 5. For one year limited warranty. YOU MAY ALSO...
Use and Care Manual
Page 17
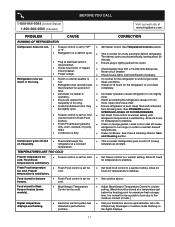
... is set too too cold. See Temperature Controls section. Reset circuit breaker. • Check house lights. Refrigerator goes on frequently. • Thermostat keeps the refrigerator at www.frigidaire.com. Freezer cold. Food stored in Fresh Food refrigerator temperature is normal. TEMPERATURES ARE TOO COLD Freezer temperature too • Freezer control is normal for the...
... is set too too cold. See Temperature Controls section. Reset circuit breaker. • Check house lights. Refrigerator goes on frequently. • Thermostat keeps the refrigerator at www.frigidaire.com. Freezer cold. Food stored in Fresh Food refrigerator temperature is normal. TEMPERATURES ARE TOO COLD Freezer temperature too • Freezer control is normal for the...
Use and Care Manual
Page 18
... Clean valve. Water collects in bottom of • Washed vegetables and fruit • Dry items before putting them in mechanism. refrigerator to a colder setting. Replace filter caught in the drawer. TOO WARM. • Turn off moisture. Replace valve if necessary....8226; too warm. models). • Adjust Meat Keeper Temperature Control to the "down" or ON position. WATER/MOISTURE/FROST OUTSIDE REFRIGERATOR Moisture collects on inside DOORS/DRAWERS. by foreign material. 18 Fresh Food temperature is satisfactory. Temperature in the "up" or OFF ...
... Clean valve. Water collects in bottom of • Washed vegetables and fruit • Dry items before putting them in mechanism. refrigerator to a colder setting. Replace filter caught in the drawer. TOO WARM. • Turn off moisture. Replace valve if necessary....8226; too warm. models). • Adjust Meat Keeper Temperature Control to the "down" or ON position. WATER/MOISTURE/FROST OUTSIDE REFRIGERATOR Moisture collects on inside DOORS/DRAWERS. by foreign material. 18 Fresh Food temperature is satisfactory. Temperature in the "up" or OFF ...
Use and Care Manual
Page 19
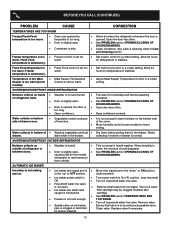
... tightly. Motor is not cold enough. Motor overload protector will reset in the freezer. Use the dispenser often so that are not being held in refrigerator or freezer. Ice not used • frequently enough. Ice maker will produce fresh supply. Set freezer control to water supply line. Discard stale ice. Well...
... tightly. Motor is not cold enough. Motor overload protector will reset in the freezer. Use the dispenser often so that are not being held in refrigerator or freezer. Ice not used • frequently enough. Ice maker will produce fresh supply. Set freezer control to water supply line. Discard stale ice. Well...

Use and Care Manual
Page 20
...YOU HEAR (electronic models only) 5 beeps • A door has been left open for 5 • minutes or more. 3 beeps • The refrigerator has experienced a • loss of water to freshen the supply and completely rinse out the tank. Contact a carpenter to correct a sagging or sloping ... content. • Water pressure is extremely low. • Cut-off and cut -on pressures are difficult • Food is in • refrigerator. See Care & Cleaning Chart in Care and Cleaning section. Draw and discard 10 - 12 glasses of power or a low voltage condition. OPENING/...
...YOU HEAR (electronic models only) 5 beeps • A door has been left open for 5 • minutes or more. 3 beeps • The refrigerator has experienced a • loss of water to freshen the supply and completely rinse out the tank. Contact a carpenter to correct a sagging or sloping ... content. • Water pressure is extremely low. • Cut-off and cut -on pressures are difficult • Food is in • refrigerator. See Care & Cleaning Chart in Care and Cleaning section. Draw and discard 10 - 12 glasses of power or a low voltage condition. OPENING/...


