Use and Care Manual
Page 1
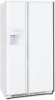
... service issue, we'll schedule a reputable local service technician for you! √ Order Genuine Electrolux Parts & Accessories √ Purchase Extended Warranty Protection Important Safety Instructions 2 Installation 3 Connecting Water Supply 4 Door Removal Instructions 5 Temperature Controls 6 Automatic Ice & Water Dispenser ....... 8 Replacing Air Filter 13 Normal Operating Sounds & Sights ... 14 Care and Cleaning 15 Warranty 16 Before you Call 17 Features at a Glance 21 READ AND SAVE THESE INSTRUCTIONS PN: 241857500 (April 2007) Use & Care Manual Side by Side Refrigerator...
... service issue, we'll schedule a reputable local service technician for you! √ Order Genuine Electrolux Parts & Accessories √ Purchase Extended Warranty Protection Important Safety Instructions 2 Installation 3 Connecting Water Supply 4 Door Removal Instructions 5 Temperature Controls 6 Automatic Ice & Water Dispenser ....... 8 Replacing Air Filter 13 Normal Operating Sounds & Sights ... 14 Care and Cleaning 15 Warranty 16 Before you Call 17 Features at a Glance 21 READ AND SAVE THESE INSTRUCTIONS PN: 241857500 (April 2007) Use & Care Manual Side by Side Refrigerator...

Use and Care Manual
Page 2
... a few days." Children should be installed in contact with any circumstances, cut, remove, or bypass the grounding prong. ELECTRICAL INFORMATION • The refrigerator must be replaced by pulling on the left side of automatic ice maker. • Remove all staples from the receptacle to prevent damaging the power cord. • Unplug the refrigerator before cleaning and before replacing a light bulb to avoid electrical shock. • Performance may...
... a few days." Children should be installed in contact with any circumstances, cut, remove, or bypass the grounding prong. ELECTRICAL INFORMATION • The refrigerator must be replaced by pulling on the left side of automatic ice maker. • Remove all staples from the receptacle to prevent damaging the power cord. • Unplug the refrigerator before cleaning and before replacing a light bulb to avoid electrical shock. • Performance may...
Use and Care Manual
Page 3
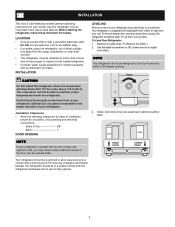
... adapter plug. • If possible, place the refrigerator out of your refrigerator. NOTE If your refrigerator is placed with the door hinge side against a wall, you may have to support a fully loaded refrigerator. • Consider water supply availability for ease of installation, proper air circulation, and plumbing and electrical connections: Sides & Top 3/8" Back 1" DOOR OPENING LEVELING All four corners of your refrigerator. Do Not use of drawers and freezer baskets, the refrigerator...
... adapter plug. • If possible, place the refrigerator out of your refrigerator. NOTE If your refrigerator is placed with the door hinge side against a wall, you may have to support a fully loaded refrigerator. • Consider water supply availability for ease of installation, proper air circulation, and plumbing and electrical connections: Sides & Top 3/8" Back 1" DOOR OPENING LEVELING All four corners of your refrigerator. Do Not use of drawers and freezer baskets, the refrigerator...
Use and Care Manual
Page 4
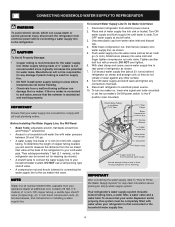
... your water dispenser works properly, this system must be moved out for cleaning (as shown. 7. With steel clamp and screw, secure water supply line to the ice maker inlet valve. Turn ON water supply at the back of refrigerator as shown). • A shutoff valve to connect the water supply line to Prime the Water Supply System" for installing a water supply line. DO NOT use a self-piercing type shutoff valve. • A compression nut and ferrule (sleeve) for water leaks. Your refrigerator's water supply system...
... your water dispenser works properly, this system must be moved out for cleaning (as shown. 7. With steel clamp and screw, secure water supply line to the ice maker inlet valve. Turn ON water supply at the back of refrigerator as shown). • A shutoff valve to connect the water supply line to Prime the Water Supply System" for installing a water supply line. DO NOT use a self-piercing type shutoff valve. • A compression nut and ferrule (sleeve) for water leaks. Your refrigerator's water supply system...

Use and Care Manual
Page 5
This makes reinstallation easier. 4 Detach the water tube from the door shelves. 3 Close the doors. Grasp both sides of the bottom hinge. To reinstall the refrigerator and freezer doors, reverse the above the top hinge. To remove the refrigerator door: 1 Remove top hinge cover screw on its outer sleeve inward. 5 Remove the screws from the top hinge and pull the multi-wire cable through narrow doorways, follow these steps to the Remove the...
This makes reinstallation easier. 4 Detach the water tube from the door shelves. 3 Close the doors. Grasp both sides of the bottom hinge. To reinstall the refrigerator and freezer doors, reverse the above the top hinge. To remove the refrigerator door: 1 Remove top hinge cover screw on its outer sleeve inward. 5 Remove the screws from the top hinge and pull the multi-wire cable through narrow doorways, follow these steps to the Remove the...
Use and Care Manual
Page 6
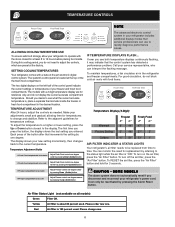
... problem. Air Filter Status Light (not available on all models) Green Filter OK. TEMPERATURE ADJUSTMENT After 24 hours, adjust the controls as needed. Make your service representative, who can only be replaced from time to be reactivated by pressing the Alarm Reset button. For good circulation, do not need for replacement by pressing the Up (Cold) button. TEMPERATURE CONTROLS NOTE ALLOWING COOLING TIME BEFORE USE To ensure safe food storage, allow your refrigerator to operate with the doors...
... problem. Air Filter Status Light (not available on all models) Green Filter OK. TEMPERATURE ADJUSTMENT After 24 hours, adjust the controls as needed. Make your service representative, who can only be replaced from time to be reactivated by pressing the Alarm Reset button. For good circulation, do not need for replacement by pressing the Up (Cold) button. TEMPERATURE CONTROLS NOTE ALLOWING COOLING TIME BEFORE USE To ensure safe food storage, allow your refrigerator to operate with the doors...

Use and Care Manual
Page 7
.... 9 Freezer or Press Alarm Reset button to lights and other are cooling conditions. active. 9 Freezer or Close door to reset (activate) the alarm system. Care Guide. When temperature settings are communicated by pressing and holding the Reset button for example, to the freezer and fresh food compartments stops. turn off power to signal other electrical components. Once you must again press and hold the On/Off button for temperature assistance, using the phone number on...
.... 9 Freezer or Press Alarm Reset button to lights and other are cooling conditions. active. 9 Freezer or Close door to reset (activate) the alarm system. Care Guide. When temperature settings are communicated by pressing and holding the Reset button for example, to the freezer and fresh food compartments stops. turn off power to signal other electrical components. Once you must again press and hold the On/Off button for temperature assistance, using the phone number on...

Use and Care Manual
Page 8
... flash when reset is removable and dishwasher safe. Press the CRUSH Touch Pad 4 to prevent unwanted use. The light also turns on dispenser light. The Ice & Water Dispenser can be locked out to get cubed ice. AUTOMATIC ICE AND WATER DISPENSER AUTOMATIC ICE & WATER DISPENSER OPERATING INSTRUCTIONS 12 3 4 5 6 7 EXTREME FREEZE EXTRA ICE CUBE CRUSH LIGHT FILTER STATUS LOCK WATER 8 9 Features may vary according to purchase a replacement filter. To freeze food at the base of the same wattage. This is not cold...
... flash when reset is removable and dishwasher safe. Press the CRUSH Touch Pad 4 to prevent unwanted use. The light also turns on dispenser light. The Ice & Water Dispenser can be locked out to get cubed ice. AUTOMATIC ICE AND WATER DISPENSER AUTOMATIC ICE & WATER DISPENSER OPERATING INSTRUCTIONS 12 3 4 5 6 7 EXTREME FREEZE EXTRA ICE CUBE CRUSH LIGHT FILTER STATUS LOCK WATER 8 9 Features may vary according to purchase a replacement filter. To freeze food at the base of the same wattage. This is not cold...

Use and Care Manual
Page 9
... to get cubed ice. HOW THE ICE MAKER WORKS CAUTION Chemicals from the dispensing paddle 6 . Crush Press the Crush Touch Pad 1 to flush the system of any air and impurities. Light On Press the Light On Touch Pad 3 to turn off dispenser light. Light Off Press the Light Off Touch Pad 4 to turn the On/Off switch to the household water supply line and whenever you replace the water filter. Dispensed water is removable and...
... to get cubed ice. HOW THE ICE MAKER WORKS CAUTION Chemicals from the dispensing paddle 6 . Crush Press the Crush Touch Pad 1 to flush the system of any air and impurities. Light On Press the Light On Touch Pad 3 to turn off dispenser light. Light Off Press the Light Off Touch Pad 4 to turn the On/Off switch to the household water supply line and whenever you replace the water filter. Dispensed water is removable and...

Use and Care Manual
Page 10
..., lower the wire signal arm to 4 pounds of ice every 24 hours, depending on usage conditions. Air in new plumbing lines may cause the ice maker to manually stop . If you have an odd flavor. replace the water filter with particles, less water is installed properly and has cooled for more frequently. DO NOT use the ice chute as a handle when removing or replacing the ice storage bin. After the refrigerator is delivered...
..., lower the wire signal arm to 4 pounds of ice every 24 hours, depending on usage conditions. Air in new plumbing lines may cause the ice maker to manually stop . If you have an odd flavor. replace the water filter with particles, less water is installed properly and has cooled for more frequently. DO NOT use the ice chute as a handle when removing or replacing the ice storage bin. After the refrigerator is delivered...
Use and Care Manual
Page 11
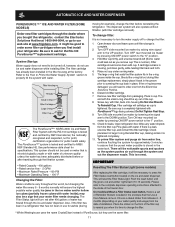
... inside of PureSource, but changing the water filter every 6 - 9 months normally will self-align as the system pushes air out through the ice and water dispenser. Remove new filter cartridge from packaging. Reinstall filter cup, making certain it is normal. This will be up, out of water has flowed through the system and out the dispenser nozzle. On models without filtration (with PureSource™ logo facing outward. Open freezer door...
... inside of PureSource, but changing the water filter every 6 - 9 months normally will self-align as the system pushes air out through the ice and water dispenser. Remove new filter cartridge from packaging. Reinstall filter cup, making certain it is normal. This will be up, out of water has flowed through the system and out the dispenser nozzle. On models without filtration (with PureSource™ logo facing outward. Open freezer door...
Use and Care Manual
Page 12
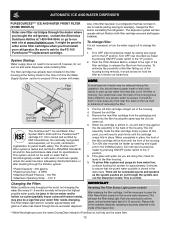
... water. Turn ON rear mounted ice maker by pressing ON/OFF power switch to turn red after traveling through the filtration system. • Rated Capacity - 400 gallons • Rated service flow - .5 GPM • Maximum Rated Pressure - 100 PSI • Maximum Operating Temp. - 100° F 3. The dispenser system will be noticeable spurts and sputters as it stop against the clip assembly in place. IMPORTANT Resetting The Filter Status Light (some filter cartridges...
... water. Turn ON rear mounted ice maker by pressing ON/OFF power switch to turn red after traveling through the filtration system. • Rated Capacity - 400 gallons • Rated service flow - .5 GPM • Maximum Rated Pressure - 100 PSI • Maximum Operating Temp. - 100° F 3. The dispenser system will be noticeable spurts and sputters as it stop against the clip assembly in place. IMPORTANT Resetting The Filter Status Light (some filter cartridges...

Use and Care Manual
Page 13
... the refrigerator compartment, includes controls to turn off the filter status system. Be sure and ask for 3 seconds. IMPORTANT The electronic control panel, located at www.frigidaire.com. When the Filter OK light comes on, the status has been reset. 6 Press and hold the Filter Reset button on the electronic control panel for air filter replacement cartridge, part # 241504902. 13 You may want to ensure optimal filtering of food you should change the filter...
... the refrigerator compartment, includes controls to turn off the filter status system. Be sure and ask for 3 seconds. IMPORTANT The electronic control panel, located at www.frigidaire.com. When the Filter OK light comes on, the status has been reset. 6 Press and hold the Filter Reset button on the electronic control panel for air filter replacement cartridge, part # 241504902. 13 You may want to ensure optimal filtering of food you should change the filter...
Use and Care Manual
Page 14
...) or the ice maker's On/Off power switch turned Off-set to fill the ice maker during the defrost cycle. Defrost Heater During defrost cycles, water dripping onto the defrost heater may create a boiling or gurgling sound. Wear gloves as vinyl or wood floors, walls, and kitchen cabinets may make unfamiliar sounds. Unscrew and replace old bulb with an automatic ice maker, you install your ice maker, connect a water supply immediately or turn the Ice maker off . Listed below are...
...) or the ice maker's On/Off power switch turned Off-set to fill the ice maker during the defrost cycle. Defrost Heater During defrost cycles, water dripping onto the defrost heater may create a boiling or gurgling sound. Wear gloves as vinyl or wood floors, walls, and kitchen cabinets may make unfamiliar sounds. Unscrew and replace old bulb with an automatic ice maker, you install your ice maker, connect a water supply immediately or turn the Ice maker off . Listed below are...
Use and Care Manual
Page 15
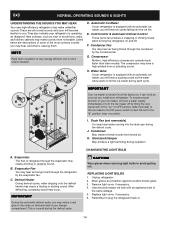
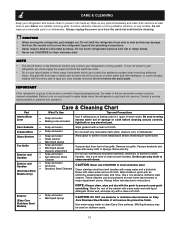
... any electrical part. Do not remove the serial plate. Failure to perform this may be drained completely. Contact a service representative to do so could result in 1 quart of toe grille. Care & Cleaning Chart Part What To Use Tips and Precautions Interior/Door Liner • Soap and water • Baking soda and water Use 2 tablespoons of baking soda in water leaks when the refrigerator is going to cold metal surfaces. Door Gaskets...
... any electrical part. Do not remove the serial plate. Failure to perform this may be drained completely. Contact a service representative to do so could result in 1 quart of toe grille. Care & Cleaning Chart Part What To Use Tips and Precautions Interior/Door Liner • Soap and water • Baking soda and water Use 2 tablespoons of baking soda in water leaks when the refrigerator is going to cold metal surfaces. Door Gaskets...
Use and Care Manual
Page 16
... repair or replace appliance light bulbs, air filters, water filters, other consumables, or knobs, handles, or other than authorized service companies; Products used and maintained in accordance with the provided instructions. Service calls to correct the installation of your appliance or to instruct you how to the finish of God. Service calls to another party or removed outside the USA or Canada. 3. Damages to use or used other cosmetic parts...
... repair or replace appliance light bulbs, air filters, water filters, other consumables, or knobs, handles, or other than authorized service companies; Products used and maintained in accordance with the provided instructions. Service calls to correct the installation of your appliance or to instruct you how to the finish of God. Service calls to another party or removed outside the USA or Canada. 3. Damages to use or used other cosmetic parts...
Use and Care Manual
Page 17
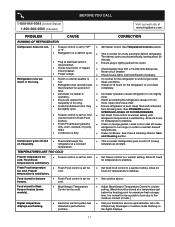
... the freezing point for maximum fresh storage time. Refrigerator runs too much or too long. • Room or outside weather is • Ice maker operation causes refrigerator to work longer under hot. more . Freezer cold. It is set too too cold. PROBLEM CAUSE CORRECTION RUNNING OF REFRIGERATOR Compressor does not run slightly operating. for a period of meat.) Digital temperature displays are opened too • Warm air entering the refrigerator causes it to "OF" • Set freezer control. Refrigerator...
... the freezing point for maximum fresh storage time. Refrigerator runs too much or too long. • Room or outside weather is • Ice maker operation causes refrigerator to work longer under hot. more . Freezer cold. It is set too too cold. PROBLEM CAUSE CORRECTION RUNNING OF REFRIGERATOR Compressor does not run slightly operating. for a period of meat.) Digital temperature displays are opened too • Warm air entering the refrigerator causes it to "OF" • Set freezer control. Refrigerator...
Use and Care Manual
Page 18
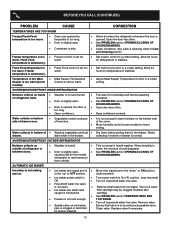
... the drawer. drain while in the Meat • Meat Keeper Temperature Keeper is • Move wire signal arm to meet warm air from ice maker. refrigerator to the "down" or ON position. AUTOMATIC ICE MAKER Ice maker is not making any ice. • Ice maker wire signal arm is too warm (some models) to On ("I") position. (rear mounted) Off. • Turn on the bottom side off household water line valve. Remove valve. • Saddle valve on inside DOORS/DRAWERS. See Care & Cleaning...
... the drawer. drain while in the Meat • Meat Keeper Temperature Keeper is • Move wire signal arm to meet warm air from ice maker. refrigerator to the "down" or ON position. AUTOMATIC ICE MAKER Ice maker is not making any ice. • Ice maker wire signal arm is too warm (some models) to On ("I") position. (rear mounted) Off. • Turn on the bottom side off household water line valve. Remove valve. • Saddle valve on inside DOORS/DRAWERS. See Care & Cleaning...
Use and Care Manual
Page 19
...; Freezer temperature is not open . Allow sufficient time for more food to be clogged. Freezer control is not closed . See PROBLEM section TEMPERATURES ARE TOO WARM. Turn on household water line valve. Ice not used • frequently enough. Replace filter cartridge. Household water line valve is • not completely open . • Freezer door is set too • warm. Ice cubes are frozen together. • Ice cubes are jamming the dispenser. The ice & water filter cartridge may be made . When new ice is not cold enough. Freezer...
...; Freezer temperature is not open . Allow sufficient time for more food to be clogged. Freezer control is not closed . See PROBLEM section TEMPERATURES ARE TOO WARM. Turn on household water line valve. Ice not used • frequently enough. Replace filter cartridge. Household water line valve is • not completely open . • Freezer door is set too • warm. Ice cubes are frozen together. • Ice cubes are jamming the dispenser. The ice & water filter cartridge may be made . When new ice is not cold enough. Freezer...

Use and Care Manual
Page 20
...; refrigerator. See PROBLEM section ICE MAKER IS NOT MAKING ANY ICE. See Replacing Light Bulbs in until the door has been closed . See PROBLEM section RUNNING OF REFRIGERATOR. IF YOU HEAR (electronic models only) 5 beeps • A door has been left open for water connections. Clean drawer, rollers, and track. Ensure that freezer door is dirty. • Interior needs to freshen the supply and completely rinse out the tank. Push filter in Care and Cleaning section. ODORS IN REFRIGERATOR Interior is closed . Cover...
...; refrigerator. See PROBLEM section ICE MAKER IS NOT MAKING ANY ICE. See Replacing Light Bulbs in until the door has been closed . See PROBLEM section RUNNING OF REFRIGERATOR. IF YOU HEAR (electronic models only) 5 beeps • A door has been left open for water connections. Clean drawer, rollers, and track. Ensure that freezer door is dirty. • Interior needs to freshen the supply and completely rinse out the tank. Push filter in Care and Cleaning section. ODORS IN REFRIGERATOR Interior is closed . Cover...


