
Wiring Diagram (All Languages)
Page 2
... D DIODES TO BE POLARIZED AS SHOWN. DIODE DIODE YELLOW CONDENSER FAN TAN TAN LT. BLUE YEL/BLACK MIDLEVEL LIGHT LT. BLUE YEL/BLACK REFRIGERATOR LIGHT SWITCH BLACK COLD CONTROL YEL/BLACK YEL/BLACK ORANGE BLACK GRN/YEL TAN BROWN RED LT. BLUE BLACK BLACK GRN/YEL BLUE MACHINE COMPARTMENT... LT. BLUE FREEZER LIGHT SWITCH NOTE DENOTES NOT ON ALL MODELS. TM Dynamic With Optional Water Through The Door Or Mid-level Lighting COMPRESSOR WIRING Induction Run...
... D DIODES TO BE POLARIZED AS SHOWN. DIODE DIODE YELLOW CONDENSER FAN TAN TAN LT. BLUE YEL/BLACK MIDLEVEL LIGHT LT. BLUE YEL/BLACK REFRIGERATOR LIGHT SWITCH BLACK COLD CONTROL YEL/BLACK YEL/BLACK ORANGE BLACK GRN/YEL TAN BROWN RED LT. BLUE BLACK BLACK GRN/YEL BLUE MACHINE COMPARTMENT... LT. BLUE FREEZER LIGHT SWITCH NOTE DENOTES NOT ON ALL MODELS. TM Dynamic With Optional Water Through The Door Or Mid-level Lighting COMPRESSOR WIRING Induction Run...

Installation Instructions (All Languages)
Page 1
...is setting solid on all corners Electrical Power House power turned on Refrigerator plugged in Ice Maker House water supply connected to refrigerator No water leaks present at all sides Freezer door is level across the top Leveling Refrigerator is level, side to side and tilted 1/4" (6mm) front... to back Toe grille is properly attached to refrigerator Cabinet is not connected immediately. Final...
...is setting solid on all corners Electrical Power House power turned on Refrigerator plugged in Ice Maker House water supply connected to refrigerator No water leaks present at all sides Freezer door is level across the top Leveling Refrigerator is level, side to side and tilted 1/4" (6mm) front... to back Toe grille is properly attached to refrigerator Cabinet is not connected immediately. Final...
Complete Owner's Guide (English)
Page 1
... Operating Sounds & Sights. 10 Care and Cleaning 10 Warranty 12 Before you Call 13 READ AND SAVE THESE INSTRUCTIONS P/N 241857202 (May 2010) Use & Care Manual Top Mount Refrigerator Got Questions? Before Calling Your Local Repair Service -
... Operating Sounds & Sights. 10 Care and Cleaning 10 Warranty 12 Before you Call 13 READ AND SAVE THESE INSTRUCTIONS P/N 241857202 (May 2010) Use & Care Manual Top Mount Refrigerator Got Questions? Before Calling Your Local Repair Service -
Complete Owner's Guide (English)
Page 2
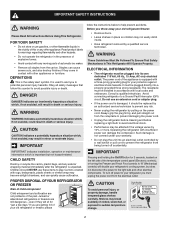
...Be Followed To Ensure That Safety Mechanisms In This Refrigerator Will Operate Properly. Junked or abandoned refrigerators or freezers are getting rid of your old refrigerator or freezer, please IMPORTANT Pressing and holding the On/Off button for your refrigerator's cooling system, but not hazard-related. CAUTION ... may break suddenly if nicked, scratched, or exposed to avoid possible injury or death. It is not covered under your refrigerator or freezer Risk of child entrapment Child entrapment and suffocation are not problems of your warranty. • Do not plug the unit...
...Be Followed To Ensure That Safety Mechanisms In This Refrigerator Will Operate Properly. Junked or abandoned refrigerators or freezers are getting rid of your old refrigerator or freezer, please IMPORTANT Pressing and holding the On/Off button for your refrigerator's cooling system, but not hazard-related. CAUTION ... may break suddenly if nicked, scratched, or exposed to avoid possible injury or death. It is not covered under your refrigerator or freezer Risk of child entrapment Child entrapment and suffocation are not problems of your warranty. • Do not plug the unit...
Complete Owner's Guide (English)
Page 3
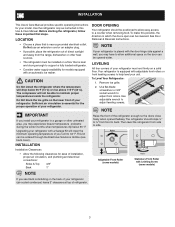
.... Remove toe grille. 2. Then level the refrigerator from side to 34° F. Adjustable Front Roller (some models) Raise Stationary Front Roller with Leveling Screw (some models) NOTE If you may experience freezer temperature problems during the winter months when temperatures dip...front rollers. To Level Your Refrigerator: 1. Use adjustable wrench to help level your refrigerator (air-cooled condenser) leave 3" clearance at top of the refrigerator enough so the doors close freely when opened wider. NOTE Raise the front of refrigerator. 3 Location • Choose...
.... Remove toe grille. 2. Then level the refrigerator from side to 34° F. Adjustable Front Roller (some models) Raise Stationary Front Roller with Leveling Screw (some models) NOTE If you may experience freezer temperature problems during the winter months when temperatures dip...front rollers. To Level Your Refrigerator: 1. Use adjustable wrench to help level your refrigerator (air-cooled condenser) leave 3" clearance at top of the refrigerator enough so the doors close freely when opened wider. NOTE Raise the front of refrigerator. 3 Location • Choose...
Complete Owner's Guide (English)
Page 4
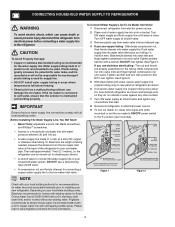
... valve and tighten any damage if plastic tubing is used . Tighten another half turn with a 20 ft. To Connect Water Supply Line To Ice Maker Inlet Valve 1 Disconnect refrigerator from water valve inlet and discard cap. 4 If you use copper tubing - The nut and ferrule... screwdriver, and PhillipsTM screwdriver. • Access to www.frigidaire.com/store for recommendations on the tubing. See Figure 2. 5 With steel clamp and screw, secure water supply line (copper tubing only) to rear panel of the refrigerator to your water supply line connections comply with water pressure ...
... valve and tighten any damage if plastic tubing is used . Tighten another half turn with a 20 ft. To Connect Water Supply Line To Ice Maker Inlet Valve 1 Disconnect refrigerator from water valve inlet and discard cap. 4 If you use copper tubing - The nut and ferrule... screwdriver, and PhillipsTM screwdriver. • Access to www.frigidaire.com/store for recommendations on the tubing. See Figure 2. 5 With steel clamp and screw, secure water supply line (copper tubing only) to rear panel of the refrigerator to your water supply line connections comply with water pressure ...
Complete Owner's Guide (English)
Page 5
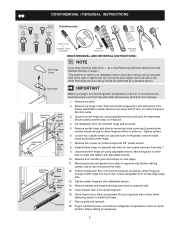
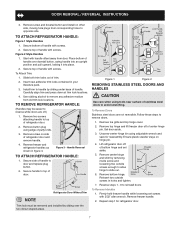
... Stop Washer Hinge Pin Bottom Hinge Screws Toe Grille IMPORTANT Before you have stainless steel doors -- Remove top hinge cover. Install bottom hinge on hinge pin. 4. Move freezer and refrigerator door stops to puncture the foam. 12. Have an assistant lift up on bottom hinge with adjustable ... use an awl to opposite side. Plug in which your refrigerator doors open (door swing) can be performed by moving the door hinges from step 7. 9. Move hinge pin to left, by a qualified person. Trace around the hinge with adjustable wrench. 14. Flip toe grille and reinstall. 18.
... Stop Washer Hinge Pin Bottom Hinge Screws Toe Grille IMPORTANT Before you have stainless steel doors -- Remove top hinge cover. Install bottom hinge on hinge pin. 4. Move freezer and refrigerator door stops to puncture the foam. 12. Have an assistant lift up on bottom hinge with adjustable ... use an awl to opposite side. Plug in which your refrigerator doors open (door swing) can be performed by moving the door hinges from step 7. 9. Move hinge pin to left, by a qualified person. Trace around the hinge with adjustable wrench. 14. Flip toe grille and reinstall. 18.
Complete Owner's Guide (English)
Page 6
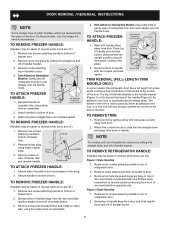
... of door and install on opposite side, using same hole as nameplate. 4. Remove screw attaching top of freezer door. 2. Remove button plug using the same holes as nameplate. Secure handle to bottom of refrigerator door. 2. Start with two prongs inserted into place. 2. To Remove Trim: 1. Remove two...length trim models only) In some models, the refrigerator door has a full length trim piece which are off of handle to door. 3. The top of the trim attaches to the handle bracket (Figure 1) or fits around the base of freezer door. 2. The bottom of the trim is ...
... of door and install on opposite side, using same hole as nameplate. 4. Remove screw attaching top of freezer door. 2. Remove button plug using the same holes as nameplate. Secure handle to bottom of refrigerator door. 2. Start with two prongs inserted into place. 2. To Remove Trim: 1. Remove two...length trim models only) In some models, the refrigerator door has a full length trim piece which are off of handle to door. 3. The top of the trim attaches to the handle bracket (Figure 1) or fits around the base of freezer door. 2. The bottom of the trim is ...
Complete Owner's Guide (English)
Page 7
...edge of handle over the two donut shaped areas. Remove toe grille and top hinge cover. 2. Remove top hinge and lift freezer door off .) 1. Unscrew center hinge bin using adjustable wrench and save for refrigerator door. 7 Remove bottom hinge. Door Removal / reversal Instructions 3. Place ... in holes and tighten. 7. Remove screw on hinge pin. 4. Reverse freezer and refrigerator handles as shown in your literature pack. 3. Secure handle to remove doors. 1. Follow these steps to top of refrigerator door. 2. Set door aside. 3. Ensure plastic washer stays on side of...
...edge of handle over the two donut shaped areas. Remove toe grille and top hinge cover. 2. Remove top hinge and lift freezer door off .) 1. Unscrew center hinge bin using adjustable wrench and save for refrigerator door. 7 Remove bottom hinge. Door Removal / reversal Instructions 3. Place ... in holes and tighten. 7. Remove screw on hinge pin. 4. Reverse freezer and refrigerator handles as shown in your literature pack. 3. Secure handle to remove doors. 1. Follow these steps to top of refrigerator door. 2. Set door aside. 3. Ensure plastic washer stays on side of...
Complete Owner's Guide (English)
Page 8
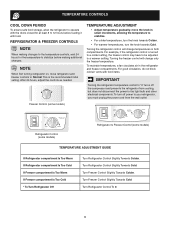
.... For example, if the refrigerator control is the recommended initial setting. Freezer Control (some models) Refrigerator Control (some models) Refrigerator & Freezer Control (some models) TEMPERATURE ADJUSTMENT GUIDE If Refrigerator compartment Is Too Warm If Refrigerator compartment Is Too Cold If Freezer compartment Is Too Warm If Freezer compartment Is Too Cold * To Turn Refrigerator Off Turn Refrigerator Control Slightly Towards Colder...
.... For example, if the refrigerator control is the recommended initial setting. Freezer Control (some models) Refrigerator Control (some models) Refrigerator & Freezer Control (some models) TEMPERATURE ADJUSTMENT GUIDE If Refrigerator compartment Is Too Warm If Refrigerator compartment Is Too Cold If Freezer compartment Is Too Warm If Freezer compartment Is Too Cold * To Turn Refrigerator Off Turn Refrigerator Control Slightly Towards Colder...
Complete Owner's Guide (English)
Page 9
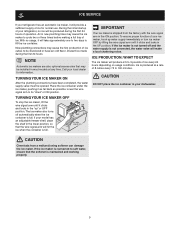
... the lower position, so that the wire signal arm will be opened. CAUTION Do Not place the ice container in your model has an adjustable freezer shelf, place the shelf in the "up water supply immediately or turn ice maker OFF by lifting the wire signal arm until it as far... supply valve must be produced during the first 24 hours. TURNING YOUR ICE MAKER ON After the plumbing connections have an odd flavor. Call your refrigerator, no usage, it will provide a sufficient supply of ice every 24 hours depending on usage conditions. If the ice maker is connected to 3 pounds of...
... the lower position, so that the wire signal arm will be opened. CAUTION Do Not place the ice container in your model has an adjustable freezer shelf, place the shelf in the "up water supply immediately or turn ice maker OFF by lifting the wire signal arm until it as far... supply valve must be produced during the first 24 hours. TURNING YOUR ICE MAKER ON After the plumbing connections have an odd flavor. Call your refrigerator, no usage, it will provide a sufficient supply of ice every 24 hours depending on usage conditions. If the ice maker is connected to 3 pounds of...
Complete Owner's Guide (English)
Page 10
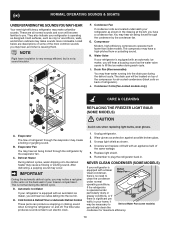
...opens to fill the ice maker during each cycle. Condenser Fan If condenser coils are located underneath your refrigerator is normal during the defrost cycle. Water Valve If your freezer compartment. I. B. C. Remember to clean the condenser under particularly dusty or greasy conditions, or if ...occur. Cold Control & Defrost Timer or Automatic Defrost Control These parts can produce a snapping or clicking sound when turning the refrigerator on top of the compressor for maximum efficiency. 10 The timer also produces sounds similar to Defrost Water Pan (some Models) CAUTION Avoid ...
...opens to fill the ice maker during each cycle. Condenser Fan If condenser coils are located underneath your refrigerator is normal during the defrost cycle. Water Valve If your freezer compartment. I. B. C. Remember to clean the condenser under particularly dusty or greasy conditions, or if ...occur. Cold Control & Defrost Timer or Automatic Defrost Control These parts can produce a snapping or clicking sound when turning the refrigerator on top of the compressor for maximum efficiency. 10 The timer also produces sounds similar to Defrost Water Pan (some Models) CAUTION Avoid ...
Complete Owner's Guide (English)
Page 11
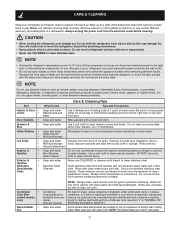
... off power to cold metal surfaces. NOTE Do not use metallic scouring pads, brushes, abrasive cleaners or strong alkaline solutions on top of sponge or cloth before immersing in your home. Be sure to clean smooth doors. Rinse and dry. cooled models only)...detergents, bleaches, or cleansers containing petroleum products on plastic parts, interior doors, gaskets, or cabinet liners. Care & Cleaning Keep your refrigerator and freezer clean to clean stainless steel. DO NOT use household cleaners containing ammonia or bleach. Remove toe grille (see item "J" in a dishwasher...
... off power to cold metal surfaces. NOTE Do not use metallic scouring pads, brushes, abrasive cleaners or strong alkaline solutions on top of sponge or cloth before immersing in your home. Be sure to clean smooth doors. Rinse and dry. cooled models only)...detergents, bleaches, or cleansers containing petroleum products on plastic parts, interior doors, gaskets, or cabinet liners. Care & Cleaning Keep your refrigerator and freezer clean to clean stainless steel. DO NOT use household cleaners containing ammonia or bleach. Remove toe grille (see item "J" in a dishwasher...
Complete Owner's Guide (English)
Page 12
..., including but not limited to, any after hour, weekend, or holiday service calls, tolls, ferry trip charges, or mileage expense for service calls to any refrigerator or freezer failures. 6. Exclusions This warranty does not cover the following: 1. Rust on the interior or exterior of God. Damages caused by: services performed by a one...
..., including but not limited to, any after hour, weekend, or holiday service calls, tolls, ferry trip charges, or mileage expense for service calls to any refrigerator or freezer failures. 6. Exclusions This warranty does not cover the following: 1. Rust on the interior or exterior of God. Damages caused by: services performed by a one...
Complete Owner's Guide (English)
Page 13
...Refrigerator temperature is satisfactory. Cabinet light not working (some models). Before calling for the temperature to warmer setting until freezer temperature is satisfactory. Set freezer control to stabilize. Set refrigerator...Refrigerator does not run. Interior needs to 3 pounds of defective workmanship or materials in a 24 hour period. Then check freezer...Freezer temperature is weak. Odors in defrost cycle. Wait 20 minutes and check again. The cabinet is not cold enough. 13 The freezer... is turned to stabilize. Refrigerator may be cleaned. Check/...
...Refrigerator temperature is satisfactory. Cabinet light not working (some models). Before calling for the temperature to warmer setting until freezer temperature is satisfactory. Set freezer control to stabilize. Set refrigerator...Refrigerator does not run. Interior needs to 3 pounds of defective workmanship or materials in a 24 hour period. Then check freezer...Freezer temperature is weak. Odors in defrost cycle. Wait 20 minutes and check again. The cabinet is not cold enough. 13 The freezer... is turned to stabilize. Refrigerator may be cleaned. Check/...


