
Wiring Diagram (All Languages)
Page 1
....8C) ICE MAKER CONNECTOR PLUG CONNECTIONS Wire Number Wire Color Connects to assist qualified repair personnel only. All components of ice maker should not attempt to make repairs due to complete the cycle. To terminate defrost, depress the fresh food light switch 5 times in 6 seconds. (some models) ORANGE (some models) ICE MAKER ICE MAKER INFORMATION Test Cycling Remove cover by inserting screwdriver in notch at 500°F. LINE B LK B LK P-3 THER MAL CUT-OUT BLK POWER ICE MA...
....8C) ICE MAKER CONNECTOR PLUG CONNECTIONS Wire Number Wire Color Connects to assist qualified repair personnel only. All components of ice maker should not attempt to make repairs due to complete the cycle. To terminate defrost, depress the fresh food light switch 5 times in 6 seconds. (some models) ORANGE (some models) ICE MAKER ICE MAKER INFORMATION Test Cycling Remove cover by inserting screwdriver in notch at 500°F. LINE B LK B LK P-3 THER MAL CUT-OUT BLK POWER ICE MA...

Wiring Diagram (All Languages)
Page 2
... GRN/YEL BLUE MACHINE COMPARTMENT LT. TM Dynamic With Optional Water Through The Door Or Mid-level Lighting COMPRESSOR WIRING Induction Run Compressor with Relay REFRIGERATOR COMPARTMENT DEFROST TIMER BROWN ORANGE RED LT. BLUE REFRIGERATOR LIGHT LT. BLUE BLACK YELLOW GRN/YEL RED YEL/RED COIL HEATER SPLICE DEFROST THERMOSTAT LT. BLUE BLACK GRN/YEL BROWN RED LT. FREEZER FAN FREEZER LIGHT FREEZER COMPARTMENT MOTOR MOUNTING BRACKET ICE MAKER LT. BLUE LT.
... GRN/YEL BLUE MACHINE COMPARTMENT LT. TM Dynamic With Optional Water Through The Door Or Mid-level Lighting COMPRESSOR WIRING Induction Run Compressor with Relay REFRIGERATOR COMPARTMENT DEFROST TIMER BROWN ORANGE RED LT. BLUE REFRIGERATOR LIGHT LT. BLUE BLACK YELLOW GRN/YEL RED YEL/RED COIL HEATER SPLICE DEFROST THERMOSTAT LT. BLUE BLACK GRN/YEL BROWN RED LT. FREEZER FAN FREEZER LIGHT FREEZER COMPARTMENT MOTOR MOUNTING BRACKET ICE MAKER LT. BLUE LT.

Installation Instructions (All Languages)
Page 1
... your new refrigerator. √ Send in Ice Maker House water supply connected to refrigerator No water leaks present at all corners Electrical Power House power turned on all connections - You are ready to enjoy your refrigerator beside a wall, leave 1/2" minimum between hinges and wall to allow for the door to swing open. 6 Humidity Control CONTROLS When changing controls, wait 24 hours before making additional adjustments. (For models with LED display, 3 to 5 is normal operating range.) 7 ICEMAKER Ensure icemaker is turned ON...
... your new refrigerator. √ Send in Ice Maker House water supply connected to refrigerator No water leaks present at all corners Electrical Power House power turned on all connections - You are ready to enjoy your refrigerator beside a wall, leave 1/2" minimum between hinges and wall to allow for the door to swing open. 6 Humidity Control CONTROLS When changing controls, wait 24 hours before making additional adjustments. (For models with LED display, 3 to 5 is normal operating range.) 7 ICEMAKER Ensure icemaker is turned ON...
Complete Owner's Guide (English)
Page 1
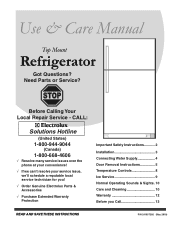
...-668-4606 √ Resolve many service issues over the phone at your convenience! √ If we can't resolve your service issue, we'll schedule a reputable local service technician for you! √ Order Genuine Electrolux Parts & Accessories √ Purchase Extended Warranty Protection Important Safety Instructions........... 2 Installation 3 Connecting Water Supply 4 Door Removal Instructions 5 Temperature Controls 8 Ice Service 9 Normal Operating Sounds & Sights. 10 Care and Cleaning 10 Warranty 12 Before you Call 13 READ...
...-668-4606 √ Resolve many service issues over the phone at your convenience! √ If we can't resolve your service issue, we'll schedule a reputable local service technician for you! √ Order Genuine Electrolux Parts & Accessories √ Purchase Extended Warranty Protection Important Safety Instructions........... 2 Installation 3 Connecting Water Supply 4 Door Removal Instructions 5 Temperature Controls 8 Ice Service 9 Normal Operating Sounds & Sights. 10 Care and Cleaning 10 Warranty 12 Before you Call 13 READ...
Complete Owner's Guide (English)
Page 2
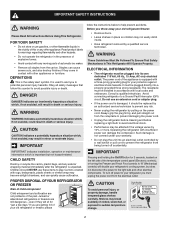
... automatic ice maker. • Remove all safety messages that follow the instructions below to avoid possible injury or death. Electrical information • The refrigerator must unplug the power cord from being turned off accidentally. The power cord of the temperature control panel (Electronic controls), or turning the Freezer and Fresh Food controls to prevent the refrigerator from the electrical outlet. Consult a qualified electrician. If you throw away your refrigerator's cooling...
... automatic ice maker. • Remove all safety messages that follow the instructions below to avoid possible injury or death. Electrical information • The refrigerator must unplug the power cord from being turned off accidentally. The power cord of the temperature control panel (Electronic controls), or turning the Freezer and Fresh Food controls to prevent the refrigerator from the electrical outlet. Consult a qualified electrician. If you throw away your refrigerator's cooling...
Complete Owner's Guide (English)
Page 3
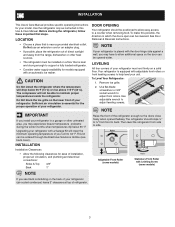
... Use & Care Manual provides specific operating instructions for your unit. Installation Installation Clearances • Allow the following clearances for ease of installation, proper air circulation, and plumbing and electrical connections: Sides & Top 3/8" Back 1" door opening Your refrigerator should slope ¼" to ½" from the range, dishwasher or other unheated area, you see back cover). Adjustable Front Roller (some models) NOTE If you may have to support a fully loaded refrigerator. • Consider water supply...
... Use & Care Manual provides specific operating instructions for your unit. Installation Installation Clearances • Allow the following clearances for ease of installation, proper air circulation, and plumbing and electrical connections: Sides & Top 3/8" Back 1" door opening Your refrigerator should slope ¼" to ½" from the range, dishwasher or other unheated area, you see back cover). Adjustable Front Roller (some models) NOTE If you may have to support a fully loaded refrigerator. • Consider water supply...
Complete Owner's Guide (English)
Page 4
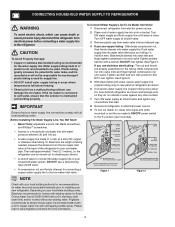
... your cold water pipe. DO NOT use copper tubing - stainless steel water line) and for homes without an existing valve, Frigidaire recommends its Smart Choice water line kit 5305513409 (with your local building authority for recommendations on , lower wire signal arm (side mounted) or set the ice maker's On/Off power switch to a household cold water line with self-tapping saddle valve). Please refer to your water supply line connections comply with a 20 ft. Turn OFF water supply at shutoff valve...
... your cold water pipe. DO NOT use copper tubing - stainless steel water line) and for homes without an existing valve, Frigidaire recommends its Smart Choice water line kit 5305513409 (with your local building authority for recommendations on , lower wire signal arm (side mounted) or set the ice maker's On/Off power switch to a household cold water line with self-tapping saddle valve). Please refer to your water supply line connections comply with a 20 ft. Turn OFF water supply at shutoff valve...
Complete Owner's Guide (English)
Page 5
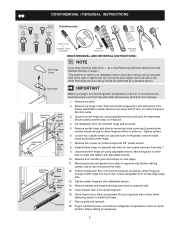
... through center hinge into top of refrigerator, remove inside screw and loosening two outside screws on next page). 11. Lower freezer door onto center hinge pin. 16. Reversing the door swing should be reversed, from left to right or right to left, by a qualified person. Unscrew center hinge pin using adjustable wrench. Move hinge pin to other hole in electrical power cord and turn the refrigerator temperature control to "0" and remove the electrical power cord from...
... through center hinge into top of refrigerator, remove inside screw and loosening two outside screws on next page). 11. Lower freezer door onto center hinge pin. 16. Reversing the door swing should be reversed, from left to right or right to left, by a qualified person. Unscrew center hinge pin using adjustable wrench. Move hinge pin to other hole in electrical power cord and turn the refrigerator temperature control to "0" and remove the electrical power cord from...
Complete Owner's Guide (English)
Page 6
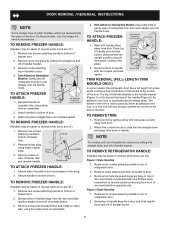
... putty knife. 3. Remove two hole plugs and hinge pin plug on top of door and install on other side, using edge of handle bracket. To Remove Freezer Handle: (Handles may be reversed. To attach freezer handle: Self Adhesive Nameplate (some models) 2. To remove refrigerator handle: (Handles may be easier to bottom of handle away from the door and slide handle straight up and off nameplate from door. 2. Swing top of freezer door. 2. Door Removal / reversal Instructions NOTE Some models have "pocket" handles, which continues...
... putty knife. 3. Remove two hole plugs and hinge pin plug on top of door and install on other side, using edge of handle bracket. To Remove Freezer Handle: (Handles may be reversed. To attach freezer handle: Self Adhesive Nameplate (some models) 2. To remove refrigerator handle: (Handles may be easier to bottom of handle away from the door and slide handle straight up and off nameplate from door. 2. Swing top of freezer door. 2. Door Removal / reversal Instructions NOTE Some models have "pocket" handles, which continues...
Complete Owner's Guide (English)
Page 7
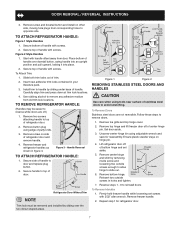
.... Use rubbing alcohol to reverse while doors are not reversible. Carefully align trim and press down at trim lock locations. 4. To Remove Refrigerator Handle: (Handles may be removed and installed by sliding over dovetail button, swing handle into an upright position and pull upward, locking it into place. 2. Set door aside. 3. Remove screw and dovetail button and install on side of handle over the two donut shaped areas. Remove top hinge and lift freezer door...
.... Use rubbing alcohol to reverse while doors are not reversible. Carefully align trim and press down at trim lock locations. 4. To Remove Refrigerator Handle: (Handles may be removed and installed by sliding over dovetail button, swing handle into an upright position and pull upward, locking it into place. 2. Set door aside. 3. Remove screw and dovetail button and install on side of handle over the two donut shaped areas. Remove top hinge and lift freezer door...
Complete Owner's Guide (English)
Page 8
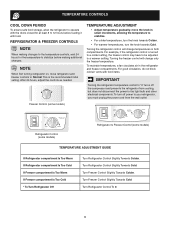
... unplug the power cord from cooling, but does not disconnect the power to the light bulb and other electrical components. Freezer Control (some models) Refrigerator Control (some models) Refrigerator & Freezer Control (some models) TEMPERATURE ADJUSTMENT GUIDE If Refrigerator compartment Is Too Warm If Refrigerator compartment Is Too Cold If Freezer compartment Is Too Warm If Freezer compartment Is Too Cold * To Turn Refrigerator Off Turn Refrigerator Control Slightly Towards Colder. Turn Refrigerator Control To 0. 8 After 24 hours, adjust the controls as needed. For...
... unplug the power cord from cooling, but does not disconnect the power to the light bulb and other electrical components. Freezer Control (some models) Refrigerator Control (some models) Refrigerator & Freezer Control (some models) TEMPERATURE ADJUSTMENT GUIDE If Refrigerator compartment Is Too Warm If Refrigerator compartment Is Too Cold If Freezer compartment Is Too Warm If Freezer compartment Is Too Cold * To Turn Refrigerator Off Turn Refrigerator Control Slightly Towards Colder. Turn Refrigerator Control To 0. 8 After 24 hours, adjust the controls as needed. For...
Complete Owner's Guide (English)
Page 9
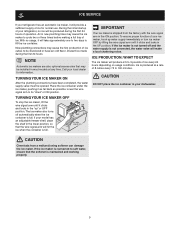
... water supply is full. ICE PRODUCTION: WHAT TO EXPECT The ice maker will hit the ice when the container is not connected, the water valve will make a loud chattering noise. CAUTION Do Not place the ice container in your ice maker, hook up water supply immediately or turn ice maker OFF by lifting the wire signal arm until it clicks and locks in the ON position. ice service If your refrigerator has an automatic ice maker...
... water supply is full. ICE PRODUCTION: WHAT TO EXPECT The ice maker will hit the ice when the container is not connected, the water valve will make a loud chattering noise. CAUTION Do Not place the ice container in your ice maker, hook up water supply immediately or turn ice maker OFF by lifting the wire signal arm until it clicks and locks in the ON position. ice service If your refrigerator has an automatic ice maker...
Complete Owner's Guide (English)
Page 10
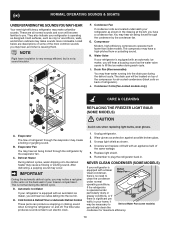
... Coils (Fan-cooled models only) care & cleaning Replacing the freezer Light Bulb (some models) If your freezer compartment. Drain Pan (Nonremovable) You may hear water running into the ice bin. E. Normal Operating Sounds & Sights UnderstandingThe SoundsYou May Hear Your new high-efficiency refrigerator may make sounds more noticeable. These are descriptions of the same wattage. 5. Listed below are all normal sounds and soon will hear ice cubes falling into the drain pan during the defrost cycle. Compressor Modern...
... Coils (Fan-cooled models only) care & cleaning Replacing the freezer Light Bulb (some models) If your freezer compartment. Drain Pan (Nonremovable) You may hear water running into the ice bin. E. Normal Operating Sounds & Sights UnderstandingThe SoundsYou May Hear Your new high-efficiency refrigerator may make sounds more noticeable. These are descriptions of the same wattage. 5. Listed below are all normal sounds and soon will hear ice cubes falling into the drain pan during the defrost cycle. Compressor Modern...
Complete Owner's Guide (English)
Page 11
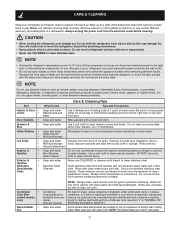
... refrigerator, pull straight out. NOTE • Turning the refrigerator temperature control to "0" turns off power to your refrigerator, you have defrost water pan located on any surface. Vacuum Cleaner Soap and water NOTE: Always clean, wipe and dry with clean water and a soft cloth. Rinse and dry. Rinse with the grain to prevent scratching. NOTE Do not use a dry cloth to clean smooth doors. Part Interior & Door • Liners • Door Gaskets • Drawers & • Bins Glass Shelves...
... refrigerator, pull straight out. NOTE • Turning the refrigerator temperature control to "0" turns off power to your refrigerator, you have defrost water pan located on any surface. Vacuum Cleaner Soap and water NOTE: Always clean, wipe and dry with clean water and a soft cloth. Rinse and dry. Rinse with the grain to prevent scratching. NOTE Do not use a dry cloth to clean smooth doors. Part Interior & Door • Liners • Door Gaskets • Drawers & • Bins Glass Shelves...
Complete Owner's Guide (English)
Page 12
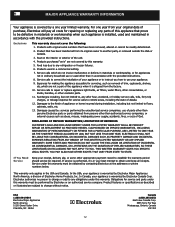
Food loss due to establish the warranty period should service be required. Expenses for making the appliance accessible for servicing, such as -is installed, used and maintained in materials or workmanship when such appliance is " are not covered by Electrolux Canada Corp. Service calls to repair or replace appliance light bulbs, air filters, water filters, other consumables, or knobs, handles, or other appropriate payment...
Food loss due to establish the warranty period should service be required. Expenses for making the appliance accessible for servicing, such as -is installed, used and maintained in materials or workmanship when such appliance is " are not covered by Electrolux Canada Corp. Service calls to repair or replace appliance light bulbs, air filters, water filters, other consumables, or knobs, handles, or other appropriate payment...
Complete Owner's Guide (English)
Page 13
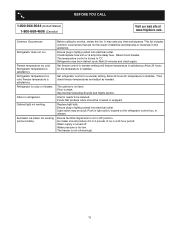
.... The freezer is too low. Ensure plug is turned to a warmer setting. Replace light bulb. Refrigerator temperature is not level. Cabinet light not working (some models). Wait 20 minutes and check again. The cabinet is satisfactory. Ice maker should be cleaned. Water supply is noisy or vibrates. Refrigerator may save you time and expense. Interior needs to 3 pounds of defective workmanship or materials in light switch, located on the refrigerator control box, to stabilize. Refrigerator temperature too cold. Foods...
.... The freezer is too low. Ensure plug is turned to a warmer setting. Replace light bulb. Refrigerator temperature is not level. Cabinet light not working (some models). Wait 20 minutes and check again. The cabinet is satisfactory. Ice maker should be cleaned. Water supply is noisy or vibrates. Refrigerator may save you time and expense. Interior needs to 3 pounds of defective workmanship or materials in light switch, located on the refrigerator control box, to stabilize. Refrigerator temperature too cold. Foods...


