
Wiring Diagram (All Languages)
Page 2
... MOTOR MOUNTING BRACKET ICE MAKER LT. BLUE BLACK BLACK YELLOW GRN/YEL GRN/YEL RED RED YEL/RED BROWN BLUE LT. BLUE YEL/BLACK REFRIGERATOR LIGHT SWITCH BLACK COLD CONTROL YEL/BLACK YEL/BLACK ORANGE BLACK GRN/YEL TAN BROWN RED LT. BLUE BLACK RED YELLOW LT. DIODE DIODE... DOOR COMPARTMENT TAN RED/BLACK TAN GRN/YEL RED/BLACK TAN GRN/YEL INTERLOCK SWITCH RED/BLACK TAN DOOR WATER DISPENSER SWITCH Ladder Schematic - REFRIGERATOR COMPARTMENT DEFROST TIMER BROWN ORANGE RED LT. BLUE BLACK BLACK GRN/YEL BLUE MACHINE COMPARTMENT LT. BLUE BLACK GRN/YEL BROWN RED LT. BLUE...
... MOTOR MOUNTING BRACKET ICE MAKER LT. BLUE BLACK BLACK YELLOW GRN/YEL GRN/YEL RED RED YEL/RED BROWN BLUE LT. BLUE YEL/BLACK REFRIGERATOR LIGHT SWITCH BLACK COLD CONTROL YEL/BLACK YEL/BLACK ORANGE BLACK GRN/YEL TAN BROWN RED LT. BLUE BLACK RED YELLOW LT. DIODE DIODE... DOOR COMPARTMENT TAN RED/BLACK TAN GRN/YEL RED/BLACK TAN GRN/YEL INTERLOCK SWITCH RED/BLACK TAN DOOR WATER DISPENSER SWITCH Ladder Schematic - REFRIGERATOR COMPARTMENT DEFROST TIMER BROWN ORANGE RED LT. BLUE BLACK BLACK GRN/YEL BLUE MACHINE COMPARTMENT LT. BLUE BLACK GRN/YEL BROWN RED LT. BLUE...

Use and Care Manual
Page 1
Before Calling Your Local Repair Service - Need Parts or Service? Use & Care Manual Top Mount Refrigerator Got Questions? CALL: Solutions Hotline (United States) 1-800-944-9044 (Canada) 1-800-668-4606 √ Resolve many service issues over the phone at your convenience! &#...
Before Calling Your Local Repair Service - Need Parts or Service? Use & Care Manual Top Mount Refrigerator Got Questions? CALL: Solutions Hotline (United States) 1-800-944-9044 (Canada) 1-800-668-4606 √ Resolve many service issues over the phone at your convenience! &#...

Use and Care Manual
Page 2
...with a three-prong grounding plug for "just a few days." Consult a qualified electrician. Such damage is not covered under your refrigerator from the wall outlet. even if they come in contact with insufficient power can damage the compressor. If you must be plugged directly...break suddenly if nicked, scratched, or exposed to a Ground Fault Interruptor (GFI) circuit. To turn off accidentally. • Avoid connecting refrigerator to sudden temperature change. 2 Children should NEVER use an extension cord or adapter plug. • If the power cord is unpacked. Cartons...
...with a three-prong grounding plug for "just a few days." Consult a qualified electrician. Such damage is not covered under your refrigerator from the wall outlet. even if they come in contact with insufficient power can damage the compressor. If you must be plugged directly...break suddenly if nicked, scratched, or exposed to a Ground Fault Interruptor (GFI) circuit. To turn off accidentally. • Avoid connecting refrigerator to sudden temperature change. 2 Children should NEVER use an extension cord or adapter plug. • If the power cord is unpacked. Cartons...

Use and Care Manual
Page 3
...installation, proper air circulation, and plumbing and electrical connections: Sides & Top 3/8" Back 1" NOTE If you see back cover). DOOR OPENING Your refrigerator should slope ¼" to ½" from side to a counter when removing food. To make this possible, the direction in this Use &...• Choose a place that is placed with a Garage Kit will drop below 55° F. INSTALLATION CAUTION Do Not install the refrigerator where the temperature will lower the minimum operating temperature of direct sunlight and away from the range, dishwasher or other unheated area, you ...
...installation, proper air circulation, and plumbing and electrical connections: Sides & Top 3/8" Back 1" NOTE If you see back cover). DOOR OPENING Your refrigerator should slope ¼" to ½" from side to a counter when removing food. To make this possible, the direction in this Use &...• Choose a place that is placed with a Garage Kit will drop below 55° F. INSTALLATION CAUTION Do Not install the refrigerator where the temperature will lower the minimum operating temperature of direct sunlight and away from the range, dishwasher or other unheated area, you ...

Use and Care Manual
Page 4
...4. With steel clamp and screw, secure water supply line to your cold water pipe. Then add approximately 7 feet (2.1 meters), so the refrigerator can be responsible for cleaning (as shown). • A shutoff valve to connect the water supply line to measure the distance from a ...Water Supply Line,You Will Need • Basic Tools: adjustable wrench, flat-blade screwdriver, and PhillipsTM screwdriver • Access to the refrigerator. NOTE Water line kit number 5303917950, available from electrical power before connecting a water supply line to a household cold water line with all...
...4. With steel clamp and screw, secure water supply line to your cold water pipe. Then add approximately 7 feet (2.1 meters), so the refrigerator can be responsible for cleaning (as shown). • A shutoff valve to connect the water supply line to measure the distance from a ...Water Supply Line,You Will Need • Basic Tools: adjustable wrench, flat-blade screwdriver, and PhillipsTM screwdriver • Access to the refrigerator. NOTE Water line kit number 5303917950, available from electrical power before connecting a water supply line to a household cold water line with all...

Use and Care Manual
Page 5
...have stainless steel doors -- Trace around the hinge with adjustable wrench. 14. Unscrew center hinge pin using adjustable wrench. Position refrigerator door onto bottom hinge pin and screw center hinge pin through center hinge into top of bottom hinge and set aside. 5. ...hinges from the wall outlet. Flip toe grille and reinstall. 18. Tighten screws. 6. Install bottom hinge on opposite side of refrigerator, remove inside screw and install center hinge. 7. Close refrigerator door to other . Lift refrigerator door off center hinge pin. Have an assistant lift up on...
...have stainless steel doors -- Trace around the hinge with adjustable wrench. 14. Unscrew center hinge pin using adjustable wrench. Position refrigerator door onto bottom hinge pin and screw center hinge pin through center hinge into top of bottom hinge and set aside. 5. ...hinges from the wall outlet. Flip toe grille and reinstall. 18. Tighten screws. 6. Install bottom hinge on opposite side of refrigerator, remove inside screw and install center hinge. 7. Close refrigerator door to other . Lift refrigerator door off center hinge pin. Have an assistant lift up on...

Use and Care Manual
Page 6
... 1. Place top of the handle (Figure 2). Screw Handle Screw Nameplate Lock Handle over old handle holes. TO REMOVE TRIM: 1. TO REMOVE REFRIGERATOR HANDLE: (Handles may be easier to the bottom of handle bracket. Self-Adhesive Nameplate Models: Gently peel off of the door. Remove screw ... sliding trim straight down and off nameplate from base of the trim attaches to door. 4. Remove two screws attaching handle to bottom of refrigerator door. 2. Remove two screws attaching handle to top of freezer door. 2. Attach handle to bottom of door. 3. Remove button plug ...
... 1. Place top of the handle (Figure 2). Screw Handle Screw Nameplate Lock Handle over old handle holes. TO REMOVE TRIM: 1. TO REMOVE REFRIGERATOR HANDLE: (Handles may be easier to the bottom of handle bracket. Self-Adhesive Nameplate Models: Gently peel off of the door. Remove screw ... sliding trim straight down and off nameplate from base of the trim attaches to door. 4. Remove two screws attaching handle to bottom of refrigerator door. 2. Remove two screws attaching handle to top of freezer door. 2. Attach handle to bottom of door. 3. Remove button plug ...

Use and Care Manual
Page 7
... residue from old trim lock locations. Follow these steps to top of stainless steel doors to reinstall doors To Remove Handles 1. Lift refrigerator door off .) 1. Firmly hold freezer handle while loosening set aside. 5. Start with screws. Carefully align trim and press down at... handle to remove doors. 1. Figure 1 Figure 2 REMOVING STAINLESS STEEL DOORS AND HANDLES CAUTION Use care when using tools near surface of refrigerator door. 2. Remove bottom hinge. Insert new adhesive trim locks contained in figure 3. Remove top hinge and lift freezer door off of handle...
... residue from old trim lock locations. Follow these steps to top of stainless steel doors to reinstall doors To Remove Handles 1. Lift refrigerator door off .) 1. Firmly hold freezer handle while loosening set aside. 5. Start with screws. Carefully align trim and press down at... handle to remove doors. 1. Figure 1 Figure 2 REMOVING STAINLESS STEEL DOORS AND HANDLES CAUTION Use care when using tools near surface of refrigerator door. 2. Remove bottom hinge. Insert new adhesive trim locks contained in figure 3. Remove top hinge and lift freezer door off of handle...

Use and Care Manual
Page 8
...components. If Freezer compartment Is Too Warm Turn Freezer Control Slightly Towards Colder. After 24 hours, adjust the controls as needed. REFRIGERATOR & FREEZER CONTROLS NOTE When making changes to the temperature controls, wait 24 hours for at least 8 to 12 hours before... freezer temperature. If Freezer compartment Is Too Cold Turn Freezer Control Slightly Towards Cold. * To Turn Refrigerator Off Turn Refrigerator Control To 0. 8 For example, if the refrigerator control is the recommended initial setting. To turn the knob towards Colder. • For warmer temperatures,...
...components. If Freezer compartment Is Too Warm Turn Freezer Control Slightly Towards Colder. After 24 hours, adjust the controls as needed. REFRIGERATOR & FREEZER CONTROLS NOTE When making changes to the temperature controls, wait 24 hours for at least 8 to 12 hours before... freezer temperature. If Freezer compartment Is Too Cold Turn Freezer Control Slightly Towards Cold. * To Turn Refrigerator Off Turn Refrigerator Control To 0. 8 For example, if the refrigerator control is the recommended initial setting. To turn the knob towards Colder. • For warmer temperatures,...

Use and Care Manual
Page 9
... will be discolored or have been completed, the water supply valve must be installed in most models at a rate of ice for information. If your refrigerator, no usage, it will produce 2.5 to 3 pounds of your model has an adjustable freezer shelf, place the shelf in the UP position. ICE SERVICE If...
... will be discolored or have been completed, the water supply valve must be installed in most models at a rate of ice for information. If your refrigerator, no usage, it will produce 2.5 to 3 pounds of your model has an adjustable freezer shelf, place the shelf in the UP position. ICE SERVICE If...

Use and Care Manual
Page 10
...Defrost Heater During defrost cycles, water dripping onto the defrost heater may make sounds more noticeable. This is causing them. If the refrigerator is equipped with an automatic ice maker, you will be necessary to an electric clock. Hard surfaces, such as protection against ...foam insulation is very energy efficient, but is operating as shown. 4. I. Unsnap light shield as designed. B. Unplug refrigerator. 2. F. Automatic Ice Maker If your refrigerator is significant pet traffic in . Unscrew and replace old bulb with an automatic ice maker, you will hear a buzzing ...
...Defrost Heater During defrost cycles, water dripping onto the defrost heater may make sounds more noticeable. This is causing them. If the refrigerator is equipped with an automatic ice maker, you will be necessary to an electric clock. Hard surfaces, such as protection against ...foam insulation is very energy efficient, but is operating as shown. 4. I. Unsnap light shield as designed. B. Unplug refrigerator. 2. F. Automatic Ice Maker If your refrigerator is significant pet traffic in . Unscrew and replace old bulb with an automatic ice maker, you will hear a buzzing ...

Use and Care Manual
Page 11
...dust build-up any removable parts in "NORNAL OPERATING SOUNDS & SIGHTS"). It will remove the protective finish. NOTE • Turning the refrigerator temperature control to "0" turns off power to your vacuum to the back of warm water. Use a non-abrasive stainless steel cleaner. ... ammonia, or alcohol to cold metal surfaces. Condenser Coils (Air-cooled • Vacuum Cleaner Use the dusting tool attachment on your refrigerator, you have already removed. Wash the rest of sponge or cloth before cleaning around controls, light bulb or any surface. Care ...
...dust build-up any removable parts in "NORNAL OPERATING SOUNDS & SIGHTS"). It will remove the protective finish. NOTE • Turning the refrigerator temperature control to "0" turns off power to your vacuum to the back of warm water. Use a non-abrasive stainless steel cleaner. ... ammonia, or alcohol to cold metal surfaces. Condenser Coils (Air-cooled • Vacuum Cleaner Use the dusting tool attachment on your refrigerator, you have already removed. Wash the rest of sponge or cloth before cleaning around controls, light bulb or any surface. Care ...

Use and Care Manual
Page 12
..., or holiday service calls, tolls, ferry trip charges, or mileage expense for appliances not in ordinary household use of the unit. 4. Service calls to , any refrigerator or freezer failures. 6. In the USA, your appliance is covered by Electrolux Canada Corp. Obligations for repairing or replacing any obligations under this warranty must...
..., or holiday service calls, tolls, ferry trip charges, or mileage expense for appliances not in ordinary household use of the unit. 4. Service calls to , any refrigerator or freezer failures. 6. In the USA, your appliance is covered by Electrolux Canada Corp. Obligations for repairing or replacing any obligations under this warranty must...

Use and Care Manual
Page 13
...(United States) 1-800-668-4606 (Canada) Visit our web site at www.frigidaire.com. Freezer temperature too cold. Odors in defrost cycle. Refrigerator is satisfactory. Push in light switch, located on the refrigerator control box, to release. • Ensure the Wire Signal Arm is not.... • The temperature control is weak. • See Normal Operating Sounds and Sights section. • Interior needs to "O". • Refrigerator may be covered or wrapped. • Replace light bulb. • Ensure plug is tightly pushed into electrical outlet. • Check/replace ...
...(United States) 1-800-668-4606 (Canada) Visit our web site at www.frigidaire.com. Freezer temperature too cold. Odors in defrost cycle. Refrigerator is satisfactory. Push in light switch, located on the refrigerator control box, to release. • Ensure the Wire Signal Arm is not.... • The temperature control is weak. • See Normal Operating Sounds and Sights section. • Interior needs to "O". • Refrigerator may be covered or wrapped. • Replace light bulb. • Ensure plug is tightly pushed into electrical outlet. • Check/replace ...
Installation Instructions
Page 1
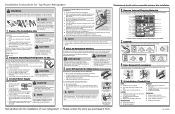
... your site preparation: • Choose a place near a grounded electrical outlet. • Do not use a hand truck to position the refrigerator directly in your dealer, provides all connections - Tighten another half turn with ¼-inch (6.4mm) OD. Do not over -tighten retaining ...61551; Ice Maker is larger than an entrance, consider two options: • Remove the entrance door if one exists. • Remove the refrigerator doors (see "Door Removal Instructions" in front of installation, proper air circulation, and plumbing and electrical connections: Sides & Top: 3/8 inch...
... your site preparation: • Choose a place near a grounded electrical outlet. • Do not use a hand truck to position the refrigerator directly in your dealer, provides all connections - Tighten another half turn with ¼-inch (6.4mm) OD. Do not over -tighten retaining ...61551; Ice Maker is larger than an entrance, consider two options: • Remove the entrance door if one exists. • Remove the refrigerator doors (see "Door Removal Instructions" in front of installation, proper air circulation, and plumbing and electrical connections: Sides & Top: 3/8 inch...
Parts Catalog
Page 1
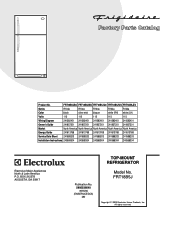
...All rights reserved. FRT18B5JB4 FRT18B5JM4 FRT18B5JQ4 FRT18B5JW4 FRT18B5JZ4 Series R134a R134a R134a R134a R134a Color black silver mist bisque white (RH) white (LH) Volts 115 115 115 115 115 Wiring Diagram 241582401 241582401 ...Installation Instructions 240568304 240568304 240568304 240568304 240568304 N05L00001.eps N05DAACKA1.eps N05BBAABA30.eps N05SADDEA5.eps N05CBCCAD0.eps W241582401.eps S241582801.eps TOP-MOUNT REFRIGERATOR Electrolux Major Appliances North & Latin America P.O. FRT18B5J Copyright © 2009 Electrolux Home Products, Inc. Product No. BOX 212378...
...All rights reserved. FRT18B5JB4 FRT18B5JM4 FRT18B5JQ4 FRT18B5JW4 FRT18B5JZ4 Series R134a R134a R134a R134a R134a Color black silver mist bisque white (RH) white (LH) Volts 115 115 115 115 115 Wiring Diagram 241582401 241582401 ...Installation Instructions 240568304 240568304 240568304 240568304 240568304 N05L00001.eps N05DAACKA1.eps N05BBAABA30.eps N05SADDEA5.eps N05CBCCAD0.eps W241582401.eps S241582801.eps TOP-MOUNT REFRIGERATOR Electrolux Major Appliances North & Latin America P.O. FRT18B5J Copyright © 2009 Electrolux Home Products, Inc. Product No. BOX 212378...


