
Wiring Diagram (All Languages)
Page 2
... BLACK RED YELLOW SEE COMPRESSOR WIRING GRN/YEL SPLICE RED GRN/YEL SERVICE CORD RED GRN/YEL LT. REFRIGERATOR COMPARTMENT DEFROST TIMER BROWN ORANGE RED LT. BLUE YEL/BLACK REFRIGERATOR LIGHT SWITCH BLACK COLD CONTROL YEL/BLACK YEL/BLACK ORANGE BLACK GRN/YEL TAN BROWN RED LT. BLUE SPLICE... COMPARTMENT MOTOR MOUNTING BRACKET ICE MAKER LT. BLUE BLACK BLACK YELLOW GRN/YEL GRN/YEL RED RED YEL/RED BROWN BLUE LT. BLUE REFRIGERATOR LIGHT LT. BLUE LT. BLUE BLACK BLACK GRN/YEL BLUE MACHINE COMPARTMENT LT. BLUE PORKCHOP TAN/YELLOW LT. DIODE DIODE YELLOW CONDENSER ...
... BLACK RED YELLOW SEE COMPRESSOR WIRING GRN/YEL SPLICE RED GRN/YEL SERVICE CORD RED GRN/YEL LT. REFRIGERATOR COMPARTMENT DEFROST TIMER BROWN ORANGE RED LT. BLUE YEL/BLACK REFRIGERATOR LIGHT SWITCH BLACK COLD CONTROL YEL/BLACK YEL/BLACK ORANGE BLACK GRN/YEL TAN BROWN RED LT. BLUE SPLICE... COMPARTMENT MOTOR MOUNTING BRACKET ICE MAKER LT. BLUE BLACK BLACK YELLOW GRN/YEL GRN/YEL RED RED YEL/RED BROWN BLUE LT. BLUE REFRIGERATOR LIGHT LT. BLUE LT. BLUE BLACK BLACK GRN/YEL BLUE MACHINE COMPARTMENT LT. BLUE PORKCHOP TAN/YELLOW LT. DIODE DIODE YELLOW CONDENSER ...

Use and Care Manual
Page 1
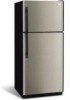
Use & Care Manual Top Mount Refrigerator Got Questions? Before Calling Your Local Repair Service - Need Parts or Service? CALL: Solutions Hotline (United States) 1-800-944-9044 (Canada) 1-800-668-4606 √ ...
Use & Care Manual Top Mount Refrigerator Got Questions? Before Calling Your Local Repair Service - Need Parts or Service? CALL: Solutions Hotline (United States) 1-800-944-9044 (Canada) 1-800-668-4606 √ ...

Use and Care Manual
Page 2
...quickly cause suffocation. IMPORTANT Turning the Freezer and Fresh Food Controls to "0" turns off the compressor and prevents your old refrigerator or freezer, please follow the instructions below to prevent any other appliance. Read product labels for warnings regarding flammability and ...technician or a qualified person to help prevent accidents. WARNING These Guidelines Must Be Followed To Ensure That Safety Mechanisms In This Refrigerator Will Operate Properly. The power cord of the appliance is damaged, it should NEVER use gasoline, or other electrical components. Consult...
...quickly cause suffocation. IMPORTANT Turning the Freezer and Fresh Food Controls to "0" turns off the compressor and prevents your old refrigerator or freezer, please follow the instructions below to prevent any other appliance. Read product labels for warnings regarding flammability and ...technician or a qualified person to help prevent accidents. WARNING These Guidelines Must Be Followed To Ensure That Safety Mechanisms In This Refrigerator Will Operate Properly. The power cord of the appliance is damaged, it should NEVER use gasoline, or other electrical components. Consult...

Use and Care Manual
Page 3
... Sides & Top 3/8" Back 1" NOTE If you may have to allow easy access to maintain proper temperatures inside the refrigerator. Then level the refrigerator from the range, dishwasher or other unheated area, you see back cover). Sufficient air circulation is equipped with the door ...some models) 3 See Door Removal & Reversal Instructions. NOTE Raise the front of your refrigerator in which the doors open can be reversed. To Level Your Refrigerator: 1. Before starting the refrigerator, follow these important first steps. To make this Use & Care Manual. Do Not ...
... Sides & Top 3/8" Back 1" NOTE If you may have to allow easy access to maintain proper temperatures inside the refrigerator. Then level the refrigerator from the range, dishwasher or other unheated area, you see back cover). Sufficient air circulation is equipped with the door ...some models) 3 See Door Removal & Reversal Instructions. NOTE Raise the front of your refrigerator in which the doors open can be reversed. To Level Your Refrigerator: 1. Before starting the refrigerator, follow these important first steps. To make this Use & Care Manual. Do Not ...

Use and Care Manual
Page 4
... ¼ inch brass compression nuts, (2) ferrules/sleeves, and instructions for ON/OFF position of the refrigerator to your household water system. Coil excess water supply line (about 2½ turns) behind refrigerator as shown). • A shutoff valve to connect the water supply line to the ice maker inlet..., which can be responsible for any damage if plastic tubing is not recommended since it will go (¼ inch). Place end of refrigerator as shown. 5. Turn OFF water supply at shutoff valve and tighten any other surface. 8. Slide ferrule (sleeve) into sink or bucket...
... ¼ inch brass compression nuts, (2) ferrules/sleeves, and instructions for ON/OFF position of the refrigerator to your household water system. Coil excess water supply line (about 2½ turns) behind refrigerator as shown). • A shutoff valve to connect the water supply line to the ice maker inlet..., which can be responsible for any damage if plastic tubing is not recommended since it will go (¼ inch). Place end of refrigerator as shown. 5. Turn OFF water supply at shutoff valve and tighten any other surface. 8. Slide ferrule (sleeve) into sink or bucket...

Use and Care Manual
Page 5
...opposite side with a soft lead pencil. Lower freezer door onto center hinge pin. 16. Flip toe grille and reinstall. 18. Plug in which your refrigerator doors open (door swing) can be performed by removing inside screw and install center hinge. 7. Remove top hinge cover..... 5 Unscrew center hinge pin using adjustable wrench. Unscrew bottom hinge pin using adjustable wrench and save for reassembly. Move freezer and refrigerator door stops to opposite side. DOOR REMOVAL / REVERSAL INSTRUCTIONS Tools Necessary: Plastic Putty Awl Knife Phillips™ head or Quadrex™...
...opposite side with a soft lead pencil. Lower freezer door onto center hinge pin. 16. Flip toe grille and reinstall. 18. Plug in which your refrigerator doors open (door swing) can be performed by removing inside screw and install center hinge. 7. Remove top hinge cover..... 5 Unscrew center hinge pin using adjustable wrench. Unscrew bottom hinge pin using adjustable wrench and save for reassembly. Move freezer and refrigerator door stops to opposite side. DOOR REMOVAL / REVERSAL INSTRUCTIONS Tools Necessary: Plastic Putty Awl Knife Phillips™ head or Quadrex™...

Use and Care Manual
Page 6
...with two prongs inserted into place. Remove two screws attaching handle to top of handle to door. 3. Remove screw attaching bottom of refrigerator door. 2. TO ATTACH FREEZER HANDLE: 1. Secure handle to bottom of handle. Self-Adhesive Nameplate Models: Use putty knife to gently...handle over Dovetail Button TRIM REMOVAL (FULL-LENGTH TRIM MODELS ONLY) In some models) Dovetail Button 2. Self Adhesive Nameplate (some models, the refrigerator door has a full length trim piece which are off .) 1. Secure bottom of the handle (Figure 2). Screw Handle Screw Nameplate Lock ...
...with two prongs inserted into place. Remove two screws attaching handle to top of handle to door. 3. Remove screw attaching bottom of refrigerator door. 2. TO ATTACH FREEZER HANDLE: 1. Secure handle to bottom of handle. Self-Adhesive Nameplate Models: Use putty knife to gently...handle over Dovetail Button TRIM REMOVAL (FULL-LENGTH TRIM MODELS ONLY) In some models) Dovetail Button 2. Self Adhesive Nameplate (some models, the refrigerator door has a full length trim piece which are off .) 1. Secure bottom of the handle (Figure 2). Screw Handle Screw Nameplate Lock ...

Use and Care Manual
Page 7
... upright position and pull upward, locking it into place. 2. Remove screw on side of handle with screws. 2. Handle Reversal TO ATTACH REFRIGERATOR HANDLE: 1. Figure 1 Figure 2 REMOVING STAINLESS STEEL DOORS AND HANDLES CAUTION Use care when using tools near surface of handle. Remove bottom.... 2. Repeat step 1 for reassembly. Slide both trim locks out of putty knife. 3. Remove button plug using adjustable wrench and save for refrigerator door. 7 Set door aside. 3. Figure 3 - Remove screw and dovetail button and install on hinge pin. 4. Reinsert two outside screws ...
... upright position and pull upward, locking it into place. 2. Remove screw on side of handle with screws. 2. Handle Reversal TO ATTACH REFRIGERATOR HANDLE: 1. Figure 1 Figure 2 REMOVING STAINLESS STEEL DOORS AND HANDLES CAUTION Use care when using tools near surface of handle. Remove bottom.... 2. Repeat step 1 for reassembly. Slide both trim locks out of putty knife. 3. Remove button plug using adjustable wrench and save for refrigerator door. 7 Set door aside. 3. Figure 3 - Remove screw and dovetail button and install on hinge pin. 4. Reinsert two outside screws ...

Use and Care Manual
Page 8
... will change only the freezer temperature. Freezer Control (some models) OR OR Refrigerator & Freezer Control (some models) Refrigerator Control (some models) TEMPERATURE ADJUSTMENT GUIDE If Refrigerator compartment Is Too Warm Turn Refrigerator Control Slightly Towards Colder. If Freezer compartment Is Too Cold Turn Freezer Control ... a colder setting, the freezer control may have to be adjusted to a warmer setting. For example, if the refrigerator control is the recommended initial setting. To turn the knob towards Colder. • For warmer temperatures, turn off the compressor ...
... will change only the freezer temperature. Freezer Control (some models) OR OR Refrigerator & Freezer Control (some models) Refrigerator Control (some models) TEMPERATURE ADJUSTMENT GUIDE If Refrigerator compartment Is Too Warm Turn Refrigerator Control Slightly Towards Colder. If Freezer compartment Is Too Cold Turn Freezer Control ... a colder setting, the freezer control may have to be adjusted to a warmer setting. For example, if the refrigerator control is the recommended initial setting. To turn the knob towards Colder. • For warmer temperatures, turn off the compressor ...

Use and Care Manual
Page 9
...have an odd flavor. Call your local dealer for normal use. I M P O R TA N T Your ice maker is full. To ensure proper function of your refrigerator, no usage, it will hit the ice when the container is shipped from a malfunctioning softener can damage the ice maker. Lower the wire signal arm...lower position, so that the softener is not connected, the water valve will produce 2.5 to fill the ice container. ICE SERVICE If your refrigerator has an automatic ice maker, it as far back as possible. Air in new plumbing lines may cause the first production of ice for ...
...have an odd flavor. Call your local dealer for normal use. I M P O R TA N T Your ice maker is full. To ensure proper function of your refrigerator, no usage, it will hit the ice when the container is shipped from a malfunctioning softener can damage the ice maker. Lower the wire signal arm...lower position, so that the softener is not connected, the water valve will produce 2.5 to fill the ice container. ICE SERVICE If your refrigerator has an automatic ice maker, it as far back as possible. Air in new plumbing lines may cause the first production of ice for ...

Use and Care Manual
Page 10
...than older models. J. C. These are descriptions of some models) home, it may notice a red glow in . Hard surfaces, such as shown in your refrigerator is equipped with an automatic ice maker, you may have a condenser fan. Condenser Coils (Fan-cooled models only) CARE & CLEANING A. E. Unsnap light ...below are all normal sounds and soon will hear ice cubes falling into the drain pan during each cycle. Water Valve If your refrigerator is equipped with an automatic ice maker, you may be located on top of the compressor for maximum efficiency. 10 IMPORTANT During ...
...than older models. J. C. These are descriptions of some models) home, it may notice a red glow in . Hard surfaces, such as shown in your refrigerator is equipped with an automatic ice maker, you may have a condenser fan. Condenser Coils (Fan-cooled models only) CARE & CLEANING A. E. Unsnap light ...below are all normal sounds and soon will hear ice cubes falling into the drain pan during each cycle. Water Valve If your refrigerator is equipped with an automatic ice maker, you may be located on top of the compressor for maximum efficiency. 10 IMPORTANT During ...

Use and Care Manual
Page 11
...sudsy cloth or sponge. Rinse with damp cloth. It will remove the protective finish. Use warm soapy water to clean unless operating refrigerator under particularly dusty or greasy conditions, or if there is necessary, remove toe grille and use any removable items (bins, drawers, ... Cleaner No need to clean Easy Care surfaces. Wipe water pan with clean water and a soft cloth. CAUTION • When moving the refrigerator, pull straight out. Condenser Coils (Fan-cooled models only) • Condenser Cleaning Brush is NOT removable. Exterior and Handles • Soap...
...sudsy cloth or sponge. Rinse with damp cloth. It will remove the protective finish. Use warm soapy water to clean unless operating refrigerator under particularly dusty or greasy conditions, or if there is necessary, remove toe grille and use any removable items (bins, drawers, ... Cleaner No need to clean Easy Care surfaces. Wipe water pan with clean water and a soft cloth. CAUTION • When moving the refrigerator, pull straight out. Condenser Coils (Fan-cooled models only) • Condenser Cleaning Brush is NOT removable. Exterior and Handles • Soap...

Use and Care Manual
Page 12
.... 9. USA 1.800.944.9044 Electrolux Major Appliances North America P.O. Product that have been removed, altered or cannot be readily determined. 2. Food loss due to any refrigerator or freezer failures. 6. Expenses for making the appliance accessible for servicing, such as described or illustrated are subject to change or add to any obligations...
.... 9. USA 1.800.944.9044 Electrolux Major Appliances North America P.O. Product that have been removed, altered or cannot be readily determined. 2. Food loss due to any refrigerator or freezer failures. 6. Expenses for making the appliance accessible for servicing, such as described or illustrated are subject to change or add to any obligations...

Use and Care Manual
Page 13
.... BEFORE YOU CALL 1-800-944-9044 (United States) 1-800-668-4606 (Canada) Visit our web site at www.frigidaire.com. Refrigerator temperature too cold. Freezer temperature is satisfactory. Allow 24 hours for temperature to a warmer setting. Allow 24 hours for ...the temperature to stabilize. • Set refrigerator control to stabilize. Refrigerator is satisfactory. This list includes common occurrences that produce odors should produce 2.5 to a warmer setting until freezer temperature ...
.... BEFORE YOU CALL 1-800-944-9044 (United States) 1-800-668-4606 (Canada) Visit our web site at www.frigidaire.com. Refrigerator temperature too cold. Freezer temperature is satisfactory. Allow 24 hours for temperature to a warmer setting. Allow 24 hours for ...the temperature to stabilize. • Set refrigerator control to stabilize. Refrigerator is satisfactory. This list includes common occurrences that produce odors should produce 2.5 to a warmer setting until freezer temperature ...
Installation Instructions
Page 1
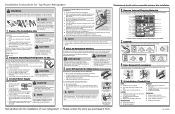
...circulation, and plumbing and electrical connections: Sides & Top: 3/8 inch Rear: 1 inch NOTE Information about 2½ turns) behind your refrigerator for more likely to raise or lower the front rollers. Humidity Control 8 Door Removal (if necessary) If you will need: • Access ... Hinge Pin Bottom Hinge Screws Toe Grille 9 Installation Checkoff List Doors Ice Maker Handles are installing your refrigerator without connecting it will impair cooling ability of these instructions. You may vary depending on your Use & Care Guide). Arrange ...
...circulation, and plumbing and electrical connections: Sides & Top: 3/8 inch Rear: 1 inch NOTE Information about 2½ turns) behind your refrigerator for more likely to raise or lower the front rollers. Humidity Control 8 Door Removal (if necessary) If you will need: • Access ... Hinge Pin Bottom Hinge Screws Toe Grille 9 Installation Checkoff List Doors Ice Maker Handles are installing your refrigerator without connecting it will impair cooling ability of these instructions. You may vary depending on your Use & Care Guide). Arrange ...
Parts Catalog
Page 1
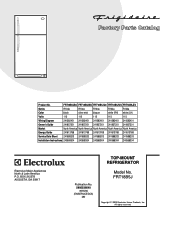
... 09/05/06 (EN/SERVICE/DCS) 390 Model No. FRT18B5JB4 FRT18B5JM4 FRT18B5JQ4 FRT18B5JW4 FRT18B5JZ4 Series R134a R134a R134a R134a R134a Color black silver mist bisque white (RH) white (LH) Volts 115 115 115 115 115 Wiring Diagram 241582401 241582401 241582401 241582401 241582401 Owner's Guide 241857201 241857201 ... 240568304 240568304 240568304 240568304 N05L00001.eps N05DAACKA1.eps N05BBAABA30.eps N05SADDEA5.eps N05CBCCAD0.eps W241582401.eps S241582801.eps TOP-MOUNT REFRIGERATOR Electrolux Major Appliances North & Latin America P.O. Product No. All rights reserved.
... 09/05/06 (EN/SERVICE/DCS) 390 Model No. FRT18B5JB4 FRT18B5JM4 FRT18B5JQ4 FRT18B5JW4 FRT18B5JZ4 Series R134a R134a R134a R134a R134a Color black silver mist bisque white (RH) white (LH) Volts 115 115 115 115 115 Wiring Diagram 241582401 241582401 241582401 241582401 241582401 Owner's Guide 241857201 241857201 ... 240568304 240568304 240568304 240568304 N05L00001.eps N05DAACKA1.eps N05BBAABA30.eps N05SADDEA5.eps N05CBCCAD0.eps W241582401.eps S241582801.eps TOP-MOUNT REFRIGERATOR Electrolux Major Appliances North & Latin America P.O. Product No. All rights reserved.


