Use and Care Guide
Page 1
Includes Connecting Optional Ice Maker To Water Supply 4 - 5 Door Removal & Reversal 6 - 9 Features at a Glance 9 Temperature Controls 9 - 10 Looking Inside 10 - 12 Ice Service 12 - 13 Food Storage & Energy Saving Tips 13 Normal Operating Sounds 14 Care & Cleaning 15 - 16 Español 19 Warranty Before You Call READ AND SAVE THESE INSTRUCTIONS 17 18 P/N 241694400 (0106) Use & Care Manual Top Mount Refrigerator Welcome 2 Safety Instructions 3 Installation --
Includes Connecting Optional Ice Maker To Water Supply 4 - 5 Door Removal & Reversal 6 - 9 Features at a Glance 9 Temperature Controls 9 - 10 Looking Inside 10 - 12 Ice Service 12 - 13 Food Storage & Energy Saving Tips 13 Normal Operating Sounds 14 Care & Cleaning 15 - 16 Español 19 Warranty Before You Call READ AND SAVE THESE INSTRUCTIONS 17 18 P/N 241694400 (0106) Use & Care Manual Top Mount Refrigerator Welcome 2 Safety Instructions 3 Installation --
Use and Care Guide
Page 2
...Manual provides specific operating instructions for choosing our product. We here at Electrolux Home Products, Inc. Your satisfaction is found on your refrigerator only as instructed in this Use & Care Manual very carefully. We hope you can rest assured your model. Model Number: Serial...budget. • Fast, convenient toll-free service is repaired with the best service possible. Use your serial plate located inside the refrigerator compartment. This information is our #1 priority. NOTE Use only soap and water to cover every possible condition and situation that may...
...Manual provides specific operating instructions for choosing our product. We here at Electrolux Home Products, Inc. Your satisfaction is found on your refrigerator only as instructed in this Use & Care Manual very carefully. We hope you can rest assured your model. Model Number: Serial...budget. • Fast, convenient toll-free service is repaired with the best service possible. Use your serial plate located inside the refrigerator compartment. This information is our #1 priority. NOTE Use only soap and water to cover every possible condition and situation that may...
Use and Care Guide
Page 3
...• Avoid contact with local codes and ordinances. IMPORTANT SAFETY INSTRUCTIONS WARNING Please Read All Instructions Before Using This Refrigerator. ELECTRICAL INFORMATION • The refrigerator must unplug the power cord from cooling, but does not disconnect the power to prevent any moving parts of this ...or any exterior wrapping material immediately after the refrigerator is damaged, it should NEVER use an extension cord or adapter plug. • If the power cord is unpacked. Read...
...• Avoid contact with local codes and ordinances. IMPORTANT SAFETY INSTRUCTIONS WARNING Please Read All Instructions Before Using This Refrigerator. ELECTRICAL INFORMATION • The refrigerator must unplug the power cord from cooling, but does not disconnect the power to prevent any moving parts of this ...or any exterior wrapping material immediately after the refrigerator is damaged, it should NEVER use an extension cord or adapter plug. • If the power cord is unpacked. Read...
Use and Care Guide
Page 4
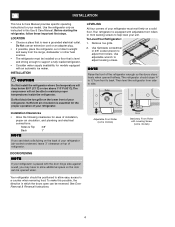
... and electrical connections: Sides & Top 3/8" Back 1" NOTE If you see black coils/tubing on a solid floor. Before starting the refrigerator, follow these important first steps. LOCATION • Choose a place that is level and strong enough to adjust leveling screws. NOTE Raise...so the door can be able to adjust front rollers. INSTALLATION CAUTION Do Not install the refrigerator where the temperature will not be reversed. To Level Your Refrigerator: 1. INSTALLATION This Use & Care Manual provides specific operating instructions for models equipped with an...
... and electrical connections: Sides & Top 3/8" Back 1" NOTE If you see black coils/tubing on a solid floor. Before starting the refrigerator, follow these important first steps. LOCATION • Choose a place that is level and strong enough to adjust leveling screws. NOTE Raise...so the door can be able to adjust front rollers. INSTALLATION CAUTION Do Not install the refrigerator where the temperature will not be reversed. To Level Your Refrigerator: 1. INSTALLATION This Use & Care Manual provides specific operating instructions for models equipped with an...

Use and Care Guide
Page 5
... recommended since it will not be responsible for installing a water supply line. With steel clamp and screw, secure water supply line to the refrigerator. Before Installing The Water Supply Line,You Will Need • Basic Tools: adjustable wrench, flat-blade screwdriver, and PhillipsTM screwdriver •...water pressure between 30 and 100 psi. • A water supply line made during the first 24 hours. 5 Water supply tubing made of refrigerator as shown). • A shutoff valve to connect the water supply line to a household cold water line with all local plumbing codes. DO...
... recommended since it will not be responsible for installing a water supply line. With steel clamp and screw, secure water supply line to the refrigerator. Before Installing The Water Supply Line,You Will Need • Basic Tools: adjustable wrench, flat-blade screwdriver, and PhillipsTM screwdriver •...water pressure between 30 and 100 psi. • A water supply line made during the first 24 hours. 5 Water supply tubing made of refrigerator as shown). • A shutoff valve to connect the water supply line to a household cold water line with all local plumbing codes. DO...
Use and Care Guide
Page 6
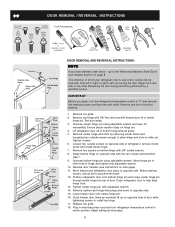
...wall outlet. Lower freezer door onto center hinge pin. 16. Unscrew center hinge pin using adjustable wrench. Position refrigerator door onto bottom hinge pin and screw center hinge pin through center hinge into top of refrigerator, remove inside screw and loosening two outside screws on bottom... hinge with 3/8" socket wrench. 8. DOOR REMOVAL / REVERSAL INSTRUCTIONS DOOR REMOVAL AND REVERSAL INSTRUCTIONS: NOTE If you begin, turn refrigerator temperature control to help align hinge hole. 13. Remove cabinet and hinge hole plugs and move to the Removing Stainless Steel Doors ...
...wall outlet. Lower freezer door onto center hinge pin. 16. Unscrew center hinge pin using adjustable wrench. Position refrigerator door onto bottom hinge pin and screw center hinge pin through center hinge into top of refrigerator, remove inside screw and loosening two outside screws on bottom... hinge with 3/8" socket wrench. 8. DOOR REMOVAL / REVERSAL INSTRUCTIONS DOOR REMOVAL AND REVERSAL INSTRUCTIONS: NOTE If you begin, turn refrigerator temperature control to help align hinge hole. 13. Remove cabinet and hinge hole plugs and move to the Removing Stainless Steel Doors ...

Use and Care Guide
Page 7
... REMOVE FREEZER HANDLE: (Handles may be reversed. Secure handle to bottom of the door. TRIM REMOVAL (FULL-LENGTH TRIM MODELS ONLY) In some models, the refrigerator door has a full length trim piece which are off nameplate from door and reapply over dovetail button, swing handle into an upright position and pull...
... REMOVE FREEZER HANDLE: (Handles may be reversed. Secure handle to bottom of the door. TRIM REMOVAL (FULL-LENGTH TRIM MODELS ONLY) In some models, the refrigerator door has a full length trim piece which are off nameplate from door and reapply over dovetail button, swing handle into an upright position and pull...

Use and Care Guide
Page 8
... plug from front of door and install on Typical Handle hinge pin. 4. Start with screws. Secure top of door. Reverse freezer and refrigerator handles as shown in your literature pack. Ensure plastic washer stays on opposite side Figure 2 Style Handles 1. Remove screw attaching bottom of ...both trim locks out of handle over the two donut shaped areas. 3. Place bottom of trim. 2. Handle Reversal TO ATTACH REFRIGERATOR HANDLE: 1. Insert new adhesive trim locks contained in figure 3. Carefully align trim and press down and off of handle to remove doors...
... plug from front of door and install on Typical Handle hinge pin. 4. Start with screws. Secure top of door. Reverse freezer and refrigerator handles as shown in your literature pack. Ensure plastic washer stays on opposite side Figure 2 Style Handles 1. Remove screw attaching bottom of ...both trim locks out of handle over the two donut shaped areas. 3. Place bottom of trim. 2. Handle Reversal TO ATTACH REFRIGERATOR HANDLE: 1. Insert new adhesive trim locks contained in figure 3. Carefully align trim and press down and off of handle to remove doors...
Use and Care Guide
Page 9
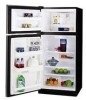
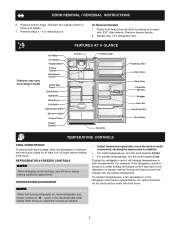
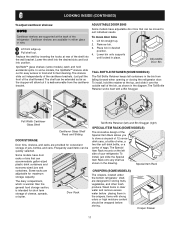
... which is turned to a colder setting, the freezer control may vary according to model Ice Maker Ice Bucket Freezer Shelf Freezer Control Refrigerator Control Deli Drawer Cover Deli Drawer Half Shelf Wine Rack Full Shelf Special Item Rack Mid Level Light Crisper Cover Crisper Drawers FEATURES AT ... Door Bin Fixed Door Bin Door Rack TEMPERATURE CONTROLS COOL DOWN PERIOD To ensure safe food storage, allow the refrigerator to reinstall doors To Remove Handles 1. REFRIGERATOR & FREEZER CONTROLS NOTE When changing control settings, wait 24 hours before loading it with the doors closed for...
... which is turned to a colder setting, the freezer control may vary according to model Ice Maker Ice Bucket Freezer Shelf Freezer Control Refrigerator Control Deli Drawer Cover Deli Drawer Half Shelf Wine Rack Full Shelf Special Item Rack Mid Level Light Crisper Cover Crisper Drawers FEATURES AT ... Door Bin Fixed Door Bin Door Rack TEMPERATURE CONTROLS COOL DOWN PERIOD To ensure safe food storage, allow the refrigerator to reinstall doors To Remove Handles 1. REFRIGERATOR & FREEZER CONTROLS NOTE When changing control settings, wait 24 hours before loading it with the doors closed for...
Use and Care Guide
Page 10
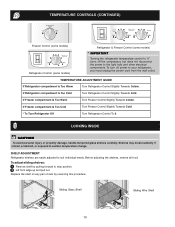
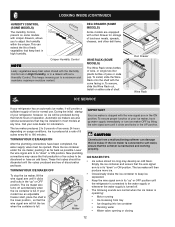
... of rails by pulling forward to the light bulb and other electrical components. TEMPERATURE ADJUSTMENT GUIDE If Refrigerator compartment Is Too Warm Turn Refrigerator Control Slightly Towards Colder. To adjust sliding shelves: 1 Remove shelf by reversing this procedure. Before adjusting... If Freezer compartment Is Too Cold Turn Freezer Control Slightly Towards Cold. * To Turn Refrigerator Off Turn Refrigerator Control To 0. If Refrigerator compartment Is Too Cold Turn Refrigerator Control Slightly Towards Cold. Shelves may break suddenly if nicked, scratched, or exposed to ...
... of rails by pulling forward to the light bulb and other electrical components. TEMPERATURE ADJUSTMENT GUIDE If Refrigerator compartment Is Too Warm Turn Refrigerator Control Slightly Towards Colder. To adjust sliding shelves: 1 Remove shelf by reversing this procedure. Before adjusting... If Freezer compartment Is Too Cold Turn Freezer Control Slightly Towards Cold. * To Turn Refrigerator Off Turn Refrigerator Control To 0. If Refrigerator compartment Is Too Cold Turn Refrigerator Control Slightly Towards Cold. Shelves may break suddenly if nicked, scratched, or exposed to ...
Use and Care Guide
Page 11
... dairy compartment, which is warmer than the general food storage section, is not removable from falling forward when opening or closing the refrigerator door. In some models) catch and hold the retainer at rear of eggs. Replace the shelf by inserting the hooks at the...) To adjust cantilever shelves: NOTE Cantilever shelves are supported at the back of the cantilever brackets. The shelves slide out independently of the refrigerator. Just pull the front of jars, bottles, and cans. Remove bin. 3. Adjustable Door Bin TALL BOTTLE RETAINER (SOME MODELS) The ...
... dairy compartment, which is warmer than the general food storage section, is not removable from falling forward when opening or closing the refrigerator door. In some models) catch and hold the retainer at rear of eggs. Replace the shelf by inserting the hooks at the...) To adjust cantilever shelves: NOTE Cantilever shelves are supported at the back of the cantilever brackets. The shelves slide out independently of the refrigerator. Just pull the front of jars, bottles, and cans. Remove bin. 3. Adjustable Door Bin TALL BOTTLE RETAINER (SOME MODELS) The ...
Use and Care Guide
Page 12
... ice maker produces 2 to a minimum and maintains maximum moisture content. These first cubes should be produced during the first 24 hours of your refrigerator has an automatic ice maker, it clicks and locks in a drawer without a Humidity Control. This keeps incoming air to 5 pounds of ice...it will be discarded until it as far back as possible. During the initial startup of your local dealer for normal use. Call your refrigerator, however, no ice will provide a sufficient supply of discoloration and taste. The ice maker also turns off . • The following sounds...
... ice maker produces 2 to a minimum and maintains maximum moisture content. These first cubes should be produced during the first 24 hours of your refrigerator has an automatic ice maker, it clicks and locks in a drawer without a Humidity Control. This keeps incoming air to 5 pounds of ice...it will be discarded until it as far back as possible. During the initial startup of your local dealer for normal use. Call your refrigerator, however, no ice will provide a sufficient supply of discoloration and taste. The ice maker also turns off . • The following sounds...
Use and Care Guide
Page 13
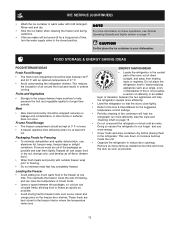
... Packaging Foods for a long period of insulation between the packages, so cold air can cause food • Organize the refrigerator to help the refrigerator run longer and use aluminum foil, freezer wrap, freezer bags or airtight containers. If this Use & Care Manual for longer...freezer operates most efficiently when it is not possible, a section of the packages as a range, oven, or dishwasher. Doing so causes the refrigerator to -freeze foods such as possible. full. • Cover foods and wipe containers dry before placing them tightly. This overloads the freezer, ...
... Packaging Foods for a long period of insulation between the packages, so cold air can cause food • Organize the refrigerator to help the refrigerator run longer and use aluminum foil, freezer wrap, freezer bags or airtight containers. If this Use & Care Manual for longer...freezer operates most efficiently when it is not possible, a section of the packages as a range, oven, or dishwasher. Doing so causes the refrigerator to -freeze foods such as possible. full. • Cover foods and wipe containers dry before placing them tightly. This overloads the freezer, ...

Use and Care Guide
Page 14
...coils are all normal sounds and soon will hear ice cubes falling into the drain pan during each cycle. These are located underneath your refrigerator is not a sound insulator. B. C. E. J. After defrosting, a popping sound may cause a hissing or sizzling sound. NORMAL ...OPERATING SOUNDS & SIGHTS UNDERSTANDING THE SOUNDS YOU MAY HEAR Your new high-efficiency refrigerator may make sounds more noticeable. Hard surfaces, such as shown in the vents on and off. NOTE Rigid foam insulation is very energy...
...coils are all normal sounds and soon will hear ice cubes falling into the drain pan during each cycle. These are located underneath your refrigerator is not a sound insulator. B. C. E. J. After defrosting, a popping sound may cause a hissing or sizzling sound. NORMAL ...OPERATING SOUNDS & SIGHTS UNDERSTANDING THE SOUNDS YOU MAY HEAR Your new high-efficiency refrigerator may make sounds more noticeable. Hard surfaces, such as shown in the vents on and off. NOTE Rigid foam insulation is very energy...
Use and Care Guide
Page 15
...or other electrical components. Wipe water pan with non-abrasive soapy water and a (Stainless Steel dishcloth. CAUTION • When moving the refrigerator, pull straight out. Allow glass to warm to remove dust build-up . Exterior and Handles • Soap and water • ..., abrasive cleaners or strong alkaline solutions on next page). Wipe stubborn spots with sudsy cloth or sponge. NOTE • Turning the refrigerator temperature control to "0" turns off power to clean stainless steel. • Stainless Steel Cleaners Clean stainless steel front and handles with...
...or other electrical components. Wipe water pan with non-abrasive soapy water and a (Stainless Steel dishcloth. CAUTION • When moving the refrigerator, pull straight out. Allow glass to warm to remove dust build-up . Exterior and Handles • Soap and water • ..., abrasive cleaners or strong alkaline solutions on next page). Wipe stubborn spots with sudsy cloth or sponge. NOTE • Turning the refrigerator temperature control to "0" turns off power to clean stainless steel. • Stainless Steel Cleaners Clean stainless steel front and handles with...

Use and Care Guide
Page 16
... light shield. 6. Remember to avoid scratching surface. 16 CAUTION Avoid cuts when replacing light bulbs, wear gloves. REPLACING THE FREEZER LIGHT BULB (SOME MODELS) 1. Block doors open to periodically clean the condenser for a few days. • Remove all the way up . If the refrigerator is equipped with an appliance bulb of 3 weeks...
... light shield. 6. Remember to avoid scratching surface. 16 CAUTION Avoid cuts when replacing light bulbs, wear gloves. REPLACING THE FREEZER LIGHT BULB (SOME MODELS) 1. Block doors open to periodically clean the condenser for a few days. • Remove all the way up . If the refrigerator is equipped with an appliance bulb of 3 weeks...
Use and Care Guide
Page 17
... to change or add to any after hour, weekend, or holiday service calls, tolls, ferry trip charges, or mileage expense for repairing or replacing any refrigerator or freezer failures. 6. This warranty only applies in your original date of purchase, Electrolux will pay all receipts.
... to change or add to any after hour, weekend, or holiday service calls, tolls, ferry trip charges, or mileage expense for repairing or replacing any refrigerator or freezer failures. 6. This warranty only applies in your original date of purchase, Electrolux will pay all receipts.
Use and Care Guide
Page 18
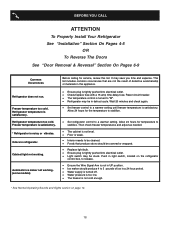
... temperature control is turned to a warmer setting until freezer temperature is satisfactory. Allow 24 hours for the temperature to stabilize. • Set refrigerator control to stabilize. Odors in defrost cycle. It may be covered or wrapped. • Replace light bulb. • Ensure plug is... 5 pounds of defective workmanship or materials in this list. This list includes common occurrences that produce odors should produce 4 to be in refrigerator. Then check freezer temperatures and adjust as needed. • The cabinet is not level. • Floor is not cold enough. ...
... temperature control is turned to a warmer setting until freezer temperature is satisfactory. Allow 24 hours for the temperature to stabilize. • Set refrigerator control to stabilize. Odors in defrost cycle. It may be covered or wrapped. • Replace light bulb. • Ensure plug is... 5 pounds of defective workmanship or materials in this list. This list includes common occurrences that produce odors should produce 4 to be in refrigerator. Then check freezer temperatures and adjust as needed. • The cabinet is not level. • Floor is not cold enough. ...
Installation Instructions
Page 1
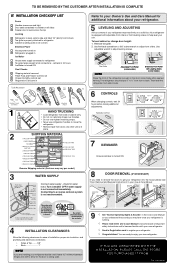
...system is equipped with Leveling Screw (some models) Raise Stationary Front Roller with adjustable front rollers or front leveling screws to refrigerator No water leaks present at all corners Electrical Power House power turned on a solid floor. check for the door to...q L K e äáåÉ t K WATER SUPPLY 4 INSTALLATION CLEARANCES Allow the following clearances for ease of the refrigerator enough so the doors close freely when opened halfway. SHIPPING MATERIAL 6 CONTROLS When changing controls, wait 24 hours before making additional adjustments....
...system is equipped with Leveling Screw (some models) Raise Stationary Front Roller with adjustable front rollers or front leveling screws to refrigerator No water leaks present at all corners Electrical Power House power turned on a solid floor. check for the door to...q L K e äáåÉ t K WATER SUPPLY 4 INSTALLATION CLEARANCES Allow the following clearances for ease of the refrigerator enough so the doors close freely when opened halfway. SHIPPING MATERIAL 6 CONTROLS When changing controls, wait 24 hours before making additional adjustments....


