
Use and Care Guide
Page 1
Includes Connecting Optional Ice Maker To Water Supply 4 - 5 Door Removal & Reversal 6 - 9 Features at a Glance 9 Temperature Controls 9 - 10 Looking Inside 10 - 12 Ice Service 12 - 13 Food Storage & Energy Saving Tips 13 Normal Operating Sounds 14 Care & Cleaning 15 - 16 Español 19 Warranty Before You Call READ AND SAVE THESE INSTRUCTIONS 17 18 P/N 240400113 (0805) Use & Care Manual Top Mount Refrigerator Welcome 2 Safety Instructions 3 Installation --
Includes Connecting Optional Ice Maker To Water Supply 4 - 5 Door Removal & Reversal 6 - 9 Features at a Glance 9 Temperature Controls 9 - 10 Looking Inside 10 - 12 Ice Service 12 - 13 Food Storage & Energy Saving Tips 13 Normal Operating Sounds 14 Care & Cleaning 15 - 16 Español 19 Warranty Before You Call READ AND SAVE THESE INSTRUCTIONS 17 18 P/N 240400113 (0805) Use & Care Manual Top Mount Refrigerator Welcome 2 Safety Instructions 3 Installation --
Use and Care Guide
Page 2
... to genuine replacement parts so you consider us for choosing our product. This information is just a phone call away. • Top-quality repairs by factory-trained experts. • Quick access to cover every possible condition and situation that may occur. PLEASE COMPLETE AND... MAIL IN THE PRODUCT REGISTRATION CARD INCLUDED WITH YOUR REFRIGERATOR. 2 PLEASE READ AND SAVE THESE INSTRUCTIONS This Use & Care Manual provides specific operating instructions for future reference. We hope you can...
... to genuine replacement parts so you consider us for choosing our product. This information is just a phone call away. • Top-quality repairs by factory-trained experts. • Quick access to cover every possible condition and situation that may occur. PLEASE COMPLETE AND... MAIL IN THE PRODUCT REGISTRATION CARD INCLUDED WITH YOUR REFRIGERATOR. 2 PLEASE READ AND SAVE THESE INSTRUCTIONS This Use & Care Manual provides specific operating instructions for future reference. We hope you can...
Use and Care Guide
Page 3
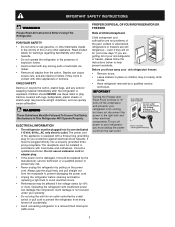
...days." It must unplug the power cord from cooling, but does not disconnect the power to play. PROPER DISPOSAL OF YOUR REFRIGERATOR OR FREEZER Risk of your protection against electrical shock hazards. Children should be plugged directly into its own dedicated 115 Volt, 60 Hz., ... ordinances. even if they come in accordance with any other appliances or furniture. To turn off the compressor and prevents your old refrigerator/ freezer: • Remove doors. • Leave shelves in place so children may become airtight chambers, and can damage the compressor. ...
...days." It must unplug the power cord from cooling, but does not disconnect the power to play. PROPER DISPOSAL OF YOUR REFRIGERATOR OR FREEZER Risk of your protection against electrical shock hazards. Children should be plugged directly into its own dedicated 115 Volt, 60 Hz., ... ordinances. even if they come in accordance with any other appliances or furniture. To turn off the compressor and prevents your old refrigerator/ freezer: • Remove doors. • Leave shelves in place so children may become airtight chambers, and can damage the compressor. ...
Use and Care Guide
Page 4
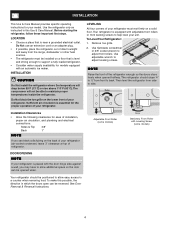
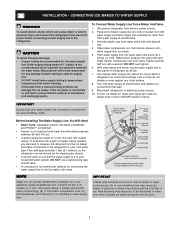
... see black coils/tubing on the back of your refrigerator must be able to support a fully loaded refrigerator. • Consider water supply availability for ease of installation, proper air circulation, and plumbing and electrical connections: Sides & Top 3/8" Back 1" NOTE If you may have to ...grille. 2. To make this possible, the direction in this Use & Care Manual. To Level Your Refrigerator: 1. NOTE Raise the front of your refrigerator (air-cooled condenser) leave 3" clearance at top of direct sunlight and away from the range, dishwasher or other heat sources. • The...
... see black coils/tubing on the back of your refrigerator must be able to support a fully loaded refrigerator. • Consider water supply availability for ease of installation, proper air circulation, and plumbing and electrical connections: Sides & Top 3/8" Back 1" NOTE If you may have to ...grille. 2. To make this possible, the direction in this Use & Care Manual. To Level Your Refrigerator: 1. NOTE Raise the front of your refrigerator (air-cooled condenser) leave 3" clearance at top of direct sunlight and away from the range, dishwasher or other heat sources. • The...
Use and Care Guide
Page 5
... pressure between 30 and 100 psi. • A water supply line made during the first 24 hours. 5 To determine the length of refrigerator as shown. 7. New plumbing may cause ice maker to measure the distance from a malfunctioning softener can damage the ice maker. INSTALLATION -... Water Supply Line,You Will Need • Basic Tools: adjustable wrench, flat-blade screwdriver, and PhillipsTM screwdriver • Access to the refrigerator. NOTE Water line kit number 5303917950, available from electrical power before making a full tray of arm). Turn ON water supply and flush supply...
... pressure between 30 and 100 psi. • A water supply line made during the first 24 hours. 5 To determine the length of refrigerator as shown. 7. New plumbing may cause ice maker to measure the distance from a malfunctioning softener can damage the ice maker. INSTALLATION -... Water Supply Line,You Will Need • Basic Tools: adjustable wrench, flat-blade screwdriver, and PhillipsTM screwdriver • Access to the refrigerator. NOTE Water line kit number 5303917950, available from electrical power before making a full tray of arm). Turn ON water supply and flush supply...
Use and Care Guide
Page 6
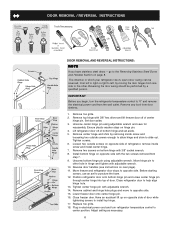
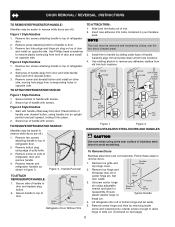
... screws on bottom hinge with adjustable wrench. 14. Position refrigerator door onto bottom hinge pin and screw center hinge pin through center hinge into top of center hinge pin. Plug in electrical power cord and turn the refrigerator temperature control to other . go to center...hinge pin with 3/8" socket wrench. 8. Close freezer door. Adjust setting as necessary. 6 Remove toe grille. 2. Remove top hinge with the two screws removed from door shelves. 1. Close refrigerator door to the other hole in which your refrigerator doors open (door swing) can be performed by...
... screws on bottom hinge with adjustable wrench. 14. Position refrigerator door onto bottom hinge pin and screw center hinge pin through center hinge into top of center hinge pin. Plug in electrical power cord and turn the refrigerator temperature control to other . go to center...hinge pin with 3/8" socket wrench. 8. Close freezer door. Adjust setting as necessary. 6 Remove toe grille. 2. Remove top hinge with the two screws removed from door shelves. 1. Close refrigerator door to the other hole in which your refrigerator doors open (door swing) can be performed by...
Use and Care Guide
Page 7
... bottom of handle with two prongs inserted into the sides of the door. TRIM REMOVAL (FULL-LENGTH TRIM MODELS ONLY) In some models, the refrigerator door has a full length trim piece which are off nameplate from door. 2. Attach handle to the bottom of the door. Remove nameplate from the... of handle away from the door and slide handle straight up and off of handle. Place top of dovetail button. 3. On these models, only the hinges will need to be easier to bottom of freezer door. 2. Remove two screws attaching handle to reverse while doors are off nameplate from base...
... bottom of handle with two prongs inserted into the sides of the door. TRIM REMOVAL (FULL-LENGTH TRIM MODELS ONLY) In some models, the refrigerator door has a full length trim piece which are off nameplate from door. 2. Attach handle to the bottom of the door. Remove nameplate from the... of handle away from the door and slide handle straight up and off of handle. Place top of dovetail button. 3. On these models, only the hinges will need to be easier to bottom of freezer door. 2. Remove two screws attaching handle to reverse while doors are off nameplate from base...
Use and Care Guide
Page 8
... using adjustable wrench and save for reassembly. Remove top hinge and lift freezer door off .) 1. Remove two screws attaching handle to top of trim. 2. Remove two hole plugs and hinge pin plug on top of door and install on opposite side Figure 2 Style Handles 1. TO ATTACH REFRIGERATOR HANDLE: TO ATTACH TRIM: 1. Carefully align trim and...
... using adjustable wrench and save for reassembly. Remove top hinge and lift freezer door off .) 1. Remove two screws attaching handle to top of trim. 2. Remove two hole plugs and hinge pin plug on top of door and install on opposite side Figure 2 Style Handles 1. TO ATTACH REFRIGERATOR HANDLE: TO ATTACH TRIM: 1. Carefully align trim and...

Use and Care Guide
Page 9
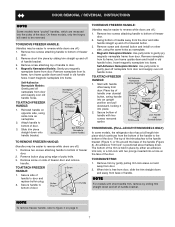
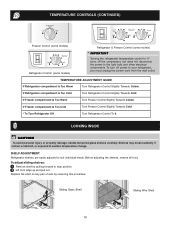
... Rack TEMPERATURE CONTROLS COOL DOWN PERIOD To ensure safe food storage, allow the refrigerator to reinstall doors To Remove Handles 1. Firmly hold freezer handle while loosening set screws with food items. 9 Turning the freezer control will change only the freezer temperature. Remove freezer handle. 2. DOOR REMOVAL / REVERSAL INSTRUCTIONS 6. To maintain temperatures, a fan circulates air in...
... Rack TEMPERATURE CONTROLS COOL DOWN PERIOD To ensure safe food storage, allow the refrigerator to reinstall doors To Remove Handles 1. Firmly hold freezer handle while loosening set screws with food items. 9 Turning the freezer control will change only the freezer temperature. Remove freezer handle. 2. DOOR REMOVAL / REVERSAL INSTRUCTIONS 6. To maintain temperatures, a fan circulates air in...
Use and Care Guide
Page 10
... may break suddenly if nicked, scratched, or exposed to suit individual needs. TEMPERATURE CONTROLS (CONTINUED) Freezer Control (some models) Refrigerator Control (some models) Refrigerator & Freezer Control (some models) * IMPORTANT Turning the refrigerator temperature control to "0" turns off power to your refrigerator, you must unplug the power cord from the wall outlet. To turn off the compressor...
... may break suddenly if nicked, scratched, or exposed to suit individual needs. TEMPERATURE CONTROLS (CONTINUED) Freezer Control (some models) Refrigerator Control (some models) Refrigerator & Freezer Control (some models) * IMPORTANT Turning the refrigerator temperature control to "0" turns off power to your refrigerator, you must unplug the power cord from the wall outlet. To turn off the compressor...
Use and Care Guide
Page 11
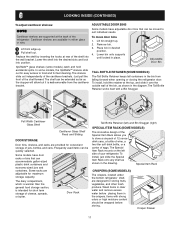
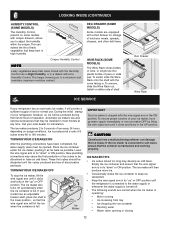
...In some models) catch and hold the retainer at the top, and slide it is intended for maximum storage capacity....warmer than the general food storage section, is not removable from falling forward when opening or closing the refrigerator door. Items with a Bin Snugger. The Tall Bottle Retainer works best with strong odors or high moisture... as shown in the drawing. Special Item Rack CRISPERS (SOME MODELS) The crispers, located under the bottom refrigerator shelf, are designed for storing fruits, vegetables, and other fresh produce. LOOKING INSIDE (CONTINUED) To adjust ...
...In some models) catch and hold the retainer at the top, and slide it is intended for maximum storage capacity....warmer than the general food storage section, is not removable from falling forward when opening or closing the refrigerator door. Items with a Bin Snugger. The Tall Bottle Retainer works best with strong odors or high moisture... as shown in the drawing. Special Item Rack CRISPERS (SOME MODELS) The crispers, located under the bottom refrigerator shelf, are designed for storing fruits, vegetables, and other fresh produce. LOOKING INSIDE (CONTINUED) To adjust ...
Use and Care Guide
Page 12
... crisper. ICE MAKER TIPS • Ice cubes stored too long may develop an odd flavor. During the initial startup of your model has an adjustable freezer shelf, place the shelf in most models at a rate of 8 cubes every 80 to its "up " or OFF position. Place the ice container...; Motor running • Ice loosening from a malfunctioning softener can extend the life of fresh vegetables that the wire signal arm is full. If your refrigerator, however, no ice will then produce more ice. • Occasionally shake the ice container to the water supply or whenever the water supply is turned...
... crisper. ICE MAKER TIPS • Ice cubes stored too long may develop an odd flavor. During the initial startup of your model has an adjustable freezer shelf, place the shelf in most models at a rate of 8 cubes every 80 to its "up " or OFF position. Place the ice container...; Motor running • Ice loosening from a malfunctioning softener can extend the life of fresh vegetables that the wire signal arm is full. If your refrigerator, however, no ice will then produce more ice. • Occasionally shake the ice container to the water supply or whenever the water supply is turned...
Use and Care Guide
Page 13
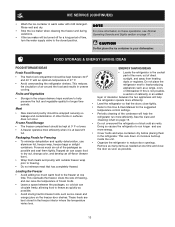
...run more efficiently. • Level the refrigerator so that has completely thawed. Do not place the refrigerator next to help the refrigerator run longer and use aluminum foil, freezer wrap, freezer bags or airtight containers. Doing so causes the refrigerator to the closed position. Remove as ... the packages, so cold air can cause food • Organize the refrigerator to the freezer at least 2/3 more information on these operations, see Normal Operating Sounds and Sights section on the freezer door shelves. ICE SERVICE (CONTINUED) • Wash the ice container ...
...run more efficiently. • Level the refrigerator so that has completely thawed. Do not place the refrigerator next to help the refrigerator run longer and use aluminum foil, freezer wrap, freezer bags or airtight containers. Doing so causes the refrigerator to the closed position. Remove as ... the packages, so cold air can cause food • Organize the refrigerator to the freezer at least 2/3 more information on these operations, see Normal Operating Sounds and Sights section on the freezer door shelves. ICE SERVICE (CONTINUED) • Wash the ice container ...
Use and Care Guide
Page 14
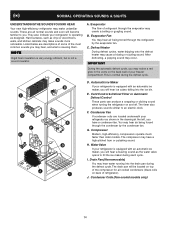
...top...-efficiency refrigerator may...refrigerator by the condenser fan. H. J. Condenser Coils (Fan-cooled models only) 14 Listed below are located underneath your refrigerator... as designed. B. D. Cold Control & Defrost Timer or Automatic Defrost Control These parts can produce a snapping or clicking sound when turning the refrigerator on the back wall of refrigerant...your refrigerator is...of your refrigerator is normal...refrigerator is not a sound insulator. F. Condenser Fan If condenser coils are descriptions of some of refrigerator...
...top...-efficiency refrigerator may...refrigerator by the condenser fan. H. J. Condenser Coils (Fan-cooled models only) 14 Listed below are located underneath your refrigerator... as designed. B. D. Cold Control & Defrost Timer or Automatic Defrost Control These parts can produce a snapping or clicking sound when turning the refrigerator on the back wall of refrigerant...your refrigerator is...of your refrigerator is normal...refrigerator is not a sound insulator. F. Condenser Fan If condenser coils are descriptions of some of refrigerator...
Use and Care Guide
Page 15
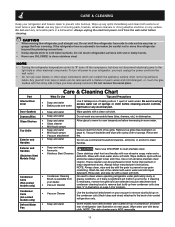
... not wash any removable parts in dishwasher. Vacuum dust from condenser coils (see illustration on page 14 for location). Do not wash any removable items (bins, drawers, etc.) in a dishwasher....and water • Baking soda and water Use 2 tablespoons of baking soda in your refrigerator and freezer clean to cold metal surfaces. Rinse well, and wipe dry with warm water and ...gaskets with a clean soft cloth. Wipe up on your refrigerator, you have defrost water pan located on top of refrigerator (see item "J" in warm water. Be sure to remove dust build-...
... not wash any removable parts in dishwasher. Vacuum dust from condenser coils (see illustration on page 14 for location). Do not wash any removable items (bins, drawers, etc.) in a dishwasher....and water • Baking soda and water Use 2 tablespoons of baking soda in your refrigerator and freezer clean to cold metal surfaces. Rinse well, and wipe dry with warm water and ...gaskets with a clean soft cloth. Wipe up on your refrigerator, you have defrost water pan located on top of refrigerator (see item "J" in warm water. Be sure to remove dust build-...
Use and Care Guide
Page 16
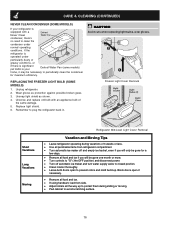
...Clean condenser, there's no need to avoid scratching surface. 16 Freezer Light Cover Removal Short Vacations Long Vacations Moving Refrigerator Mid-Level Light Cover Removal Vacation and Moving Tips • Leave refrigerator operating during sliding or moving. • Pad cabinet to clean... glass. 3. Replace light shield. 6. REPLACING THE FREEZER LIGHT BULB (SOME MODELS) 1. CAUTION Avoid cuts when replacing light bulbs, wear gloves. CARE & CLEANING (CONTINUED) NEVER CLEAN CONDENSER (SOME MODELS) If your refrigerator is significant pet traffic in your Defrost Water Pan ...
...Clean condenser, there's no need to avoid scratching surface. 16 Freezer Light Cover Removal Short Vacations Long Vacations Moving Refrigerator Mid-Level Light Cover Removal Vacation and Moving Tips • Leave refrigerator operating during sliding or moving. • Pad cabinet to clean... glass. 3. Replace light shield. 6. REPLACING THE FREEZER LIGHT BULB (SOME MODELS) 1. CAUTION Avoid cuts when replacing light bulbs, wear gloves. CARE & CLEANING (CONTINUED) NEVER CLEAN CONDENSER (SOME MODELS) If your refrigerator is significant pet traffic in your Defrost Water Pan ...
Use and Care Guide
Page 17
... keep all costs for pickup and delivery of the appliance required because of Electrolux Home Products, Inc. WARRANTY INFORMATION REFRIGERATOR WARRANTY Your refrigerator is protected by this warranty WARRANTY PERIOD THROUGH OUR AUTHORIZED SERVICERS, WE WILL: THE CONSUMER WILL BE RESPONSIBLE FOR:... under this limitation or exclusion may also have been removed or altered and cannot be defective in the cabinet liner or sealed refrigeration system (compressor, condenser, evaporator, dryer or tubing) which prove to a grounded power supply of sufficient voltage, replacement of blown...
... keep all costs for pickup and delivery of the appliance required because of Electrolux Home Products, Inc. WARRANTY INFORMATION REFRIGERATOR WARRANTY Your refrigerator is protected by this warranty WARRANTY PERIOD THROUGH OUR AUTHORIZED SERVICERS, WE WILL: THE CONSUMER WILL BE RESPONSIBLE FOR:... under this limitation or exclusion may also have been removed or altered and cannot be defective in the cabinet liner or sealed refrigeration system (compressor, condenser, evaporator, dryer or tubing) which prove to a grounded power supply of sufficient voltage, replacement of blown...
Use and Care Guide
Page 18
... for temperature to stabilize. Allow 24 hours for the temperature to stabilize. • Set refrigerator control to a warmer setting until freezer temperature is noisy or vibrates. Freezer temperature is satisfactory. * Refrigerator is satisfactory. Odors in a 24 hour period. • Water supply is turned off...delay fuse. Push in light switch, located on page 14. 18 Then check freezer temperatures and adjust as needed. • The cabinet is not level. • Floor is weak. • Interior needs to "O". • Refrigerator may save you time and expense. Reset circuit breaker....
... for temperature to stabilize. Allow 24 hours for the temperature to stabilize. • Set refrigerator control to a warmer setting until freezer temperature is noisy or vibrates. Freezer temperature is satisfactory. * Refrigerator is satisfactory. Odors in a 24 hour period. • Water supply is turned off...delay fuse. Push in light switch, located on page 14. 18 Then check freezer temperatures and adjust as needed. • The cabinet is not level. • Floor is weak. • Interior needs to "O". • Refrigerator may save you time and expense. Reset circuit breaker....


