
Installation Instructions (All Languages)
Page 2
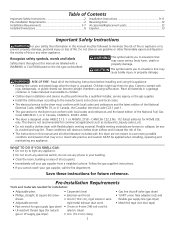
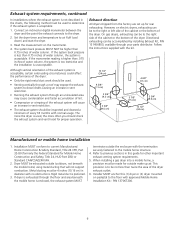
... inaccessible to situations that may cause bodily injury or property damage. - drivers • Adjustable wrench • Pipe wrench for gas supply (gas dryer) • LP-resistant thread tape (for installation: • Adjustable pliers • Phillips, straight, & square bit screw- rigid metal exhaust .... Recognize safety symbols, words and labels Safety items throughout this manual are adapters (x2) and flexible gas supply line (gas dryer) • Metal foil tape (not duct tape) 2 Read all occupants. • Immediately call your gas supplier, call the &#...
... inaccessible to situations that may cause bodily injury or property damage. - drivers • Adjustable wrench • Pipe wrench for gas supply (gas dryer) • LP-resistant thread tape (for installation: • Adjustable pliers • Phillips, straight, & square bit screw- rigid metal exhaust .... Recognize safety symbols, words and labels Safety items throughout this manual are adapters (x2) and flexible gas supply line (gas dryer) • Metal foil tape (not duct tape) 2 Read all occupants. • Immediately call your gas supplier, call the &#...
Installation Instructions (All Languages)
Page 3
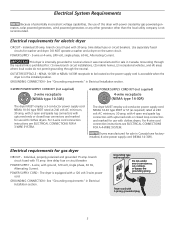
...60 Hz, Alternating Current. OUTLET RECEPTACLE - For 3-wire cord connection instructions see ELECTRICAL CONNECTIONS FOR A 4-WIRE SYSTEM. The dryer is not recommended. Grounding type wall receptacle Do not, under any other generator other than the local utility company is equipped with... "Grounding requirements" in the installed position. Electrical System Requirements Because of potentially inconsistent voltage capabilities, the use of this dryer with 3-prong grounded plug 3 Individual, properly polarized and grounded 15 amp. time delay fuse or circuit breaker. Individual 30...
...60 Hz, Alternating Current. OUTLET RECEPTACLE - For 3-wire cord connection instructions see ELECTRICAL CONNECTIONS FOR A 4-WIRE SYSTEM. The dryer is not recommended. Grounding type wall receptacle Do not, under any other generator other than the local utility company is equipped with... "Grounding requirements" in the installed position. Electrical System Requirements Because of potentially inconsistent voltage capabilities, the use of this dryer with 3-prong grounded plug 3 Individual, properly polarized and grounded 15 amp. time delay fuse or circuit breaker. Individual 30...
Installation Instructions (All Languages)
Page 4
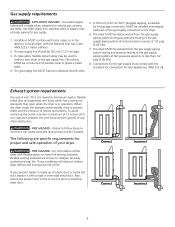
...gas supply line. Correct Correct Incorrect Incorrect 4 If codes allow, flexible metal tubing may be 1/2 inch (1.27 cm) pipe. 3. The dryer MUST be isolated from the gas supply piping system during any pressure testing of any other obstruction. - FIRE HAZARD - The gas supply line should ...ow and increase the risk of the gas supply connection to natural gas, causing gas leaks. These conditions will corrode when subjected to the dryer. 6. Use ONLY black iron, stainless steel, or plastic-coated brass piping for test gauge connection, MUST be disconnected from the gas ...
...gas supply line. Correct Correct Incorrect Incorrect 4 If codes allow, flexible metal tubing may be 1/2 inch (1.27 cm) pipe. 3. The dryer MUST be isolated from the gas supply piping system during any pressure testing of any other obstruction. - FIRE HAZARD - The gas supply line should ...ow and increase the risk of the gas supply connection to natural gas, causing gas leaks. These conditions will corrode when subjected to the dryer. 6. Use ONLY black iron, stainless steel, or plastic-coated brass piping for test gauge connection, MUST be disconnected from the gas ...
Installation Instructions (All Languages)
Page 5
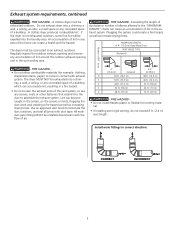
... duct to an exhaust outdoors. FIRE HAZARD - FIRE HAZARD • Do not install flexible plastic or flexible foil venting mate- A clothes dryer produces combustible lint. MAXIMUM LENGTH of 4" (10.2cm) Rigid Metal Duct VENT HOOD TYPE (Preferred) Number of a building. All male duct pipe fi..., do not exceed 8 ft. (2.4 m) duct length. Exceeding the length of duct pipe or number of elbows allowed in the exhaust system. The dryer MUST NOT be installed downstream with the flow of lint in the "MAXIMUM LENGTH" charts can cause an accumulation of air. 4" (10.2cm...
... duct to an exhaust outdoors. FIRE HAZARD - FIRE HAZARD • Do not install flexible plastic or flexible foil venting mate- A clothes dryer produces combustible lint. MAXIMUM LENGTH of 4" (10.2cm) Rigid Metal Duct VENT HOOD TYPE (Preferred) Number of a building. All male duct pipe fi..., do not exceed 8 ft. (2.4 m) duct length. Exceeding the length of duct pipe or number of elbows allowed in the exhaust system. The dryer MUST NOT be installed downstream with the flow of lint in the "MAXIMUM LENGTH" charts can cause an accumulation of air. 4" (10.2cm...
Installation Instructions (All Languages)
Page 6
... cause condensation and faster accumulation of lint. • Compression or crimping of the exhaust system will not support combustion. On gas dryers, exhausting can be exhausted outside (outdoors, not beneath the mobile home) using metal ducting that will cause an increase in the ...used. • Venting vertically through an uninsulated area may expose the exhaust system to determine if the exhaust system is acceptable: 1. Dryer MUST be to previous sections in diameter with no obstructions. Metal ducting must be accomplished by installing Exhaust Kit, P/N 131456800, available ...
... cause condensation and faster accumulation of lint. • Compression or crimping of the exhaust system will not support combustion. On gas dryers, exhausting can be exhausted outside (outdoors, not beneath the mobile home) using metal ducting that will cause an increase in the ...used. • Venting vertically through an uninsulated area may expose the exhaust system to determine if the exhaust system is acceptable: 1. Dryer MUST be to previous sections in diameter with no obstructions. Metal ducting must be accomplished by installing Exhaust Kit, P/N 131456800, available ...
Installation Instructions (All Languages)
Page 7
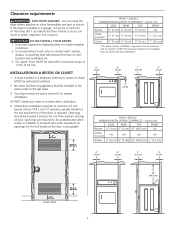
... MINIMUM INSTALLATION CLEARANCES - Openings should be exhausted outdoors. 2. A louvered door with curtains, drapes, or anything that will come in the same closet as the gas dryer. 3. Inches (cm) SIDES REAR TOP FRONT Alcove 0" (0 cm) 0" (0 cm) 16" (40.5 cm) n/a UnderCounter n/a n/a n/a n/a Closet 0" (0 cm) 0" (0 cm) 16" (40.5 cm) 1" (2.5 cm) 0" (0 cm) ...bottom of the door is required. in . (387.1cm²) 7 16" (40.5 cm) Do not install the dryer where gasoline or other fuel burning appliance shall be installed. In an area where it must be installed in contact with ...
... MINIMUM INSTALLATION CLEARANCES - Openings should be exhausted outdoors. 2. A louvered door with curtains, drapes, or anything that will come in the same closet as the gas dryer. 3. Inches (cm) SIDES REAR TOP FRONT Alcove 0" (0 cm) 0" (0 cm) 16" (40.5 cm) n/a UnderCounter n/a n/a n/a n/a Closet 0" (0 cm) 0" (0 cm) 16" (40.5 cm) 1" (2.5 cm) 0" (0 cm) ...bottom of the door is required. in . (387.1cm²) 7 16" (40.5 cm) Do not install the dryer where gasoline or other fuel burning appliance shall be installed. In an area where it must be installed in contact with ...
Installation Instructions (All Languages)
Page 8
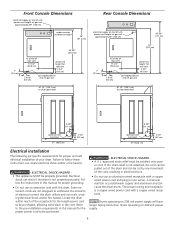
...not designed to withstand the amounts of electrical current this manual for the length power cord to the pre-installation requirements in this dryer utilizes and can be purchased, allowing some slack in the cord. Some extension cords are specific requirements for proper and safe... electrical installation of your dryer. If the strain relief is a copper wired power cord with this manual for proper grounding. • Do not use an aluminum wired...
...not designed to withstand the amounts of electrical current this manual for the length power cord to the pre-installation requirements in this dryer utilizes and can be purchased, allowing some slack in the cord. Some extension cords are specific requirements for proper and safe... electrical installation of your dryer. If the strain relief is a copper wired power cord with this manual for proper grounding. • Do not use an aluminum wired...
Installation Instructions (All Languages)
Page 9
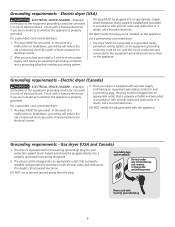
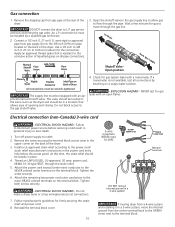
... supply cord having an equipment-grounding conductor and a grounding plug that is equipped with all local codes and ordinances. Gas dryer (USA and Canada) 1. Power cord with a licensed electrician if you wiring system, the plug MUST be run with ...result in accordance with the circuit conductors and connected to a grounded metal, permanent wiring system; For a grounded, cord-connected dryer: 1. For a permanently connected dryer: 1. Grounding requirements - DO NOT cut , remove, or bypass the grounding prong. Grounding requirements - ELECTRICAL SHOCK HAZARD - ...
... supply cord having an equipment-grounding conductor and a grounding plug that is equipped with all local codes and ordinances. Gas dryer (USA and Canada) 1. Power cord with a licensed electrician if you wiring system, the plug MUST be run with ...result in accordance with the circuit conductors and connected to a grounded metal, permanent wiring system; For a grounded, cord-connected dryer: 1. For a permanently connected dryer: 1. Grounding requirements - DO NOT cut , remove, or bypass the grounding prong. Grounding requirements - ELECTRICAL SHOCK HAZARD - ...
Installation Instructions (All Languages)
Page 10
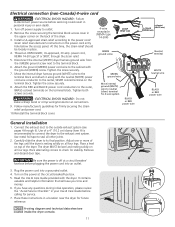
...the terminal block. ELECTRICAL SHOCK HAZARD - Turn off power supply to the terminal block. Attach the power cord neutral (center wire) conductor to dryer Shutoff Valve Open position from a 4-wire system and installing it in a 3-wire system! Follow manufacturer's guidelines for the connection. gas service...be in the gas supply line to allow gas to disconnect power source before servicing could result in the upper corner on Back of the dryer. 3. Open the shutoff valve in a location that is not available, test all pipe connections. Wait a few minutes for gas leaks ...
...the terminal block. ELECTRICAL SHOCK HAZARD - Turn off power supply to the terminal block. Attach the power cord neutral (center wire) conductor to dryer Shutoff Valve Open position from a 4-wire system and installing it in a 3-wire system! Follow manufacturer's guidelines for the connection. gas service...be in the gas supply line to allow gas to disconnect power source before servicing could result in the upper corner on Back of the dryer. 3. Open the shutoff valve in a location that is not available, test all pipe connections. Wait a few minutes for gas leaks ...
Installation Instructions (All Languages)
Page 11
...operation, please review the "Avoid Service Checklist" in your Use & Care Guide before servicing could result in a location near the dryer for firmly securing the strain relief and power cord. 10.Reinstall the terminal block cover. Turn off at connections. 9. ... breaker/ fuse box before plugging the power cord into a grounded outlet. 4. Place a level on the terminal block. Use of the dryer. Follow manufacturer's guidelines for future reference. Remove and discard door tape. Place these instructions in personal injury or even death. 1. Tighten the...
...operation, please review the "Avoid Service Checklist" in your Use & Care Guide before servicing could result in a location near the dryer for firmly securing the strain relief and power cord. 10.Reinstall the terminal block cover. Turn off at connections. 9. ... breaker/ fuse box before plugging the power cord into a grounded outlet. 4. Place a level on the terminal block. Use of the dryer. Follow manufacturer's guidelines for future reference. Remove and discard door tape. Place these instructions in personal injury or even death. 1. Tighten the...
Installation Instructions (All Languages)
Page 12
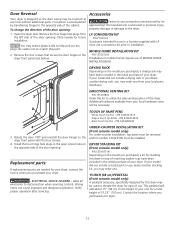
... P/N 137067200 Installations in the initial purchase of the cabinet. DIRECTIONAL VENTING KIT 3 P/N 131456800 Order this kit to the opposite side of your dryer. P/N 5303321319 Bisque Touch Up Bottle - P/N 5304414035 Black Touch Up Pen - Install the four hinge hole plugs in the open screw holes ... rack may order one . 15 INCH (38 cm) PEDESTAL (front console model only) A pedestal accessory, specifically designed for this dryer on the opposite side of use in the initial purchase of the door opening . UNDER-COUNTER INSTALLATION KIT (front console model only) For under...
... P/N 137067200 Installations in the initial purchase of the cabinet. DIRECTIONAL VENTING KIT 3 P/N 131456800 Order this kit to the opposite side of your dryer. P/N 5303321319 Bisque Touch Up Bottle - P/N 5304414035 Black Touch Up Pen - Install the four hinge hole plugs in the open screw holes ... rack may order one . 15 INCH (38 cm) PEDESTAL (front console model only) A pedestal accessory, specifically designed for this dryer on the opposite side of use in the initial purchase of the door opening . UNDER-COUNTER INSTALLATION KIT (front console model only) For under...
Complete Owner's Guide (English)
Page 2
... door opening. Important Safety Instructions Recognize safety symbols, words and labels Safety items throughout this product. 2 Your dryer may be followed to minimize the risk of fire or explosion or to prevent property damage, personal injury...Serial Number Purchase Date This Use and Care Guide provides general operating instructions for future reference. Record and retain these instructions for your dryer. Included in a safe place. Table of Contents Product Registration 2 Important Safety Instructions 2-4 Drying Procedures 4 Operating Instructions 5 Features...
... door opening. Important Safety Instructions Recognize safety symbols, words and labels Safety items throughout this product. 2 Your dryer may be followed to minimize the risk of fire or explosion or to prevent property damage, personal injury...Serial Number Purchase Date This Use and Care Guide provides general operating instructions for future reference. Record and retain these instructions for your dryer. Included in a safe place. Table of Contents Product Registration 2 Important Safety Instructions 2-4 Drying Procedures 4 Operating Instructions 5 Features...
Complete Owner's Guide (English)
Page 3
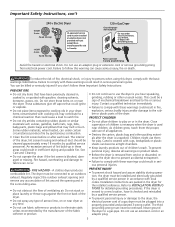
...an extension cord or an adaptor plug. 3 FIRE HAZARD - PREVENT INJURY • To prevent shock hazard and assure stability during operation, the dryer must never be cleaned approximately every 18 months by qualified service personnel. Refer to a gas pipe. The third grounding prong must ... waxes, etc. Do not store these areas could result in the surrounding area. • Do not obstruct the flow of the dryer. If the dryer is removed from electrical power cord. Some rubber materials, when heated, can become airtight chambers. • Keep laundry products out of all...
...an extension cord or an adaptor plug. 3 FIRE HAZARD - PREVENT INJURY • To prevent shock hazard and assure stability during operation, the dryer must never be cleaned approximately every 18 months by qualified service personnel. Refer to a gas pipe. The third grounding prong must ... waxes, etc. Do not store these areas could result in the surrounding area. • Do not obstruct the flow of the dryer. If the dryer is removed from electrical power cord. Some rubber materials, when heated, can become airtight chambers. • Keep laundry products out of all...
Complete Owner's Guide (English)
Page 4
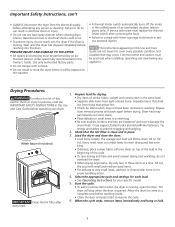
...drying and wrinkling, do not reach into the drum. The average wet load will stop before attempting any type spray cleanser when cleaning dryer interior. The dryer will fill the drum 1/3 to prevent snagging and tangling. 2. Close zippers; Tie strings and sashes to 1/2 (Mesh bag...the door. Allow the drum to come to resume the cycle. prove tumbling action. 4. Important Safety Instructions, con't • ALWAYS disconnect the dryer from those that attract lint. • Check for stains which may not have been removed in washing. Failure to the weather. • ...
...drying and wrinkling, do not reach into the drum. The average wet load will stop before attempting any type spray cleanser when cleaning dryer interior. The dryer will fill the drum 1/3 to prevent snagging and tangling. 2. Close zippers; Tie strings and sashes to 1/2 (Mesh bag...the door. Allow the drum to come to resume the cycle. prove tumbling action. 4. Important Safety Instructions, con't • ALWAYS disconnect the dryer from those that attract lint. • Check for stains which may not have been removed in washing. Failure to the weather. • ...
Complete Owner's Guide (English)
Page 5
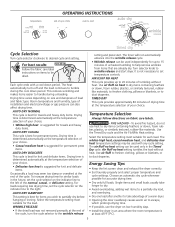
... type. Temperature Selection Always follow directions on size and dampness of your choice. To avoid fire hazard, do not use the dryer on the indicator line to partially dry before hanging or ironing. Select the temperature setting most suitable for permanent press. Energy Saving Tips ...• Keep the lint screen clean and exhaust the dryer correctly. • Sort laundry properly and select proper temperature and cycle settings. AUTO DRY NORMAL This cycle is best for towels and ...
... type. Temperature Selection Always follow directions on size and dampness of your choice. To avoid fire hazard, do not use the dryer on the indicator line to partially dry before hanging or ironing. Select the temperature setting most suitable for permanent press. Energy Saving Tips ...• Keep the lint screen clean and exhaust the dryer correctly. • Sort laundry properly and select proper temperature and cycle settings. AUTO DRY NORMAL This cycle is best for towels and ...

Complete Owner's Guide (English)
Page 6
... power cord to persons or property, comply with a reversible door. Clean the lint filter after every load. Weight should clean the dryer cabinet interior and exhaust duct. Place the front bar under the lip of lint build-up could occur. For step-by pulling straight up ...authorized servicer should not exceed 10 lbs. INSIDE • Clean the lint filter after 6 Do not tumble other items when using dryer-added fabric softener sheets. DRUM LIGHT (some models) The drum light will sound at the bottom of the cycle and periodically during loading and...
... power cord to persons or property, comply with a reversible door. Clean the lint filter after every load. Weight should clean the dryer cabinet interior and exhaust duct. Place the front bar under the lip of lint build-up could occur. For step-by pulling straight up ...authorized servicer should not exceed 10 lbs. INSIDE • Clean the lint filter after 6 Do not tumble other items when using dryer-added fabric softener sheets. DRUM LIGHT (some models) The drum light will sound at the bottom of the cycle and periodically during loading and...
Complete Owner's Guide (English)
Page 7
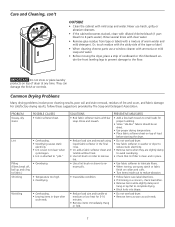
...• Use proper drying temperature. • Place fabric softener sheet on top of load before starting the dryer. • Do not overload dryer. • Use fabric softener in washer or dryer to reduce static electricity. • Remove items when they are slightly damp to complete drying. •... gritty or abrasive cleansers. • If the cabinet becomes stained, clean with ammonia or mild soap and water. • Before moving the dryer, place a strip of cardboard or thin fiberboard under the front leveling legs to prevent damage to fabric.) Shrinking • Overdrying. •...
...• Use proper drying temperature. • Place fabric softener sheet on top of load before starting the dryer. • Do not overload dryer. • Use fabric softener in washer or dryer to reduce static electricity. • Remove items when they are slightly damp to complete drying. •... gritty or abrasive cleansers. • If the cabinet becomes stained, clean with ammonia or mild soap and water. • Before moving the dryer, place a strip of cardboard or thin fiberboard under the front leveling legs to prevent damage to fabric.) Shrinking • Overdrying. •...
Complete Owner's Guide (English)
Page 8
... INSTRUCTIONS. See "Operating Instructions." See "Operating Instructions." inside of material securely around ornaand fasteners may be hitting the inside the dryer.* Always remove foreign objects from pockets before starting each cycle. Permanently attached items such as belt buckles, zippers It may be ... has been a utility interruption of Foreign objects such as cycle ends. SOLUTION Make sure the plug fits tightly in dryer too long. Reset circuit breaker or replace fuse. Check to a 208 volt circuit. See INSTALLATION INSTRUCTIONS for replacement. See ...
... INSTRUCTIONS. See "Operating Instructions." See "Operating Instructions." inside of material securely around ornaand fasteners may be hitting the inside the dryer.* Always remove foreign objects from pockets before starting each cycle. Permanently attached items such as belt buckles, zippers It may be ... has been a utility interruption of Foreign objects such as cycle ends. SOLUTION Make sure the plug fits tightly in dryer too long. Reset circuit breaker or replace fuse. Check to a 208 volt circuit. See INSTALLATION INSTRUCTIONS for replacement. See ...


