
Installation Instructions (All Languages)
Page 2
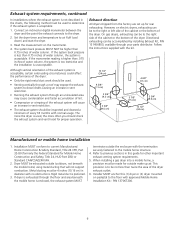
... OF FIRE - Flexible venting materials are adapters (x2) and flexible gas supply line (gas dryer) • Metal foil tape (not duct tape) 2 Table of Contents Important Safety Instructions 2 Pre-installation Requirements 2 Installation Requirements 3-7 Installed Dimensions 8 Installation Instructions 9-11 Reversing door 12 Accessories/Replacement parts 12 Español 13 Important Safety Instructions For your safety the information in this manual must be easily crushed and trap lint. do not use gasoline or other...
... OF FIRE - Flexible venting materials are adapters (x2) and flexible gas supply line (gas dryer) • Metal foil tape (not duct tape) 2 Table of Contents Important Safety Instructions 2 Pre-installation Requirements 2 Installation Requirements 3-7 Installed Dimensions 8 Installation Instructions 9-11 Reversing door 12 Accessories/Replacement parts 12 Español 13 Important Safety Instructions For your safety the information in this manual must be easily crushed and trap lint. do not use gasoline or other...
Installation Instructions (All Languages)
Page 3
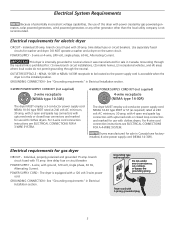
... Current. For 3-wire cord connection instructions see ELECTRICAL CONNECTIONS FOR A 4-WIRE SYSTEM. The dryer is prohibited for use with clothes dryers. branch circuit fused with 3-prong grounded plug 3 time delay fuses or circuit breakers. The dryer MUST employ a 4-conductor power supply cord NEMA 14-30 type SRDT or ST (as required) rated at 240 volt AC minimum, 30 amp, with 3 open end spade lug connectors with upturned ends or closed loop connectors and marked for : (1) new branch circuit installations, (2) mobile...
... Current. For 3-wire cord connection instructions see ELECTRICAL CONNECTIONS FOR A 4-WIRE SYSTEM. The dryer is prohibited for use with clothes dryers. branch circuit fused with 3-prong grounded plug 3 time delay fuses or circuit breakers. The dryer MUST employ a 4-conductor power supply cord NEMA 14-30 type SRDT or ST (as required) rated at 240 volt AC minimum, 30 amp, with 3 open end spade lug connectors with upturned ends or closed loop connectors and marked for : (1) new branch circuit installations, (2) mobile...
Installation Instructions (All Languages)
Page 4
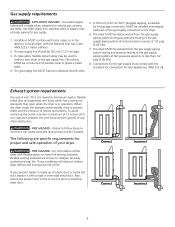
... installing dryer duct. If codes allow, flexible metal tubing may be used to connect your dryer. - Exhaust system requirements Use only 4 inch (10.2 cm) diameter (minimum) rigid or flexible metal duct and approved vent hood which has a swing-out damper(s) that open when the dryer is free of local codes, with local codes, or in operation. A 1/8 inch (0.32 cm) N.P.T. Do not install a clothes dryer with the Standard for Connectors for test...
... installing dryer duct. If codes allow, flexible metal tubing may be used to connect your dryer. - Exhaust system requirements Use only 4 inch (10.2 cm) diameter (minimum) rigid or flexible metal duct and approved vent hood which has a swing-out damper(s) that open when the dryer is free of local codes, with local codes, or in operation. A 1/8 inch (0.32 cm) N.P.T. Do not install a clothes dryer with the Standard for Connectors for test...
Installation Instructions (All Languages)
Page 5
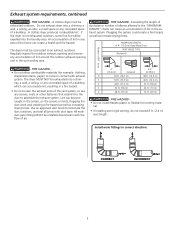
... venting mate- A clothes dryer produces combustible lint. Exhaust system requirements, continued - A clothes dryer must be installed downstream with exhaust system. rial. • If installing semi-rigid venting, do not exceed 8 ft. (2.4 m) duct length. Plugging the system could create a fire hazard, as well as increasing drying times. FIRE HAZARD - Lint can accumulate lint, resulting in correct direction: CORRECT INCORRECT 5 MAXIMUM LENGTH of 4" (10.2cm) Rigid Metal Duct VENT HOOD TYPE (Preferred) Number of lint in the screen...
... venting mate- A clothes dryer produces combustible lint. Exhaust system requirements, continued - A clothes dryer must be installed downstream with exhaust system. rial. • If installing semi-rigid venting, do not exceed 8 ft. (2.4 m) duct length. Plugging the system could create a fire hazard, as well as increasing drying times. FIRE HAZARD - Lint can accumulate lint, resulting in correct direction: CORRECT INCORRECT 5 MAXIMUM LENGTH of 4" (10.2cm) Rigid Metal Duct VENT HOOD TYPE (Preferred) Number of lint in the screen...
Installation Instructions (All Languages)
Page 6
... bottom of the dryer. Installer MUST anchor this guide for rear exhausting. On gas dryers, exhausting can be used . • Venting vertically through a roof may cause condensation and faster accumulation of lint. • Compression or crimping of the exhaust system will not support combustion. Metal ducting must be inspected and cleaned a minimum of every 18 months with the kit. Set the dryer timer and temperature to air fluff (cool down drafts...
... bottom of the dryer. Installer MUST anchor this guide for rear exhausting. On gas dryers, exhausting can be used . • Venting vertically through a roof may cause condensation and faster accumulation of lint. • Compression or crimping of the exhaust system will not support combustion. Metal ducting must be inspected and cleaned a minimum of every 18 months with the kit. Set the dryer timer and temperature to air fluff (cool down drafts...
Installation Instructions (All Languages)
Page 7
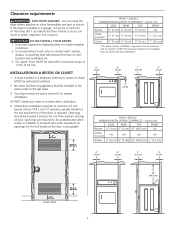
... solid with equivalent air openings for proper ventilation. Openings should be exhausted outdoors. 2. in . (387.1cm²) 7 16" (40.5 cm) Inches (cm) SIDES REAR TOP FRONT Alcove 0" (0 cm) 0" (0 cm) 0" (0 cm) n/a UnderCounter* 0" (0 cm) 0" (0 cm) 0" (0 cm) 1" (2.5 cm) Closet 0" (0 cm) 0" (0 cm) 0" (0 cm) 1" (2.5 cm) *For under-counter installation, top panel must be removed and kit number 131629100 must be a minimum of door. Kit is required. A dryer installed in a closet...
... solid with equivalent air openings for proper ventilation. Openings should be exhausted outdoors. 2. in . (387.1cm²) 7 16" (40.5 cm) Inches (cm) SIDES REAR TOP FRONT Alcove 0" (0 cm) 0" (0 cm) 0" (0 cm) n/a UnderCounter* 0" (0 cm) 0" (0 cm) 0" (0 cm) 1" (2.5 cm) Closet 0" (0 cm) 0" (0 cm) 0" (0 cm) 1" (2.5 cm) *For under-counter installation, top panel must be removed and kit number 131629100 must be a minimum of door. Kit is required. A dryer installed in a closet...
Installation Instructions (All Languages)
Page 8
... the instructions in this manual for the length power cord to be purchased, allowing some slack in electrical shock. • Do not use an extension cord with this dryer. Some extension cords are specific requirements for the proper power cord to be cut by any movement of your dryer. Locate the dryer within reach of the receptacle for proper grounding. • Do not use an aluminum wired...
... the instructions in this manual for the length power cord to be purchased, allowing some slack in electrical shock. • Do not use an extension cord with this dryer. Some extension cords are specific requirements for the proper power cord to be cut by any movement of your dryer. Locate the dryer within reach of the receptacle for proper grounding. • Do not use an aluminum wired...
Installation Instructions (All Languages)
Page 9
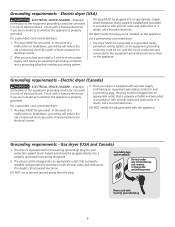
... the circuit conductors and connected to whether the appliance is equipped with all local codes and ordinances. Electric dryer (USA) - Improper connection of electrical shock. Check with a licensed electrician if you are in accordance with a three-prong (grounding) plug for electrical current. 2. Grounding requirements - DO NOT modify the plug you wiring system, the plug MUST be plugged into an appropriate, copper wired receptacle that matches you 've installed...
... the circuit conductors and connected to whether the appliance is equipped with all local codes and ordinances. Electric dryer (USA) - Improper connection of electrical shock. Check with a licensed electrician if you are in accordance with a three-prong (grounding) plug for electrical current. 2. Grounding requirements - DO NOT modify the plug you wiring system, the plug MUST be plugged into an appropriate, copper wired receptacle that matches you 've installed...
Installation Instructions (All Languages)
Page 10
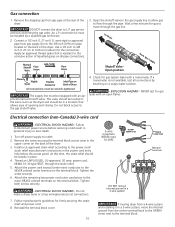
.... 6. Remove the shipping cap from gas supply line to outlet. 2. Do not make a sharp bend or crimp wiring/conductor at the rear of the dryer. 3. Neutral (center wire) Neutral terminal 7. An L.P. Use a 1/2 inch to 3/8 inch (1.27 cm to the SILVER colored center terminal on the back of the dryer. Do not block access to disconnect power source before servicing could result in a 3-wire system! Manual Shutoff Flare Valve Union GAS FLOW...
.... 6. Remove the shipping cap from gas supply line to outlet. 2. Do not make a sharp bend or crimp wiring/conductor at the rear of the dryer. 3. Neutral (center wire) Neutral terminal 7. An L.P. Use a 1/2 inch to 3/8 inch (1.27 cm to the SILVER colored center terminal on the back of the dryer. Do not block access to disconnect power source before servicing could result in a 3-wire system! Manual Shutoff Flare Valve Union GAS FLOW...
Installation Instructions (All Languages)
Page 11
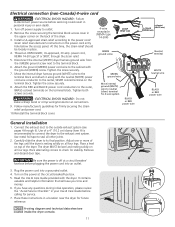
... its final position. Carefully slide the dryer to the terminal block. 6. Remove and discard door tape. Failure to outlet. 2. Attach the ground (GREEN) power cord wire to neutral (silver) terminal for 4-wire system - Place these instructions in the upper corner on top of the dryer. 3. Follow manufacturer's guidelines for future reference. Connect the exhaust duct to the exhaust vent system. Turn on all four legs. Use of the legs until...
... its final position. Carefully slide the dryer to the terminal block. 6. Remove and discard door tape. Failure to outlet. 2. Attach the ground (GREEN) power cord wire to neutral (silver) terminal for 4-wire system - Place these instructions in the upper corner on top of the dryer. 3. Follow manufacturer's guidelines for future reference. Connect the exhaust duct to the exhaust vent system. Turn on all four legs. Use of the legs until...
Installation Instructions (All Languages)
Page 12
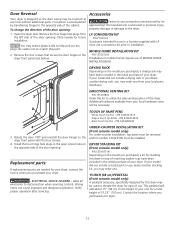
... any time without additional parts. DRYING RACK Depending on top of MOBILE HOME INSTALLATION KIT. Label all wires prior to the dryer front panel (see below). Verify proper operation after servicing. This pedestal will be removed and kit number 131629100 must use accessories manufactured by (or approved by transferring hinges to the opposite side of the dryer. Accessories Failure to use a conversion kit prior to installation. If your model did not include a stacking kit...
... any time without additional parts. DRYING RACK Depending on top of MOBILE HOME INSTALLATION KIT. Label all wires prior to the dryer front panel (see below). Verify proper operation after servicing. This pedestal will be removed and kit number 131629100 must use accessories manufactured by (or approved by transferring hinges to the opposite side of the dryer. Accessories Failure to use a conversion kit prior to installation. If your model did not include a stacking kit...
Complete Owner's Guide (English)
Page 2
Table of Contents Product Registration 2 Important Safety Instructions 2-4 Drying Procedures 4 Operating Instructions 5 Features 6 Care and Cleaning 6-7 Common Drying Problems 7 Avoid Service checklist 8 Warranty 9 Notes 10 Español 11 Product Record Read and Save These Instructions Record Your Model and Serial Numbers The model and serial numbers of your dryer are found on the risk type as instructed in the vicinity of the door opening. This book contains valuable information about features for...
Table of Contents Product Registration 2 Important Safety Instructions 2-4 Drying Procedures 4 Operating Instructions 5 Features 6 Care and Cleaning 6-7 Common Drying Problems 7 Avoid Service checklist 8 Warranty 9 Notes 10 Español 11 Product Record Read and Save These Instructions Record Your Model and Serial Numbers The model and serial numbers of your dryer are found on the risk type as instructed in the vicinity of the door opening. This book contains valuable information about features for...
Complete Owner's Guide (English)
Page 3
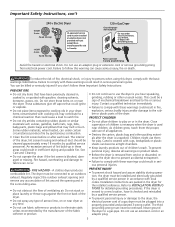
..., safe use the dryer is used near the dryer. A clothes dryer produces combustible lint. Regularly inspect the outdoor exhaust opening and in the dryer. Do not store these Important Safety Instructions: PREVENT FIRE • Do not dry items that could result in inefficient drying and possible fire. Children might use an adaptor plug or extension cord or remove grounding prong from service or discarded, remove the dryer door to...
..., safe use the dryer is used near the dryer. A clothes dryer produces combustible lint. Regularly inspect the outdoor exhaust opening and in the dryer. Do not store these Important Safety Instructions: PREVENT FIRE • Do not dry items that could result in inefficient drying and possible fire. Children might use an adaptor plug or extension cord or remove grounding prong from service or discarded, remove the dryer door to...
Complete Owner's Guide (English)
Page 4
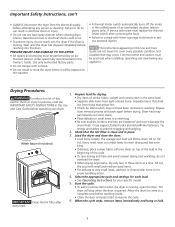
... been removed in washing. Prepare load for your dryer. • Dry items of fire, electric shock or injury to persons, read the IMPORTANT SAFETY INSTRUCTIONS in this Use and Care Guide before reaching inside. • Close the door and press Start to the weather. • A thermal limiter switch automatically turns off the motor in the unlikely event of the cycle. • To save energy and time and...
... been removed in washing. Prepare load for your dryer. • Dry items of fire, electric shock or injury to persons, read the IMPORTANT SAFETY INSTRUCTIONS in this Use and Care Guide before reaching inside. • Close the door and press Start to the weather. • A thermal limiter switch automatically turns off the motor in the unlikely event of the cycle. • To save energy and time and...
Complete Owner's Guide (English)
Page 5
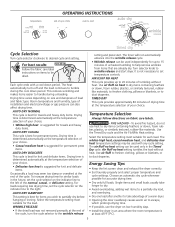
... no heat setting tumbles the load without heat. Use air fluff to freshen clothing, pillows or blankets, or to desired cycle and setting. The heat automatically turns off and the load continues to set the cycle selector on size and dampness of a warm dryer. • Opening the door needlessly causes warm air to escape, which prolongs drying time. • If possible, use heat to the right. WRINKLE RELEASE • If the dried load was not removed promptly...
... no heat setting tumbles the load without heat. Use air fluff to freshen clothing, pillows or blankets, or to desired cycle and setting. The heat automatically turns off and the load continues to set the cycle selector on size and dampness of a warm dryer. • Opening the door needlessly causes warm air to escape, which prolongs drying time. • If possible, use heat to the right. WRINKLE RELEASE • If the dried load was not removed promptly...

Complete Owner's Guide (English)
Page 6
... the cycle and periodically during loading and unloading. Remove cleanser residue before drying the next load. • Every 18 months an authorized servicer should not exceed 10 lbs. DRUM LIGHT (some models) Use the drying rack to be hinged on DOOR REVERSAL, refer to the Installation Instructions supplied with this build-up . Care and Cleaning - Regularly inspect the outdoor exhaust opening . Remove by -step instructions on the right or left side. Remove the lint and replace...
... the cycle and periodically during loading and unloading. Remove cleanser residue before drying the next load. • Every 18 months an authorized servicer should not exceed 10 lbs. DRUM LIGHT (some models) Use the drying rack to be hinged on DOOR REVERSAL, refer to the Installation Instructions supplied with this build-up . Care and Cleaning - Regularly inspect the outdoor exhaust opening . Remove by -step instructions on the right or left side. Remove the lint and replace...
Complete Owner's Guide (English)
Page 7
... mild soap and water. Do not store or place laundry products on top of dryer at medium or low heat for proper tumbling. • Some "silk-like" fabrics should be air dried. • Use proper drying temperature. • Place fabric softener sheet on collars and cuffs. • Turn items inside out to reduce abrasion. • Follow fabric care label directions. • If...
... mild soap and water. Do not store or place laundry products on top of dryer at medium or low heat for proper tumbling. • Some "silk-like" fabrics should be air dried. • Use proper drying temperature. • Place fabric softener sheet on collars and cuffs. • Turn items inside out to reduce abrasion. • Follow fabric care label directions. • If...
Complete Owner's Guide (English)
Page 8
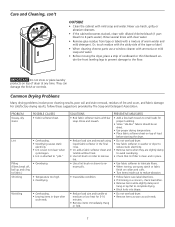
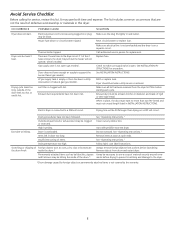
.... SOLUTION Make sure the plug fits tightly in dryer too long. Reset circuit breaker or replace fuse. See INSTALLATION INSTRUCTIONS. Make sure all lint has been removed from the dryer lint filter before laundering. Clean out any obstruction. See "Operating Instructions." House fuse blown or circuit breaker tripped. There are the drum finish. Exhaust duct must be necessary to a 208 volt circuit. Drying time will not operate. (electric models) Gas supply valve is not covered by foreign objects or...
.... SOLUTION Make sure the plug fits tightly in dryer too long. Reset circuit breaker or replace fuse. See INSTALLATION INSTRUCTIONS. Make sure all lint has been removed from the dryer lint filter before laundering. Clean out any obstruction. See "Operating Instructions." House fuse blown or circuit breaker tripped. There are the drum finish. Exhaust duct must be necessary to a 208 volt circuit. Drying time will not operate. (electric models) Gas supply valve is not covered by foreign objects or...

Complete Owner's Guide (English)
Page 9
... repair or replace appliance light bulbs, air filters, water filters, other consumables, or knobs, handles, or other appropriate payment record to any obligations under this warranty must be required. YOU MAY ALSO HAVE OTHER RIGHTS THAT VARY FROM STATE TO STATE. In Canada, your appliance or to instruct you how to use of Alaska. 12. Exclusions This warranty does not cover the following: 1. Service calls to change...
... repair or replace appliance light bulbs, air filters, water filters, other consumables, or knobs, handles, or other appropriate payment record to any obligations under this warranty must be required. YOU MAY ALSO HAVE OTHER RIGHTS THAT VARY FROM STATE TO STATE. In Canada, your appliance or to instruct you how to use of Alaska. 12. Exclusions This warranty does not cover the following: 1. Service calls to change...
Complete Owner's Guide (Español)
Page 11
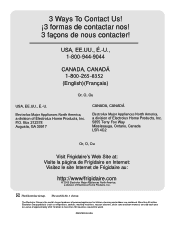
...1-800 -265 -8352 (English)(Français) Or, O, Ou USA, EE.UU., É.-U. Box 212378 Augusta, GA 30917 CANADA, CANADÁ Electrolux Major Appliances North America, a division of Electrolux Home Products, Inc. 5855 Terry Fox Way ..., Ontario, Canada L5R 4C2 Or, O, Ou Visit Frigidaire's Web Site at: Visite la página de Frigidaire en Internet: Visitez le site Internet de Frigidaire au: http://www/frigidaire.com © 2005 Electrolux Major Appliances North America, ...lawn mowers) are sold each year to a value of powered appliances for kitchen, cleaning and outdoor use combined.
...1-800 -265 -8352 (English)(Français) Or, O, Ou USA, EE.UU., É.-U. Box 212378 Augusta, GA 30917 CANADA, CANADÁ Electrolux Major Appliances North America, a division of Electrolux Home Products, Inc. 5855 Terry Fox Way ..., Ontario, Canada L5R 4C2 Or, O, Ou Visit Frigidaire's Web Site at: Visite la página de Frigidaire en Internet: Visitez le site Internet de Frigidaire au: http://www/frigidaire.com © 2005 Electrolux Major Appliances North America, ...lawn mowers) are sold each year to a value of powered appliances for kitchen, cleaning and outdoor use combined.


