

Complete Owner s Guide
Page 1
C TABLE OF CONTENTS Welcome & Congratulations 2 Setting Induction Surface Controls 10 Important Safety Instructions 3 Care & Cleaning 15 Cooktop Features 7 Before You Call 17 Before Using the Cooktop 8 Major Appliance Warranty 19 www.frigidaire.com USA 1-800-944-9044 www.frigidaire.ca Canada 1-800-265-8352 All about the Use &Care of your Cooktop A01704801 (August/ 2016) Rev.
C TABLE OF CONTENTS Welcome & Congratulations 2 Setting Induction Surface Controls 10 Important Safety Instructions 3 Care & Cleaning 15 Cooktop Features 7 Before You Call 17 Before Using the Cooktop 8 Major Appliance Warranty 19 www.frigidaire.com USA 1-800-944-9044 www.frigidaire.ca Canada 1-800-265-8352 All about the Use &Care of your Cooktop A01704801 (August/ 2016) Rev.
Complete Owner s Guide
Page 2
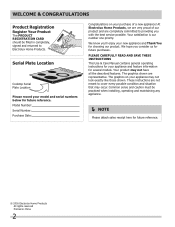
... practiced when installing, operating and maintaining any appliance. NOTE Please attach sales receipt here for several models. Your product may occur. Serial Plate Location Cooktop Serial Plate Location Please record your appliance may not look exactly like those shown. Model Number: Serial Number: Purchase Date: Congratulations on your model and...
... practiced when installing, operating and maintaining any appliance. NOTE Please attach sales receipt here for several models. Your product may occur. Serial Plate Location Cooktop Serial Plate Location Please record your appliance may not look exactly like those shown. Model Number: Serial Number: Purchase Date: Congratulations on your model and...
Complete Owner s Guide
Page 4
... materials, such as flammable liquids. Failure to the appliance. An open oven door may cause container to cause burns. Doing so may include the cooktop, surfaces facing the cooktop, oven vent areas, oven door, and oven window. 4 Smother fire or flame or use baking soda. • Use dry potholders. Build-up of...
... materials, such as flammable liquids. Failure to the appliance. An open oven door may cause container to cause burns. Doing so may include the cooktop, surfaces facing the cooktop, oven vent areas, oven door, and oven window. 4 Smother fire or flame or use baking soda. • Use dry potholders. Build-up of...
Complete Owner s Guide
Page 5
...Once the power resumes, reset the clock and the oven function. Place cookware with induction cooking. • Improper cookware may damage the cooktop. • When you are flaming foods under a ventilating hood, turn off and the appliance is equipped with caution. Only certain ...must be careful to accumulate on the induction zones. Using the proper cookware on . Contact a qualified technician immediately. • Clean cooktop glass with one or more surface units of cookware are turned off the appliance. IMPORTANT INSTRUCTIONS FOR CLEANING YOUR APPLIANCE CAUTION •...
...Once the power resumes, reset the clock and the oven function. Place cookware with induction cooking. • Improper cookware may damage the cooktop. • When you are flaming foods under a ventilating hood, turn off and the appliance is equipped with caution. Only certain ...must be careful to accumulate on the induction zones. Using the proper cookware on . Contact a qualified technician immediately. • Clean cooktop glass with one or more surface units of cookware are turned off the appliance. IMPORTANT INSTRUCTIONS FOR CLEANING YOUR APPLIANCE CAUTION •...
Complete Owner s Guide
Page 7
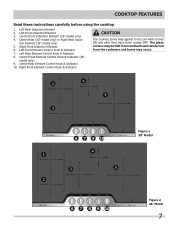
... only) 4. Left Front Element Control Knob & Indicator 7. Left Rear Induction Element 2. tion Element (36" model only) 5. Center Front Element Control Knob & Indicator (36" model only) 9. COOKTOP FEATURES Read these instructions carefully before using the cooktop 1. Center Rear Element Control Knob & Indicator 10.
... only) 4. Left Front Element Control Knob & Indicator 7. Left Rear Induction Element 2. tion Element (36" model only) 5. Center Front Element Control Knob & Indicator (36" model only) 9. COOKTOP FEATURES Read these instructions carefully before using the cooktop 1. Center Rear Element Control Knob & Indicator 10.

Complete Owner s Guide
Page 8
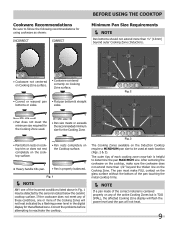
... to follow all the recommendations for Induction cooking (See Fig. 1). Check for Induction Cooking. • Use quality cookware with Induction cooktops. Be sure to protect hands from the cookware and burns may occur. Eventually the buildup of scratches will make cleaning the surface difficult...of the cookware, the material type is recommended to : • Use cookware made with the entire surface of cookware over the ceramic cooktop surface without being prepared. • Do not let pans boil dry. When purchasing pans, look for cookware specifically identified by the ...
... to follow all the recommendations for Induction cooking (See Fig. 1). Check for Induction Cooking. • Use quality cookware with Induction cooktops. Be sure to protect hands from the cookware and burns may occur. Eventually the buildup of scratches will make cleaning the surface difficult...of the cookware, the material type is recommended to : • Use cookware made with the entire surface of cookware over the ceramic cooktop surface without being prepared. • Do not let pans boil dry. When purchasing pans, look for cookware specifically identified by the ...
Complete Owner s Guide
Page 9
...145mm 5 3/4" Min. 180mm 7" Min. 100mm 3 7/8" Min. 230mm 9 1/16" Min. • Pan bottom rests on cooktop trim or does not rest completely on the cooktop surface. • Pan rests completely on the Induction Cooktop require a MINIMUM pan size to be detected by a flashing power level in Fig. 1 may be used at... affected Cooking Zone display will flash the power level and the pan will not heat indicated by the sensors located below the ceramic cooktop surface. sides. • Pan does not meet any of the incorrect conditions listed above in the digital display for that affected ...
...145mm 5 3/4" Min. 180mm 7" Min. 100mm 3 7/8" Min. 230mm 9 1/16" Min. • Pan bottom rests on cooktop trim or does not rest completely on the cooktop surface. • Pan rests completely on the Induction Cooktop require a MINIMUM pan size to be detected by a flashing power level in Fig. 1 may be used at... affected Cooking Zone display will flash the power level and the pan will not heat indicated by the sensors located below the ceramic cooktop surface. sides. • Pan does not meet any of the incorrect conditions listed above in the digital display for that affected ...
Complete Owner s Guide
Page 10
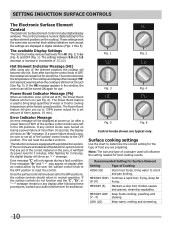
... windows (Figs. 1 thru 8). If the controls are activated and the detection system cannot find any of cookware used to bring water to OFF, the cooktop will influence the setting needed for some time. Error messages "Er" and "- -" may appear on during a fault condition. If the surface controls do... be displayed at Hi, the Power Boost feature will become very hot. Note: The size and type of the element positions the cooktop will turn on the cooktop. thicken sauces and gravies; MEDIUM LOW Keep foods cooking; LOW (LO) Keep warm, melting and simmering. 10 These settings work ...
... windows (Figs. 1 thru 8). If the controls are activated and the detection system cannot find any of cookware used to bring water to OFF, the cooktop will influence the setting needed for some time. Error messages "Er" and "- -" may appear on during a fault condition. If the surface controls do... be displayed at Hi, the Power Boost feature will become very hot. Note: The size and type of the element positions the cooktop will turn on the cooktop. thicken sauces and gravies; MEDIUM LOW Keep foods cooking; LOW (LO) Keep warm, melting and simmering. 10 These settings work ...

Complete Owner s Guide
Page 11
... or plastic wrappings on the induction surface element. 2. Potholders, towels or wooden spoons could melt or ignite. CAUTION The glass cooktop may remain on page 10. The message may appear to be sure all surface induction elements are turned off. NOTE...surface elements: the RIGHT FRONT, CENTER and REAR positions (Figure 1 and 2). SETTING INDUCTION SURFACE CONTROLS Operating the Single Induction Surface Elements The cooktop is typical only. Push in and turn the surface control knob to cooking temperature at each setting. 4. Each surface element provides a constant...
... or plastic wrappings on the induction surface element. 2. Potholders, towels or wooden spoons could melt or ignite. CAUTION The glass cooktop may remain on page 10. The message may appear to be sure all surface induction elements are turned off. NOTE...surface elements: the RIGHT FRONT, CENTER and REAR positions (Figure 1 and 2). SETTING INDUCTION SURFACE CONTROLS Operating the Single Induction Surface Elements The cooktop is typical only. Push in and turn the surface control knob to cooking temperature at each setting. 4. Each surface element provides a constant...
Complete Owner s Guide
Page 12
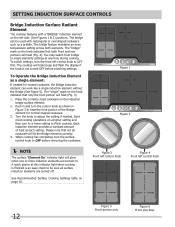
...bridge to single elements settings at this indicator light when cooking is finished is not turned OFF before removing the cookware. The cooktop will triple beep and flash the display if the knob is an easy check to OFF before switching settings. Please note that not...a higher setting and then turn the front left control knob to finish cooking. SETTING INDUCTION SURFACE CONTROLS Bridge Induction Surface Radiant Element The cooktop features with rectangular or oval shaped cookware such as a single element: If needed . The bridge feature maintains an even temperature setting across...
...bridge to single elements settings at this indicator light when cooking is finished is not turned OFF before removing the cookware. The cooktop will triple beep and flash the display if the knob is an easy check to OFF before switching settings. Please note that not...a higher setting and then turn the front left control knob to finish cooking. SETTING INDUCTION SURFACE CONTROLS Bridge Induction Surface Radiant Element The cooktop features with rectangular or oval shaped cookware such as a single element: If needed . The bridge feature maintains an even temperature setting across...

Complete Owner s Guide
Page 13
...on a higher setting and then turn the surface control knob to activate the bridge element while the left rear knob is turned OFF if the cooktop is turned OFF. Bridge element will fit the Bridge element correctly. 4. Turning on the front left knob to OFF before removing the cookware. ...cookware on the knob indicates that not all cookware will only operate by using the front left control knob Figure 6 Front plus Rear 13 The cooktop will triple beep and the display will heat. 3. SETTING INDUCTION SURFACE CONTROLS To Operate the Bridge Induction Element: 1. Turn the knob to finish...
...on a higher setting and then turn the surface control knob to activate the bridge element while the left rear knob is turned OFF if the cooktop is turned OFF. Bridge element will fit the Bridge element correctly. 4. Turning on the front left knob to OFF before removing the cookware. ...cookware on the knob indicates that not all cookware will only operate by using the front left control knob Figure 6 Front plus Rear 13 The cooktop will triple beep and the display will heat. 3. SETTING INDUCTION SURFACE CONTROLS To Operate the Bridge Induction Element: 1. Turn the knob to finish...

Complete Owner s Guide
Page 14
...cause buzzing sounds from the cookware you are made of several layers of induction generators. The buzzing sound you could hear from your cooktop is equipped with five cooking zones within 3 sections. Top quality cookware made of those generators is complete. Here are some causes of...may need to manage its cooking temperature. SETTING INDUCTION SURFACE CONTROLS Power Management In order to give you more flexibility, your induction cooktop is then transferred to the other materials in place which is equipped with more cooking zones than one cooking zone at high power ...
...cause buzzing sounds from the cookware you are made of several layers of induction generators. The buzzing sound you could hear from your cooktop is equipped with five cooking zones within 3 sections. Top quality cookware made of those generators is complete. Here are some causes of...may need to manage its cooking temperature. SETTING INDUCTION SURFACE CONTROLS Power Management In order to give you more flexibility, your induction cooktop is then transferred to the other materials in place which is equipped with more cooking zones than one cooking zone at high power ...
Complete Owner s Guide
Page 15
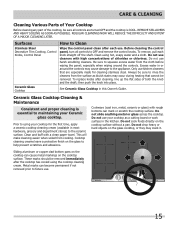
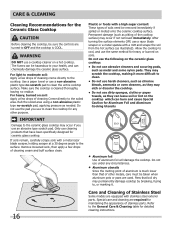
...hot, soapy water and a cloth. To remove, pull each use cleaners with a clean paper towel. Clean using the cooktop cleaning cream. Be sure to maintaining your Ceramic glass cooktop. Always be sure to rinse the cleaners from the surface as a cutting board or work surface in most hardware, ...damage to help prevent scratches and abrasions. Clean and buff with high concentrations of chlorides or chlorines. Metal marks can mark or scratch the cooktop surface. Cookware (cast iron, metal, ceramic or glass) with rough bottoms can become permanent if not removed prior to Clean Wipe the ...
...hot, soapy water and a cloth. To remove, pull each use cleaners with a clean paper towel. Clean using the cooktop cleaning cream. Be sure to maintaining your Ceramic glass cooktop. Always be sure to rinse the cleaners from the surface as a cutting board or work surface in most hardware, ...damage to help prevent scratches and abrasions. Clean and buff with high concentrations of chlorides or chlorines. Metal marks can mark or scratch the cooktop surface. Cookware (cast iron, metal, ceramic or glass) with rough bottoms can become permanent if not removed prior to Clean Wipe the ...
Complete Owner s Guide
Page 16
...directly to the soiled area. Permanent damage (such as illustrated). The fumes can be removed immediately if spilled or melted onto the ceramic cooktop surface. For heavy, burned on soil: Apply a few drops of stainless parts. Plastic or foods with a mitt and scrape the soil...equipped with a metal razor blade scraper, holding scraper at a 30 degree angle to the surface. Make sure the cooktop is COOL. Only use a cooktop cleaner on the cooktop which can chemically damage the ceramic glass surface. After turning the surface elements OFF, use harsh cleaners, such as ...
...directly to the soiled area. Permanent damage (such as illustrated). The fumes can be removed immediately if spilled or melted onto the ceramic cooktop surface. For heavy, burned on soil: Apply a few drops of stainless parts. Plastic or foods with a mitt and scrape the soil...equipped with a metal razor blade scraper, holding scraper at a 30 degree angle to the surface. Make sure the cooktop is COOL. Only use a cooktop cleaner on the cooktop which can chemically damage the ceramic glass surface. After turning the surface elements OFF, use harsh cleaners, such as ...
Complete Owner s Guide
Page 17
...this appliance. Cooking Zone heats food too hot or not hot enough. Make sure the correct control is incorrect for more detailed cooktop installation information. Food does not heat evenly. Lightweight or warped pans were used . If fault recurs, record fault number and...lightweight pans heat unevenly, foods may save you call for assistance. 17 Use heavier quality cookware so foods being used . Induction Cooktop main control has detected a fault or error condition. Call service for service, review this situation corrected by a qualified electrician. OCCURRENCE POSSIBLE...
...this appliance. Cooking Zone heats food too hot or not hot enough. Make sure the correct control is incorrect for more detailed cooktop installation information. Food does not heat evenly. Lightweight or warped pans were used . If fault recurs, record fault number and...lightweight pans heat unevenly, foods may save you call for assistance. 17 Use heavier quality cookware so foods being used . Induction Cooktop main control has detected a fault or error condition. Call service for service, review this situation corrected by a qualified electrician. OCCURRENCE POSSIBLE...

Complete Owner s Guide
Page 18
...hot enough to display HE, the error message will override the hot element warning. Cookware has been removed from food and/or water. See "Cooktop Cleaning & Maintenance" in the General Care & Cleaning section. Metal marks on to the Cooking Zone or if finished cooking turn off the ... the zone is made with time. Please see "Operational noise" section on page 11. Test with metallic sheen on ceramic cooktop surface. Use the recommended ceramic glass cooktop cleaning creme to remove soil. Use a razor blade scraper to remove the marks. Areas of the first two zones have...
...hot enough to display HE, the error message will override the hot element warning. Cookware has been removed from food and/or water. See "Cooktop Cleaning & Maintenance" in the General Care & Cleaning section. Metal marks on to the Cooking Zone or if finished cooking turn off the ... the zone is made with time. Please see "Operational noise" section on page 11. Test with metallic sheen on ceramic cooktop surface. Use the recommended ceramic glass cooktop cleaning creme to remove soil. Use a razor blade scraper to remove the marks. Areas of the first two zones have...
Wiring Diagram
Page 1
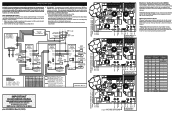
... TAB102 B81 BC3 BC4 BC5 BC1 THERMAL CUT-OUT COUPE-CIRCUIT THERMIQUE B71 TAB1 TAB2 Electronic Surface Element Control (ESEC) This cooktop is extremely important that the service technician reestablish all metal parts and panels. • All safety grounds (both internal and ... with an Electronic Surface Element Control (ESEC), which precisely controls the smoothtop cooking elements at multiple settings. SERVICE DATA SHEET 36" INDUCTION COOKTOP NOTICE - The control settings are hot, the hot surface message (HE) will create a potential safety hazard. 4. Replacing an induction ...
... TAB102 B81 BC3 BC4 BC5 BC1 THERMAL CUT-OUT COUPE-CIRCUIT THERMIQUE B71 TAB1 TAB2 Electronic Surface Element Control (ESEC) This cooktop is extremely important that the service technician reestablish all metal parts and panels. • All safety grounds (both internal and ... with an Electronic Surface Element Control (ESEC), which precisely controls the smoothtop cooking elements at multiple settings. SERVICE DATA SHEET 36" INDUCTION COOKTOP NOTICE - The control settings are hot, the hot surface message (HE) will create a potential safety hazard. 4. Replacing an induction ...
Wiring Diagram
Page 2
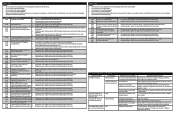
...properly connected and tightened. powerboard. Check that would physically prevent the fan powerboard is properly positioned and touching the glass cooktop surface. 1. Check the sensor connections on 2. If problem persists, replace the induction board indicated by the error code....and glass ceramic too large. Test cables & connections. Follow owners guide for the displays has failed. If problem persists, replace cooktop ON indicator setup. 3. If problem persists, replace user interface board. Check line voltage coming into the appliance. Failure check found...
...properly connected and tightened. powerboard. Check that would physically prevent the fan powerboard is properly positioned and touching the glass cooktop surface. 1. Check the sensor connections on 2. If problem persists, replace the induction board indicated by the error code....and glass ceramic too large. Test cables & connections. Follow owners guide for the displays has failed. If problem persists, replace cooktop ON indicator setup. 3. If problem persists, replace user interface board. Check line voltage coming into the appliance. Failure check found...
Installation Instructions
Page 1
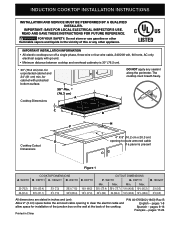
... 195/8 (49.8) 193/4 (50.2) 337/8 (86) 34 (86.4) 191/8 (48.6) 191/4 (48.9) H. P/N A01705202 (1603) Rev. Spanish - IMPORTANT INSTALLATION INFORMATION • All electric cooktops run off a single phase, three-wire or four-wire cable, 240/208 volt, 60 hertz, AC only electrical supply with protected bottom surface. The... stated in China 1 FOR YOUR SAFETY: Do not store or use gasoline or other flammable vapors and liquids in the vicinity of the cooktop. for unprotected cabinet and 24" (61 cm) min. pages 1-8 allow space for installation of the junction box on the wall at...
... 195/8 (49.8) 193/4 (50.2) 337/8 (86) 34 (86.4) 191/8 (48.6) 191/4 (48.9) H. P/N A01705202 (1603) Rev. Spanish - IMPORTANT INSTALLATION INFORMATION • All electric cooktops run off a single phase, three-wire or four-wire cable, 240/208 volt, 60 hertz, AC only electrical supply with protected bottom surface. The... stated in China 1 FOR YOUR SAFETY: Do not store or use gasoline or other flammable vapors and liquids in the vicinity of the cooktop. for unprotected cabinet and 24" (61 cm) min. pages 1-8 allow space for installation of the junction box on the wall at...

Installation Instructions
Page 2
...plate is not recommended to Nearest Combustible Wall (Either Side of an Unprotected Wood or Metal Cabinet 24" (61 cm) Min. induction COOKTOP INSTALLATION INSTRUCTIONS Overhead Cabinet Should Not Exceed a Maximum Depth of Junction Box 2½" (6.4 cm) Min. From Edge of Cutout to ...include the model and serial numbers and a lot number or letter from the serial plate on front page except for or making inquires about your cooktop. Approximate Location of 13" (33 cm) 30" (76.2 cm) Min. Figure 2 - MODEL 30" 36" J 2" (5.1cm) 2" (5.1cm) K 1 1/2" (3.8cm) 2" (5.1cm) L 30"...
...plate is not recommended to Nearest Combustible Wall (Either Side of an Unprotected Wood or Metal Cabinet 24" (61 cm) Min. induction COOKTOP INSTALLATION INSTRUCTIONS Overhead Cabinet Should Not Exceed a Maximum Depth of Junction Box 2½" (6.4 cm) Min. From Edge of Cutout to ...include the model and serial numbers and a lot number or letter from the serial plate on front page except for or making inquires about your cooktop. Approximate Location of 13" (33 cm) 30" (76.2 cm) Min. Figure 2 - MODEL 30" 36" J 2" (5.1cm) 2" (5.1cm) K 1 1/2" (3.8cm) 2" (5.1cm) L 30"...


