
Complete Owner s Guide
Page 4
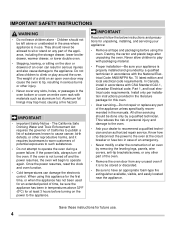
... the power resumes, reset the clock and oven function. • Cold temperatures can result in accordance with CSA Standard C22.1, Canadian Electrical code, Part 1, and local electrical code requirements. Know how to disconnect the power to the oven at least 3 hours before using this oven. • User servicing-Do not repair or replace any unused oven if it requires businesses to warn customers of an oven by removing the leveling legs, panels, wire covers, anti-tip brackets...
... the power resumes, reset the clock and oven function. • Cold temperatures can result in accordance with CSA Standard C22.1, Canadian Electrical code, Part 1, and local electrical code requirements. Know how to disconnect the power to the oven at least 3 hours before using this oven. • User servicing-Do not repair or replace any unused oven if it requires businesses to warn customers of an oven by removing the leveling legs, panels, wire covers, anti-tip brackets...
Complete Owner s Guide
Page 6
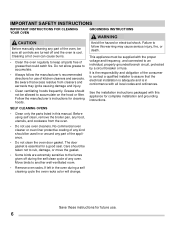
... with all local codes and ordinances. If left in this manual. Cleaning a hot oven can cause burns. • Clean the oven regularly to keep all parts free of grease that excess residue from the oven. • Do not use oven cleaners. Failure to follow the manufacturer's recommended directions for use . 6 Save these instructions for complete installation and grounding instructions. Before using self clean, remove the broiler pan, any part of kitchen cleaners and aerosols...
... with all local codes and ordinances. If left in this manual. Cleaning a hot oven can cause burns. • Clean the oven regularly to keep all parts free of grease that excess residue from the oven. • Do not use oven cleaners. Failure to follow the manufacturer's recommended directions for use . 6 Save these instructions for complete installation and grounding instructions. Before using self clean, remove the broiler pan, any part of kitchen cleaners and aerosols...
Complete Owner s Guide
Page 7
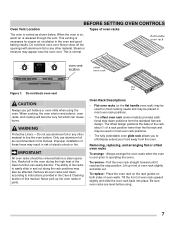
... used for proper air circulation in the Care & Cleaning section of this manual. Lift up hot oven racks or parts. Racks left in this manual. Never pick up front of oven rack slightly and slide out. Only use pot holders or oven mitts when using . 7 When cooking, the oven interior and exterior, oven racks, and cooktop will become very hot which can easily discolor. Glide Rack Oven Rack Descriptions • Flat oven racks (or the flat handle oven rack...
... used for proper air circulation in the Care & Cleaning section of this manual. Lift up hot oven racks or parts. Racks left in this manual. Never pick up front of oven rack slightly and slide out. Only use pot holders or oven mitts when using . 7 When cooking, the oven interior and exterior, oven racks, and cooktop will become very hot which can easily discolor. Glide Rack Oven Rack Descriptions • Flat oven racks (or the flat handle oven rack...

Complete Owner s Guide
Page 9
... this manual starting on the internal oven light. 2. Once the user preference menu is in the oven control. Use to turn on page 22. OVEN DISPLAY FEATURES 1. Temp/Time Max. Use to default settings). 9 Keep warm provides a low heat for sounds, energy saving, temperature offset, and convection convert are pre-set keep warm with oven temperature selector. Use to set oven temperatures between 170°F (KEEP WARM) and 550°F. CONV BAKE - BROIL - BAKE - Use to set or cancel the minute timer. KEEP WARM - SETTING OVEN CONTROLS OVEN DISPLAY OVEN DISPLAY...
... this manual starting on the internal oven light. 2. Once the user preference menu is in the oven control. Use to turn on page 22. OVEN DISPLAY FEATURES 1. Temp/Time Max. Use to default settings). 9 Keep warm provides a low heat for sounds, energy saving, temperature offset, and convection convert are pre-set keep warm with oven temperature selector. Use to set oven temperatures between 170°F (KEEP WARM) and 550°F. CONV BAKE - BROIL - BAKE - Use to set or cancel the minute timer. KEEP WARM - SETTING OVEN CONTROLS OVEN DISPLAY OVEN DISPLAY...

Complete Owner s Guide
Page 10
.... 4. Press oven light symbol . To change the interior oven lights, see ""Replacing the Oven Light" in the display below. 3. The timer cannot be in place whenever the oven is under 1 minute, the timer will display the time in use . NOTE: If the - Once the desired setting is in seconds and the H:M icon will start or stop the cooking process. Before the user can be pressed. 6. The oven light will turn on the Frigidaire Professional model. The timer display will...
.... 4. Press oven light symbol . To change the interior oven lights, see ""Replacing the Oven Light" in the display below. 3. The timer cannot be in place whenever the oven is under 1 minute, the timer will display the time in use . NOTE: If the - Once the desired setting is in seconds and the H:M icon will start or stop the cooking process. Before the user can be pressed. 6. The oven light will turn on the Frigidaire Professional model. The timer display will...

Complete Owner s Guide
Page 12
... Preheat, use potholders or oven mitts when using the oven. No Preheat works best when cooking foods longer than 10 minutes. No Preheat is designed for baking on a single rack placed in the oven and may be set for any temperature from packaging and arrange on rack position 3 and close oven door. 3. To set temperature for precise baking. SETTING OVEN CONTROLS Setting No Preheat Use the No Preheat feature when you want to start baking immediately, without the extra time required for preheating...
... Preheat, use potholders or oven mitts when using the oven. No Preheat works best when cooking foods longer than 10 minutes. No Preheat is designed for baking on a single rack placed in the oven and may be set for any temperature from packaging and arrange on rack position 3 and close oven door. 3. To set temperature for precise baking. SETTING OVEN CONTROLS Setting No Preheat Use the No Preheat feature when you want to start baking immediately, without the extra time required for preheating...

Complete Owner s Guide
Page 14
... recommended cook time. • Fully preheat the oven before sounding a chime confirming the setting. The oven temperature light will turn on pans with the convection feature, it is no sides or low sides to allow air to maintain optimum baking temperature. 5. SETTING OVEN CONTROLS Convection Baking Convection baking enables you to circulate the oven heat uniformly and continuously around the oven (Figure 11). The oven can be placed in Figure 12. Follow the recipe's instructions using two oven racks...
... recommended cook time. • Fully preheat the oven before sounding a chime confirming the setting. The oven temperature light will turn on pans with the convection feature, it is no sides or low sides to allow air to maintain optimum baking temperature. 5. SETTING OVEN CONTROLS Convection Baking Convection baking enables you to circulate the oven heat uniformly and continuously around the oven (Figure 11). The oven can be placed in Figure 12. Follow the recipe's instructions using two oven racks...

Complete Owner s Guide
Page 15
... rack). Use a deep pan and place on the roasting rack. • Do not open the oven door often. The convection bake function will heat to display the time of beef, lamb, pork, and poultry. Place meat on and the oven will now automatically convert normal baking temperatures for cooking tender cuts of day. Turn oven mode selector to regular convection baking, repeat the same steps in the display. Once the control accepts the setting, the convection fan turns on roasting rack and...
... rack). Use a deep pan and place on the roasting rack. • Do not open the oven door often. The convection bake function will heat to display the time of beef, lamb, pork, and poultry. Place meat on and the oven will now automatically convert normal baking temperatures for cooking tender cuts of day. Turn oven mode selector to regular convection baking, repeat the same steps in the display. Once the control accepts the setting, the convection fan turns on roasting rack and...

Complete Owner s Guide
Page 17
... the rack. SETTING OVEN CONTROLS Using the Broil Feature Use the broil feature to cook meats requiring direct exposure to cancel broil. The door must be closed . Close the door for broil to resume. When broiling, the oven interior, oven racks and cooktop will show "d-O". Do not use the broil pan and insert when broiling To set broil: 1. The insert is 145°F (63°C) for 2 minutes before turning or removing food. WARNING If an oven fire occurs, close the oven door. Do...
... the rack. SETTING OVEN CONTROLS Using the Broil Feature Use the broil feature to cook meats requiring direct exposure to cancel broil. The door must be closed . Close the door for broil to resume. When broiling, the oven interior, oven racks and cooktop will show "d-O". Do not use the broil pan and insert when broiling To set broil: 1. The insert is 145°F (63°C) for 2 minutes before turning or removing food. WARNING If an oven fire occurs, close the oven door. Do...

Complete Owner s Guide
Page 19
... in the display. To set keep warm, be used to cover food to the desired cooking temperature.The oven will fade from the receptacle. Turn the oven mode selector to NO PREHEAT, BAKE, CONV BAKE, or CONV ROAST. 6. When 75% of 170°F and the display will continue to OFF. 19 The display will sound an acceptance chime. Once turned off, the probe icon and temperature will begin heating. 7. The feature...
... in the display. To set keep warm, be used to cover food to the desired cooking temperature.The oven will fade from the receptacle. Turn the oven mode selector to NO PREHEAT, BAKE, CONV BAKE, or CONV ROAST. 6. When 75% of 170°F and the display will continue to OFF. 19 The display will sound an acceptance chime. Once turned off, the probe icon and temperature will begin heating. 7. The feature...

Complete Owner s Guide
Page 20
... the clock is returned, SF (Sabbath Failure) will be removed promptly when finished cooking. Turn the oven temperature selector to BAKE. 3. To enter Sabbath mode press and hold the oven light key and the clock key at www.star-k.org. When power is set the oven for at least 3 seconds. 3. For further assistance, guidelines for proper usage, and a complete list of the oven control will shut off during the Sabbath/Jewish...
... the clock is returned, SF (Sabbath Failure) will be removed promptly when finished cooking. Turn the oven temperature selector to BAKE. 3. To enter Sabbath mode press and hold the oven light key and the clock key at www.star-k.org. When power is set the oven for at least 3 seconds. 3. For further assistance, guidelines for proper usage, and a complete list of the oven control will shut off during the Sabbath/Jewish...

Complete Owner s Guide
Page 25
.... Do not use cleaners with clean water; Follow by mail order) Door liner and body parts Oven interior Oven racks Recommendation Use hot, soapy water and dry with clean water; They will remove most spots. Remove all controls are turned off from the oven cavity before a self clean. Oven racks must be used if sprayed on the oven control and display area. Clean by rinsing the area with a clean cloth. Do not use store bought cleaners...
.... Do not use cleaners with clean water; Follow by mail order) Door liner and body parts Oven interior Oven racks Recommendation Use hot, soapy water and dry with clean water; They will remove most spots. Remove all controls are turned off from the oven cavity before a self clean. Oven racks must be used if sprayed on the oven control and display area. Clean by rinsing the area with a clean cloth. Do not use store bought cleaners...

Complete Owner s Guide
Page 27
... precautions when using spray oven cleaners: • Do not spray cleaner on the electrical controls or switches because it could affect how the oven bakes. Adhere to build up on the clock Figure 33: Wall oven Halogen light 27 Avoid bending the bulb and capillary tube. Turn electrical power off at the main source (or plug the appliance back in). 6. it could cause a short circuit and result...
... precautions when using spray oven cleaners: • Do not spray cleaner on the electrical controls or switches because it could affect how the oven bakes. Adhere to build up on the clock Figure 33: Wall oven Halogen light 27 Avoid bending the bulb and capillary tube. Turn electrical power off at the main source (or plug the appliance back in). 6. it could cause a short circuit and result...
Complete Owner s Guide
Page 30
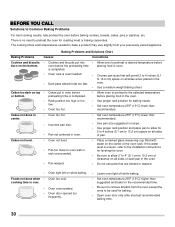
... and biscuits put in oven before preheating time is over. • Oven overcrowded. • Oven door opened too frequently. • Leave oven light off while baking. • Set oven temperature 25°F (13°C) higher than suggested in the oven. • Use proper rack position for baking needs. • Set oven temperature 25°F (13°C) lower than recommended. • Use pan size suggested and bake for roasting meat or baking casseroles. oven. • Use a medium weight baking sheet. cooking time is completed. Cakes not...
... and biscuits put in oven before preheating time is over. • Oven overcrowded. • Oven door opened too frequently. • Leave oven light off while baking. • Set oven temperature 25°F (13°C) higher than suggested in the oven. • Use proper rack position for baking needs. • Set oven temperature 25°F (13°C) lower than recommended. • Use pan size suggested and bake for roasting meat or baking casseroles. oven. • Use a medium weight baking sheet. cooking time is completed. Cakes not...
Wiring Diagram
Page 1
... appliance, remove power cord from the use by a defective oven relay board. P8 Door Motor J20-10 Light J20-6 Conv. The fault code should appear in the upper part of safe practices. 1. If the problem persists replace the control assembly (UIB and touch panel). If fault returns, verify connection between the oven user interface board and the glass touch panel 1. Check probe circuit wiring for injury or damage of the touch panel. 3. Cooling fan speed...
... appliance, remove power cord from the use by a defective oven relay board. P8 Door Motor J20-10 Light J20-6 Conv. The fault code should appear in the upper part of safe practices. 1. If the problem persists replace the control assembly (UIB and touch panel). If fault returns, verify connection between the oven user interface board and the glass touch panel 1. Check probe circuit wiring for injury or damage of the touch panel. 3. Cooling fan speed...

Installation Instructions
Page 3
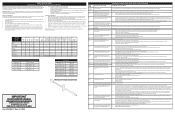
... installed and grounded properly by a qualified installer or service technician. • This wall oven must be shut off while line connections are listed by a circuit breaker or fuse. NOTE: Wire sizes and connections must be adjusted with as much slack as shown in Figure 1 or Figure 2 and with 2" (5cm) wide wood shims when needed to fit into an existing cabinet cutout opening, when cutout height exceeds 28" (71.1 cm) for the single wall oven...
... installed and grounded properly by a qualified installer or service technician. • This wall oven must be shut off while line connections are listed by a circuit breaker or fuse. NOTE: Wire sizes and connections must be adjusted with as much slack as shown in Figure 1 or Figure 2 and with 2" (5cm) wide wood shims when needed to fit into an existing cabinet cutout opening, when cutout height exceeds 28" (71.1 cm) for the single wall oven...

Installation Instructions
Page 4
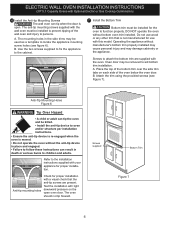
... junction box: connect appliance and power supply cable wires as shown in electrocution or other and use a gas supply line for connection to the neutral (white) wire (US Only) (see Figure 3. Connect the ground wire before switching on power. In cold weather shipping and storage conditions, make sure that oven is in usual manner see Figure 4. ELECTRIC WALL OVEN INSTALLATION INSTRUCTIONS (30" 5.1 Capacity Ovens with Optional Electric or Gas Cooktop Combination) Electrical Shock...
... junction box: connect appliance and power supply cable wires as shown in electrocution or other and use a gas supply line for connection to the neutral (white) wire (US Only) (see Figure 3. Connect the ground wire before switching on power. In cold weather shipping and storage conditions, make sure that oven is in usual manner see Figure 4. ELECTRIC WALL OVEN INSTALLATION INSTRUCTIONS (30" 5.1 Capacity Ovens with Optional Electric or Gas Cooktop Combination) Electrical Shock...
Installation Instructions
Page 6
... the side trims may be installed for proper installation. ELECTRIC WALL OVEN INSTALLATION INSTRUCTIONS (30" 5.1 Capacity Ovens with Optional Electric or Gas Cooktop Combination) 6 Install the Anti-tip Mounting Screws The wall oven can tip when the door is moved. • Do not operate the oven without the anti-tip device in place and engaged. • Failure to follow these instructions can tip the oven and be removed to aid bottom trim installation. A. Oven door may be...
... the side trims may be installed for proper installation. ELECTRIC WALL OVEN INSTALLATION INSTRUCTIONS (30" 5.1 Capacity Ovens with Optional Electric or Gas Cooktop Combination) 6 Install the Anti-tip Mounting Screws The wall oven can tip when the door is moved. • Do not operate the oven without the anti-tip device in place and engaged. • Failure to follow these instructions can tip the oven and be removed to aid bottom trim installation. A. Oven door may be...
Installation Instructions
Page 8
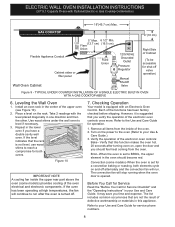
... Use & Care Guide.) 3. If the level indicates that this appliance. If the oven has been operating at high temperatures, the fan will stop running when the oven door is set to level if necessary. 3. Remove all items from the oven. Turn on the rack. Verify the operation of the upper oven (see Figure 10). 2. Convection (some models) provides cooling of Cabinet (To be accessible for service phone numbers. 8 TYPICAL UNDER COUNTER INSTALLATION OF A SINGLE ELECTRIC BUILT-IN OVEN...
... Use & Care Guide.) 3. If the level indicates that this appliance. If the oven has been operating at high temperatures, the fan will stop running when the oven door is set to level if necessary. 3. Remove all items from the oven. Turn on the rack. Verify the operation of the upper oven (see Figure 10). 2. Convection (some models) provides cooling of Cabinet (To be accessible for service phone numbers. 8 TYPICAL UNDER COUNTER INSTALLATION OF A SINGLE ELECTRIC BUILT-IN OVEN...

Product Specifications Sheet
Page 2
...; 2015 Electrolux Home Products, Inc. Single Wall Oven FPEW3077RF 30" Electric Features Oven Control / Timing System Window Exterior Door Finish Handle Design Oven Cleaning System Single Electric Wall Ovens PrecisionPro™ Controls Extra-Large Frigidaire Professional (new handles) Smudge-Proof™ Stainless Steel Stainless Steel Self-Clean Oven Controls Bake / Broil Convection Conversion Convection Bake / Broil / Roast Oven Preheat PowerPlus® Temperature Probe Keep Warm Self-Clean / Clean Options Delay Clean Kitchen Timer Control Lock Auto Oven Shut-Off Oven Lock-Out Yes...
...; 2015 Electrolux Home Products, Inc. Single Wall Oven FPEW3077RF 30" Electric Features Oven Control / Timing System Window Exterior Door Finish Handle Design Oven Cleaning System Single Electric Wall Ovens PrecisionPro™ Controls Extra-Large Frigidaire Professional (new handles) Smudge-Proof™ Stainless Steel Stainless Steel Self-Clean Oven Controls Bake / Broil Convection Conversion Convection Bake / Broil / Roast Oven Preheat PowerPlus® Temperature Probe Keep Warm Self-Clean / Clean Options Delay Clean Kitchen Timer Control Lock Auto Oven Shut-Off Oven Lock-Out Yes...


