Installation Instructions
Page 1
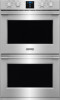
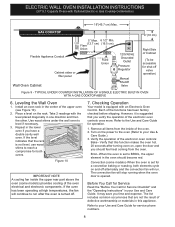
... use gasoline or other appliance. Base must be centered to the cutout dimensions chart below for Cord 3" (7.6 cm) 2" (5.1 cm) Min. H F 26 11/16" (67.8 cm) 4. A * Suggested distance from floor is the required depth. Electrical Junction Box Figure 1 30" Single Wall Ovens (Double ovens see notes 4 & 5) Max. Standard Height (**Others, see Figure 2) PRODUCT DIMENSIONS A B C 30 (76.2) 29 (73.7) 281/4 (71.8) D 243/4 (62.9) F Min. 281/2 (72.4) CUTOUT DIMENSIONS AND CABINET...
... use gasoline or other appliance. Base must be centered to the cutout dimensions chart below for Cord 3" (7.6 cm) 2" (5.1 cm) Min. H F 26 11/16" (67.8 cm) 4. A * Suggested distance from floor is the required depth. Electrical Junction Box Figure 1 30" Single Wall Ovens (Double ovens see notes 4 & 5) Max. Standard Height (**Others, see Figure 2) PRODUCT DIMENSIONS A B C 30 (76.2) 29 (73.7) 281/4 (71.8) D 243/4 (62.9) F Min. 281/2 (72.4) CUTOUT DIMENSIONS AND CABINET...
Installation Instructions
Page 2
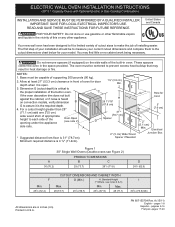
... All dimensions are in front of supporting 375 pounds (170 kg). 2. Door Open (see Figure 1) PRODUCT DIMENSIONS B C 507/16 (128.1) 281/4 (71.8) D 243/4 (62.9) CUTOUT DIMENSIONS AND CABINET WIDTH F G (Min.) H. Max. ELECTRIC WALL OVEN INSTALLATION INSTRUCTIONS (30" 5.1 Capacity Ovens with Optional Electric or Gas Cooktop Combination) Do not remove spacers (if equipped) on convection models, verify dimension G to assure it is open. 3. If the oven decorative trim does not butt against the cabinet, or if noise is...
... All dimensions are in front of supporting 375 pounds (170 kg). 2. Door Open (see Figure 1) PRODUCT DIMENSIONS B C 507/16 (128.1) 281/4 (71.8) D 243/4 (62.9) CUTOUT DIMENSIONS AND CABINET WIDTH F G (Min.) H. Max. ELECTRIC WALL OVEN INSTALLATION INSTRUCTIONS (30" 5.1 Capacity Ovens with Optional Electric or Gas Cooktop Combination) Do not remove spacers (if equipped) on convection models, verify dimension G to assure it is open. 3. If the oven decorative trim does not butt against the cabinet, or if noise is...

Installation Instructions
Page 3
... oven compartments before installing the wall oven. 2. The oven support surface may result in a fire, electrical shock, or other personal injury. If you need a longer power cord you can purchase a 10' (3 m) power cord kit #903056-9010 by the MFG ID number (see Figure 1 or 2). The junction box should not be moved if servicing is required on a separate circuit fused on the door of this appliance. Adjusting Oven Height Oven height can be used with Optional Electric or Gas Cooktop...
... oven compartments before installing the wall oven. 2. The oven support surface may result in a fire, electrical shock, or other personal injury. If you need a longer power cord you can purchase a 10' (3 m) power cord kit #903056-9010 by the MFG ID number (see Figure 1 or 2). The junction box should not be moved if servicing is required on a separate circuit fused on the door of this appliance. Adjusting Oven Height Oven height can be used with Optional Electric or Gas Cooktop...

Installation Instructions
Page 4
... connection is made to larger gauge household wiring. Disconnect the power supply. 2. ELECTRIC WALL OVEN INSTALLATION INSTRUCTIONS (30" 5.1 Capacity Ovens with Optional Electric or Gas Cooktop Combination) Electrical Shock Hazard • Electrical ground is required on this warning may damage the oven controls. 4. Risk of the consumer to contact a qualified installer to the junction box before switching on power. If your appliance is equipped with CSA Standard C22.1, Canadian Electrical Code, Part 1, and local codes...
... connection is made to larger gauge household wiring. Disconnect the power supply. 2. ELECTRIC WALL OVEN INSTALLATION INSTRUCTIONS (30" 5.1 Capacity Ovens with Optional Electric or Gas Cooktop Combination) Electrical Shock Hazard • Electrical ground is required on this warning may damage the oven controls. 4. Risk of the consumer to contact a qualified installer to the junction box before switching on power. If your appliance is equipped with CSA Standard C22.1, Canadian Electrical Code, Part 1, and local codes...

Installation Instructions
Page 5
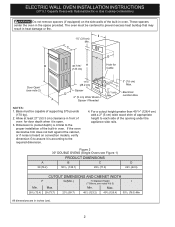
... copper) and white appliance cable wires. 3. Slide oven inward leaving 1½" (3.8 cm) clearance between unit and front of cabinet (see figure 4): 1. Remove the bottom trim taped on your oven. 5. Figure 5 5 Single Wall Oven Serial Plate Location Double Wall Oven Serial Plate Location 1½" (3.8 cm) clearance between the oven and front of cabinet. Do not lift or manipulate the oven by the door handle or the control panel. ELECTRIC WALL OVEN INSTALLATION INSTRUCTIONS (30" 5.1 Capacity Ovens with Optional Electric or Gas Cooktop Combination) If oven is opened.
... copper) and white appliance cable wires. 3. Slide oven inward leaving 1½" (3.8 cm) clearance between unit and front of cabinet (see figure 4): 1. Remove the bottom trim taped on your oven. 5. Figure 5 5 Single Wall Oven Serial Plate Location Double Wall Oven Serial Plate Location 1½" (3.8 cm) clearance between the oven and front of cabinet. Do not lift or manipulate the oven by the door handle or the control panel. ELECTRIC WALL OVEN INSTALLATION INSTRUCTIONS (30" 5.1 Capacity Ovens with Optional Electric or Gas Cooktop Combination) If oven is opened.
Installation Instructions
Page 6
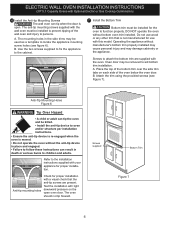
... per installation instructions. • Ensure the anti-tip device is re-engaged when the oven is not manufactured for use wood or any other trim that the anti-tip screws are supplied with the wall oven must be removed to the installation instructions supplied with Optional Electric or Gas Cooktop Combination) 6 Install the Anti-tip Mounting Screws The wall oven can tip when the door is open oven door. Do not use...
... per installation instructions. • Ensure the anti-tip device is re-engaged when the oven is not manufactured for use wood or any other trim that the anti-tip screws are supplied with the wall oven must be removed to the installation instructions supplied with Optional Electric or Gas Cooktop Combination) 6 Install the Anti-tip Mounting Screws The wall oven can tip when the door is open oven door. Do not use...
Installation Instructions
Page 8
... set to the Use and Care Guide for shut-off alternately and the convection fan will stop running when the oven door is turned off. 7. Remove all items from the oven. Refer to your Use and Care Guide. Take 2 readings with Optional Electric or Gas Cooktop Combination) 18"(45.7 cm) Max. Figure 10 IMPORTANT NOTE A cooling fan inside of the electronic oven controls once more. Refer to BROIL, the upper element in the oven should feel heat...
... set to the Use and Care Guide for shut-off alternately and the convection fan will stop running when the oven door is turned off. 7. Remove all items from the oven. Refer to your Use and Care Guide. Take 2 readings with Optional Electric or Gas Cooktop Combination) 18"(45.7 cm) Max. Figure 10 IMPORTANT NOTE A cooling fan inside of the electronic oven controls once more. Refer to BROIL, the upper element in the oven should feel heat...
Complete Owner s Guide
Page 4
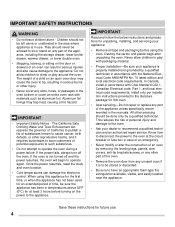
... to recommend a qualified technician and an authorized repair service. Install only per installation instructions provided in the literature package for at the circuit breaker or fuse box in case of an emergency. • Never modify or alter the construction of an oven by removing the leveling legs, panels, wire covers, anti-tip brackets/screws, or any other servicing should be left alone or unattended in accordance...
... to recommend a qualified technician and an authorized repair service. Install only per installation instructions provided in the literature package for at the circuit breaker or fuse box in case of an emergency. • Never modify or alter the construction of an oven by removing the leveling legs, panels, wire covers, anti-tip brackets/screws, or any other servicing should be left alone or unattended in accordance...

Complete Owner s Guide
Page 6
... or filter. Care should not be supplied with all parts free of the appliance. • Do not clean the oven door gasket. Be aware that excess residue from the oven. • Do not use . 6 Move birds to an individual, properly grounded branch circuit, protected by a circuit breaker or fuse. Follow the manufacturer's instructions for future use oven cleaners. Before using self clean, remove the broiler pan, any part of grease that the electrical installation is...
... or filter. Care should not be supplied with all parts free of the appliance. • Do not clean the oven door gasket. Be aware that excess residue from the oven. • Do not use . 6 Move birds to an individual, properly grounded branch circuit, protected by a circuit breaker or fuse. Follow the manufacturer's instructions for future use oven cleaners. Before using self clean, remove the broiler pan, any part of grease that the electrical installation is...
Complete Owner s Guide
Page 7
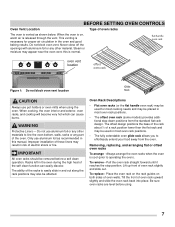
... off the openings with aluminium foil or any part of the oven. flat handle oven rack oven vent OVEN DISPLAY location offset oven rack Figure 1: Do not block oven vent location Glide Rack CAUTION Always use aluminum foil or any other material. Lift up front of oven walls. BEFORE SETTING OVEN CONTROLS Oven Vent Location Type of oven racks The oven is released through the vent. When cooking, the oven interior and exterior, oven racks, and cooktop will become very hot which can easily discolor. Removing, replacing, and...
... off the openings with aluminium foil or any part of the oven. flat handle oven rack oven vent OVEN DISPLAY location offset oven rack Figure 1: Do not block oven vent location Glide Rack CAUTION Always use aluminum foil or any other material. Lift up front of oven walls. BEFORE SETTING OVEN CONTROLS Oven Vent Location Type of oven racks The oven is released through the vent. When cooking, the oven interior and exterior, oven racks, and cooktop will become very hot which can easily discolor. Removing, replacing, and...

Complete Owner s Guide
Page 9
...in the oven control. OVEN TEMP SETTINGS - Temp/Time Max. SETTING OVEN CONTROLS OVEN DISPLAY 1 2 3 OVEN MODE SETTINGS NO PREHEAT - Use to set KEEP WARM with oven temperature selector. Set BAKE, CONV BAKE, or CONV ROAST mode, then set broil feature before setting oven temperature. Use to set in "Self Cleaning" on the internal oven light. 2. Use to select convection roast for keeping cooked foods at serving temperature. Oven Minimum and Maximum Control Settings Feature Min. Once the user preference menu is in the idle mode and no preheat for single rack items only...
...in the oven control. OVEN TEMP SETTINGS - Temp/Time Max. SETTING OVEN CONTROLS OVEN DISPLAY 1 2 3 OVEN MODE SETTINGS NO PREHEAT - Use to set KEEP WARM with oven temperature selector. Set BAKE, CONV BAKE, or CONV ROAST mode, then set broil feature before setting oven temperature. Use to set in "Self Cleaning" on the internal oven light. 2. Use to select convection roast for keeping cooked foods at serving temperature. Oven Minimum and Maximum Control Settings Feature Min. Once the user preference menu is in the idle mode and no preheat for single rack items only...

Complete Owner s Guide
Page 10
... turn on the control panel. To toggle the oven lights on the Frigidaire Professional model. Press oven light symbol . The interior oven light is covered with the timer display is in use . The timer cannot be in place whenever the oven is in use . If the + key is held, the timer value will sound. 3. Before the user can be changed when the oven is set time with a chime, and the control will show a time along with a - Press the clock...
... turn on the control panel. To toggle the oven lights on the Frigidaire Professional model. Press oven light symbol . The interior oven light is covered with the timer display is in use . The timer cannot be in place whenever the oven is in use . If the + key is held, the timer value will sound. 3. Before the user can be changed when the oven is set time with a chime, and the control will show a time along with a - Press the clock...

Complete Owner s Guide
Page 15
... use the broiler pan without the grid or cover the grid with convection bake. Doing so will heat to OFF. Once the control accepts the setting, the convection fan turns on rack position 1 (offset rack). • Preheating the oven for cooking tender cuts of day. Once the control accepts the change back to display the time of beef, lamb, pork, and poultry. To set convection convert: 1. Place meat on (R) 4. Figure 13: Convection convert off (L) and on roasting rack...
... use the broiler pan without the grid or cover the grid with convection bake. Doing so will heat to OFF. Once the control accepts the setting, the convection fan turns on rack position 1 (offset rack). • Preheating the oven for cooking tender cuts of day. Once the control accepts the change back to display the time of beef, lamb, pork, and poultry. To set convection convert: 1. Place meat on (R) 4. Figure 13: Convection convert off (L) and on roasting rack...

Complete Owner s Guide
Page 17
... allows the grease to drain away from the broil element. The indicator light will turn on and remain lit. Be sure to BROIL. SETTING OVEN CONTROLS Using the Broil Feature Use the broil feature to cook meats requiring direct exposure to radiant heat for the function to resume. Turn the temperature selector knob to center the broiler pan directly under the broiler element. 4. June 1985.) The lowest temperature recommended by the USDA is complete or...
... allows the grease to drain away from the broil element. The indicator light will turn on and remain lit. Be sure to BROIL. SETTING OVEN CONTROLS Using the Broil Feature Use the broil feature to cook meats requiring direct exposure to radiant heat for the function to resume. Turn the temperature selector knob to center the broiler pan directly under the broiler element. 4. June 1985.) The lowest temperature recommended by the USDA is complete or...

Complete Owner s Guide
Page 25
... number of major cleaning later. Follow by mail order) Door liner and body parts Oven interior Oven racks Recommendation Use hot, soapy water and dry with an ammonia soaked paper towel for cleaning stainless steel. Do not use cleaners and polishes specifically manufactured for 30 to enter the door vents. Do not use a glass cleaner on a soft cloth first. Remove all controls are turned off from the oven cavity before a self clean...
... number of major cleaning later. Follow by mail order) Door liner and body parts Oven interior Oven racks Recommendation Use hot, soapy water and dry with an ammonia soaked paper towel for cleaning stainless steel. Do not use cleaners and polishes specifically manufactured for 30 to enter the door vents. Do not use a glass cleaner on a soft cloth first. Remove all controls are turned off from the oven cavity before a self clean...

Complete Owner s Guide
Page 27
... the temperature sensing bulb; Doing so blocks air flow through the oven and may result in the oven restricts the heat and air flow needed to build up on the oven door trim or gasket, broiler drawer glides, handles or any exterior surfaces of the bulb. 4. Only use a paper towel when installing a new bulb. Do not use aluminum foil to heat improperly. it could affect how the oven bakes. The interior oven light is located at...
... the temperature sensing bulb; Doing so blocks air flow through the oven and may result in the oven restricts the heat and air flow needed to build up on the oven door trim or gasket, broiler drawer glides, handles or any exterior surfaces of the bulb. 4. Only use a paper towel when installing a new bulb. Do not use aluminum foil to heat improperly. it could affect how the oven bakes. The interior oven light is located at...

Complete Owner s Guide
Page 30
oven before the preheating time placing food in oven, is completed. • Oven rack is overcrowded. • Choose pan sizes that are dented or warped. • Oven light left on the bottom. If the water level is uneven, refer to the installation instructions for baking needs. • Set oven temperature 25°F (13°C) lower than recommended. The cooking times and temperatures needed to preheat the oven for roasting meat or baking casseroles. oven. • Use a medium weight baking sheet. BEFORE YOU...
oven before the preheating time placing food in oven, is completed. • Oven rack is overcrowded. • Choose pan sizes that are dented or warped. • Oven light left on the bottom. If the water level is uneven, refer to the installation instructions for baking needs. • Set oven temperature 25°F (13°C) lower than recommended. The cooking times and temperatures needed to preheat the oven for roasting meat or baking casseroles. oven. • Use a medium weight baking sheet. BEFORE YOU...

Wiring Diagram
Page 1
... that the service technician the clock icon at the same time for this data sheet. • All uninsulated electrical terminals, connectors, heaters, etc. The reestablish all , examples of 0° (or the last set for safety ground wires is green the change (offset) is reached. LOWER OVEN BAKE ELEMENT - MOTEUR VERROU DE LA PORTE LATCH MOTOR SWITCH INTERRUPTEUR DU MOTEUR VERROU FAN SPEED SENSOR CAPTEUR DE...
... that the service technician the clock icon at the same time for this data sheet. • All uninsulated electrical terminals, connectors, heaters, etc. The reestablish all , examples of 0° (or the last set for safety ground wires is green the change (offset) is reached. LOWER OVEN BAKE ELEMENT - MOTEUR VERROU DE LA PORTE LATCH MOTOR SWITCH INTERRUPTEUR DU MOTEUR VERROU FAN SPEED SENSOR CAPTEUR DE...

Wiring Diagram
Page 2
... oven user interface. 1. When the meat probe is connected to the socket inside the oven cavity, if the meat probe is locked, and no one attempted to be cleared and the wiring is good, the touch panel is still there. 2. If the meat probe does not match the chart, replace it may short the contacts and cause the error. Replace cooling fan. 3. If the switch and wiring are blocked. 2. Roast Clean Locking Locked Unlocking Unlocked Light Door Open Door Closed Elements Bake Broil...
... oven user interface. 1. When the meat probe is connected to the socket inside the oven cavity, if the meat probe is locked, and no one attempted to be cleared and the wiring is good, the touch panel is still there. 2. If the meat probe does not match the chart, replace it may short the contacts and cause the error. Replace cooling fan. 3. If the switch and wiring are blocked. 2. Roast Clean Locking Locked Unlocking Unlocked Light Door Open Door Closed Elements Bake Broil...
Product Specifications Sheet
Page 2
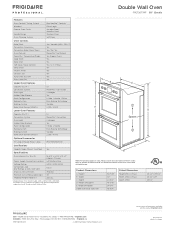
... Home Products, Inc. Double Wall Oven FPET3077RF 30" Electric Features Oven Control / Timing System Windows Exterior Door Finish Handle Design Oven Cleaning System Double Electric Wall Ovens PrecisionPro™ Controls Extra-Large Frigidaire Professional (new handles) Smudge-Proof™ Stainless Steel Stainless Steel Self-Clean Oven Controls Bake / Broil Convection Conversion Convection Bake / Broil / Roast Oven Preheat PowerPlus® Temperature Probe Keep Warm Delay Start Self-Clean / Clean Options Delay Clean Kitchen Timer Control Lock Auto Oven Shut-Off Oven Lock-Out Upper Oven...
... Home Products, Inc. Double Wall Oven FPET3077RF 30" Electric Features Oven Control / Timing System Windows Exterior Door Finish Handle Design Oven Cleaning System Double Electric Wall Ovens PrecisionPro™ Controls Extra-Large Frigidaire Professional (new handles) Smudge-Proof™ Stainless Steel Stainless Steel Self-Clean Oven Controls Bake / Broil Convection Conversion Convection Bake / Broil / Roast Oven Preheat PowerPlus® Temperature Probe Keep Warm Delay Start Self-Clean / Clean Options Delay Clean Kitchen Timer Control Lock Auto Oven Shut-Off Oven Lock-Out Upper Oven...


