

Complete Owner's Guide (English)
Page 1
A TABLE OF CONTENTS Welcome & Congratulations 2 Care & Cleaning (Cleaning Chart 11 Important Safety Instructions 3 Care & Cleaning 12 Setting Surface Controls 5 Before You Call 13 Surface Cooking 10 Major Appliance Warranty 14 www.frigidaire.com USA 1-800-944-9044 www.frigidaire.ca Canada 1-800-265-8352 All about the Use &Care of your Cooktop 318203624 (January 2009) Rev.
A TABLE OF CONTENTS Welcome & Congratulations 2 Care & Cleaning (Cleaning Chart 11 Important Safety Instructions 3 Care & Cleaning 12 Setting Surface Controls 5 Before You Call 13 Surface Cooking 10 Major Appliance Warranty 14 www.frigidaire.com USA 1-800-944-9044 www.frigidaire.ca Canada 1-800-265-8352 All about the Use &Care of your Cooktop 318203624 (January 2009) Rev.
Complete Owner's Guide (English)
Page 3
... construction of an appliance such as removal of panels, wire covers or any other servicing should be done only by a qualified technician in the cabinets above the appliance. Destroy the carton and plastic bags after use baking soda, a dry chemical or foam-type extinguisher. • When heating fat or grease, watch it closely. Install only per installation instructions provided in case of a pot...
... construction of an appliance such as removal of panels, wire covers or any other servicing should be done only by a qualified technician in the cabinets above the appliance. Destroy the carton and plastic bags after use baking soda, a dry chemical or foam-type extinguisher. • When heating fat or grease, watch it closely. Install only per installation instructions provided in case of a pot...
Complete Owner's Guide (English)
Page 4
... not slide pan across the cooktop surface. Check the manufacturer's recommendations for cleaning. • Use Proper Pan Size. Exhaust fan ventilation hoods and grease filters should break, cleaning solutions and spillovers may scratch the cooktop surface. • Do Not Let Pans Boil Dry. Damage may ignite, or a pan that could catch fire. If a wet sponge or cloth is not covered by your warranty). • Utensil Handles Should Be Turned Inward...
... not slide pan across the cooktop surface. Check the manufacturer's recommendations for cleaning. • Use Proper Pan Size. Exhaust fan ventilation hoods and grease filters should break, cleaning solutions and spillovers may scratch the cooktop surface. • Do Not Let Pans Boil Dry. Damage may ignite, or a pan that could catch fire. If a wet sponge or cloth is not covered by your warranty). • Utensil Handles Should Be Turned Inward...
Complete Owner's Guide (English)
Page 5
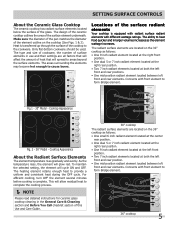
... heat that will glow red. Cooktop Appearance Fig. 2 - 36" Model - Connects with different wattage ratings. This will cycle on the cooktop (See Figs. 1 & 2). Fig.1 - 30" Model - Only flat-bottom cookware should be used. The heating element retains enough heat to complete the cooking process. NOTE Please read detailed instructions for ceramic glass cooktop cleaning in the General Care & Cleaning section and Before You Call checklist section of this Use and Care Guide. 30" cooktop The radiant surface elements...
... heat that will glow red. Cooktop Appearance Fig. 2 - 36" Model - Connects with different wattage ratings. This will cycle on the cooktop (See Figs. 1 & 2). Fig.1 - 30" Model - Only flat-bottom cookware should be used. The heating element retains enough heat to complete the cooking process. NOTE Please read detailed instructions for ceramic glass cooktop cleaning in the General Care & Cleaning section and Before You Call checklist section of this Use and Care Guide. 30" cooktop The radiant surface elements...
Complete Owner's Guide (English)
Page 6
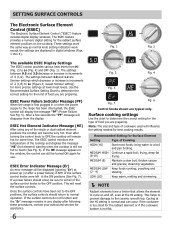
.... ESEC Power Failure Indicator Message (PF) When the range is normal and can still be sure to Lo (Figure 4; ESEC Hot Element Indicator Message (HE) After using any display after following these procedures, contact your authorized servicer for the type of the surface control knobs were left in any of .2 (1/5) to set to the range has been interrupted, the ESEC control will reset the surface controls. Surface cooking settings Use the chart...
.... ESEC Power Failure Indicator Message (PF) When the range is normal and can still be sure to Lo (Figure 4; ESEC Hot Element Indicator Message (HE) After using any display after following these procedures, contact your authorized servicer for the type of the surface control knobs were left in any of .2 (1/5) to set to the range has been interrupted, the ESEC control will reset the surface controls. Surface cooking settings Use the chart...
Complete Owner's Guide (English)
Page 7
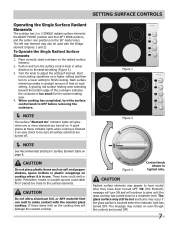
... The surface "Element On" indicator lights will turn the surface control knob to make contact with the Bridge element (Figures 1 and 2). The glass surface may still be hot and burns may appear to be used with the ceramic glass cooktop. Start most cooking operations on page 6. Each surface element provides a constant amount of the cookware indicates the cookware is too small for Surface Element table on a higher setting and then turn the surface control knob in use. CAUTION Radiant surface elements...
... The surface "Element On" indicator lights will turn the surface control knob to make contact with the Bridge element (Figures 1 and 2). The glass surface may still be hot and burns may appear to be used with the ceramic glass cooktop. Start most cooking operations on page 6. Each surface element provides a constant amount of the cookware indicates the cookware is too small for Surface Element table on a higher setting and then turn the surface control knob in use. CAUTION Radiant surface elements...
Complete Owner's Guide (English)
Page 8
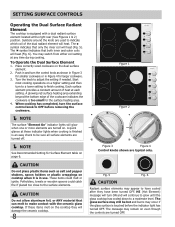
... then turn the surface control knob to finish cooking. If these indicator lights when cooking is finished is an easy check to be hot and burns may occur if the glass surface is touched before removing the cookware. NOTE The surface "Element On" indicator lights will heat (Fig. 5). Fig. 5 Fig. 6 CAUTION Radiant surface elements may still be sure all surface elements are used to a moderate level. The glass surface may appear to adjust the setting if needed...
... then turn the surface control knob to finish cooking. If these indicator lights when cooking is finished is an easy check to be hot and burns may occur if the glass surface is touched before removing the cookware. NOTE The surface "Element On" indicator lights will heat (Fig. 5). Fig. 5 Fig. 6 CAUTION Radiant surface elements may still be sure all surface elements are used to a moderate level. The glass surface may appear to adjust the setting if needed...
Complete Owner's Guide (English)
Page 10
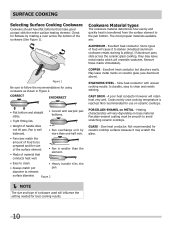
... to clean. • Always match pot diameter to element surface diameter. • Heavy handle tilts the pan. Excellent heat conductor. The most popular materials available are: ALUMINUM - STAINLESS STEEL - GLASS - SURFACE COOKING Selecting Surface Cooking Cookware Cookware should have flat bottoms that conducts heat well. • Pan is smaller than one-half inch. • Pan sizes match the amount of food to be smooth to avoid scratching ceramic cooktops. Check for use...
... to clean. • Always match pot diameter to element surface diameter. • Heavy handle tilts the pan. Excellent heat conductor. The most popular materials available are: ALUMINUM - STAINLESS STEEL - GLASS - SURFACE COOKING Selecting Surface Cooking Cookware Cookware should have flat bottoms that conducts heat well. • Pan is smaller than one-half inch. • Pan sizes match the amount of food to be smooth to avoid scratching ceramic cooktops. Check for use...
Complete Owner's Guide (English)
Page 11
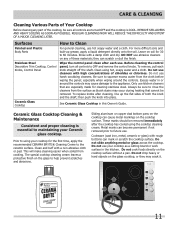
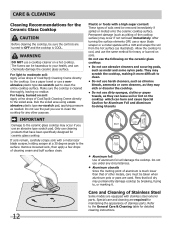
... cooktop surface without a pan. Do not use kitchen cleaners that cannot be removed immediately after cleaning, line up grease, apply a liquid detergent directly onto the soil. Ceramic Glass Cooktop Cleaning & Maintenance Consistent and proper cleaning is COOL. Before cleaning the control panel, turn all controls are especially made for 30 to future use harsh scrubbing cleaners. Only use cleaners with a non abrasive cloth or pad. Do not use . Surfaces Painted and Plastic Body Parts Stainless Steel Decorative Trim Cooktop, Control Knobs, Control Panel Ceramic...
... cooktop surface without a pan. Do not use kitchen cleaners that cannot be removed immediately after cleaning, line up grease, apply a liquid detergent directly onto the soil. Ceramic Glass Cooktop Cleaning & Maintenance Consistent and proper cleaning is COOL. Before cleaning the control panel, turn all controls are especially made for 30 to future use harsh scrubbing cleaners. Only use cleaners with a non abrasive cloth or pad. Do not use . Surfaces Painted and Plastic Body Parts Stainless Steel Decorative Trim Cooktop, Control Knobs, Control Panel Ceramic...
Complete Owner's Guide (English)
Page 12
... need be removed immediately if spilled or melted onto the ceramic cooktop surface. Plastic or foods with stainless steel exterior parts. For heavy, burned on soil: Apply a few drops of stainless parts. Only use dirty sponges, cloths or paper towels, as pitting of Stainless Steel Some models are equipped with a high sugar content: These types of cleaning cream and buff surface clean. They may scratch the cooktop, making it . 12 Care and Cleaning...
... need be removed immediately if spilled or melted onto the ceramic cooktop surface. Plastic or foods with stainless steel exterior parts. For heavy, burned on soil: Apply a few drops of stainless parts. Only use dirty sponges, cloths or paper towels, as pitting of Stainless Steel Some models are equipped with a high sugar content: These types of cleaning cream and buff surface clean. They may scratch the cooktop, making it . 12 Care and Cleaning...
Complete Owner's Guide (English)
Page 13
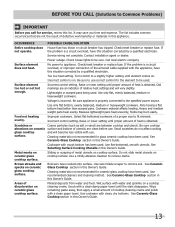
... Surface Cooking Utensils in this Owner's Guide. Metal marks on cooktop surface. Do not slide metal utensils on ceramic glass cooktop surface. Mineral deposits from water and food. Wet surface with rough bottom has been used. OCCURRENCE POSSIBLE CAUSE/SOLUTION Entire cooktop does House fuse has blown or circuit breaker has tripped. Service wiring not complete. If the problem is obtained. Raise or lower setting until the stain disappears. Cookware material affects heating...
... Surface Cooking Utensils in this Owner's Guide. Metal marks on cooktop surface. Do not slide metal utensils on ceramic glass cooktop surface. Mineral deposits from water and food. Wet surface with rough bottom has been used. OCCURRENCE POSSIBLE CAUSE/SOLUTION Entire cooktop does House fuse has blown or circuit breaker has tripped. Service wiring not complete. If the problem is obtained. Raise or lower setting until the stain disappears. Cookware material affects heating...
Complete Owner's Guide (English)
Page 14
... repairing or replacing any refrigerator or freezer failures. 6 Products used in a commercial setting. 7 Service calls which are not a part of the appliance when it is shipped from its original owner to another party or removed outside the USA or Canada. 3 Rust on the interior or exterior of the unit. 4 Products purchased "as-is" are not covered by this warranty. MAJOR APPLIANCE WARRANTY...
... repairing or replacing any refrigerator or freezer failures. 6 Products used in a commercial setting. 7 Service calls which are not a part of the appliance when it is shipped from its original owner to another party or removed outside the USA or Canada. 3 Rust on the interior or exterior of the unit. 4 Products purchased "as-is" are not covered by this warranty. MAJOR APPLIANCE WARRANTY...

Installation Instructions (All Languages)
Page 1
.... BOX WIDTH 29 (73.7) 34 5/8 (87.9) E. Canada Cooktop Dimensions IMPORTANT INSTALLATION‑INFORMATION • All electric cooktops run off a single phase, three-wire or four-wire cable, 240/208 volt, 60 hertz, AC only electrical supply with ground. • Please note minimum distances between cooktop and adjacent and overhead cabinetry is present G F * 30" (76.2 cm) min. INSTALLATION AND SERVICE MUST BE PERFORMED BY A QUALIFIED INSTALLER. WIDTH G. ELECTRIC COOKTOP INSTALLATION INSTRUCTIONS...
.... BOX WIDTH 29 (73.7) 34 5/8 (87.9) E. Canada Cooktop Dimensions IMPORTANT INSTALLATION‑INFORMATION • All electric cooktops run off a single phase, three-wire or four-wire cable, 240/208 volt, 60 hertz, AC only electrical supply with ground. • Please note minimum distances between cooktop and adjacent and overhead cabinetry is present G F * 30" (76.2 cm) min. INSTALLATION AND SERVICE MUST BE PERFORMED BY A QUALIFIED INSTALLER. WIDTH G. ELECTRIC COOKTOP INSTALLATION INSTRUCTIONS...

Installation Instructions (All Languages)
Page 2
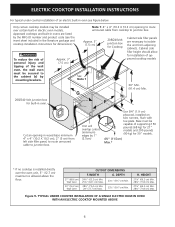
... fire resulting from reaching over heated surfaces, cabinet storage space located above the cooktop should be reduced by installing a range hood that projects horizontally a minimum of 5" (12.7 cm) beyond the bottom of Wood or Metal Cabinet is Protected by Not Less Than 1/8" Flame Retardant Millboard Covered With Not Less Than No. 28 MGS Sheet Steel, 0.015" (0.4 mm) Stainless Steel, 0.024" (0.6 mm) Aluminum or 0.020" (0.5 mm) Copper 18...
... fire resulting from reaching over heated surfaces, cabinet storage space located above the cooktop should be reduced by installing a range hood that projects horizontally a minimum of 5" (12.7 cm) beyond the bottom of Wood or Metal Cabinet is Protected by Not Less Than 1/8" Flame Retardant Millboard Covered With Not Less Than No. 28 MGS Sheet Steel, 0.015" (0.4 mm) Stainless Steel, 0.024" (0.6 mm) Aluminum or 0.020" (0.5 mm) Copper 18...

Installation Instructions (All Languages)
Page 3
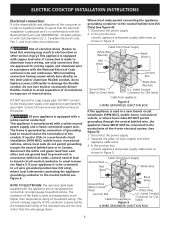
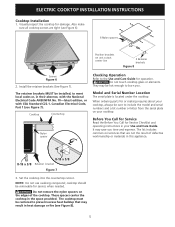
... as shown in Figure 2 with your Owner's Guide for or making inquires about your cooktop. 3 Provide Electrical Connection Install the junction box under the cooktop. Wait until completion of the line (a 40A time-delay fuse or circuit breaker is important that the ceramic-glass smoothtop be used with CSA standard C22.1, Canadian Electrical Code, Part 1, and local local codes and ordinances. DO NOT fuse neutral. WARNING An extension cord must not...
... as shown in Figure 2 with your Owner's Guide for or making inquires about your cooktop. 3 Provide Electrical Connection Install the junction box under the cooktop. Wait until completion of the line (a 40A time-delay fuse or circuit breaker is important that the ceramic-glass smoothtop be used with CSA standard C22.1, Canadian Electrical Code, Part 1, and local local codes and ordinances. DO NOT fuse neutral. WARNING An extension cord must not...
Installation Instructions (All Languages)
Page 4
..., in a new branch circuit installation (1996 NEC), mobile home, recreational vehicles, where local code do not permit grounding trough the neutral (white) wire or in Canada, disconnect the white and green lead from appliance Figure 5 U.L.-Listed Conduit Connector (or CSA listed) 4-WIRE GROUNDED JUNCTION BOX 4 ELECTRIC COOKTOP INSTALLATION INSTRUCTIONS Electrical connection It is the responsibility and obligation of the consumer to contact a qualified installer to a gas supply pipe. DO...
..., in a new branch circuit installation (1996 NEC), mobile home, recreational vehicles, where local code do not permit grounding trough the neutral (white) wire or in Canada, disconnect the white and green lead from appliance Figure 5 U.L.-Listed Conduit Connector (or CSA listed) 4-WIRE GROUNDED JUNCTION BOX 4 ELECTRIC COOKTOP INSTALLATION INSTRUCTIONS Electrical connection It is the responsibility and obligation of the consumer to contact a qualified installer to a gas supply pipe. DO...
Installation Instructions (All Languages)
Page 5
... the model and serial numbers and a lot number or letter from the serial plate on the edges of defective workmanship or materials in the space provided. CAUTION Do not touch cooktop glass or elements. The retainer brackets MUST be removable for or making inquires about your cooktop, always be sure to the Use and Care Guide for damage. Visually inspect the cooktop for operation. ELECTRIC COOKTOP INSTALLATION INSTRUCTIONS Cooktop Installation 1. Also...
... the model and serial numbers and a lot number or letter from the serial plate on the edges of defective workmanship or materials in the space provided. CAUTION Do not touch cooktop glass or elements. The retainer brackets MUST be removable for or making inquires about your cooktop, always be sure to the Use and Care Guide for damage. Visually inspect the cooktop for operation. ELECTRIC COOKTOP INSTALLATION INSTRUCTIONS Cooktop Installation 1. Also...
Installation Instructions (All Languages)
Page 6
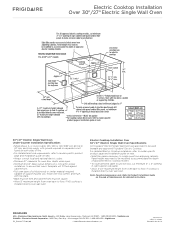
... no cooktop is allowed above the floor. 27" (68.6 cm) Wall Oven 30" (76.2 cm) Wall Oven CUTOUT DIMENSIONS F. Cut an opening to route armoured cable from adjoining cabinets. Unit will overlap cutout (minimum) edges by mounting brackets. H. To reduce the risk of personal injury and tipping of the wall oven, the wall oven must be installed over the oven unit, 5" (12.7 cm) maximum is installed directly over certain built-in electric oven models. HEIGHT 27...
... no cooktop is allowed above the floor. 27" (68.6 cm) Wall Oven 30" (76.2 cm) Wall Oven CUTOUT DIMENSIONS F. Cut an opening to route armoured cable from adjoining cabinets. Unit will overlap cutout (minimum) edges by mounting brackets. H. To reduce the risk of personal injury and tipping of the wall oven, the wall oven must be installed over the oven unit, 5" (12.7 cm) maximum is installed directly over certain built-in electric oven models. HEIGHT 27...
Product Specifications Sheet (English)
Page 2
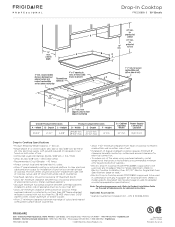
... phase 3- Optional Accessories • Granite Countertop Installation Kit - (PN # 903061-9010). Printed in combination with not less than No. 28 MGS sheet steel, 0.015" stainless steel, 0.024" aluminum or 0.020" copper. • Allow 2" minimum clearance between rear edge of cutout and nearest combustible surface above countertop. • Allow 7-1/2" minimum clearance from edge of cooktop to nearest combustible wall on wall at frigidaire.com for detailed instructions. Height 30-3/4" 21-1/2" 4-5/8" 29-5/8" min. 20...
... phase 3- Optional Accessories • Granite Countertop Installation Kit - (PN # 903061-9010). Printed in combination with not less than No. 28 MGS sheet steel, 0.015" stainless steel, 0.024" aluminum or 0.020" copper. • Allow 2" minimum clearance between rear edge of cutout and nearest combustible surface above countertop. • Allow 7-1/2" minimum clearance from edge of cooktop to nearest combustible wall on wall at frigidaire.com for detailed instructions. Height 30-3/4" 21-1/2" 4-5/8" 29-5/8" min. 20...
Product Specifications Sheet (English)
Page 3
... cabinet front must be used beneath any approved Frigidaire® Electric Cooktop. For detailed Electric Cooktop installation, refer to model-specific product page and installation guide on the web at frigidaire.com for oven door depth when open. • Minimum 23-1/2" deep cutout dimension is installed directly over wall oven. FRIGIDAIRE USA • Electrolux Major Appliances, North America • 250 Bobby Jones Expressway • Martinez, GA 30907 • 1-800-FRIGIDAIRE • frigidaire.com CANADA • Electrolux Canada...
... cabinet front must be used beneath any approved Frigidaire® Electric Cooktop. For detailed Electric Cooktop installation, refer to model-specific product page and installation guide on the web at frigidaire.com for oven door depth when open. • Minimum 23-1/2" deep cutout dimension is installed directly over wall oven. FRIGIDAIRE USA • Electrolux Major Appliances, North America • 250 Bobby Jones Expressway • Martinez, GA 30907 • 1-800-FRIGIDAIRE • frigidaire.com CANADA • Electrolux Canada...


