Installation Instructions (All Languages)
Page 1
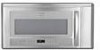
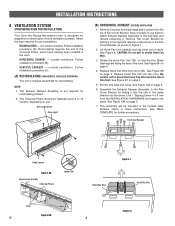
... to a minimum of one of the stud can be located by a qualified electrician before installing the Over the Range Microwave Oven. The maximum depth is installed. The mounting surfaces must be flat for future reference. • SKILL LEVEL - The center...new electrical outlet is not covered under the Warranty. • Please read all items which locates the nails in Thailand INSTALLATION INSTRUCTIONS Over The Range Microwave Oven BEFORE YOU BEGIN Read these instructions completely and carefully. • IMPORTANT Save these instructions for Mounting Template Information...
... to a minimum of one of the stud can be located by a qualified electrician before installing the Over the Range Microwave Oven. The maximum depth is installed. The mounting surfaces must be flat for future reference. • SKILL LEVEL - The center...new electrical outlet is not covered under the Warranty. • Please read all items which locates the nails in Thailand INSTALLATION INSTRUCTIONS Over The Range Microwave Oven BEFORE YOU BEGIN Read these instructions completely and carefully. • IMPORTANT Save these instructions for Mounting Template Information...
Installation Instructions (All Languages)
Page 2
... If the power supply cord is equipped with the National Electrical Code and local codes and ordinances. Improper use plastic duct. INSTALLATION INSTRUCTIONS 3 ELECTRICAL GROUNDING INSTRUCTIONS This appliance must be metal; All ductwork must be grounded. ELECTRICAL REQUIREMENTS The oven is too short..., have any liability for calculating air flow resistance equivalent, which is properly installed and grounded in Figure 2. Neither Electrolux nor the dealer can result in parentheses for damage to the oven or personal injury ...
... If the power supply cord is equipped with the National Electrical Code and local codes and ordinances. Improper use plastic duct. INSTALLATION INSTRUCTIONS 3 ELECTRICAL GROUNDING INSTRUCTIONS This appliance must be metal; All ductwork must be grounded. ELECTRICAL REQUIREMENTS The oven is too short..., have any liability for calculating air flow resistance equivalent, which is properly installed and grounded in Figure 2. Neither Electrolux nor the dealer can result in parentheses for damage to the oven or personal injury ...
Installation Instructions (All Languages)
Page 3
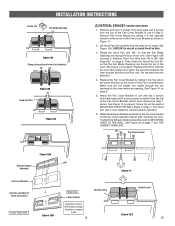
... rest on the door. Check the oven for product and range - Item Name q Wood Screw 5 x 35 mm w Toggle Bolt 3/16" e Top Cabinet Screw 5 x 93 mm r Flat Washer 30 mm diameter t Grommet y Tapping Screw 4 x 8 mm u Exhaust Damper Assembly i Grease Filter o Rear Cushion a Installation Instructions s Top Template d Wall Template 316902446 316902447 316902448 Quantity 6 4 2 2 1 4 1 2 1 1 1 1 7 PREPARATION...
... rest on the door. Check the oven for product and range - Item Name q Wood Screw 5 x 35 mm w Toggle Bolt 3/16" e Top Cabinet Screw 5 x 93 mm r Flat Washer 30 mm diameter t Grommet y Tapping Screw 4 x 8 mm u Exhaust Damper Assembly i Grease Filter o Rear Cushion a Installation Instructions s Top Template d Wall Template 316902446 316902447 316902448 Quantity 6 4 2 2 1 4 1 2 1 1 1 1 7 PREPARATION...
Installation Instructions (All Languages)
Page 4
... Fan Unit carefully and slip wires out of the oven. See Figure 9B on page 5. 4. See WALL TEMPLATE for your installation. Follow installation procedure (B). Save 3 screws to use them to attach Exhaust Damper Assembly to the Fan Cover Bracket by sliding it into the... the arrow. Remove 3 screws from back edge and 5 screws from the INSTALLATION HARDWARE and tighten into cavity. See Figure 8. INSTALLATION INSTRUCTIONS 8 VENTILATION SYSTEM (PREPARING OVEN FOR INSTALLATION) This Over the Range Microwave Oven is designed for adaptation to three types of hood ventilation systems. ...
... Fan Unit carefully and slip wires out of the oven. See Figure 9B on page 5. 4. See WALL TEMPLATE for your installation. Follow installation procedure (B). Save 3 screws to use them to attach Exhaust Damper Assembly to the Fan Cover Bracket by sliding it into the... the arrow. Remove 3 screws from back edge and 5 screws from the INSTALLATION HARDWARE and tighten into cavity. See Figure 8. INSTALLATION INSTRUCTIONS 8 VENTILATION SYSTEM (PREPARING OVEN FOR INSTALLATION) This Over the Range Microwave Oven is designed for adaptation to three types of hood ventilation systems. ...
Installation Instructions (All Languages)
Page 5
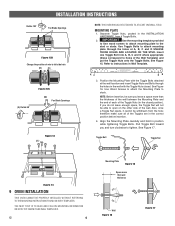
... is now rotated for future instructions. Oven Rear Side Figure 10B Wall Side Rear Cushion Apply Rear Cushion after mounting the oven. See Figure 12A. INSTALLATION INSTRUCTIONS Rotate 180° Fan Blade Openings Figure 9A Change the position of wire to wall. 5 Hood Fan Wire Figure 11 Hood Fan Unit Figure...
... is now rotated for future instructions. Oven Rear Side Figure 10B Wall Side Rear Cushion Apply Rear Cushion after mounting the oven. See Figure 12A. INSTALLATION INSTRUCTIONS Rotate 180° Fan Blade Openings Figure 9A Change the position of wire to wall. 5 Hood Fan Wire Figure 11 Hood Fan Unit Figure...
Installation Instructions (All Languages)
Page 6
... USE ABOVE GAS OR ELECTRICAL COOKING EQUIPMENT 36 INCHES OR LESS WIDE WARNING TO REDUCE THE RISK OF FIRE AND ELECTRICAL SHOCK,INSTALL AT LEAST 13-3/16 INCHES ABOVE A RANGE (OR COOK TOP) DB 3. NOTE: Before insertion, be sure you do not leave enough space, the Toggle Nut will not be... you leave a space more than the thickness of the wall between the Mounting Plate and the end of each of the Toggles are in the INSTALLATION HARDWARE, from the hole; Separate Toggle Nuts, packed in the correct position before insertion. 4. Position the Mounting Plate with the Toggle Nuts closed position)....
... USE ABOVE GAS OR ELECTRICAL COOKING EQUIPMENT 36 INCHES OR LESS WIDE WARNING TO REDUCE THE RISK OF FIRE AND ELECTRICAL SHOCK,INSTALL AT LEAST 13-3/16 INCHES ABOVE A RANGE (OR COOK TOP) DB 3. NOTE: Before insertion, be sure you do not leave enough space, the Toggle Nut will not be... you leave a space more than the thickness of the wall between the Mounting Plate and the end of each of the Toggles are in the INSTALLATION HARDWARE, from the hole; Separate Toggle Nuts, packed in the correct position before insertion. 4. Position the Mounting Plate with the Toggle Nuts closed position)....
Installation Instructions (All Languages)
Page 7
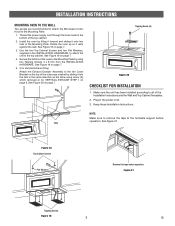
...which removed at the turntable support before operation. Figure 21 Tapping Screws Figure 19 7 E Secure the bottom of the oven to all of the Installation Instructions and the Wall and Top Cabinet Templates. 2. Plug in the bottom of the Mounting Plate. Tabs Figure 18 Top Cabinet Screws Flat Washers... 20 on the top of the outercase cabinet by tilting it forward and sliding it rests against the wall. See figure 21. INSTALLATION INSTRUCTIONS MOUNTING OVEN TO THE WALL Two people are recommended to attach the Microwave Oven/ Hood to the top cabinet. Thread the power supply...
...which removed at the turntable support before operation. Figure 21 Tapping Screws Figure 19 7 E Secure the bottom of the oven to all of the Installation Instructions and the Wall and Top Cabinet Templates. 2. Plug in the bottom of the Mounting Plate. Tabs Figure 18 Top Cabinet Screws Flat Washers... 20 on the top of the outercase cabinet by tilting it forward and sliding it rests against the wall. See figure 21. INSTALLATION INSTRUCTIONS MOUNTING OVEN TO THE WALL Two people are recommended to attach the Microwave Oven/ Hood to the top cabinet. Thread the power supply...


