Installation Instructions (All Languages)
Page 1
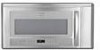
...more from floor Figure 1 As a guide to installation, see page 8 for Mounting Template Information. 2 WALL CONSTRUCTION This Over the Range Microwave Oven should be attached to a minimum of the stud and then placing a mark halfway between the edges. Use a stud finder, a magnetic device... which would normally be stored in the top cabinet above the unit. NEED HELP? INSTALLATION INSTRUCTIONS Over The Range Microwave Oven BEFORE YOU BEGIN Read these instructions completely and carefully. • IMPORTANT Save these instructions for local inspector's use spacers to ...
...more from floor Figure 1 As a guide to installation, see page 8 for Mounting Template Information. 2 WALL CONSTRUCTION This Over the Range Microwave Oven should be attached to a minimum of the stud and then placing a mark halfway between the edges. Use a stud finder, a magnetic device... which would normally be stored in the top cabinet above the unit. NEED HELP? INSTALLATION INSTRUCTIONS Over The Range Microwave Oven BEFORE YOU BEGIN Read these instructions completely and carefully. • IMPORTANT Save these instructions for local inspector's use spacers to ...
Installation Instructions (All Languages)
Page 2
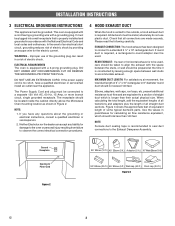
... standard 3 1/4" x 10" rectangular duct. Elbows, adapters, wall caps, roof caps, etc. Use the values in a risk of electric shock. This oven is required, a rectangular-to-round adapter must be used , care should total less than their actual physical size. WARNING - NOTE: 1. If round duct... wall receptacle that all connections are equivalent to a section of straight duct which should be located inside the cabinet directly above the Microwave Oven mounting location as shown in accordance with a 3-prong grounding plug. In the event of an electrical short circuit, grounding reduces risk ...
... standard 3 1/4" x 10" rectangular duct. Elbows, adapters, wall caps, roof caps, etc. Use the values in a risk of electric shock. This oven is required, a rectangular-to-round adapter must be used , care should total less than their actual physical size. WARNING - NOTE: 1. If round duct... wall receptacle that all connections are equivalent to a section of straight duct which should be located inside the cabinet directly above the Microwave Oven mounting location as shown in accordance with a 3-prong grounding plug. In the event of an electrical short circuit, grounding reduces risk ...
Installation Instructions (All Languages)
Page 4
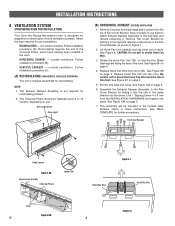
... Fan Wire Hood Fan Unit Tabs Figure 6B E 4 Figure 8 INSTALLATION INSTRUCTIONS 8 VENTILATION SYSTEM (PREPARING OVEN FOR INSTALLATION) This Over the Range Microwave Oven is designed for adaptation to three types of Fan Cover Bracket. RECIRCULATING - non-vented, ductless. Follow ...remaining 5. HORIZONTAL EXHAUST - outside ventilation. Follow installation procedure (B). The Exhaust Damper Assembly is not required for recirculating. Oven Light Cover Oven Light (B) HORIZONTAL EXHAUST: OUTSIDE VENTILATION 1. CAUTION: Do not pull or stretch Hood Fan Wire. 3. See Figure...
... Fan Wire Hood Fan Unit Tabs Figure 6B E 4 Figure 8 INSTALLATION INSTRUCTIONS 8 VENTILATION SYSTEM (PREPARING OVEN FOR INSTALLATION) This Over the Range Microwave Oven is designed for adaptation to three types of Fan Cover Bracket. RECIRCULATING - non-vented, ductless. Follow ...remaining 5. HORIZONTAL EXHAUST - outside ventilation. Follow installation procedure (B). The Exhaust Damper Assembly is not required for recirculating. Oven Light Cover Oven Light (B) HORIZONTAL EXHAUST: OUTSIDE VENTILATION 1. CAUTION: Do not pull or stretch Hood Fan Wire. 3. See Figure...
Installation Instructions (All Languages)
Page 7
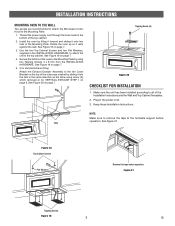
...of the Installation Instructions and the Wall and Top Cabinet Templates. 2. Make sure the unit has been installed according to all of the oven to the Mounting Plate by using screw (A) which removed at the turntable support before operation. Tabs Figure 18 Top Cabinet Screws Flat ... so it onto two tabs of the Mounting Plate. Figure 21 Tapping Screws Figure 19 7 E INSTALLATION INSTRUCTIONS MOUNTING OVEN TO THE WALL Two people are recommended to attach the Microwave Oven/ Hood to remove the tape at (C) VERTICAL EXHAUST STEP 1 on page 7. 4. See figure 21. Thread the ...
...of the Installation Instructions and the Wall and Top Cabinet Templates. 2. Make sure the unit has been installed according to all of the oven to the Mounting Plate by using screw (A) which removed at the turntable support before operation. Tabs Figure 18 Top Cabinet Screws Flat ... so it onto two tabs of the Mounting Plate. Figure 21 Tapping Screws Figure 19 7 E INSTALLATION INSTRUCTIONS MOUNTING OVEN TO THE WALL Two people are recommended to attach the Microwave Oven/ Hood to remove the tape at (C) VERTICAL EXHAUST STEP 1 on page 7. 4. See figure 21. Thread the ...


