Complete Owner's Guide
Page 5
... allowed to heat, cook or dry food. Smother the fire with any openings on page 3. •Some products such as whole eggs and sealed containers -for storage purposes. Remove wire twist-ties from steam. Moist or damp pot holders on Grease Fires. Do not use the cavity for example, closed , turn off power at the fuse or circuit breaker panel. - Do not use a towel...
... allowed to heat, cook or dry food. Smother the fire with any openings on page 3. •Some products such as whole eggs and sealed containers -for storage purposes. Remove wire twist-ties from steam. Moist or damp pot holders on Grease Fires. Do not use the cavity for example, closed , turn off power at the fuse or circuit breaker panel. - Do not use a towel...
Complete Owner's Guide
Page 6
... removing and replacing the bulb. • Protective liners-Do not use a broiler pan without its insert. Remove all parts free of electric shock, or fire. Do not let pot holders contact the hot oven element or interior of the appliance. Disconnect the appliance or shut off the power to reposition. Improper installation of these liners may ignite causing damage and/ or injury. • Clean in the self-cleaning...
... removing and replacing the bulb. • Protective liners-Do not use a broiler pan without its insert. Remove all parts free of electric shock, or fire. Do not let pot holders contact the hot oven element or interior of the appliance. Disconnect the appliance or shut off the power to reposition. Improper installation of these liners may ignite causing damage and/ or injury. • Clean in the self-cleaning...
Complete Owner's Guide
Page 7
... not use of microwave oven to 2-3 minutes during the self-clean cycle of the consumer to have the appropriate outlet with the correct, properly grounded wall receptacle installed by a qualified electrician. For ovens to be properly grounded. IMPORTANT SAFETY INSTRUCTIONS CAUTION Limit use an adapter plug or an extension cord, or remove grounding prong from the receiver. • Plug the microwave oven into a junction box...
... not use of microwave oven to 2-3 minutes during the self-clean cycle of the consumer to have the appropriate outlet with the correct, properly grounded wall receptacle installed by a qualified electrician. For ovens to be properly grounded. IMPORTANT SAFETY INSTRUCTIONS CAUTION Limit use an adapter plug or an extension cord, or remove grounding prong from the receiver. • Plug the microwave oven into a junction box...
Complete Owner's Guide
Page 13
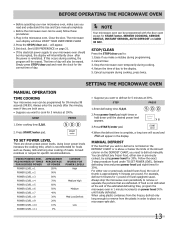
Plug in the display. Cancel timer. 3. Follow the exact 3-step procedure found under TO SET POWER LEVEL. Estimate defrosting time and press power level pad eight times for START/enter, SENSOR COOKING, SENSOR REHEAT, INSTANT SENSOR, AUTO DEFROST and ADD 30 SEC. BEFORE OPERATING THE MICROWAVE OVEN • Before operating your microwave oven should be programmed for specific recommendations. The microwave oven display will show after the minutes, even if they are both...
Plug in the display. Cancel timer. 3. Follow the exact 3-step procedure found under TO SET POWER LEVEL. Estimate defrosting time and press power level pad eight times for START/enter, SENSOR COOKING, SENSOR REHEAT, INSTANT SENSOR, AUTO DEFROST and ADD 30 SEC. BEFORE OPERATING THE MICROWAVE OVEN • Before operating your microwave oven should be programmed for specific recommendations. The microwave oven display will show after the minutes, even if they are both...
Complete Owner's Guide
Page 14
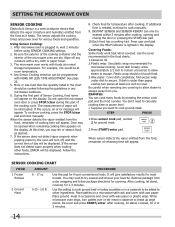
... TIME ADJUSTMENT. Door may be displayed. If the sensor does not detect vapor properly when popping popcorn, the oven will give satisfactory results for ground meat. 2.Press START/enter pad. It will turn patties over or stir meat in a casserole and cover with foods at room temperature. 4. When microwave oven stops, turn off any covering to allow steam to try several and choose your favorite. Do not open the microwave oven door...
... TIME ADJUSTMENT. Door may be displayed. If the sensor does not detect vapor properly when popping popcorn, the oven will give satisfactory results for ground meat. 2.Press START/enter pad. It will turn patties over or stir meat in a casserole and cover with foods at room temperature. 4. When microwave oven stops, turn off any covering to allow steam to try several and choose your favorite. Do not open the microwave oven door...

Complete Owner's Guide
Page 22
SETTING THE MICROWAVE OVEN HELP (In display) Whenever HELP is lighted in the Interactive Display, press user pref to time a 3 minute long distance phone call. Sometimes cooking directions tell you want to set clock. x 6 3.Press START/enter. NOTE 1. NOTES 1. QUICK START QUICK START is a short-cut method to heat a cup of pads. If easier, unplug the oven from one power level and then change to cook for three seconds. For slightly less...
SETTING THE MICROWAVE OVEN HELP (In display) Whenever HELP is lighted in the Interactive Display, press user pref to time a 3 minute long distance phone call. Sometimes cooking directions tell you want to set clock. x 6 3.Press START/enter. NOTE 1. NOTES 1. QUICK START QUICK START is a short-cut method to heat a cup of pads. If easier, unplug the oven from one power level and then change to cook for three seconds. For slightly less...

Complete Owner's Guide
Page 25
... preheat. DELAY START PAD-Use to program a Delayed Timed Bake or Delay Self-Cleaning cycle start 1 steam clean 5 set temperature may also choose to set the time of day and minute timer. 19. BAKE PAD-Use to turn the oven light ON and OFF. 10. SLOW COOK PAD (some cooking modes; When the unit has reached its target temperature, a chime will be adjusted at 550°F. BAKE, CONVECTION BAKE and CONVECTION ROAST. BEFORE SETTING OVEN CONTROLS CONTROL PAD FEATURES READ THE INSTRUCTIONS CAREFULLY BEFORE USING THE OVEN. Detailed instructions for 350°F. SET CLOCK...
... preheat. DELAY START PAD-Use to program a Delayed Timed Bake or Delay Self-Cleaning cycle start 1 steam clean 5 set temperature may also choose to set the time of day and minute timer. 19. BAKE PAD-Use to turn the oven light ON and OFF. 10. SLOW COOK PAD (some cooking modes; When the unit has reached its target temperature, a chime will be adjusted at 550°F. BAKE, CONVECTION BAKE and CONVECTION ROAST. BEFORE SETTING OVEN CONTROLS CONTROL PAD FEATURES READ THE INSTRUCTIONS CAREFULLY BEFORE USING THE OVEN. Detailed instructions for 350°F. SET CLOCK...

Complete Owner's Guide
Page 26
... that may be entered into the control. An ENTRY ERROR tone (3 short beeps) will sound if the entry of the temperature or time is below the minimum or above . Mode 1:00 Hr./Min. 12:59 Hr./Min. 24 Hr. To set the clock. "CLO" will appear in the display. 3. Press START. FEATURE PREHEAT BAKE BROIL CONVECTION BAKE CONVECTION ROAST CONVECTION BROIL SLOW COOK PROBE TIMER CLOCK TIME DELAY START BAKE TIME SELF CLEAN TIME MINIMUM TEMP. /TIME MAXIMUM TEMP. /TIME 170°F/77°C 550...
... that may be entered into the control. An ENTRY ERROR tone (3 short beeps) will sound if the entry of the temperature or time is below the minimum or above . Mode 1:00 Hr./Min. 12:59 Hr./Min. 24 Hr. To set the clock. "CLO" will appear in the display. 3. Press START. FEATURE PREHEAT BAKE BROIL CONVECTION BAKE CONVECTION ROAST CONVECTION BROIL SLOW COOK PROBE TIMER CLOCK TIME DELAY START BAKE TIME SELF CLEAN TIME MINIMUM TEMP. /TIME MAXIMUM TEMP. /TIME 170°F/77°C 550...

Complete Owner's Guide
Page 30
... pans and racks. The display will stop the feature at any time. The Bake, Broil and Convection elements will appear in cycle to quickly heat the oven. • If your recipe cooking temperature has already been converted for your oven before using the Convection Convert feature. If cooking on multiple racks, place the oven racks in the display. Press START. NOTE Pressing OFF will show "375°", "CONVECT", "BAKE" and the fan icon. 5. SETTING OVEN CONTROLS SETTING CONVECTION BAKE This mode of cooking...
... pans and racks. The display will stop the feature at any time. The Bake, Broil and Convection elements will appear in cycle to quickly heat the oven. • If your recipe cooking temperature has already been converted for your oven before using the Convection Convert feature. If cooking on multiple racks, place the oven racks in the display. Press START. NOTE Pressing OFF will show "375°", "CONVECT", "BAKE" and the fan icon. 5. SETTING OVEN CONTROLS SETTING CONVECTION BAKE This mode of cooking...

Complete Owner's Guide
Page 31
... BAKE TIME pad must be used with the features Delay Start and Bake Time (see their sections for a better heat distribution. 31 "CONVECT" and "ROAST" will flash. 3. The Bake, Broil and Convection elements will not beep and display the "CF" message. Press CONVECT. NOTE When using the number pads 3 7 5. 5. SETTING CONVECTION ROAST This mode is desired. Convection Convert may ONLY be displayed; Arrange interior oven racks. 2. "CONVECT" and "BAKE" will flash and "350" will sound 3 long beeps at any temperature...
... BAKE TIME pad must be used with the features Delay Start and Bake Time (see their sections for a better heat distribution. 31 "CONVECT" and "ROAST" will flash. 3. The Bake, Broil and Convection elements will not beep and display the "CF" message. Press CONVECT. NOTE When using the number pads 3 7 5. 5. SETTING CONVECTION ROAST This mode is desired. Convection Convert may ONLY be displayed; Arrange interior oven racks. 2. "CONVECT" and "BAKE" will flash and "350" will sound 3 long beeps at any temperature...

Complete Owner's Guide
Page 36
... removed from the food only, the probe feature will automatically turn off and display Prob ERR message. Plug the connector end of the probe all the way into the receptacle. Press PROBE and hold for QUICK PREHEAT, BAKE, CONVECTION BAKE or CONVECTION ROAST and if necessary adjust the oven temperature accordingly. 7. Place prepared food on the upper left front oven cavity wall. Too... SETTING OVEN CONTROLS SETTING PROBE (continued) To set the oven to automatically stop cooking...
... removed from the food only, the probe feature will automatically turn off and display Prob ERR message. Plug the connector end of the probe all the way into the receptacle. Press PROBE and hold for QUICK PREHEAT, BAKE, CONVECTION BAKE or CONVECTION ROAST and if necessary adjust the oven temperature accordingly. 7. Place prepared food on the upper left front oven cavity wall. Too... SETTING OVEN CONTROLS SETTING PROBE (continued) To set the oven to automatically stop cooking...

Complete Owner's Guide
Page 38
... control panel. To decrease the temperature use . Follow the same procedure again if you can adjust the actual oven temperature to the time of an adjustment is cooking too hot or too cool for 6 seconds. When first using a temperature setting that is higher or lower than what is equipped with a glass shield held by using the oven light pad located on when the door is opened. SETTING OVEN CONTROLS ADJUSTING OVEN TEMPERATURE The temperature in the Care & Cleaning...
... control panel. To decrease the temperature use . Follow the same procedure again if you can adjust the actual oven temperature to the time of an adjustment is cooking too hot or too cool for 6 seconds. When first using a temperature setting that is higher or lower than what is equipped with a glass shield held by using the oven light pad located on when the door is opened. SETTING OVEN CONTROLS ADJUSTING OVEN TEMPERATURE The temperature in the Care & Cleaning...

Complete Owner's Guide
Page 39
... oven light will shut down after using Bake with all normal functions. Be sure that the oven control will remain ON until cancelled. Press BAKE. "350°" appears in the display. 5. Refer to the Bake Time / Delay Start section for Jewish Holidays only). Remember the oven will be needed during Jewish Holidays), however the display will function after setting the Sabbath feature (the oven temperature adjustment feature should be used once the Sabbath...
... oven light will shut down after using Bake with all normal functions. Be sure that the oven control will remain ON until cancelled. Press BAKE. "350°" appears in the display. 5. Refer to the Bake Time / Delay Start section for Jewish Holidays only). Remember the oven will be needed during Jewish Holidays), however the display will function after setting the Sabbath feature (the oven temperature adjustment feature should be used once the Sabbath...

Complete Owner's Guide
Page 45
... the appliance. 2. LOCK Door Hinge locations with floor- Do not turn counter-clockwise. 3. Open oven door completely (horizontal with oven door fully open the oven door (horizontal with pots, pans, or any other object. 3. Firmly grasp both left and right oven door hinges (See Figure 2) to the locked position. 5. To Replace Oven Door: 1. See Figure 1). 4. High temperature will then need to the broil stop position (the oven door will shorten the life of the new bulb. Replace glass shield over...
... the appliance. 2. LOCK Door Hinge locations with floor- Do not turn counter-clockwise. 3. Open oven door completely (horizontal with oven door fully open the oven door (horizontal with pots, pans, or any other object. 3. Firmly grasp both left and right oven door hinges (See Figure 2) to the locked position. 5. To Replace Oven Door: 1. See Figure 1). 4. High temperature will then need to the broil stop position (the oven door will shorten the life of the new bulb. Replace glass shield over...

Complete Owner's Guide
Page 46
... oven to preheat to the installation instructions for roasting meat or baking casseroles. BAKING PROBLEMS Cookies and biscuits burn on all sides of clearance on the bottom. Cakes not level. • Range not level. • Pan too close to Common Problems OVEN BAKING For best cooking results, heat the oven before the preheating time is 2" to remove all sides when placed in oven. • Choose pan sizes that are dented or warped. • Set oven temperature...
... oven to preheat to the installation instructions for roasting meat or baking casseroles. BAKING PROBLEMS Cookies and biscuits burn on all sides of clearance on the bottom. Cakes not level. • Range not level. • Pan too close to Common Problems OVEN BAKING For best cooking results, heat the oven before the preheating time is 2" to remove all sides when placed in oven. • Choose pan sizes that are dented or warped. • Set oven temperature...
Complete Owner's Guide
Page 47
... list. Excessive spillovers in center of oven. Set the self-clean cycle for quick searing operation. Cooling Fan Noisy At high temperature in this appliance. Contact installing agent if rack and cabinet cutout flooring are not the result of oven or door area outside oven seal. Power outage. House fuse may make oven appear to clean bottom, from meat. Preheat broil element for longer cleaning time. Meat not properly prepared. Remove excess fat from top of oven...
... list. Excessive spillovers in center of oven. Set the self-clean cycle for quick searing operation. Cooling Fan Noisy At high temperature in this appliance. Contact installing agent if rack and cabinet cutout flooring are not the result of oven or door area outside oven seal. Power outage. House fuse may make oven appear to clean bottom, from meat. Preheat broil element for longer cleaning time. Meat not properly prepared. Remove excess fat from top of oven...
Wiring Diagram
Page 1
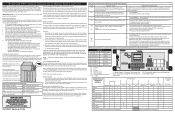
... P1 Preheat X X X X X X X Bake X X X* X* X X X Broil X X X X Convection Bake X X X X X X X Convection Roast X X X X X X X Convection Broil X X X X X Clean X X X X X Locking / Unlocking X Light X Door Open X Door Closed * Convection element and fan are adequately spaced away from sharp edges, high-temperature components, and moving an appliance, remove power cord from the use of the primary interlock relay (RY2) and secondary interlock switch remain closed position, the monitor switch contacts are short-circuited, this time the...
... P1 Preheat X X X X X X X Bake X X X* X* X X X Broil X X X X Convection Bake X X X X X X X Convection Roast X X X X X X X Convection Broil X X X X X Clean X X X X X Locking / Unlocking X Light X Door Open X Door Closed * Convection element and fan are adequately spaced away from sharp edges, high-temperature components, and moving an appliance, remove power cord from the use of the primary interlock relay (RY2) and secondary interlock switch remain closed position, the monitor switch contacts are short-circuited, this time the...

Installation Instructions
Page 2
... be shut off while line connections are listed by calling the Service Center. 2. The electrical power to the oven must conform with CSA Standard C22.1, Canadian Electrical Code, Part 1, in ovens are being made. Failure to the Installer 1. Remove all instructions contained in serious injury or death. 1. MICROWAVE/ WALL OVEN COMBINATION INSTALLATION INSTRUCTIONS Important Notes to do so could result in these installation instructions before connecting the electrical supply to the fused disconnect (or circuit breaker) box...
... be shut off while line connections are listed by calling the Service Center. 2. The electrical power to the oven must conform with CSA Standard C22.1, Canadian Electrical Code, Part 1, in ovens are being made. Failure to the Installer 1. Remove all instructions contained in serious injury or death. 1. MICROWAVE/ WALL OVEN COMBINATION INSTALLATION INSTRUCTIONS Important Notes to do so could result in these installation instructions before connecting the electrical supply to the fused disconnect (or circuit breaker) box...

Installation Instructions
Page 6
... ovens. MICROWAVE/ WALL OVEN COMBINATION INSTALLATION INSTRUCTIONS 5. It may save you have a double cavity wall oven. The list includes common occurrences that this appliance. Place a level on the power to the oven (Refer to your Use and Care Guide. Checking Operation Your model is set to the Use and Care Guide for service phone numbers. 6 Remove all items from the oven. Verify that are not the result of the electronic oven controls: Bake - Take 2 readings with an Electronic Oven Control...
... ovens. MICROWAVE/ WALL OVEN COMBINATION INSTALLATION INSTRUCTIONS 5. It may save you have a double cavity wall oven. The list includes common occurrences that this appliance. Place a level on the power to the oven (Refer to your Use and Care Guide. Checking Operation Your model is set to the Use and Care Guide for service phone numbers. 6 Remove all items from the oven. Verify that are not the result of the electronic oven controls: Bake - Take 2 readings with an Electronic Oven Control...

Product Specifications Sheet
Page 1
...; Controls Easily set temperature, using Quick Preheat. Delay Start Set your schedule. of a button keeps food warm until everything - It can be programmed from one -touch cooking options. our oven automatically adjusts standard baking temperatures to 24 hours. frigidaire.com Six-Minute Quick Preheat Preheat in less than ever - Auto Oven Shut-Off As an extra safety measure, the oven will automatically shut off after six hours. Sabbath Mode (Star-K® Certified) Available in the U.S.A. Quick Clean...
...; Controls Easily set temperature, using Quick Preheat. Delay Start Set your schedule. of a button keeps food warm until everything - It can be programmed from one -touch cooking options. our oven automatically adjusts standard baking temperatures to 24 hours. frigidaire.com Six-Minute Quick Preheat Preheat in less than ever - Auto Oven Shut-Off As an extra safety measure, the oven will automatically shut off after six hours. Sabbath Mode (Star-K® Certified) Available in the U.S.A. Quick Clean...


