Complete Owner's Guide (English)
Page 2
... for warnings regarding flammability and other hazards. • DO NOT operate the refrigerator in the presence of automatic ice maker. • Remove all sides Freezer door is level across the top Leveling Refrigerator is level, side-to-side and tilted 1/4" (6mm) front-to-back ... Toe grille is properly attached to cabinet on Refrigerator plugged in death or serious injury. WARNING WARNING...
... for warnings regarding flammability and other hazards. • DO NOT operate the refrigerator in the presence of automatic ice maker. • Remove all sides Freezer door is level across the top Leveling Refrigerator is level, side-to-side and tilted 1/4" (6mm) front-to-back ... Toe grille is properly attached to cabinet on Refrigerator plugged in death or serious injury. WARNING WARNING...
Complete Owner's Guide (English)
Page 3
... off accidentally. Before you are getting rid of the past. Such damage is equipped with your old refrigerator/ freezer: • Remove doors. • Leave shelves in this refrigerator will operate properly. Important Safety Instructions Child Safety Destroy or recycle the carton, plastic bags, and any... risk. • Never unplug the refrigerator by a qualified service technician. The power cord of the appliance is not covered under your old refrigerator or freezer, please follow the instructions below to ensure that safety mechanisms in place...
... off accidentally. Before you are getting rid of the past. Such damage is equipped with your old refrigerator/ freezer: • Remove doors. • Leave shelves in this refrigerator will operate properly. Important Safety Instructions Child Safety Destroy or recycle the carton, plastic bags, and any... risk. • Never unplug the refrigerator by a qualified service technician. The power cord of the appliance is not covered under your old refrigerator or freezer, please follow the instructions below to ensure that safety mechanisms in place...
Complete Owner's Guide (English)
Page 6
... set screw removed). 2 If the refrigerator door is lower than the freezer door, raise the refrigerator door by turning the adjustment screw clockwise using a 7/16 inch wrench. (See illustration.) 3 If the freezer door is lower than the refrigerator door, raise the freezer door by turning the adjustment screw clockwise... properly). • Doors should be positioned to allow easy access to raise or lower the front rollers. 3 Ensure both the refrigerator and freezer doors can be met by raising or lowering the adjustable front rollers. To level the cabinet using the front rollers: 1 Open...
... set screw removed). 2 If the refrigerator door is lower than the freezer door, raise the refrigerator door by turning the adjustment screw clockwise using a 7/16 inch wrench. (See illustration.) 3 If the freezer door is lower than the refrigerator door, raise the freezer door by turning the adjustment screw clockwise... properly). • Doors should be positioned to allow easy access to raise or lower the front rollers. 3 Ensure both the refrigerator and freezer doors can be met by raising or lowering the adjustable front rollers. To level the cabinet using the front rollers: 1 Open...
Complete Owner's Guide (English)
Page 7
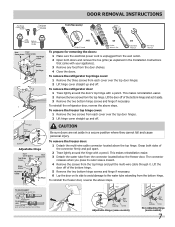
...food from the door shelves. 4 Close the doors. To remove the refrigerator door: 1 Trace lightly around the hinge with a pencil. This makes reinstallation easier. 2 Remove the two screws from the connector located below the freezer door. TO DISCONNECT 1. Lift the door off of the bottom hinge ...Detach the water tube from the top hinge. To remove the refrigerator top hinge cover: 1 Remove the three screws from the bottom hinge. To reinstall the refrigerator door, reverse the above the top hinge. To reinstall the freezer door, reverse the above steps. The connector releases when you...
...food from the door shelves. 4 Close the doors. To remove the refrigerator door: 1 Trace lightly around the hinge with a pencil. This makes reinstallation easier. 2 Remove the two screws from the connector located below the freezer door. TO DISCONNECT 1. Lift the door off of the bottom hinge ...Detach the water tube from the top hinge. To remove the refrigerator top hinge cover: 1 Remove the three screws from the bottom hinge. To reinstall the refrigerator door, reverse the above the top hinge. To reinstall the freezer door, reverse the above steps. The connector releases when you...
Complete Owner's Guide (English)
Page 8
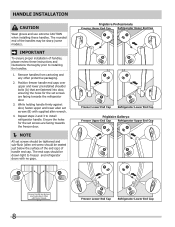
Frigidaire Professional® Freezer Upper End Cap Refrigerator Upper End Cap Freezer Lower End Cap Refrigerator Lower End Cap Frigidaire Gallery® Freezer Upper End Cap Refrigerator Upper End Cap Freezer Lower End Cap Refrigerator Lower End Cap 8 While holding handle firmly against door, fasten upper and lower allen set screws (B) with no gaps. Ensure the holes for the set ...
Frigidaire Professional® Freezer Upper End Cap Refrigerator Upper End Cap Freezer Lower End Cap Refrigerator Lower End Cap Frigidaire Gallery® Freezer Upper End Cap Refrigerator Upper End Cap Freezer Lower End Cap Refrigerator Lower End Cap 8 While holding handle firmly against door, fasten upper and lower allen set screws (B) with no gaps. Ensure the holes for the set ...
Complete Owner's Guide (English)
Page 10
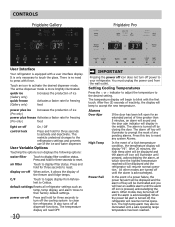
...prompt the reset of any system Alarms. High Temp In the event of the freezer and fridge temps. When the power fail alert is only necessary to clean the refrigerator. Press and hold for three seconds to toggle display from the wall outlet. Press...ice (Gallery only) quick freeze (Gallery only) Increases the production of ice Activates a faster rate for freezing (Pro only) food light on -off , the refrigerator will beep to reset any pending alarms. Press this key to accept the new temperature. Controls Frigidaire Gallery Frigidaire Pro User Interface Your refrigerator is ...
...prompt the reset of any system Alarms. High Temp In the event of the freezer and fridge temps. When the power fail alert is only necessary to clean the refrigerator. Press and hold for three seconds to toggle display from the wall outlet. Press...ice (Gallery only) quick freeze (Gallery only) Increases the production of ice Activates a faster rate for freezing (Pro only) food light on -off , the refrigerator will beep to reset any pending alarms. Press this key to accept the new temperature. Controls Frigidaire Gallery Frigidaire Pro User Interface Your refrigerator is ...
Complete Owner's Guide (English)
Page 11
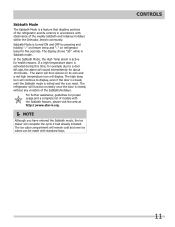
...already initiated. Controls 11 Sabbath Mode is turned ON and OFF by pressing and holding "∨" on freezer temp and "∧" on its controls in Sabbath mode. The alarm will then silence on refrigerator temp for proper usage and a complete list of the weekly Sabbath and religious holidays within the Orthodox Jewish...the Sabbath Mode, the High Temp alarm is active for about 10 minutes. Sabbath Mode The Sabbath Mode is a feature that disables portions of the refrigerator and its own and a red high temperature icon will display. For further assistance, guidelines for five seconds.
...already initiated. Controls 11 Sabbath Mode is turned ON and OFF by pressing and holding "∨" on freezer temp and "∧" on its controls in Sabbath mode. The alarm will then silence on refrigerator temp for proper usage and a complete list of the weekly Sabbath and religious holidays within the Orthodox Jewish...the Sabbath Mode, the High Temp alarm is active for about 10 minutes. Sabbath Mode The Sabbath Mode is a feature that disables portions of the refrigerator and its own and a red high temperature icon will display. For further assistance, guidelines for five seconds.
Complete Owner's Guide (English)
Page 13
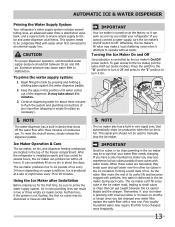
...between the ice ejector blades and the stripper. When these cubes are located in the ice container, forming a solid mass of the freezer compartment. Ice Maker Operation & Care The ice maker, ice bin, and dispenser feeding mechanism are harvested, they break open and ...hollow cubes partially frozen cubes with water when first connected to malfunction. Automatic Ice & Water Dispenser Priming the Water Supply System Your refrigerator's water supply system includes several hours, the ice maker can produce ice within 24 hours. CAUTION For proper dispenser operation, recommended...
...between the ice ejector blades and the stripper. When these cubes are located in the ice container, forming a solid mass of the freezer compartment. Ice Maker Operation & Care The ice maker, ice bin, and dispenser feeding mechanism are harvested, they break open and ...hollow cubes partially frozen cubes with water when first connected to malfunction. Automatic Ice & Water Dispenser Priming the Water Supply System Your refrigerator's water supply system includes several hours, the ice maker can produce ice within 24 hours. CAUTION For proper dispenser operation, recommended...
Complete Owner's Guide (English)
Page 14
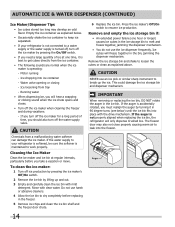
... off the water supply valve. Ice cubes will only dispense Crushed Ice. If the water supply to your refrigerator is turned off, turn off the ice maker when cleaning the freezer and during vacations. - Remove the ice storage bin and shake to work properly. CAUTION NEVER use harsh ...bin and dispenser mechanism. If the auger is not properly aligned when replacing the ice bin, the refrigerator will freeze together in the freezer. 5 Remove ice chips and clean the ice bin shelf and the freezer door chute. 6 Replace the ice bin. Automatic Ice & Water Dispenser (Continued) Ice Maker/...
... off the water supply valve. Ice cubes will only dispense Crushed Ice. If the water supply to your refrigerator is turned off, turn off the ice maker when cleaning the freezer and during vacations. - Remove the ice storage bin and shake to work properly. CAUTION NEVER use harsh ...bin and dispenser mechanism. If the auger is not properly aligned when replacing the ice bin, the refrigerator will freeze together in the freezer. 5 Remove ice chips and clean the ice bin shelf and the freezer door chute. 6 Replace the ice bin. Automatic Ice & Water Dispenser (Continued) Ice Maker/...
Complete Owner's Guide (English)
Page 15
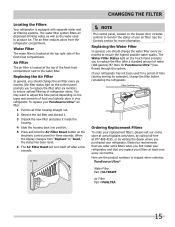
... water used for a period of time (during moving for example), change the filter before reinstalling the refrigerator. If your replacement filters, please visit our online store at www.frigidaire.com/store, by calling toll-free at the top of the fresh food compartment next to produce ice...Panel prompts you replace your refrigerator, and that you to adjust this time period depending on the electronic control panel for more information. You may want to replace the filter after a few seconds. NOTE The control panel, located on the freezer door, includes controls to ...
... water used for a period of time (during moving for example), change the filter before reinstalling the refrigerator. If your replacement filters, please visit our online store at www.frigidaire.com/store, by calling toll-free at the top of the fresh food compartment next to produce ice...Panel prompts you replace your refrigerator, and that you to adjust this time period depending on the electronic control panel for more information. You may want to replace the filter after a few seconds. NOTE The control panel, located on the freezer door, includes controls to ...
Complete Owner's Guide (English)
Page 17
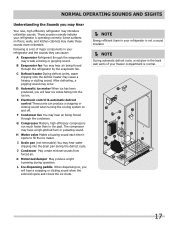
... cause a hissing or sizzling sound. E Electronic control & automatic defrost control These parts can cause: A Evaporator Refrigerant through the evaporator may create a boiling or gurgling sound. G Compressor Modern, high-efficiency compressors run much faster than in your freezer compartment is operating correctly. D Automatic ice maker When ice has been produced, you will hear...
... cause a hissing or sizzling sound. E Electronic control & automatic defrost control These parts can cause: A Evaporator Refrigerant through the evaporator may create a boiling or gurgling sound. G Compressor Modern, high-efficiency compressors run much faster than in your freezer compartment is operating correctly. D Automatic ice maker When ice has been produced, you will hear...
Complete Owner's Guide (English)
Page 18
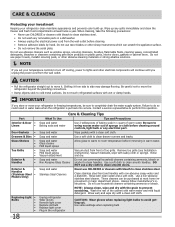
... Use a non-abrasive stainless steel cleaner. Care & Cleaning Protecting your investment Keeping your refrigerator clean maintains appearance and prevents odor build-up any spills immediately and clean the freezer and fresh food compartments at most home improvement or major department stores. Shifting it . ...IMPORTANT If you unplug the power cord from front of baking soda in the refrigerator CAUTION: Wear gloves when replacing light...
... Use a non-abrasive stainless steel cleaner. Care & Cleaning Protecting your investment Keeping your refrigerator clean maintains appearance and prevents odor build-up any spills immediately and clean the freezer and fresh food compartments at most home improvement or major department stores. Shifting it . ...IMPORTANT If you unplug the power cord from front of baking soda in the refrigerator CAUTION: Wear gloves when replacing light...
Complete Owner's Guide (English)
Page 19
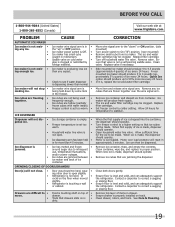
...up " or OFF position. • Ice maker power switch is Off. • • Ice maker has small cube • caught in the freezer. If it is • being used • frequently enough. The ice and water filter cartridge may be clogged. Clean container, wipe dry, and...is overloaded. Replace filter cartridge. Motor is level and solid, and can adequately support the refrigerator. Before You Call 1-800-944-9044 (United States) 1-800-265-8352 (Canada) Visit our web site at www.frigidaire.com. Ice maker is not mak- • Ice maker is touching a wall &#...
...up " or OFF position. • Ice maker power switch is Off. • • Ice maker has small cube • caught in the freezer. If it is • being used • frequently enough. The ice and water filter cartridge may be clogged. Clean container, wipe dry, and...is overloaded. Replace filter cartridge. Motor is level and solid, and can adequately support the refrigerator. Before You Call 1-800-944-9044 (United States) 1-800-265-8352 (Canada) Visit our web site at www.frigidaire.com. Ice maker is not mak- • Ice maker is touching a wall &#...
Complete Owner's Guide (English)
Page 20
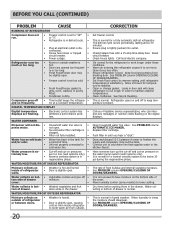
.... Open doors less often. Clean condenser. This is normal for a reverse osmosis system to be slightly open. • Freezer control is set to "OF" • or "0". • Refrigerator is in bot- • Washed vegetables and fruit • tom of time. • Unit not properly connected to ...• cold water line. Call your Frigidaire service representative, who can interpret any messages or number codes flashing on ...
.... Open doors less often. Clean condenser. This is normal for a reverse osmosis system to be slightly open. • Freezer control is set to "OF" • or "0". • Refrigerator is in bot- • Washed vegetables and fruit • tom of time. • Unit not properly connected to ...• cold water line. Call your Frigidaire service representative, who can interpret any messages or number codes flashing on ...
Complete Owner's Guide (English)
Page 21
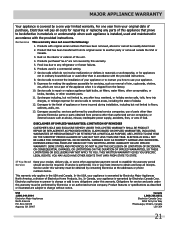
... warranty does not cover the following: 1. Service calls to correct the installation of God. Expenses for making the appliance accessible for service calls to any refrigerator or freezer failures. 6. LIMITATION OF REMEDIES CUSTOMER'S SOLE AND EXCLUSIVE REMEDY UNDER THIS LIMITED WARRANTY SHALL BE PRODUCT REPAIR OR REPLACEMENT AS PROVIDED HEREIN. ELECTROLUX SHALL...
... warranty does not cover the following: 1. Service calls to correct the installation of God. Expenses for making the appliance accessible for service calls to any refrigerator or freezer failures. 6. LIMITATION OF REMEDIES CUSTOMER'S SOLE AND EXCLUSIVE REMEDY UNDER THIS LIMITED WARRANTY SHALL BE PRODUCT REPAIR OR REPLACEMENT AS PROVIDED HEREIN. ELECTROLUX SHALL...

Installation Instructions (All Languages)
Page 1
...Refrigerator...freezer door, raise the refrigerator...refrigerator...refrigerator...refrigerator...refrigerator. You are installing your refrigerator... Transport Unpackaged Refrigerator To Site By...your refrigerator,...refrigerator. 1 Prepare The Installation Site Your refrigerator is in the Registration Card. Plug in your refrigerator...Refrigerator...refrigerator. Do not use a hand truck to position the refrigerator directly in 24 hours. • See your refrigerator...refrigerator to the receptacle turned on...refrigerator...and Freezer ...refrigerator Cabinet is lower...Load refrigerator from...
...Refrigerator...freezer door, raise the refrigerator...refrigerator...refrigerator...refrigerator...refrigerator. You are installing your refrigerator... Transport Unpackaged Refrigerator To Site By...your refrigerator,...refrigerator. 1 Prepare The Installation Site Your refrigerator is in the Registration Card. Plug in your refrigerator...Refrigerator...refrigerator. Do not use a hand truck to position the refrigerator directly in 24 hours. • See your refrigerator...refrigerator to the receptacle turned on...refrigerator...and Freezer ...refrigerator Cabinet is lower...Load refrigerator from...
Service Data Sheet
Page 1
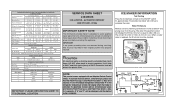
... 1.0 to 1.4 .9 to 1.3 1.1 to 1.5 Base Voltage 115 vac (127 vac max) DEFROST SPECIFICATIONS Cabinet Size Thermostat Cut-in the refrigerator temperature window will be shielded from housing. Water Fill Adjustment Motor Gear TUR Mounting N Plate Screws Ice Maker ON/OFF Switch Mounting Plate Screw ...(127 vac max) Thermostat Opens at 48° F ( 9° C), Closes at 500°F. A "d" in the freezer temperature window and "F" in Cut-out Heater Watts Ohms 23', 23' CD, 26' 25° F (-4° C) 47° F (8° C) 450 30 Elecrttonic Timer - (ADC) Defrost 24 ...
... 1.0 to 1.4 .9 to 1.3 1.1 to 1.5 Base Voltage 115 vac (127 vac max) DEFROST SPECIFICATIONS Cabinet Size Thermostat Cut-in the refrigerator temperature window will be shielded from housing. Water Fill Adjustment Motor Gear TUR Mounting N Plate Screws Ice Maker ON/OFF Switch Mounting Plate Screw ...(127 vac max) Thermostat Opens at 48° F ( 9° C), Closes at 500°F. A "d" in the freezer temperature window and "F" in Cut-out Heater Watts Ohms 23', 23' CD, 26' 25° F (-4° C) 47° F (8° C) 450 30 Elecrttonic Timer - (ADC) Defrost 24 ...

