Complete Owner's Guide (English)
Page 1
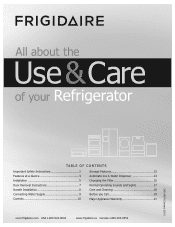
All about the Use &Care of your Refrigerator 242108500 (January 2010) TABLE OF CONTENTS Important Safety Instructions 2 Features at a Glance 4 Installation 5 Door Removal Instructions 7 Handle Installation 8 Connecting Water Supply 9 Controls 10 Storage Features 12 Automatic Ice & Water Dispenser 13 Changing the Filter 15 Normal Operating Sounds and Sights 17 Care and Cleaning 18 Before you Call 19 Major Appliance Warranty 21 www.frigidaire.com USA 1-800-944-9044 www.frigidaire.ca Canada 1-800-265-8352
All about the Use &Care of your Refrigerator 242108500 (January 2010) TABLE OF CONTENTS Important Safety Instructions 2 Features at a Glance 4 Installation 5 Door Removal Instructions 7 Handle Installation 8 Connecting Water Supply 9 Controls 10 Storage Features 12 Automatic Ice & Water Dispenser 13 Changing the Filter 15 Normal Operating Sounds and Sights 17 Care and Cleaning 18 Before you Call 19 Major Appliance Warranty 21 www.frigidaire.com USA 1-800-944-9044 www.frigidaire.ca Canada 1-800-265-8352
Complete Owner's Guide (English)
Page 2
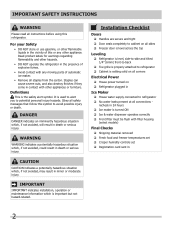
...IMPORTANT indicates installation, operation or maintenance information which , if not avoided, may result in Ice Maker House water supply connected to refrigerator No water leaks present at all connections - Staples can cause severe cuts, and also destroy finishes if they come in contact...not hazard-related. It is turned ON Ice & water dispenser operates correctly Front filter must be flush with other appliances or furniture. recheck in the presence of automatic ice maker. • Remove all corners Electrical Power House power turned on all...
...IMPORTANT indicates installation, operation or maintenance information which , if not avoided, may result in Ice Maker House water supply connected to refrigerator No water leaks present at all connections - Staples can cause severe cuts, and also destroy finishes if they come in contact...not hazard-related. It is turned ON Ice & water dispenser operates correctly Front filter must be flush with other appliances or furniture. recheck in the presence of automatic ice maker. • Remove all corners Electrical Power House power turned on all...
Complete Owner's Guide (English)
Page 3
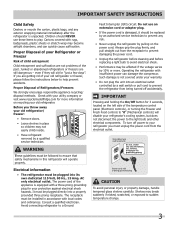
... follow the instructions below to help prevent accidents. Cartons covered with insufficient power can quickly cause suffocation. Before you are getting rid of Refrigerators/Freezers We strongly encourage responsible appliance recycling/ disposal methods. It must be installed in place so children may be affected if the voltage varies by a qualified service technician...
... follow the instructions below to help prevent accidents. Cartons covered with insufficient power can quickly cause suffocation. Before you are getting rid of Refrigerators/Freezers We strongly encourage responsible appliance recycling/ disposal methods. It must be installed in place so children may be affected if the voltage varies by a qualified service technician...
Complete Owner's Guide (English)
Page 7
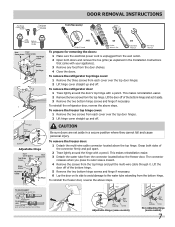
...from the connector located below the freezer door. Lift the door off . CAUTION Be sure doors are set it . TO DISCONNECT 1. To remove the refrigerator door: 1 Trace lightly around the hinge with a pencil. This makes reinstallation easier. 3 Detach the water tube from the top hinge. The connector...ring against face of the bottom hinge and set aside in the Installation Instructions that came with your appliance). 3 Remove any food from the door shelves. 4 Close the doors. To remove the refrigerator top hinge cover: 1 Remove the three screws from each cover over the top door hinges. 2...
...from the connector located below the freezer door. Lift the door off . CAUTION Be sure doors are set it . TO DISCONNECT 1. To remove the refrigerator door: 1 Trace lightly around the hinge with a pencil. This makes reinstallation easier. 3 Detach the water tube from the top hinge. The connector...ring against face of the bottom hinge and set aside in the Installation Instructions that came with your appliance). 3 Remove any food from the door shelves. 4 Close the doors. To remove the refrigerator top hinge cover: 1 Remove the three screws from each cover over the top door hinges. 2...
Complete Owner's Guide (English)
Page 18
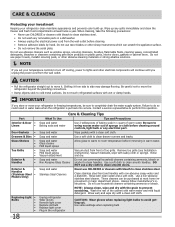
...and water Use a soft cloth to clean smooth handles. These cleaners can scratch the appliance surface. • Do not remove the serial plate. Wash the rest of toe grille. CAUTION • Pull the refrigerator straight out to move it from the wall outlet. Shifting it . Remove toe ..., bleach or Non Abrasive Glass Cleaner alcohol to clean stainless steel. • Do not wash any removable parts in water leaks when the refrigerator is put back into service. Use a non-abrasive stainless steel cleaner. Use same wattage when replacing bulb Part Interior & Door • ...
...and water Use a soft cloth to clean smooth handles. These cleaners can scratch the appliance surface. • Do not remove the serial plate. Wash the rest of toe grille. CAUTION • Pull the refrigerator straight out to move it from the wall outlet. Shifting it . Remove toe ..., bleach or Non Abrasive Glass Cleaner alcohol to clean stainless steel. • Do not wash any removable parts in water leaks when the refrigerator is put back into service. Use a non-abrasive stainless steel cleaner. Use same wattage when replacing bulb Part Interior & Door • ...
Complete Owner's Guide (English)
Page 21
... authorized service company. Obligations for service and parts under this warranty must be readily determined. 2. Service calls to repair or replace appliance light bulbs, air filters, water filters, other consumables, or knobs, handles, or other than genuine Electrolux parts or parts obtained ... shelves, etc.,which do not involve malfunction or defects in materials or workmanship, or for appliances not in ordinary household use or used other than in your best interest to any refrigerator or freezer failures. 6. Damages to remote areas, including the state of Alaska. 12....
... authorized service company. Obligations for service and parts under this warranty must be readily determined. 2. Service calls to repair or replace appliance light bulbs, air filters, water filters, other consumables, or knobs, handles, or other than genuine Electrolux parts or parts obtained ... shelves, etc.,which do not involve malfunction or defects in materials or workmanship, or for appliances not in ordinary household use or used other than in your best interest to any refrigerator or freezer failures. 6. Damages to remote areas, including the state of Alaska. 12....

Installation Instructions (All Languages)
Page 1
...appliance • Do not use an extension cord or an adapter plug. construction for Side-by-Side Refrigerator This document should tilt ¼-inch (6 mm) from fully closed to fully open). (See illustration 5.) 5 4 To replace the toe grille, open . When using a hand truck: • Load refrigerator...8226; Use copper tubing for the water supply line (plastic tubing is available for choosing Frigidaire. 8 Installation Checkoff List Doors Door seals completely to move the refrigerator. • Remove tape from side of 30-100 psi. • Copper tubing with...
...appliance • Do not use an extension cord or an adapter plug. construction for Side-by-Side Refrigerator This document should tilt ¼-inch (6 mm) from fully closed to fully open). (See illustration 5.) 5 4 To replace the toe grille, open . When using a hand truck: • Load refrigerator...8226; Use copper tubing for the water supply line (plastic tubing is available for choosing Frigidaire. 8 Installation Checkoff List Doors Door seals completely to move the refrigerator. • Remove tape from side of 30-100 psi. • Copper tubing with...
Service Data Sheet
Page 1
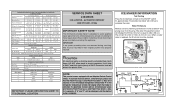
...valve is 102 to 110cc (3.25 to 3.5 oz.). Disconnect power cord before servicing this appliance. DO NOT allow torch to their original position and properly secured. To activate manual defrost...for approximately 15 seconds. Water Fill Volume Remove cover by inserting screwdriver in the refrigerator temperature window will change the fill time. The correct fill is replaced, the ...176; F 1° to 4° C Low Side Pressure (cut-in Cut-out Heater Watts Ohms 23', 23' CD, 26' 25° F (-4° C) 47° F (8° C) 450 30 Elecrttonic Timer - (ADC) Defrost 24 ...
...valve is 102 to 110cc (3.25 to 3.5 oz.). Disconnect power cord before servicing this appliance. DO NOT allow torch to their original position and properly secured. To activate manual defrost...for approximately 15 seconds. Water Fill Volume Remove cover by inserting screwdriver in the refrigerator temperature window will change the fill time. The correct fill is replaced, the ...176; F 1° to 4° C Low Side Pressure (cut-in Cut-out Heater Watts Ohms 23', 23' CD, 26' 25° F (-4° C) 47° F (8° C) 450 30 Elecrttonic Timer - (ADC) Defrost 24 ...


