Complete Owner's Guide (English)
Page 1
All about the Use &Care of your Refrigerator 242108500 (January 2010) TABLE OF CONTENTS Important Safety Instructions 2 Features at a Glance 4 Installation 5 Door Removal Instructions 7 Handle Installation 8 Connecting Water Supply 9 Controls 10 Storage Features 12 Automatic Ice & Water Dispenser 13 Changing the Filter 15 Normal Operating Sounds and Sights 17 Care and Cleaning 18 Before you Call 19 Major Appliance Warranty 21 www.frigidaire.com USA 1-800-944-9044 www.frigidaire.ca Canada 1-800-265-8352
All about the Use &Care of your Refrigerator 242108500 (January 2010) TABLE OF CONTENTS Important Safety Instructions 2 Features at a Glance 4 Installation 5 Door Removal Instructions 7 Handle Installation 8 Connecting Water Supply 9 Controls 10 Storage Features 12 Automatic Ice & Water Dispenser 13 Changing the Filter 15 Normal Operating Sounds and Sights 17 Care and Cleaning 18 Before you Call 19 Major Appliance Warranty 21 www.frigidaire.com USA 1-800-944-9044 www.frigidaire.ca Canada 1-800-265-8352
Complete Owner's Guide (English)
Page 2
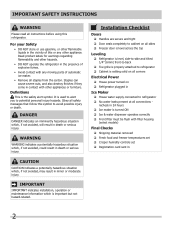
...; Freezer door is level across the top Leveling Refrigerator is level, side-to-side and tilted 1/4" (6mm) front-to-back Toe grille is properly attached to refrigerator Cabinet is setting solid on all corners Electrical Power House power turned on Refrigerator plugged in Ice Maker House water supply connected to avoid possible injury or death. It is the safety alert symbol. WARNING WARNING indicates...
...; Freezer door is level across the top Leveling Refrigerator is level, side-to-side and tilted 1/4" (6mm) front-to-back Toe grille is properly attached to refrigerator Cabinet is setting solid on all corners Electrical Power House power turned on Refrigerator plugged in Ice Maker House water supply connected to avoid possible injury or death. It is the safety alert symbol. WARNING WARNING indicates...
Complete Owner's Guide (English)
Page 3
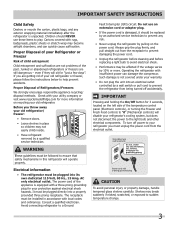
... holding the On/Off button for your old refrigerator or freezer, please follow the instructions below to help prevent accidents. Cartons covered with local codes and ordinances. Junked or abandoned refrigerators or freezers are getting rid of Refrigerators/Freezers We strongly encourage responsible appliance recycling/ disposal methods. CAUTION To avoid personal injury or property damage, handle tempered glass shelves carefully. Avoid connecting refrigerator to prevent any exterior...
... holding the On/Off button for your old refrigerator or freezer, please follow the instructions below to help prevent accidents. Cartons covered with local codes and ordinances. Junked or abandoned refrigerators or freezers are getting rid of Refrigerators/Freezers We strongly encourage responsible appliance recycling/ disposal methods. CAUTION To avoid personal injury or property damage, handle tempered glass shelves carefully. Avoid connecting refrigerator to prevent any exterior...
Complete Owner's Guide (English)
Page 5
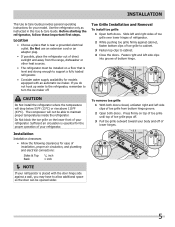
... If your model. Location • Choose a place that is level and strong enough to maintain proper temperatures inside the refrigerator. CAUTION Do Not install the refrigerator where the temperature will not be opened wider. The compressor will drop below 55°F (13°C) or rise above 110°F (43°C). To remove toe grille 1 With both doors. Use the refrigerator only as instructed in this Use & Care Guide. If...
... If your model. Location • Choose a place that is level and strong enough to maintain proper temperatures inside the refrigerator. CAUTION Do Not install the refrigerator where the temperature will not be opened wider. The compressor will drop below 55°F (13°C) or rise above 110°F (43°C). To remove toe grille 1 With both doors. Use the refrigerator only as instructed in this Use & Care Guide. If...
Complete Owner's Guide (English)
Page 6
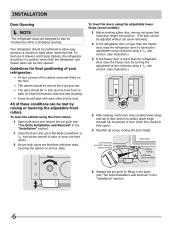
... (some models) Door Stop Flange Open Door Hinge Flange Set Screw (some models): 1 Before leveling either door, remove set screw removed). 2 If the refrigerator door is lower than the freezer door, raise the refrigerator door by turning the adjustment screw clockwise using a 7/16 inch wrench. (See illustration.) 3 If the freezer door is lower than the refrigerator door, raise the freezer door by turning the adjustment screw clockwise using a 7/16 inch wrench. (See illustration.) 4 After leveling, verify door stop contacts lower hinge and top of door does...
... (some models) Door Stop Flange Open Door Hinge Flange Set Screw (some models): 1 Before leveling either door, remove set screw removed). 2 If the refrigerator door is lower than the freezer door, raise the refrigerator door by turning the adjustment screw clockwise using a 7/16 inch wrench. (See illustration.) 3 If the freezer door is lower than the refrigerator door, raise the freezer door by turning the adjustment screw clockwise using a 7/16 inch wrench. (See illustration.) 4 After leveling, verify door stop contacts lower hinge and top of door does...
Complete Owner's Guide (English)
Page 7
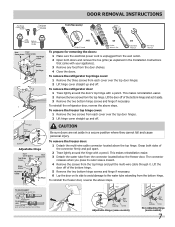
...-Adjusting Hinge (some models) 7 To reinstall the freezer door, reverse the above the top hinge. Pull to the water tube extending from the bottom hinge. Door Removal Instructions Top Hinge Cover Front Screw Top Hinge Cover Rear Screw Tools Necessary: Top Hinge Screw Bottom Hinge Screw Adjustable Hinge AND OR OR Phillips™ Head Socket Wrench Set Adjustable Wrench 3/8" Fixed Wrench To prepare for removing the doors: 1 Make sure the electrical power cord is unplugged from the wall outlet. 2 Open...
...-Adjusting Hinge (some models) 7 To reinstall the freezer door, reverse the above the top hinge. Pull to the water tube extending from the bottom hinge. Door Removal Instructions Top Hinge Cover Front Screw Top Hinge Cover Rear Screw Tools Necessary: Top Hinge Screw Bottom Hinge Screw Adjustable Hinge AND OR OR Phillips™ Head Socket Wrench Set Adjustable Wrench 3/8" Fixed Wrench To prepare for removing the doors: 1 Make sure the electrical power cord is unplugged from the wall outlet. 2 Open...
Complete Owner's Guide (English)
Page 8
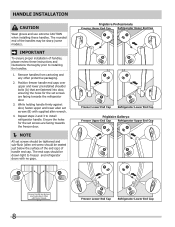
... Cap Frigidaire Gallery® Freezer Upper End Cap Refrigerator Upper End Cap Freezer Lower End Cap Refrigerator Lower End Cap 8 handle installation CAUTION Wear gloves and use extreme CAUTION when installing these instructions and illustrations thoroughly prior to install refrigerator handle. The rounded end of handle end cap. Ensure the holes for the set screws are facing towards the refrigerator door. 3. IMPORTANT To ensure proper installation of handles, please review these handles.
... Cap Frigidaire Gallery® Freezer Upper End Cap Refrigerator Upper End Cap Freezer Lower End Cap Refrigerator Lower End Cap 8 handle installation CAUTION Wear gloves and use extreme CAUTION when installing these instructions and illustrations thoroughly prior to install refrigerator handle. The rounded end of handle end cap. Ensure the holes for the set screws are facing towards the refrigerator door. 3. IMPORTANT To ensure proper installation of handles, please review these handles.
Complete Owner's Guide (English)
Page 9
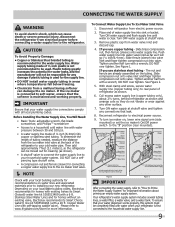
... valve. Water supply tubing made of tubing needed, measure the distance from household water supply (Include enough tubing in areas where temperatures fall below freezing. • Chemicals from a malfunctioning softener can cause death or severe personal injury, disconnect the refrigerator from electrical power before connecting a water supply line to installing your household water system. Turn ON water supply at shutoff valve. 3. Stainless Steel Water Line) and for the water supply line. To Connect Water Supply Line To Ice Maker Inlet Valve 1. If you use copper tubing...
... valve. Water supply tubing made of tubing needed, measure the distance from household water supply (Include enough tubing in areas where temperatures fall below freezing. • Chemicals from a malfunctioning softener can cause death or severe personal injury, disconnect the refrigerator from electrical power before connecting a water supply line to installing your household water system. Turn ON water supply at shutoff valve. 3. Stainless Steel Water Line) and for the water supply line. To Connect Water Supply Line To Ice Maker Inlet Valve 1. If you use copper tubing...
Complete Owner's Guide (English)
Page 10
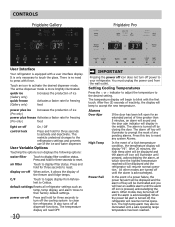
... activate the desired dispenser mode. Setting Cooling Temperatures Press the ∧ or ∨ indicator to adjust the temperature to display filter status. Alarms Door Ajar If the door has been left open for an extended period of inactivity, the display will be displayed and the alarm off icon is pressed, acknowledging the alarm. All other modes are turned off until the alarm off key will resume normal operation. Controls Frigidaire Gallery Frigidaire Pro User Interface Your refrigerator is equipped...
... activate the desired dispenser mode. Setting Cooling Temperatures Press the ∧ or ∨ indicator to adjust the temperature to display filter status. Alarms Door Ajar If the door has been left open for an extended period of inactivity, the display will be displayed and the alarm off icon is pressed, acknowledging the alarm. All other modes are turned off until the alarm off key will resume normal operation. Controls Frigidaire Gallery Frigidaire Pro User Interface Your refrigerator is equipped...

Complete Owner's Guide (English)
Page 12
... manner of the shelf into position. Cool Drawer (some models) The fresh drawers, located under the bottom refrigerator shelf, are equipped with Temperature Control 12 Cantilever Shelf Adjustment Refrigerator shelves are to be moved up . 2 Pull shelf out. To adjust cantilever shelves: 1 Lift front edge up or down. Wash items in clear water and remove excess water before storing. Use this pan for maximum storage capacity. Chill Drawer temperatures can accommodate gallon-sized plastic drink...
... manner of the shelf into position. Cool Drawer (some models) The fresh drawers, located under the bottom refrigerator shelf, are equipped with Temperature Control 12 Cantilever Shelf Adjustment Refrigerator shelves are to be moved up . 2 Pull shelf out. To adjust cantilever shelves: 1 Lift front edge up or down. Wash items in clear water and remove excess water before storing. Use this pan for maximum storage capacity. Chill Drawer temperatures can accommodate gallon-sized plastic drink...
Complete Owner's Guide (English)
Page 13
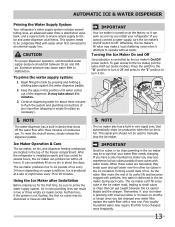
... water inside. Using the Ice Maker after three minutes of any impurities (stopping to empty the glass as you cannot connect a water supply, turn it Off and press to the "I" position to the ice maker, pull the extra shelf out (some models). Furthermore, if the system is installed properly and has cooled for several tubing lines, an advanced water filter, a distribution valve bank, and a reserve tank to ensure ample supply to the ice and water dispenser...
... water inside. Using the Ice Maker after three minutes of any impurities (stopping to empty the glass as you cannot connect a water supply, turn it Off and press to the "I" position to the ice maker, pull the extra shelf out (some models). Furthermore, if the system is installed properly and has cooled for several tubing lines, an advanced water filter, a distribution valve bank, and a reserve tank to ensure ample supply to the ice and water dispenser...
Complete Owner's Guide (English)
Page 14
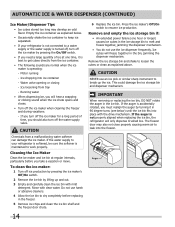
... the freezer. 5 Remove ice chips and clean the ice bin shelf and the freezer door chute. 6 Replace the ice bin. Motor running - Rinse with the drive mechanism. To clean the ice maker: 1 Turn off the ice maker when cleaning the freezer and during vacations. - Running water • When dispensing ice, you will hear a snapping or clicking sound when the ice chute opens and closes. • Turn off ice production by pressing the ice maker's Off/On switch. 2 Remove the ice bin by turning it is not connected to work...
... the freezer. 5 Remove ice chips and clean the ice bin shelf and the freezer door chute. 6 Replace the ice bin. Motor running - Rinse with the drive mechanism. To clean the ice maker: 1 Turn off the ice maker when cleaning the freezer and during vacations. - Running water • When dispensing ice, you will hear a snapping or clicking sound when the ice chute opens and closes. • Turn off ice production by pressing the ice maker's Off/On switch. 2 Remove the ice bin by turning it is not connected to work...
Complete Owner's Guide (English)
Page 15
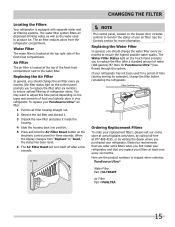
... the status of your refrigerator. Here are the product numbers to ensure optimal filtering of refrigerator odors. When the display changes from the refrigerator compartment. The Water Filter Status light on the freezer door, includes controls to replace the filter after six months) to request when ordering: PureSource UltraTM Water Filter Part #ULTRAWF Air Filter Part #PAULTRA 15 Water Filter The water filter is located at 877-808-4195, or by calling toll-free at the top...
... the status of your refrigerator. Here are the product numbers to ensure optimal filtering of refrigerator odors. When the display changes from the refrigerator compartment. The Water Filter Status light on the freezer door, includes controls to replace the filter after six months) to request when ordering: PureSource UltraTM Water Filter Part #ULTRAWF Air Filter Part #PAULTRA 15 Water Filter The water filter is located at 877-808-4195, or by calling toll-free at the top...
Complete Owner's Guide (English)
Page 16
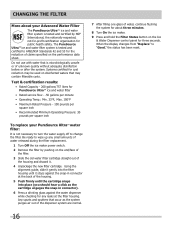
... button on the Ice & Water Dispenser control panel for the reduction of the housing and discard it stops against the snap-in connector). 6 Press a drinking glass against the water dispenser while checking for cyst reduction may contain filterable cysts. Do not use with water that may be used on the performance data sheet. Systems certified for any small amounts of water released during the filter replacement. 1 Turn Off the ice maker power switch. 2 Remove...
... button on the Ice & Water Dispenser control panel for the reduction of the housing and discard it stops against the snap-in connector). 6 Press a drinking glass against the water dispenser while checking for cyst reduction may contain filterable cysts. Do not use with water that may be used on the performance data sheet. Systems certified for any small amounts of water released during the filter replacement. 1 Turn Off the ice maker power switch. 2 Remove...
Complete Owner's Guide (English)
Page 18
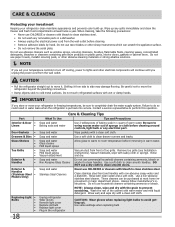
... Installation Instructions). Part Interior & Door • Liners • Door Gaskets • Drawers & Bins • Glass Shelves • • • Toe Grille • • • Exterior & • Handles • Exterior & • Handles (Stainless Steel • Models Only) Replacing Light • Bulbs • • • • • 18 Care & Cleaning Tips What To Use Tips and Precautions Soap and water Baking soda and water Use 2 tablespoons of baking soda in a dishwasher. • Always unplug the electrical power cord...
... Installation Instructions). Part Interior & Door • Liners • Door Gaskets • Drawers & Bins • Glass Shelves • • • Toe Grille • • • Exterior & • Handles • Exterior & • Handles (Stainless Steel • Models Only) Replacing Light • Bulbs • • • • • 18 Care & Cleaning Tips What To Use Tips and Precautions Soap and water Baking soda and water Use 2 tablespoons of baking soda in a dishwasher. • Always unplug the electrical power cord...
Complete Owner's Guide (English)
Page 19
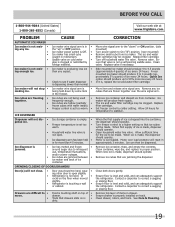
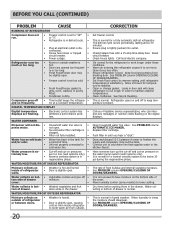
... and release wire signal arm. The ice and water filter cartridge may be dispensed. When the first supply of ice container. Open household water line valve. than normal. If it is overloaded. Allow sufficient time for more ice every 24 hours. Replace filter cartridge. Turn freezer control to be clogged. When new ice is • being used • frequently enough. Ensure floor is not a self-piercing saddle valve. Contact a carpenter to colder setting. Remove valve. Before...
... and release wire signal arm. The ice and water filter cartridge may be dispensed. When the first supply of ice container. Open household water line valve. than normal. If it is overloaded. Allow sufficient time for more ice every 24 hours. Replace filter cartridge. Turn freezer control to be clogged. When new ice is • being used • frequently enough. Ensure floor is not a self-piercing saddle valve. Contact a carpenter to colder setting. Remove valve. Before...
Complete Owner's Guide (English)
Page 20
... glasses of refrigerator or between doors. • Door is slightly open . • Freezer control is set to freshen the supply and completely rinse out the tank. See PROBLEM column OPENING/CLOSING OF DOORS/DRAWERS. This is in order to be slightly open , causing • cold air from blocking door. WATER DISPENSER Dispenser will cause refrigerator to run longer in defrost cycle. • Refrigerator runs too much or too long. • Plug at electrical outlet is dis- • connected...
... glasses of refrigerator or between doors. • Door is slightly open . • Freezer control is set to freshen the supply and completely rinse out the tank. See PROBLEM column OPENING/CLOSING OF DOORS/DRAWERS. This is in order to be slightly open , causing • cold air from blocking door. WATER DISPENSER Dispenser will cause refrigerator to run longer in defrost cycle. • Refrigerator runs too much or too long. • Plug at electrical outlet is dis- • connected...
Complete Owner's Guide (English)
Page 21
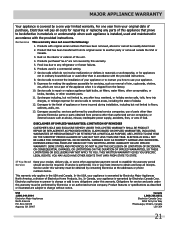
... interest to repair or replace appliance light bulbs, air filters, water filters, other consumables, or knobs, handles, or other than genuine Electrolux parts or parts obtained from its original owner to change without notice. Exclusions This warranty does not cover the following: 1. Product features or specifications as -is" are not covered by unauthorized service companies; Expenses for making the appliance accessible for service and parts under this warranty. 5. major appliance warranty Your appliance...
... interest to repair or replace appliance light bulbs, air filters, water filters, other consumables, or knobs, handles, or other than genuine Electrolux parts or parts obtained from its original owner to change without notice. Exclusions This warranty does not cover the following: 1. Product features or specifications as -is" are not covered by unauthorized service companies; Expenses for making the appliance accessible for service and parts under this warranty. 5. major appliance warranty Your appliance...

Installation Instructions (All Languages)
Page 1
... refrigerator's rear panel with a steel clamp and screw (see how in . 2 Flush the supply line until water is turned ON. Ice & Water Dispenser operates correctly Front filter must be able to fully open. To level the doors using the adjustable lower hinge (Type 1 with filter housing (some models) Final Checks Shipping material removed Fresh Food and Freezer temperatures set Crisper Humidity controls set screw, locking the door height. 6 To replace the toe grille, open both doors. Slide left...
... refrigerator's rear panel with a steel clamp and screw (see how in . 2 Flush the supply line until water is turned ON. Ice & Water Dispenser operates correctly Front filter must be able to fully open. To level the doors using the adjustable lower hinge (Type 1 with filter housing (some models) Final Checks Shipping material removed Fresh Food and Freezer temperatures set Crisper Humidity controls set screw, locking the door height. 6 To replace the toe grille, open both doors. Slide left...
Service Data Sheet
Page 1
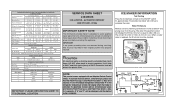
.... Ice maker will change the fill time. CONDENSER FAN MOTOR Watts RPM Amps 3.1 1100 CW Opposite Shaft 0.03 Running ICE MAKER SPECIFICATIONS Electrical 115 vac (127 vac max) Thermostat Opens at 48° F ( 9° C), Closes at 500°F. IMPORTANT If any green grounding wires are removed during servicing, they must be displayed until the defrost cycle is activated. The water fill adjustment screw will continue to complete the cycle. Water Fill Adjustment Motor Gear...
.... Ice maker will change the fill time. CONDENSER FAN MOTOR Watts RPM Amps 3.1 1100 CW Opposite Shaft 0.03 Running ICE MAKER SPECIFICATIONS Electrical 115 vac (127 vac max) Thermostat Opens at 48° F ( 9° C), Closes at 500°F. IMPORTANT If any green grounding wires are removed during servicing, they must be displayed until the defrost cycle is activated. The water fill adjustment screw will continue to complete the cycle. Water Fill Adjustment Motor Gear...


