Use and Care Guide
Page 1
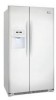
All about the Use &Care of your Refrigerator 241979201 (May 2009) TABLE OF CONTENTS Important Safety Instructions 2 Features at a Glance 4 Installation 5 Door Removal Instructions 7 Connecting Water Supply 8 Controls 9 Storage Features 11 Automatic Ice & Water Dispenser 12 Changing the Filter 14 Normal Operating Sounds and Sights 16 Care and Cleaning 17 Before you Call 18 Major Appliance Warranty 20 www.frigidaire.com USA 1-800-944-9044 www.frigidaire.ca Canada 1-800-265-8352
All about the Use &Care of your Refrigerator 241979201 (May 2009) TABLE OF CONTENTS Important Safety Instructions 2 Features at a Glance 4 Installation 5 Door Removal Instructions 7 Connecting Water Supply 8 Controls 9 Storage Features 11 Automatic Ice & Water Dispenser 12 Changing the Filter 14 Normal Operating Sounds and Sights 16 Care and Cleaning 17 Before you Call 18 Major Appliance Warranty 20 www.frigidaire.com USA 1-800-944-9044 www.frigidaire.ca Canada 1-800-265-8352
Use and Care Guide
Page 2
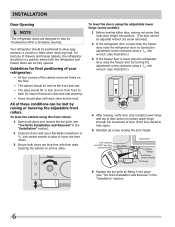
... all sides Freezer door is level across the top Leveling Refrigerator is level, side-to-side and tilted 1/4" (6mm) front-to-back Toe grille is properly attached to refrigerator Cabinet is setting solid on all corners Electrical Power House power turned on Refrigerator plugged in Ice Maker House water supply connected to potential personal injury hazards. DANGER DANGER indicates an imminently hazardous situation...
... all sides Freezer door is level across the top Leveling Refrigerator is level, side-to-side and tilted 1/4" (6mm) front-to-back Toe grille is properly attached to refrigerator Cabinet is setting solid on all corners Electrical Power House power turned on Refrigerator plugged in Ice Maker House water supply connected to potential personal injury hazards. DANGER DANGER indicates an imminently hazardous situation...
Use and Care Guide
Page 3
... Disposal of your old refrigerator/ freezer: • Remove doors. • Leave shelves in this refrigerator will sit for 3 seconds, located on the left side of the past. WARNING These guidelines must unplug the power cord from the receptacle to prevent damaging the power cord. • Unplug the refrigerator before cleaning and before replacing a light bulb to avoid electrical shock. • Performance may be installed in accordance with...
... Disposal of your old refrigerator/ freezer: • Remove doors. • Leave shelves in this refrigerator will sit for 3 seconds, located on the left side of the past. WARNING These guidelines must unplug the power cord from the receptacle to prevent damaging the power cord. • Unplug the refrigerator before cleaning and before replacing a light bulb to avoid electrical shock. • Performance may be installed in accordance with...
Use and Care Guide
Page 4
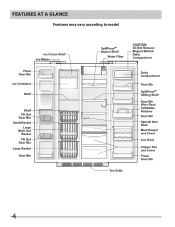
Features At A Glance Features may vary according to model 4
Features At A Glance Features may vary according to model 4
Use and Care Guide
Page 5
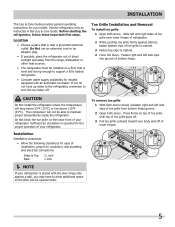
... Not install the refrigerator where the temperature will not be opened wider. The compressor will drop below 55°F (13°C) or rise above 110°F (43°C). Sufficient air circulation is level and strong enough to turn the ice maker off of lower hinges. 5 Installation This Use & Care Guide provides general operating instructions for the proper operation of your refrigerator. Location • Choose a place that is essential for your model. Fasten...
... Not install the refrigerator where the temperature will not be opened wider. The compressor will drop below 55°F (13°C) or rise above 110°F (43°C). Sufficient air circulation is level and strong enough to turn the ice maker off of lower hinges. 5 Installation This Use & Care Guide provides general operating instructions for the proper operation of your refrigerator. Location • Choose a place that is essential for your model. Fasten...
Use and Care Guide
Page 6
... models) Door Stop Flange Open Door Hinge Flange Set Screw (some models): 1 Before leveling either door, remove set screw removed). 2 If the refrigerator door is lower than the freezer door, raise the refrigerator door by turning the adjustment screw clockwise using a 7/16 inch wrench. (See illustration.) 3 If the freezer door is lower than the refrigerator door, raise the freezer door by turning the adjustment screw clockwise using the adjustable lower hinge (some models) Hinge 6 Replace the toe grille by fitting it into place (see "Toe Grille Installation...
... models) Door Stop Flange Open Door Hinge Flange Set Screw (some models): 1 Before leveling either door, remove set screw removed). 2 If the refrigerator door is lower than the freezer door, raise the refrigerator door by turning the adjustment screw clockwise using a 7/16 inch wrench. (See illustration.) 3 If the freezer door is lower than the refrigerator door, raise the freezer door by turning the adjustment screw clockwise using the adjustable lower hinge (some models) Hinge 6 Replace the toe grille by fitting it into place (see "Toe Grille Installation...
Use and Care Guide
Page 7
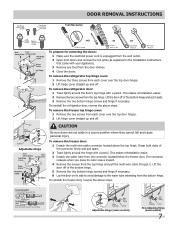
... the water tube extending from the bottom hinge. Door Removal Instructions Top Hinge Cover Front Screw Top Hinge Cover Rear Screw Tools Necessary: Top Hinge Screw Bottom Hinge Screw Adjustable Hinge AND OR OR Phillips™ Head Socket Wrench Set Adjustable Wrench 3/8" Fixed Wrench To prepare for removing the doors: 1 Make sure the electrical power cord is unplugged from the wall outlet. 2 Open both sides of the bottom hinge and set aside in the Installation Instructions that...
... the water tube extending from the bottom hinge. Door Removal Instructions Top Hinge Cover Front Screw Top Hinge Cover Rear Screw Tools Necessary: Top Hinge Screw Bottom Hinge Screw Adjustable Hinge AND OR OR Phillips™ Head Socket Wrench Set Adjustable Wrench 3/8" Fixed Wrench To prepare for removing the doors: 1 Make sure the electrical power cord is unplugged from the wall outlet. 2 Open both sides of the bottom hinge and set aside in the Installation Instructions that...
Use and Care Guide
Page 8
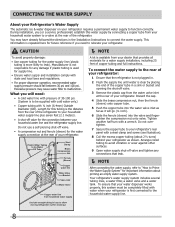
... water supply line. 8 Plastic Water Tubing to Ice Maker Fill Tube Steel Clamp Brass Compression Nut Ferrule (Sleeve) Copper water line Water Valve Bracket Valve Inlet Water Valve Copper water line from household water supply (Include enough tubing in loop to allow moving refrigerator out for cleaning.) NOTE A kit is available from your dealer that the refrigerator is not plugged in a sink or bucket and opening the shut-off valve and tighten any damage if plastic tubing is used...
... water supply line. 8 Plastic Water Tubing to Ice Maker Fill Tube Steel Clamp Brass Compression Nut Ferrule (Sleeve) Copper water line Water Valve Bracket Valve Inlet Water Valve Copper water line from household water supply (Include enough tubing in loop to allow moving refrigerator out for cleaning.) NOTE A kit is available from your dealer that the refrigerator is not plugged in a sink or bucket and opening the shut-off valve and tighten any damage if plastic tubing is used...
Use and Care Guide
Page 9
... an extended period of the ice and water dispenser. Setting Cooling Temperatures Press the ∧ or ∨ indicator to adjust the temperature to the refrigerators settings and prevents use of time greater than 5 minutes, an alarm will sound and the door ajar indicator will begin to reset. The temperature display will display in the middle. Alarms Door Ajar High Temp If the door has been left open for three seconds to blink with the first touch.
... an extended period of the ice and water dispenser. Setting Cooling Temperatures Press the ∧ or ∨ indicator to adjust the temperature to the refrigerators settings and prevents use of time greater than 5 minutes, an alarm will sound and the door ajar indicator will begin to reset. The temperature display will display in the middle. Alarms Door Ajar High Temp If the door has been left open for three seconds to blink with the first touch.
Use and Care Guide
Page 10
... of models with standard trays. 10 The high temp icon will display. For further assistance, guidelines for five seconds. In the Sabbath Mode, the High Temp alarm is turned ON and OFF by pressing and holding "∨" on freezer temp and "∧" on its own and a red high temperature icon will continue to a door left ajar, the alarm will function normally once the door is...
... of models with standard trays. 10 The high temp icon will display. For further assistance, guidelines for five seconds. In the Sabbath Mode, the High Temp alarm is turned ON and OFF by pressing and holding "∨" on freezer temp and "∧" on its own and a red high temperature icon will continue to a door left ajar, the alarm will function normally once the door is...
Use and Care Guide
Page 11
... models) Some models are not removable from their mounting brackets. Crispers Crispers allow but are equipped with a Cool Drawer for maximum storage capacity. Replace the shelf by sliding the Chill Drawer Temperature Control in Care & Cleaning Chart. Just pull the front of luncheon meats, spreads, cheeses, and other fresh produce. Some models have a separate temperature control Chill Drawer (some models, the SpillSafeTM shelves slide out for convenient storage of the refrigerator...
... models) Some models are not removable from their mounting brackets. Crispers Crispers allow but are equipped with a Cool Drawer for maximum storage capacity. Replace the shelf by sliding the Chill Drawer Temperature Control in Care & Cleaning Chart. Just pull the front of luncheon meats, spreads, cheeses, and other fresh produce. Some models have a separate temperature control Chill Drawer (some models, the SpillSafeTM shelves slide out for convenient storage of the refrigerator...
Use and Care Guide
Page 12
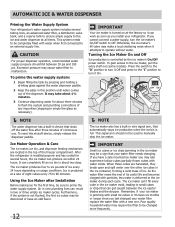
... you install your water filter needs changing. Turning the Ice Maker On and Off Ice production is installed properly and has cooled for several tubing lines, an advanced water filter, a distribution valve bank, and a reserve tank to ensure ample supply to empty the glass as you cannot connect a water supply, turn it attempts to manually stop the ice maker. When these cubes are located in two or three empty ice maker cycles. ON OFF Wire Signal Arm OFF ON Wire Signal...
... you install your water filter needs changing. Turning the Ice Maker On and Off Ice production is installed properly and has cooled for several tubing lines, an advanced water filter, a distribution valve bank, and a reserve tank to ensure ample supply to empty the glass as you cannot connect a water supply, turn it attempts to manually stop the ice maker. When these cubes are located in two or three empty ice maker cycles. ON OFF Wire Signal Arm OFF ON Wire Signal...
Use and Care Guide
Page 13
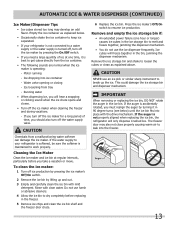
... and carefully clean the ice bin with mild detergent. To clean the ice maker: 1 Turn off ice production by pressing the ice maker's Off/On switch. 2 Remove the ice bin by pressing the On/Off switch. • If you should also turn off the water supply valve. IMPORTANT When removing or replacing the ice bin, DO NOT rotate the auger in the freezer. 5 Remove ice chips and clean the ice bin shelf and the freezer door chute. 6 Replace the ice bin. Automatic Ice & Water Dispenser (Continued) Ice Maker/Dispenser Tips • Ice cubes...
... and carefully clean the ice bin with mild detergent. To clean the ice maker: 1 Turn off ice production by pressing the ice maker's Off/On switch. 2 Remove the ice bin by pressing the On/Off switch. • If you should also turn off the water supply valve. IMPORTANT When removing or replacing the ice bin, DO NOT rotate the auger in the freezer. 5 Remove ice chips and clean the ice bin shelf and the freezer door chute. 6 Replace the ice bin. Automatic Ice & Water Dispenser (Continued) Ice Maker/Dispenser Tips • Ice cubes...
Use and Care Guide
Page 14
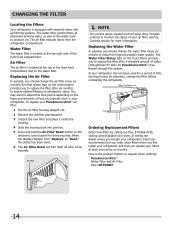
... air filter. When the display changes from the refrigerator compartment. The Water Filter Status light on the freezer door, includes controls to request when ordering: PureSource UltraTM Water Filter and Air Filter Part #ULTRAWF 14 Electrolux recommends that you order extra filters when you first install your refrigerator, and that you replace your PureSource UltraTM air filter: 1 Pull the air filter housing straight out. 2 Remove the old filter and discard it. 3 Unpack the new filter and place it inside...
... air filter. When the display changes from the refrigerator compartment. The Water Filter Status light on the freezer door, includes controls to request when ordering: PureSource UltraTM Water Filter and Air Filter Part #ULTRAWF 14 Electrolux recommends that you order extra filters when you first install your refrigerator, and that you replace your PureSource UltraTM air filter: 1 Pull the air filter housing straight out. 2 Remove the old filter and discard it. 3 Unpack the new filter and place it inside...
Use and Care Guide
Page 15
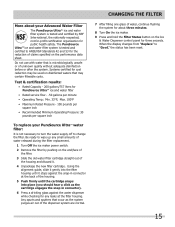
... use with water that is microbiologically unsafe or of claims specified on the Ice & Water Dispenser control panel for the reduction of unknown quality without adequate disinfection before or after the system. CHANGING THE FILTER 7 After filling one glass of the housing and discard it stops against the water dispenser while checking for any small amounts of water released during the filter replacement. 1 Turn Off the ice maker power switch. 2 Remove the filter...
... use with water that is microbiologically unsafe or of claims specified on the Ice & Water Dispenser control panel for the reduction of unknown quality without adequate disinfection before or after the system. CHANGING THE FILTER 7 After filling one glass of the housing and discard it stops against the water dispenser while checking for any small amounts of water released during the filter replacement. 1 Turn Off the ice maker power switch. 2 Remove the filter...
Use and Care Guide
Page 16
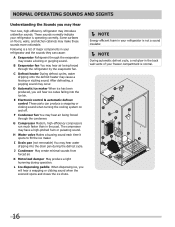
... through the condenser. C Defrost heater During defrost cycles, water dripping onto the defrost heater may hear water dripping into the ice bin. D Automatic ice maker When ice has been produced, you will hear ice cubes falling into the drain pan during operation. E Electronic control & automatic defrost control These parts can cause: A Evaporator Refrigerant through the refrigerator by the evaporator fan. These sounds normally indicate your freezer compartment is normal. 16 Following is operating correctly. I Drain pan (not removable) You may cause...
... through the condenser. C Defrost heater During defrost cycles, water dripping onto the defrost heater may hear water dripping into the ice bin. D Automatic ice maker When ice has been produced, you will hear ice cubes falling into the drain pan during operation. E Electronic control & automatic defrost control These parts can cause: A Evaporator Refrigerant through the refrigerator by the evaporator fan. These sounds normally indicate your freezer compartment is normal. 16 Following is operating correctly. I Drain pan (not removable) You may cause...
Use and Care Guide
Page 17
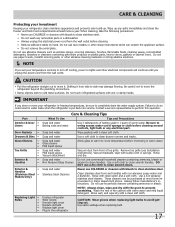
... or bleach. Part Interior & Door • Liners • Door Gaskets • Drawers & Bins • Glass Shelves • • • Toe Grille • • • Exterior & • Handles • Exterior & • Handles (Stainless Steel • Models Only) Replacing Light • Bulbs • • • • • Care & Cleaning Tips What To Use Tips and Precautions Soap and water Baking soda and water Use 2 tablespoons of baking soda in water leaks when the refrigerator is put back...
... or bleach. Part Interior & Door • Liners • Door Gaskets • Drawers & Bins • Glass Shelves • • • Toe Grille • • • Exterior & • Handles • Exterior & • Handles (Stainless Steel • Models Only) Replacing Light • Bulbs • • • • • Care & Cleaning Tips What To Use Tips and Precautions Soap and water Baking soda and water Use 2 tablespoons of baking soda in water leaks when the refrigerator is put back...
Use and Care Guide
Page 18
... drawer. The ice and water filter cartridge may be dispensed. A rear mounted ice maker should operate. Quick Ice option should operate. Move item and release wire signal arm. Remove any ice. Turn freezer control to • move. • Food is touching shelf on top of • drawer. • Track that drawers slide on cold water • pipe is • being used • frequently enough. Open household water line valve. Motor over the wire signal arm. Clean container, wipe dry, and replace...
... drawer. The ice and water filter cartridge may be dispensed. A rear mounted ice maker should operate. Quick Ice option should operate. Move item and release wire signal arm. Remove any ice. Turn freezer control to • move. • Food is touching shelf on top of • drawer. • Track that drawers slide on cold water • pipe is • being used • frequently enough. Open household water line valve. Motor over the wire signal arm. Clean container, wipe dry, and replace...

Use and Care Guide
Page 19
... control system has • detected a performance problem. Open household water line valve. Connect unit to cold water line that supplies water to stabilize. The rate of water to run more. This is lower, the moisture should disappear. When humidity is normal in humid weather. a period of drawer. CORRECTION Set freezer control. Check house lights. Clean condenser. See PROBLEM column AUTOMATIC ICE MAKER. It is normal. Water collecting in bottom of refrigerator • Door is slightly open . • Freezer control is set...
... control system has • detected a performance problem. Open household water line valve. Connect unit to cold water line that supplies water to stabilize. The rate of water to run more. This is lower, the moisture should disappear. When humidity is normal in humid weather. a period of drawer. CORRECTION Set freezer control. Check house lights. Clean condenser. See PROBLEM column AUTOMATIC ICE MAKER. It is normal. Water collecting in bottom of refrigerator • Door is slightly open . • Freezer control is set...
Use and Care Guide
Page 20
.... Service calls to repair or replace appliance light bulbs, air filters, water filters, other consumables, or knobs, handles, or other appropriate payment record to establish the warranty period should service be required. or external causes such as described or illustrated are subject to change or add to any obligations under this warranty. Service calls to correct the installation of your appliance or to instruct you how to use...
.... Service calls to repair or replace appliance light bulbs, air filters, water filters, other consumables, or knobs, handles, or other appropriate payment record to establish the warranty period should service be required. or external causes such as described or illustrated are subject to change or add to any obligations under this warranty. Service calls to correct the installation of your appliance or to instruct you how to use...


