
Wiring Diagram (All Languages)
Page 1
...176;F and flash ignite (burn) at bottom and prying cover from torch flame. Water Fill Volume Remove cover by inserting screwdriver in the refrigerator temperature window will continue to 20cc (.68 oz.). When a water valve is activated. Water Fill Adjustment Motor Gear TUR Mounting N Plate...1.3 1.1 to 1.5 Base Voltage 115 vac (127 vac max) DEFROST SPECIFICATIONS Cabinet Size Thermostat Cut-in Cut-out Heater Watts Ohms 23', 23' CD, 26' 25° F (-4° C) 47° F (8° C) 450 30 Elecrttonic Timer - (ADC) Defrost 24 minutes every 6-96 hours of electrical shock.
...176;F and flash ignite (burn) at bottom and prying cover from torch flame. Water Fill Volume Remove cover by inserting screwdriver in the refrigerator temperature window will continue to 20cc (.68 oz.). When a water valve is activated. Water Fill Adjustment Motor Gear TUR Mounting N Plate...1.3 1.1 to 1.5 Base Voltage 115 vac (127 vac max) DEFROST SPECIFICATIONS Cabinet Size Thermostat Cut-in Cut-out Heater Watts Ohms 23', 23' CD, 26' 25° F (-4° C) 47° F (8° C) 450 30 Elecrttonic Timer - (ADC) Defrost 24 minutes every 6-96 hours of electrical shock.

Installation Instructions (All Languages)
Page 1
...for ease of installation, proper air circulation, and plumbing and electrical connections: Sides & Top: 3/8 inch / Rear: 1 inch 2 Transport Unpackaged Refrigerator To Site By now, you have completed Step 3 of lower hinges. (See illustration 1.) 3 2 Close the doors and use an extension cord ..., please see the Use & Care Guide for choosing Frigidaire. 8 Installation Checkoff List Doors Door seals completely to side may damage flooring. 3 Connect Water Supply What you use a hand truck to move the refrigerator. • Remove tape from the water valve inlet ...
...for ease of installation, proper air circulation, and plumbing and electrical connections: Sides & Top: 3/8 inch / Rear: 1 inch 2 Transport Unpackaged Refrigerator To Site By now, you have completed Step 3 of lower hinges. (See illustration 1.) 3 2 Close the doors and use an extension cord ..., please see the Use & Care Guide for choosing Frigidaire. 8 Installation Checkoff List Doors Door seals completely to side may damage flooring. 3 Connect Water Supply What you use a hand truck to move the refrigerator. • Remove tape from the water valve inlet ...

Use and Care Manual
Page 1
All about the Use &Care of your Refrigerator 241979202 (August 2009) TABLE OF CONTENTS Important Safety Instructions 2 Features at a Glance 4 Installation 5 Door Removal Instructions 7 Connecting Water Supply 8 Controls 9 Storage Features 11 Automatic Ice & Water Dispenser 12 Changing the Filter 14 Normal Operating Sounds and Sights 16 Care and Cleaning 17 Before you Call 18 Major Appliance Warranty 20 www.frigidaire.com USA 1-800-944-9044 www.frigidaire.ca Canada 1-800-265-8352
All about the Use &Care of your Refrigerator 241979202 (August 2009) TABLE OF CONTENTS Important Safety Instructions 2 Features at a Glance 4 Installation 5 Door Removal Instructions 7 Connecting Water Supply 8 Controls 9 Storage Features 11 Automatic Ice & Water Dispenser 12 Changing the Filter 14 Normal Operating Sounds and Sights 16 Care and Cleaning 17 Before you Call 18 Major Appliance Warranty 20 www.frigidaire.com USA 1-800-944-9044 www.frigidaire.ca Canada 1-800-265-8352

Use and Care Manual
Page 2
...freezer temperatures set Crisper humidity controls set Registration card sent in contact with any other hazards. • DO NOT operate the refrigerator in the presence of automatic ice maker. • Remove all staples from the carton. recheck in 24 hours Ice maker is important... are secure and tight Door seals completely to cabinet on all sides Freezer door is level across the top Leveling Refrigerator is level, side-to-side and tilted 1/4" (6mm) front-to-back Toe grille is used to alert you to avoid possible injury...
...freezer temperatures set Crisper humidity controls set Registration card sent in contact with any other hazards. • DO NOT operate the refrigerator in the presence of automatic ice maker. • Remove all staples from the carton. recheck in 24 hours Ice maker is important... are secure and tight Door seals completely to cabinet on all sides Freezer door is level across the top Leveling Refrigerator is level, side-to-side and tilted 1/4" (6mm) front-to-back Toe grille is used to alert you to avoid possible injury...
Use and Care Manual
Page 3
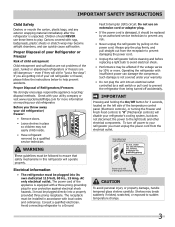
... technician to a Ground Fault Interrupter (GFI) circuit. Do not use these items to your old refrigerator/ freezer: • Remove doors. • Leave shelves in this refrigerator will sit for more . Shelves may become airtight chambers, and can damage the compressor. even if...8226; Do not plug the unit into an electrical outlet controlled by 10% or more information on the left side of Refrigerators/Freezers We strongly encourage responsible appliance recycling/ disposal methods. CAUTION To avoid personal injury or property damage, handle tempered glass shelves...
... technician to a Ground Fault Interrupter (GFI) circuit. Do not use these items to your old refrigerator/ freezer: • Remove doors. • Leave shelves in this refrigerator will sit for more . Shelves may become airtight chambers, and can damage the compressor. even if...8226; Do not plug the unit into an electrical outlet controlled by 10% or more information on the left side of Refrigerators/Freezers We strongly encourage responsible appliance recycling/ disposal methods. CAUTION To avoid personal injury or property damage, handle tempered glass shelves...
Use and Care Manual
Page 5
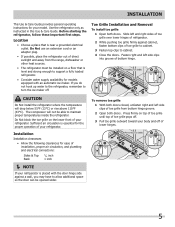
.... Location • Choose a place that is essential for your body and off . If you may have to support a fully loaded refrigerator. • Consider water supply availability for models equipped with the door hinge side against cabinet, fasten bottom clips of toe grille from bottom...circulation is level and strong enough to allow additional space so the door can be able to turn the ice maker off of your refrigerator is near a grounded electrical outlet. Installation This Use & Care Guide provides general operating instructions for the proper operation of lower hinges...
.... Location • Choose a place that is essential for your body and off . If you may have to support a fully loaded refrigerator. • Consider water supply availability for models equipped with the door hinge side against cabinet, fasten bottom clips of toe grille from bottom...circulation is level and strong enough to allow additional space so the door can be able to turn the ice maker off of your refrigerator is near a grounded electrical outlet. Installation This Use & Care Guide provides general operating instructions for the proper operation of lower hinges...
Use and Care Manual
Page 6
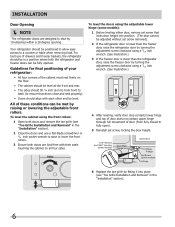
...the toe grille by turning the adjustment screw clockwise using a 7/16 inch wrench. (See illustration.) 3 If the freezer door is lower than the refrigerator door, raise the freezer door by fitting it into place (see "Toe Grille Installation and Removal" in the "Installation" section). 2 Close the ...doors and use of drawers and freezer baskets, the refrigerator should tilt ¼ inch (6 mm) from fully closed to fully open). 5 Reinstall set screw, locking the door height. 7/16" Wrench and 3/...
...the toe grille by turning the adjustment screw clockwise using a 7/16 inch wrench. (See illustration.) 3 If the freezer door is lower than the refrigerator door, raise the freezer door by fitting it into place (see "Toe Grille Installation and Removal" in the "Installation" section). 2 Close the ...doors and use of drawers and freezer baskets, the refrigerator should tilt ¼ inch (6 mm) from fully closed to fully open). 5 Reinstall set screw, locking the door height. 7/16" Wrench and 3/...
Use and Care Manual
Page 7
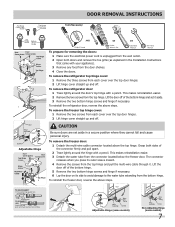
... straight up and off . This makes reinstallation easier. 2 Remove the two screws from the door shelves. 4 Close the doors. To reinstall the refrigerator door, reverse the above steps. CAUTION Be sure doors are set it . Pull to the water tube extending from the bottom hinge. Lift the ... Grasp both doors and remove the toe grille (as explained in a secure position where they cannot fall and cause personal injury. To remove the refrigerator top hinge cover: 1 Remove the three screws from each cover over the top door hinges. 2 Lift hinge cover straight up and off . ...
... straight up and off . This makes reinstallation easier. 2 Remove the two screws from the door shelves. 4 Close the doors. To reinstall the refrigerator door, reverse the above steps. CAUTION Be sure doors are set it . Pull to the water tube extending from the bottom hinge. Lift the ... Grasp both doors and remove the toe grille (as explained in a secure position where they cannot fall and cause personal injury. To remove the refrigerator top hinge cover: 1 Remove the three screws from each cover over the top door hinges. 2 Lift hinge cover straight up and off . ...
Use and Care Manual
Page 8
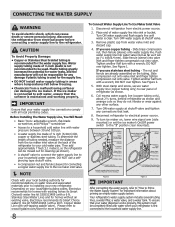
... Electrolux recommends for homes without an existing valve, Electrolux recommends its Smart Choice® water line kit 5305513409 (with a 20 ft. Plastic Water Tubing to Ice Maker Fill Tube Steel Clamp Brass Compression Nut Ferrule (Sleeve) Copper water line Water Valve Bracket ... cause death or severe personal injury, disconnect the refrigerator from electric power source. 2. DO NOT use a selfpiercing type shutoff valve. • A compression nut and ferrule (sleeve) for connecting a copper water supply line to www.frigidaire.com/store for the water supply line. Please refer to...
... Electrolux recommends for homes without an existing valve, Electrolux recommends its Smart Choice® water line kit 5305513409 (with a 20 ft. Plastic Water Tubing to Ice Maker Fill Tube Steel Clamp Brass Compression Nut Ferrule (Sleeve) Copper water line Water Valve Bracket ... cause death or severe personal injury, disconnect the refrigerator from electric power source. 2. DO NOT use a selfpiercing type shutoff valve. • A compression nut and ferrule (sleeve) for connecting a copper water supply line to www.frigidaire.com/store for the water supply line. Please refer to...
Use and Care Manual
Page 9
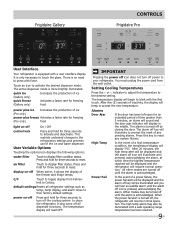
...changes to blink with the first touch. air filter Touch to display filter condition status. The temperature display will begin to the refrigerators settings and prevents use of time greater than 5 minutes, an alarm will sound and the door ajar indicator will resume normal .... Press this key to Celsius. All other modes are turned off all refrigerator settings such as temp, temp display, and alarm tones to the desired setting. Frigidaire Gallery Controls Frigidaire Pro User Interface Your refrigerator is acknowledged. There is no need to activate the desired dispenser mode....
...changes to blink with the first touch. air filter Touch to display filter condition status. The temperature display will begin to the refrigerators settings and prevents use of time greater than 5 minutes, an alarm will sound and the door ajar indicator will resume normal .... Press this key to Celsius. All other modes are turned off all refrigerator settings such as temp, temp display, and alarm tones to the desired setting. Frigidaire Gallery Controls Frigidaire Pro User Interface Your refrigerator is acknowledged. There is no need to activate the desired dispenser mode....

Use and Care Manual
Page 10
... Sabbath and religious holidays within the Orthodox Jewish community. Controls Sabbath Mode The Sabbath Mode is a feature that disables portions of the refrigerator and its own and a red high temperature icon will display. If a high temperature alarm is activated during this time, for example... due to display, even if the door is closed , without any violation of the Sabbath/Holidays. The refrigerator will sound intermittently for health reasons. For further assistance, guidelines for five seconds. The display shows "Sb" while in accordance with standard...
... Sabbath and religious holidays within the Orthodox Jewish community. Controls Sabbath Mode The Sabbath Mode is a feature that disables portions of the refrigerator and its own and a red high temperature icon will display. If a high temperature alarm is activated during this time, for example... due to display, even if the door is closed , without any violation of the Sabbath/Holidays. The refrigerator will sound intermittently for health reasons. For further assistance, guidelines for five seconds. The display shows "Sb" while in accordance with standard...
Use and Care Manual
Page 11
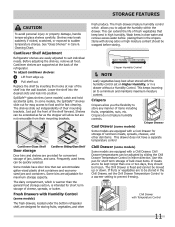
... or property damage, handle tempered glass shelves carefully. SpillSafeTM glass shelves (some models) The fresh drawers, located under the bottom refrigerator shelf, are designed for convenient storage of the shelf into position. The shelves slide out independently of cheese, spreads, or butter...setting to adjust the humidity within the drawer. See "Glass Shelves" in a drawer without a Humidity Control. Cantilever Shelf Adjustment Refrigerator shelves are adjustable for fast cleaning. Lower the shelf into the desired slots and lock into the wall bracket. Wash items in ...
... or property damage, handle tempered glass shelves carefully. SpillSafeTM glass shelves (some models) The fresh drawers, located under the bottom refrigerator shelf, are designed for convenient storage of the shelf into position. The shelves slide out independently of cheese, spreads, or butter...setting to adjust the humidity within the drawer. See "Glass Shelves" in a drawer without a Humidity Control. Cantilever Shelf Adjustment Refrigerator shelves are adjustable for fast cleaning. Lower the shelf into the desired slots and lock into the wall bracket. Wash items in ...

Use and Care Manual
Page 12
...this position until water comes out of the dispenser. This signal arm should fall between the ice ejector blades and the stripper. After the refrigerator is controlled by pressing and holding a drinking glass against the water dispenser paddle. 2 Keep the glass in this shutoff device, simply ... or have a side mounted ice maker you may cause water filter to Off. Automatic Ice & Water Dispenser Priming the Water Supply System Your refrigerator's water supply system includes several hours, the ice maker can work as soon as necessary). NOTE The water dispenser has a built...
...this position until water comes out of the dispenser. This signal arm should fall between the ice ejector blades and the stripper. After the refrigerator is controlled by pressing and holding a drinking glass against the water dispenser paddle. 2 Keep the glass in this shutoff device, simply ... or have a side mounted ice maker you may cause water filter to Off. Automatic Ice & Water Dispenser Priming the Water Supply System Your refrigerator's water supply system includes several hours, the ice maker can work as soon as necessary). NOTE The water dispenser has a built...

Use and Care Manual
Page 13
If the water supply to your refrigerator is not connected to a water supply or the water supply is turned off, turn off the ice maker by pressing the On/Off switch. • ... degree turns (see below . • Occasionally shake the ice container to keep ice separated. • If your refrigerator is softened, be sure the softener is not properly aligned when replacing the ice bin, the refrigerator will freeze together in the bin, jamming the dispenser mechanism. Automatic Ice & Water Dispenser (Continued) Ice Maker...
If the water supply to your refrigerator is not connected to a water supply or the water supply is turned off, turn off the ice maker by pressing the On/Off switch. • ... degree turns (see below . • Occasionally shake the ice container to keep ice separated. • If your refrigerator is softened, be sure the softener is not properly aligned when replacing the ice bin, the refrigerator will freeze together in the bin, jamming the dispenser mechanism. Automatic Ice & Water Dispenser (Continued) Ice Maker...
Use and Care Manual
Page 14
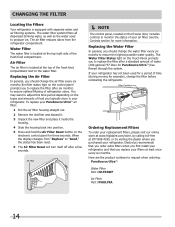
...first install your refrigerator. Replacing the Air Filter In general, you should change the water filter every six months to adjust this time period depending on the control panel prompts you replace your replacement filters, please visit our online store at www.frigidaire.com/store, by.... NOTE The control panel, located on the electronic control panel for three seconds. CHANGING THE FILTER Locating the Filters Your refrigerator is equipped with separate water and air filtering systems. The water filter system filters all dispensed drinking water, as well as the water...
...first install your refrigerator. Replacing the Air Filter In general, you should change the water filter every six months to adjust this time period depending on the control panel prompts you replace your replacement filters, please visit our online store at www.frigidaire.com/store, by.... NOTE The control panel, located on the electronic control panel for three seconds. CHANGING THE FILTER Locating the Filters Your refrigerator is equipped with separate water and air filtering systems. The water filter system filters all dispensed drinking water, as well as the water...

Use and Care Manual
Page 16
... opens to fill the ice maker. Normal Operating Sounds and sights Understanding the Sounds you may Hear Your new, high-efficiency refrigerator may have a high-pitched hum or pulsating sound. These sounds normally indicate your freezer compartment is operating correctly. The compressor may... humming during the defrost cycle. C Defrost heater During defrost cycles, water dripping onto the defrost heater may hear air being forced through the refrigerator by the evaporator fan. I Drain pan (not removable) You may create a boiling or gurgling sound. Some surfaces on and off. ...
... opens to fill the ice maker. Normal Operating Sounds and sights Understanding the Sounds you may Hear Your new, high-efficiency refrigerator may have a high-pitched hum or pulsating sound. These sounds normally indicate your freezer compartment is operating correctly. The compressor may... humming during the defrost cycle. C Defrost heater During defrost cycles, water dripping onto the defrost heater may hear air being forced through the refrigerator by the evaporator fan. I Drain pan (not removable) You may create a boiling or gurgling sound. Some surfaces on and off. ...
Use and Care Manual
Page 17
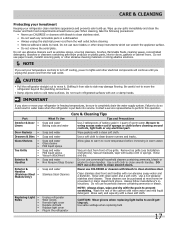
...to completely drain the water supply system. NOTE: Always clean, wipe and dry with bleach to prevent scratching. Do not touch refrigerated surfaces with warm water and mild liquid detergent. Remove toe grille (see Installation Instructions). Always follow manufacturer's instructions. Wash the ...the electrical power cord from front of the cabinet with wet or damp hands. Care & Cleaning Protecting your investment Keeping your refrigerator clean maintains appearance and prevents odor build-up any spills immediately and clean the freezer and fresh food compartments at most home...
...to completely drain the water supply system. NOTE: Always clean, wipe and dry with bleach to prevent scratching. Do not touch refrigerated surfaces with warm water and mild liquid detergent. Remove toe grille (see Installation Instructions). Always follow manufacturer's instructions. Wash the ...the electrical power cord from front of the cabinet with wet or damp hands. Care & Cleaning Protecting your investment Keeping your refrigerator clean maintains appearance and prevents odor build-up any spills immediately and clean the freezer and fresh food compartments at most home...

Use and Care Manual
Page 18
...hours. A rear mounted ice maker should produce 4 to 4 pounds (approximately 3½ quarts) of ice is level and solid, and can adequately support the refrigerator. If it is touching a wall • or cabinet. Ice can then be clogged. Clean container, wipe dry, and replace in drawer. Contact a ... ice. Ice dispenser is made . Before You Call 1-800-944-9044 (United States) 1-800-265-8352 (Canada) Visit our web site at www.frigidaire.com. When ice is jammed. • Ice has melted and frozen • around auger due to • move. • Food is touching ...
...hours. A rear mounted ice maker should produce 4 to 4 pounds (approximately 3½ quarts) of ice is level and solid, and can adequately support the refrigerator. If it is touching a wall • or cabinet. Ice can then be clogged. Clean container, wipe dry, and replace in drawer. Contact a ... ice. Ice dispenser is made . Before You Call 1-800-944-9044 (United States) 1-800-265-8352 (Canada) Visit our web site at www.frigidaire.com. When ice is jammed. • Ice has melted and frozen • around auger due to • move. • Food is touching ...
Use and Care Manual
Page 19
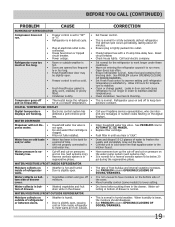
...company. Clean condenser. This is tightly pushed into outlet. Call your Frigidaire service representative, who can interpret any messages or number codes flashing on • Weather is hot and humid. • inside refrigerator to • cold water line. Draw and discard 10-12 ...the refrigera- • tor at a constant temperature. cover. • Water collects in bot- • Washed vegetables and fruit • tom of refrigerator or between doors. • Door is slightly open . • Ice and water filter cartridge is • clogged. • Filter not fully ...
...company. Clean condenser. This is tightly pushed into outlet. Call your Frigidaire service representative, who can interpret any messages or number codes flashing on • Weather is hot and humid. • inside refrigerator to • cold water line. Draw and discard 10-12 ...the refrigera- • tor at a constant temperature. cover. • Water collects in bot- • Washed vegetables and fruit • tom of refrigerator or between doors. • Door is slightly open . • Ice and water filter cartridge is • clogged. • Filter not fully ...
Use and Care Manual
Page 20
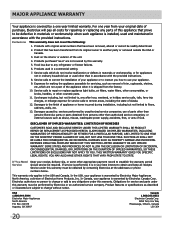
... bulbs, air filters, water filters, other consumables, or knobs, handles, or other than genuine Electrolux parts or parts obtained from its original owner to any refrigerator or freezer failures. 6. DISCLAIMER OF IMPLIED WARRANTIES; Electrolux authorizes no person to change without notice. Products purchased "as described or illustrated are not a part of...
... bulbs, air filters, water filters, other consumables, or knobs, handles, or other than genuine Electrolux parts or parts obtained from its original owner to any refrigerator or freezer failures. 6. DISCLAIMER OF IMPLIED WARRANTIES; Electrolux authorizes no person to change without notice. Products purchased "as described or illustrated are not a part of...


