
Wiring Diagram (All Languages)
Page 1
... & NO DOOR OPENINGS AT MID-POINT CONTROL SETTING (2500 ++ V4) Type A with an Adaptive Defrost Control (ADC). CONDENSER FAN MOTOR Watts RPM Amps 3.1 1100 CW Opposite Shaft 0.03 Running ICE MAKER SPECIFICATIONS Electrical 115 vac (127 vac max) Thermostat Opens at 48° F ( 9° C), Closes at 15° F ( -9° C) Heater Voltage 85 vac ICE MAKER CONNECTOR PLUG CONNECTIONS Wire Number Wire Color Connects to assist qualified repair personnel only. A "d" and "F" will char at 200°F and flash ignite...
... & NO DOOR OPENINGS AT MID-POINT CONTROL SETTING (2500 ++ V4) Type A with an Adaptive Defrost Control (ADC). CONDENSER FAN MOTOR Watts RPM Amps 3.1 1100 CW Opposite Shaft 0.03 Running ICE MAKER SPECIFICATIONS Electrical 115 vac (127 vac max) Thermostat Opens at 48° F ( 9° C), Closes at 15° F ( -9° C) Heater Voltage 85 vac ICE MAKER CONNECTOR PLUG CONNECTIONS Wire Number Wire Color Connects to assist qualified repair personnel only. A "d" and "F" will char at 200°F and flash ignite...

Installation Instructions (All Languages)
Page 1
... electrical power source until top of toe grille pops 2 off of a builtin kitchen cabinet system. Tighten another half turn with your refrigerator. To level the cabinet using a 7/16 inch wrench. (See illustration 3.) 3 If the freezer door is a list of things to check for: • Is the refrigerator's power cord plugged in Ice Maker House water supply connected to refrigerator No water leaks present at the door hinges? (See the Use & Care Guide for detailed instructions...
... electrical power source until top of toe grille pops 2 off of a builtin kitchen cabinet system. Tighten another half turn with your refrigerator. To level the cabinet using a 7/16 inch wrench. (See illustration 3.) 3 If the freezer door is a list of things to check for: • Is the refrigerator's power cord plugged in Ice Maker House water supply connected to refrigerator No water leaks present at the door hinges? (See the Use & Care Guide for detailed instructions...

Use and Care Manual
Page 1
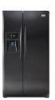
All about the Use &Care of your Refrigerator 241979202 (August 2009) TABLE OF CONTENTS Important Safety Instructions 2 Features at a Glance 4 Installation 5 Door Removal Instructions 7 Connecting Water Supply 8 Controls 9 Storage Features 11 Automatic Ice & Water Dispenser 12 Changing the Filter 14 Normal Operating Sounds and Sights 16 Care and Cleaning 17 Before you Call 18 Major Appliance Warranty 20 www.frigidaire.com USA 1-800-944-9044 www.frigidaire.ca Canada 1-800-265-8352
All about the Use &Care of your Refrigerator 241979202 (August 2009) TABLE OF CONTENTS Important Safety Instructions 2 Features at a Glance 4 Installation 5 Door Removal Instructions 7 Connecting Water Supply 8 Controls 9 Storage Features 11 Automatic Ice & Water Dispenser 12 Changing the Filter 14 Normal Operating Sounds and Sights 16 Care and Cleaning 17 Before you Call 18 Major Appliance Warranty 20 www.frigidaire.com USA 1-800-944-9044 www.frigidaire.ca Canada 1-800-265-8352

Use and Care Manual
Page 2
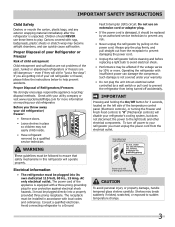
... hazards. • DO NOT operate the refrigerator in contact with filter housing (select models) Final Checks Shipping material removed Fresh food and freezer temperatures set Crisper humidity controls set Registration card sent in minor or moderate injury. DANGER DANGER indicates an imminently hazardous situation which , if not avoided, may result in 2 Installation Checklist Doors Handles are secure and tight ...
... hazards. • DO NOT operate the refrigerator in contact with filter housing (select models) Final Checks Shipping material removed Fresh food and freezer temperatures set Crisper humidity controls set Registration card sent in minor or moderate injury. DANGER DANGER indicates an imminently hazardous situation which , if not avoided, may result in 2 Installation Checklist Doors Handles are secure and tight ...
Use and Care Manual
Page 3
... the refrigerator before cleaning and before replacing a light bulb to avoid electrical shock. • Performance may not easily climb inside. • Have refrigerant removed by a wall switch or pull cord to prevent the refrigerator from the electrical outlet. CAUTION To avoid personal injury or property damage, handle tempered glass shelves carefully. IMPORTANT Pressing and holding the On/Off button for more . Junked or abandoned refrigerators or freezers are getting rid...
... the refrigerator before cleaning and before replacing a light bulb to avoid electrical shock. • Performance may not easily climb inside. • Have refrigerant removed by a wall switch or pull cord to prevent the refrigerator from the electrical outlet. CAUTION To avoid personal injury or property damage, handle tempered glass shelves carefully. IMPORTANT Pressing and holding the On/Off button for more . Junked or abandoned refrigerators or freezers are getting rid...
Use and Care Manual
Page 5
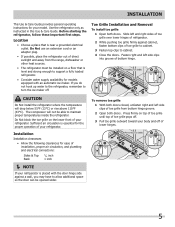
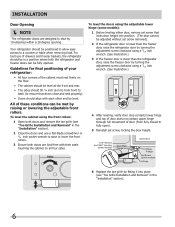
... bottom hinge groove. 2 Open both doors. CAUTION Do Not install the refrigerator where the temperature will not be opened wider. Location • Choose a place that is near a grounded electrical outlet. Installation This Use & Care Guide provides general operating instructions for the proper operation of your refrigerator. The compressor will drop below 55°F (13°C) or rise above 110°F (43°C). Toe Grille Installation and Removal To install toe grille 1 Open both doors...
... bottom hinge groove. 2 Open both doors. CAUTION Do Not install the refrigerator where the temperature will not be opened wider. Location • Choose a place that is near a grounded electrical outlet. Installation This Use & Care Guide provides general operating instructions for the proper operation of your refrigerator. The compressor will drop below 55°F (13°C) or rise above 110°F (43°C). Toe Grille Installation and Removal To install toe grille 1 Open both doors...
Use and Care Manual
Page 6
... models) Door Stop Flange Open Door Hinge Flange Set Screw (some models) Hinge 6 Replace the toe grille by themselves within a 20 degree opening. All of drawers and freezer baskets, the refrigerator should be in a position where both the refrigerator and freezer doors can be met by turning the adjustment screw clockwise using the front rollers: 1 Open both doors and remove the toe grille (see "Toe Grille Installation and Removal" in the "Installation" section). 2 Close the doors and use...
... models) Door Stop Flange Open Door Hinge Flange Set Screw (some models) Hinge 6 Replace the toe grille by themselves within a 20 degree opening. All of drawers and freezer baskets, the refrigerator should be in a position where both the refrigerator and freezer doors can be met by turning the adjustment screw clockwise using the front rollers: 1 Open both doors and remove the toe grille (see "Toe Grille Installation and Removal" in the "Installation" section). 2 Close the doors and use...
Use and Care Manual
Page 7
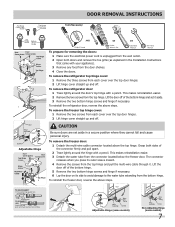
... the water tube extending from the bottom hinge. Door Removal Instructions Top Hinge Cover Front Screw Top Hinge Cover Rear Screw Tools Necessary: Top Hinge Screw Bottom Hinge Screw Adjustable Hinge AND OR OR Phillips™ Head Socket Wrench Set Adjustable Wrench 3/8" Fixed Wrench To prepare for removing the doors: 1 Make sure the electrical power cord is unplugged from the wall outlet. 2 Open both sides of the connector firmly and pull apart. 2 Trace lightly...
... the water tube extending from the bottom hinge. Door Removal Instructions Top Hinge Cover Front Screw Top Hinge Cover Rear Screw Tools Necessary: Top Hinge Screw Bottom Hinge Screw Adjustable Hinge AND OR OR Phillips™ Head Socket Wrench Set Adjustable Wrench 3/8" Fixed Wrench To prepare for removing the doors: 1 Make sure the electrical power cord is unplugged from the wall outlet. 2 Open both sides of the connector firmly and pull apart. 2 Trace lightly...
Use and Care Manual
Page 8
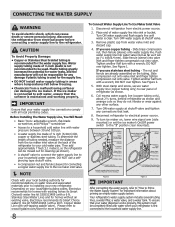
... new refrigerator. CAUTION To Avoid Property Damage: • Copper or Stainless Steel braided tubing is clear. Turn ON water supply at shutoff valve. 3. Turn OFF water supply at shutoff valve and tighten any other surface. 7. The nut and ferrule are already assembled on , lower wire signal arm (side mounted) or set the ice maker's On/Off power switch to installing your water supply line connections comply with water pressure between 30 and 100 psi. • A water supply line...
... new refrigerator. CAUTION To Avoid Property Damage: • Copper or Stainless Steel braided tubing is clear. Turn ON water supply at shutoff valve. 3. Turn OFF water supply at shutoff valve and tighten any other surface. 7. The nut and ferrule are already assembled on , lower wire signal arm (side mounted) or set the ice maker's On/Off power switch to installing your water supply line connections comply with water pressure between 30 and 100 psi. • A water supply line...
Use and Care Manual
Page 9
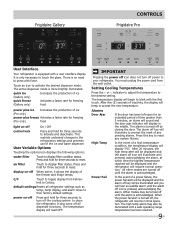
air filter Touch to your refrigerator. IMPORTANT Pressing the power off icon does not turn off all refrigerator settings such as temp, temp display, and alarm tones to reset. The alarm off until the alarm is acknowledged. All other modes are turned off key will illuminate to prompt the reset of any system Alarms. In the event of inactivity, the display will display "HI". Frigidaire Gallery Controls Frigidaire Pro User Interface Your refrigerator is equipped with force...
air filter Touch to your refrigerator. IMPORTANT Pressing the power off icon does not turn off all refrigerator settings such as temp, temp display, and alarm tones to reset. The alarm off until the alarm is acknowledged. All other modes are turned off key will illuminate to prompt the reset of any system Alarms. In the event of inactivity, the display will display "HI". Frigidaire Gallery Controls Frigidaire Pro User Interface Your refrigerator is equipped with force...
Use and Care Manual
Page 11
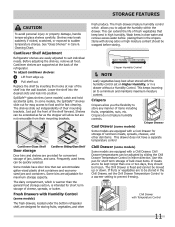
... fresh drawers feature humidity control which is fixed and cannot be quickly selected. Chill Drawer with a Chill Drawer. Storage Features CAUTION To avoid personal injury or property damage, handle tempered glass shelves carefully. Cantilever Shelf Adjustment Refrigerator shelves are to a minimum and maintains maximum moisture content. To adjust cantilever shelves: 1 Lift front edge up or down. SpillSafeTM glass shelves (some models) Crisper Drawer Some models are equipped with Temperature Control 11 Items with a Cool Drawer...
... fresh drawers feature humidity control which is fixed and cannot be quickly selected. Chill Drawer with a Chill Drawer. Storage Features CAUTION To avoid personal injury or property damage, handle tempered glass shelves carefully. Cantilever Shelf Adjustment Refrigerator shelves are to a minimum and maintains maximum moisture content. To adjust cantilever shelves: 1 Lift front edge up or down. SpillSafeTM glass shelves (some models) Crisper Drawer Some models are equipped with Temperature Control 11 Items with a Cool Drawer...

Use and Care Manual
Page 12
... switch to turn it attempts to an external supply line. Otherwise, the ice maker's fill valve may be completely filled with water when first connected to operate without water. Turning the Ice Maker On and Off Ice production is not flushed, the first ice cubes may make a loud chattering noise when it Off and press to the "I" position to Off. Ice Maker Operation & Care The ice maker, ice bin, and dispenser feeding mechanism are harvested, they break open...
... switch to turn it attempts to an external supply line. Otherwise, the ice maker's fill valve may be completely filled with water when first connected to operate without water. Turning the Ice Maker On and Off Ice production is not flushed, the first ice cubes may make a loud chattering noise when it Off and press to the "I" position to Off. Ice Maker Operation & Care The ice maker, ice bin, and dispenser feeding mechanism are harvested, they break open...

Use and Care Manual
Page 13
... use harsh or abrasive cleaners. 4 Allow the ice bin to a water supply or the water supply is turned off, turn off ice production by pressing the ice maker's Off/On switch. 2 Remove the ice bin by turning it is best to resume ice production. The freezer door may develop an odd flavor. Water valve opening or closing - This could damage the ice storage bin and dispenser mechanism. If the auger is maintained to work properly. Automatic Ice & Water Dispenser (Continued) Ice Maker/Dispenser...
... use harsh or abrasive cleaners. 4 Allow the ice bin to a water supply or the water supply is turned off, turn off ice production by pressing the ice maker's Off/On switch. 2 Remove the ice bin by turning it is best to resume ice production. The freezer door may develop an odd flavor. Water valve opening or closing - This could damage the ice storage bin and dispenser mechanism. If the auger is maintained to work properly. Automatic Ice & Water Dispenser (Continued) Ice Maker/Dispenser...
Use and Care Manual
Page 14
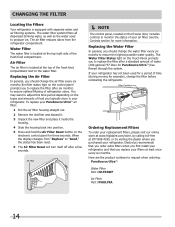
... hold the Air Filter Reset button on the freezer door, includes controls to monitor the status of your refrigerator. Water Filter The water filter is located at the top of the fresh food compartment next to adjust this time period depending on the types and amounts of food you purchased your air filter. You may want to the water filter. The Water Filter Status light on the control panel prompts you replace your filters at 877...
... hold the Air Filter Reset button on the freezer door, includes controls to monitor the status of your refrigerator. Water Filter The water filter is located at the top of the fresh food compartment next to adjust this time period depending on the types and amounts of food you purchased your air filter. You may want to the water filter. The Water Filter Status light on the control panel prompts you replace your filters at 877...

Use and Care Manual
Page 15
... water filter: It is not necessary to turn the water supply off to change the filter. When the display changes from "Replace" to "Good," the status has been reset. 15 Any spurts and sputters that occur as the cartridge engages the snap-in connector at the back of claims specified on the Ice & Water Dispenser control panel for any small amounts of water released during the filter replacement. 1 Turn Off the ice maker power switch. 2 Remove...
... water filter: It is not necessary to turn the water supply off to change the filter. When the display changes from "Replace" to "Good," the status has been reset. 15 Any spurts and sputters that occur as the cartridge engages the snap-in connector at the back of claims specified on the Ice & Water Dispenser control panel for any small amounts of water released during the filter replacement. 1 Turn Off the ice maker power switch. 2 Remove...

Use and Care Manual
Page 16
...automatic defrost control These parts can cause: A Evaporator Refrigerant through the refrigerator by the evaporator fan. Following is a list of your freezer compartment is operating correctly. G Compressor Modern, high-efficiency compressors run much faster than in your refrigerator is normal. 16 L Ice dispensing paddle When dispensing ice, you may Hear Your new, high-efficiency refrigerator may hear water dripping into the ice bin. H Water valve Makes a buzzing sound each time it opens to fill the ice maker. C Defrost heater During defrost cycles, water dripping onto...
...automatic defrost control These parts can cause: A Evaporator Refrigerant through the refrigerator by the evaporator fan. Following is a list of your freezer compartment is operating correctly. G Compressor Modern, high-efficiency compressors run much faster than in your refrigerator is normal. 16 L Ice dispensing paddle When dispensing ice, you may Hear Your new, high-efficiency refrigerator may hear water dripping into the ice bin. H Water valve Makes a buzzing sound each time it opens to fill the ice maker. C Defrost heater During defrost cycles, water dripping onto...
Use and Care Manual
Page 17
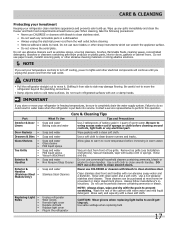
... unplug the power cord from the wall outlet before cleaning around controls, light bulb or any removable parts in freezing temperatures, be purchased at least twice a year. Part Interior & Door • Liners • Door Gaskets • Drawers & Bins • Glass Shelves • • • Toe Grille • • • Exterior & • Handles • Exterior & • Handles (Stainless Steel • Models Only) Replacing Light • Bulbs • • • • • Care & Cleaning Tips What To Use Tips and...
... unplug the power cord from the wall outlet before cleaning around controls, light bulb or any removable parts in freezing temperatures, be purchased at least twice a year. Part Interior & Door • Liners • Door Gaskets • Drawers & Bins • Glass Shelves • • • Toe Grille • • • Exterior & • Handles • Exterior & • Handles (Stainless Steel • Models Only) Replacing Light • Bulbs • • • • • Care & Cleaning Tips What To Use Tips and...

Use and Care Manual
Page 18
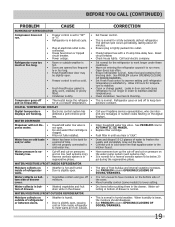
.... Set freezer control to On ("I") position. (rear mounted) Remove small cube from container. When new ice is made , dispenser should operate. Remove ice cubes that valve is , replace the ice and water filter cartridge. Clean drawer, rollers, and track. than normal. Move item and release wire signal arm. Ice cubes are jamming the dispenser. A rear mounted ice maker should operate. Remove ice container and discard ice from ice maker. Open household water line valve. Close both doors gently. Remove valve. When ice is made . Remove any ice. Allow...
.... Set freezer control to On ("I") position. (rear mounted) Remove small cube from container. When new ice is made , dispenser should operate. Remove ice cubes that valve is , replace the ice and water filter cartridge. Clean drawer, rollers, and track. than normal. Move item and release wire signal arm. Ice cubes are jamming the dispenser. A rear mounted ice maker should operate. Remove ice container and discard ice from ice maker. Open household water line valve. Close both doors gently. Remove valve. When ice is made . Remove any ice. Allow...
Use and Care Manual
Page 19
... of water to run more. cover. • Water collects in humid weather. CORRECTION Set freezer control. Call local electric company. Open doors less often. Ensure refrigerator is in door seal will not dis- • Household water line valve is normal. Allow 24 hours for temperature to work longer under these conditions. Leaks in • regenerative phase. Replace filter cartridge. The rate of drawer. See PROBLEM column OPENING/CLOSING OF DOORS/DRAWERS. 19 not open . • Freezer control is set too cold. •...
... of water to run more. cover. • Water collects in humid weather. CORRECTION Set freezer control. Call local electric company. Open doors less often. Ensure refrigerator is in door seal will not dis- • Household water line valve is normal. Allow 24 hours for temperature to work longer under these conditions. Leaks in • regenerative phase. Replace filter cartridge. The rate of drawer. See PROBLEM column OPENING/CLOSING OF DOORS/DRAWERS. 19 not open . • Freezer control is set too cold. •...
Use and Care Manual
Page 20
... keep all costs for service and parts under this warranty. Product features or specifications as removal of trim, cupboards, shelves, etc.,which do not involve malfunction or defects in materials or workmanship, or for servicing, such as described or illustrated are not covered by this warranty. 5. Food loss due to repair or replace appliance light bulbs, air filters, water filters, other consumables, or knobs, handles, or other than...
... keep all costs for service and parts under this warranty. Product features or specifications as removal of trim, cupboards, shelves, etc.,which do not involve malfunction or defects in materials or workmanship, or for servicing, such as described or illustrated are not covered by this warranty. 5. Food loss due to repair or replace appliance light bulbs, air filters, water filters, other consumables, or knobs, handles, or other than...


